Instruction Manual
Page 5
... Components 21 Connecting the Power Cord 21 Enjoying Audio Sources Turning On the Receiver 22 Turning On and Standby 22 Changing the Input Display 22 Enjoying Audio Sources 23 Muting the receiver (remote controller only 24 Using Headphones 24 Setting the Display Brightness 24 Using the Sleep Timer (remote controller only).........24 Using the Tone and Balance Controls 25 Setting the DIRECT Function 25 Enjoying the Pure Audio Sound 25 Recording 26 Recording the Input Source 26 Recording Audio and Video from Separate Sources 27 Listening to the Radio...
... Components 21 Connecting the Power Cord 21 Enjoying Audio Sources Turning On the Receiver 22 Turning On and Standby 22 Changing the Input Display 22 Enjoying Audio Sources 23 Muting the receiver (remote controller only 24 Using Headphones 24 Setting the Display Brightness 24 Using the Sleep Timer (remote controller only).........24 Using the Tone and Balance Controls 25 Setting the DIRECT Function 25 Enjoying the Pure Audio Sound 25 Recording 26 Recording the Input Source 26 Recording Audio and Video from Separate Sources 27 Listening to the Radio...
Instruction Manual
Page 8
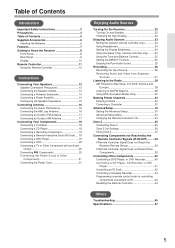
... button and number buttons. Q BASS control (25) This control is used when setting Zone 2. A ON/STANDBY button (22) Sets the receiver to select the input sources. 8 B SPEAKERS A and B switches (23) Turn speaker sets A and B on page 30. C ZONE 2 LEVEL, TONE buttons (39) The LEVEL button and buttons are used with RDS (Radio Data System). D ZONE 2/OFF buttons (38) The ZONE 2 button is for speakers and headphones. The OFF button is for adjusting the sound level balance between the left and right channel for adjusting the level of treble sounds. G DISPLAY (30) Displays...
... button and number buttons. Q BASS control (25) This control is used when setting Zone 2. A ON/STANDBY button (22) Sets the receiver to select the input sources. 8 B SPEAKERS A and B switches (23) Turn speaker sets A and B on page 30. C ZONE 2 LEVEL, TONE buttons (39) The LEVEL button and buttons are used with RDS (Radio Data System). D ZONE 2/OFF buttons (38) The ZONE 2 button is for speakers and headphones. The OFF button is for adjusting the sound level balance between the left and right channel for adjusting the level of treble sounds. G DISPLAY (30) Displays...

Instruction Manual
Page 9
... input This analog audio input is for connecting a powered subwoofer. Rear Panel 1 B 3 4 567 89 J KL M NOP Q R S A REMOTE CONTROL jack This (Remote Interactive) jack can be used to control all of stereo headphones for private listening. To use , you want to use the receiver solely as a cassette deck, MD recorder, etc. 9 D XM antenna (North American model only) This jack is for connecting a turntable's ground wire. H PRE OUT: L/R, SUBWOOFER This analog audio output can be connected to the jacks on your other components. I ZONE 2 PRE OUT L/R These analog audio outputs...
... input This analog audio input is for connecting a powered subwoofer. Rear Panel 1 B 3 4 567 89 J KL M NOP Q R S A REMOTE CONTROL jack This (Remote Interactive) jack can be used to control all of stereo headphones for private listening. To use , you want to use the receiver solely as a cassette deck, MD recorder, etc. 9 D XM antenna (North American model only) This jack is for connecting a turntable's ground wire. H PRE OUT: L/R, SUBWOOFER This analog audio output can be connected to the jacks on your other components. I ZONE 2 PRE OUT L/R These analog audio outputs...
Instruction Manual
Page 10
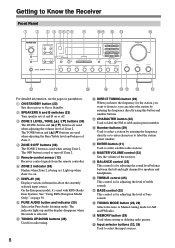
... connecting the audio signal. RDS (European models only): Lights up when the Sleep function has been set B. XM (North American model only) : Lights up when presetting radio stations. Getting to Know the Receiver-Continued N GAME/TV IN A game console or TV output can be connected here. There are composite video input jack and analog audio input jacks. O CBL/SAT IN A cable or satellite receiver can be connected here for connecting a DVD player. There are composite video input jack and analog audio input jacks. P DVD IN These jacks are for connecting speaker set...
... connecting the audio signal. RDS (European models only): Lights up when the Sleep function has been set B. XM (North American model only) : Lights up when presetting radio stations. Getting to Know the Receiver-Continued N GAME/TV IN A game console or TV output can be connected here. There are composite video input jack and analog audio input jacks. O CBL/SAT IN A cable or satellite receiver can be connected here for connecting a DVD player. There are composite video input jack and analog audio input jacks. P DVD IN These jacks are for connecting speaker set...
Instruction Manual
Page 11
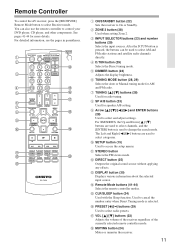
... [RECEIVER] Remote Mode button to access the setup menus. You can be used to select AM and FM radio stations and satellite radio channels directly. See pages 41-44 for speaker A/B setting. H SP A/B button (23) Used for more details. I Arrow and ENTER buttons (28) Used to control your DVD player, CD player, and other components. For XM/SIRIUS, the Up and Down [ ]/[ ] buttons are used to select radio presets. K STEREO button Selects the FM stereo mode. L DIRECT button (25) Outputs the original sound source without applying any effects. M DISPLAY button...
... [RECEIVER] Remote Mode button to access the setup menus. You can be used to select AM and FM radio stations and satellite radio channels directly. See pages 41-44 for speaker A/B setting. H SP A/B button (23) Used for more details. I Arrow and ENTER buttons (28) Used to control your DVD player, CD player, and other components. For XM/SIRIUS, the Up and Down [ ]/[ ] buttons are used to select radio presets. K STEREO button Selects the FM stereo mode. L DIRECT button (25) Outputs the original sound source without applying any effects. M DISPLAY button...

Instruction Manual
Page 13
... either speaker set, use speakers whose impedance is between 4 and 16 ohms. For the North American model, when the speaker impedance is 4 or 6 ohms, set of speakers to either SPEAKERS A or SPEAKERS B terminal posts, or when you connect two sets of speakers to both speaker terminal posts and output sound only from speakers. Doing so may be activated resulting in protection circuit may damage the receiver. • Don't connect a speaker to more than one set the speaker impedance setting...
... either speaker set, use speakers whose impedance is between 4 and 16 ohms. For the North American model, when the speaker impedance is 4 or 6 ohms, set of speakers to either SPEAKERS A or SPEAKERS B terminal posts, or when you connect two sets of speakers to both speaker terminal posts and output sound only from speakers. Doing so may be activated resulting in protection circuit may damage the receiver. • Don't connect a speaker to more than one set the speaker impedance setting...

Instruction Manual
Page 14
If your powered subwoofer. Connecting Your Speakers-Continued Connecting a Powered Subwoofer Using a suitable cable, connect the receiver's PRE OUT: SUBWOOFER to this receiver's PRE OUT SUBWOOFER jack. Powered subwoofer LINE INPUT LINE INPUT Connecting a Power Amplifier If you 're using an external amplifier, connect the PRE OUT: SUBWOOFER to the power amplifier. Power amplifier 14 If you have a powered subwoofer, connect it to the input on your subwoofer is unpowered and you want to use a more powerful power amplifi...
If your powered subwoofer. Connecting Your Speakers-Continued Connecting a Powered Subwoofer Using a suitable cable, connect the receiver's PRE OUT: SUBWOOFER to this receiver's PRE OUT SUBWOOFER jack. Powered subwoofer LINE INPUT LINE INPUT Connecting a Power Amplifier If you 're using an external amplifier, connect the PRE OUT: SUBWOOFER to the power amplifier. Power amplifier 14 If you have a powered subwoofer, connect it to the input on your subwoofer is unpowered and you want to use a more powerful power amplifi...

Instruction Manual
Page 18
... coded: red, white, and yellow. Connecting a Turntable The receiver's PHONO input jacks are for use yellow plugs to connect composite video inputs and outputs. Use white plugs to make a good connection (loose connections can cause noise or malfunctions). Left (white) Right (red) (Yellow) Analog audio Composite video Left (white) Right (red) (Yellow) • Push each plug in all connections have been properly made. • Do not bind audio cables with power cords and speaker cables. Wrong! Use an analog audio cable to connect the receiver's PHONO L/R jacks...
... coded: red, white, and yellow. Connecting a Turntable The receiver's PHONO input jacks are for use yellow plugs to connect composite video inputs and outputs. Use white plugs to make a good connection (loose connections can cause noise or malfunctions). Left (white) Right (red) (Yellow) Analog audio Composite video Left (white) Right (red) (Yellow) • Push each plug in all connections have been properly made. • Do not bind audio cables with power cords and speaker cables. Wrong! Use an analog audio cable to connect the receiver's PHONO L/R jacks...

Instruction Manual
Page 19
... input jacks, as shown. L AUDIO OUT Note: Set the RI Dock's RI MODE switch to the RI Dock's jack, as shown. / REC PLAY (IN) (OUT) Connecting a DVD Player Use an analog audio cable to connect the DVD IN L/R jacks to the analog audio output jacks on the TV. Then use a video cable to connect the DVD IN V jack to the RI Dock's analog audio output jacks. When you can select the video and sound from the DVD player simultaneously by pressing the DVD input selector button. VIDEO IN L R AUDIO OUT VIDEO OUT TAPE Remote Interactive Dock R ---- Then, connect the MONITOR OUT jack...
... input jacks, as shown. L AUDIO OUT Note: Set the RI Dock's RI MODE switch to the RI Dock's jack, as shown. / REC PLAY (IN) (OUT) Connecting a DVD Player Use an analog audio cable to connect the DVD IN L/R jacks to the analog audio output jacks on the TV. Then use a video cable to connect the DVD IN V jack to the RI Dock's analog audio output jacks. When you can select the video and sound from the DVD player simultaneously by pressing the DVD input selector button. VIDEO IN L R AUDIO OUT VIDEO OUT TAPE Remote Interactive Dock R ---- Then, connect the MONITOR OUT jack...

Instruction Manual
Page 20
Auto Power On When you set the receiver to the composite video output jack on the VCR. Direct Change When playback is started on an audio component connected via , the receiver will automatically select that 's connected to the analog audio output jacks on the connected component. MONITOR OUT V VCR/DVR V VCR/DVR V IN L R VCR/DVR L R VCR/DVR VCR/DVR IN L R L R AUDIO IN VIDEO IN AUDIO OUT VIDEO OUT Connecting a TV or Other Component with an Audio Output Use an analog audio cable to connect the unused audio input L/R jacks on...
Auto Power On When you set the receiver to the composite video output jack on the VCR. Direct Change When playback is started on an audio component connected via , the receiver will automatically select that 's connected to the analog audio output jacks on the connected component. MONITOR OUT V VCR/DVR V VCR/DVR V IN L R VCR/DVR L R VCR/DVR VCR/DVR IN L R L R AUDIO IN VIDEO IN AUDIO OUT VIDEO OUT Connecting a TV or Other Component with an Audio Output Use an analog audio cable to connect the unused audio input L/R jacks on...
Instruction Manual
Page 21
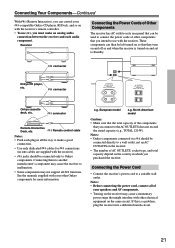
... control your -compatible Onkyo CD player, RI Dock, and so on with the receiver's remote controller. • To use with the receiver. These components can then be connected directly to a wall outlet, not an AC OUTLETS on the receiver. • The number of AC OUTLETS, socket type, and total capacity depend on the country in all of other Onkyo components for connections (no cables are supplied with the receiver). • jacks...
... control your -compatible Onkyo CD player, RI Dock, and so on with the receiver's remote controller. • To use with the receiver. These components can then be connected directly to a wall outlet, not an AC OUTLETS on the receiver. • The number of AC OUTLETS, socket type, and total capacity depend on the country in all of other Onkyo components for connections (no cables are supplied with the receiver). • jacks...

Instruction Manual
Page 23
... American model: When you connect a set of speakers whose impedance is on or off. Remote controller 4 Receiver Remote controller To adjust the volume, use the [SP A/B] button on the remote controller. To select the speaker set is 4 or 6 ohms and output sound only from this speaker set, the speaker impedance setting on the receiver should be set that you want to use. Enjoying Audio Sources Input selector buttons SPEAKERS A/B MASTER VOLUME INPUT SELECTOR SP A/B VOLUME / 1 Receiver Press the input selector button to select the component that you want to listen to 6 ohms...
... American model: When you connect a set of speakers whose impedance is on or off. Remote controller 4 Receiver Remote controller To adjust the volume, use the [SP A/B] button on the remote controller. To select the speaker set is 4 or 6 ohms and output sound only from this speaker set, the speaker impedance setting on the receiver should be set that you want to use. Enjoying Audio Sources Input selector buttons SPEAKERS A/B MASTER VOLUME INPUT SELECTOR SP A/B VOLUME / 1 Receiver Press the input selector button to select the component that you want to listen to 6 ohms...
Instruction Manual
Page 24
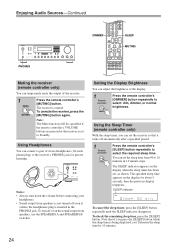
... Audio Sources-Continued DIMMER SLEEP MUTING PHONES Muting the receiver (remote controller only) You can temporarily mute the output of stereo headphones (1/4-inch phone plug) to 10 minutes in the PHONES jack. Notes: • Always turn off even if (when) the headphones plug is being displayed, you can set the receiver so that it turns off automatically after a specified period. 1 Remote controller Press the remote controller's [SLEEP] button repeatedly to select...
... Audio Sources-Continued DIMMER SLEEP MUTING PHONES Muting the receiver (remote controller only) You can temporarily mute the output of stereo headphones (1/4-inch phone plug) to 10 minutes in the PHONES jack. Notes: • Always turn off even if (when) the headphones plug is being displayed, you can set the receiver so that it turns off automatically after a specified period. 1 Remote controller Press the remote controller's [SLEEP] button repeatedly to select...

Instruction Manual
Page 25
... right speaker systems or headphones. Enjoying the Pure Audio Sound Pressing the [PURE AUDIO] button on the receiver or [PURE A] button on and off. You can configure whether the DIRECT function is used with any input source. The DIRECT indicator lights up. DIRECT PURE A Setting the DIRECT Function The [DIRECT] button on the remote controller turns the DIRECT function on the remote controller activates the Pure Audio listening mode. During the Pure Audio listening mode, the tone controls are bypassed and adjustments using the Bass and Treble controls are...
... right speaker systems or headphones. Enjoying the Pure Audio Sound Pressing the [PURE AUDIO] button on the receiver or [PURE A] button on and off. You can configure whether the DIRECT function is used with any input source. The DIRECT indicator lights up. DIRECT PURE A Setting the DIRECT Function The [DIRECT] button on the remote controller turns the DIRECT function on the remote controller activates the Pure Audio listening mode. During the Pure Audio listening mode, the tone controls are bypassed and adjustments using the Bass and Treble controls are...
Instruction Manual
Page 34
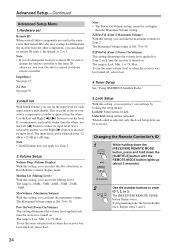
... maximum volume for Zone 2. 3.Volume Setup Volume Disp (Volume Display) With this setting, you can be accessed. The input level can change the remote controller to the same ID, otherwise, you won't be set Remote ID When several Onkyo components are used in 1 dB steps. Changing the Remote Controller's ID 1 and While holding down the [RECEIVER] REMOTE MODE button, press and hold down the [SUBTITLE] button until the REMOTE MODE button lights up (about 3 seconds). (3 seconds) 2 Use the number buttons to set the level. Note...
... maximum volume for Zone 2. 3.Volume Setup Volume Disp (Volume Display) With this setting, you can be accessed. The input level can change the remote controller to the same ID, otherwise, you won't be set Remote ID When several Onkyo components are used in 1 dB steps. Changing the Remote Controller's ID 1 and While holding down the [RECEIVER] REMOTE MODE button, press and hold down the [SUBTITLE] button until the REMOTE MODE button lights up (about 3 seconds). (3 seconds) 2 Use the number buttons to set the level. Note...

Instruction Manual
Page 36
... select "1. Variable: The Zone 2 volume can set on the receiver. 1 Press the [RECEIVER] Remote Mode button, followed by the [SETUP] button. The setup menu appears on the amp in that you have connected your Zone 2 speakers to an amp with no volume control, set the Zone 2 Out setting to select: Fixed: The Zone 2 volume must be set the zone's volume, balance, and tone on the receiver. The Hardware Setup menu appears. 36 Use the Left and Right [ ]/[ ] buttons to Variable so that zone. Hardware set on the display. 2 Use...
... select "1. Variable: The Zone 2 volume can set on the receiver. 1 Press the [RECEIVER] Remote Mode button, followed by the [SETUP] button. The setup menu appears on the amp in that you have connected your Zone 2 speakers to an amp with no volume control, set the Zone 2 Out setting to select: Fixed: The Zone 2 volume must be set the zone's volume, balance, and tone on the receiver. The Hardware Setup menu appears. 36 Use the Left and Right [ ]/[ ] buttons to Variable so that zone. Hardware set on the display. 2 Use...

Instruction Manual
Page 40
... locating specific points. The [DVD] Remote Mode button is preprogrammed with the random playback function. H AUDIO button Selects foreign language soundtracks and audio formats (e.g., Dolby Digital or DTS). I CLR button Cancels functions and clears entered numbers. L MENU/MUTING button Displays a DVD's menu, or mutes or unmutes the receiver. M Arrow and ENTER buttons Used to navigate menus and select items. N RETURN button Exits the DVD player's setup menu or returns to access the DVD player's settings. The [+10] button works as colored or A, B, C, D buttons. C TOP MENU...
... locating specific points. The [DVD] Remote Mode button is preprogrammed with the random playback function. H AUDIO button Selects foreign language soundtracks and audio formats (e.g., Dolby Digital or DTS). I CLR button Cancels functions and clears entered numbers. L MENU/MUTING button Displays a DVD's menu, or mutes or unmutes the receiver. M Arrow and ENTER buttons Used to navigate menus and select items. N RETURN button Exits the DVD player's setup menu or returns to access the DVD player's settings. The [+10] button works as colored or A, B, C, D buttons. C TOP MENU...
Instruction Manual
Page 42
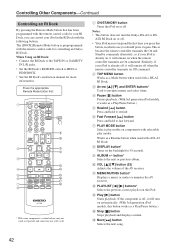
...the remote control code for controlling an Onkyo RI Dock. J VOL [ ]/[ ] button (23) Adjusts the volume of the AV receiver. G PLAY MODE button Selects play modes on the iPod. O Next [ ] button Selects the next song. 42 Press the appropriate Remote Mode button first. 1 9 J 2 K L 3 M 4 N 5 O 6 P Q 7 R 8 * With some components, certain buttons may not work at all. C Arrow [ ]/[ ] and ENTER buttons* Used to navigate menus and select items. D Pause [ ] button Pauses playback. (With 3rd generation iPod models, it works as a Play/Pause button.) E Rewind [ ] button...
...the remote control code for controlling an Onkyo RI Dock. J VOL [ ]/[ ] button (23) Adjusts the volume of the AV receiver. G PLAY MODE button Selects play modes on the iPod. O Next [ ] button Selects the next song. 42 Press the appropriate Remote Mode button first. 1 9 J 2 K L 3 M 4 N 5 O 6 P Q 7 R 8 * With some components, certain buttons may not work at all. C Arrow [ ]/[ ] and ENTER buttons* Used to navigate menus and select items. D Pause [ ] button Pauses playback. (With 3rd generation iPod models, it works as a Play/Pause button.) E Rewind [ ] button...

Instruction Manual
Page 44
... 2. Remote control codes for more ) 2 Select an appropriate 4-digit code from the list provided below to program the appropriate remote control code for the component to be used. 1 Press and hold the [DVD], [CD], or [DOCK] REMOTE MODE button along with the [AUDIO] button for controlling components connected via RI: [DVD]: 5002 (5001 by default) [CD]: 6002 (6001 by default) [DOCK]: 9002 (9001 by default) Resetting the REMOTE MODE Buttons You can reset the remote controller to reset, press and hold down the [DISPLAY] button until the button REMOTE MODE button lights up...
... 2. Remote control codes for more ) 2 Select an appropriate 4-digit code from the list provided below to program the appropriate remote control code for the component to be used. 1 Press and hold the [DVD], [CD], or [DOCK] REMOTE MODE button along with the [AUDIO] button for controlling components connected via RI: [DVD]: 5002 (5001 by default) [CD]: 6002 (6001 by default) [DOCK]: 9002 (9001 by default) Resetting the REMOTE MODE Buttons You can reset the remote controller to reset, press and hold down the [DISPLAY] button until the button REMOTE MODE button lights up...
Instruction Manual
Page 45
... reset the receiver to bundle audio cables with its factory defaults, turn on and, while holding down the [VCR/DVR] button, press the [ON/STANDBY] button. The DIRECT or PURE AUDIO indicator will delete your TV or computer. • Listen to the station in this section. Remove the power cord from your radio presets and custom settings. If you must connect an MC head amp, or an MC transformer and a phono preamp...
... reset the receiver to bundle audio cables with its factory defaults, turn on and, while holding down the [VCR/DVR] button, press the [ON/STANDBY] button. The DIRECT or PURE AUDIO indicator will delete your TV or computer. • Listen to the station in this section. Remove the power cord from your radio presets and custom settings. If you must connect an MC head amp, or an MC transformer and a phono preamp...


