Owner Manual
Page 1
Following the instructions in the unit. Please retain this manual will enable you for future reference. Others Troubleshooting 32 Specifications 34 En Stereo Receiver TX-8522/ TX-8222 Instruction Manual Contents Introduction 2 Connections 12 Enjoying Audio Sources 20 Thank you to obtain optimum performance and listening enjoyment from your new Stereo Receiver. Please read this manual thoroughly before making connections and plugging in this manual for purchasing an Onkyo Stereo Receiver.
Following the instructions in the unit. Please retain this manual will enable you for future reference. Others Troubleshooting 32 Specifications 34 En Stereo Receiver TX-8522/ TX-8222 Instruction Manual Contents Introduction 2 Connections 12 Enjoying Audio Sources 20 Thank you to obtain optimum performance and listening enjoyment from your new Stereo Receiver. Please read this manual thoroughly before making connections and plugging in this manual for purchasing an Onkyo Stereo Receiver.

Owner Manual
Page 4
...Introduction Important Safety Instructions 2 Precautions 3 Table of Contents 4 Supplied Accessories 4 Installing the Batteries 5 Features 5 Getting to Know the Receiver 6 Front Panel 6 Rear Panel 8 Display 9 Remote Controller 10 Using the Remote Controller 10 Connections Connecting Your Speakers 12 Speaker Connection...Sources 21 Muting the receiver (remote controller only) ........ 22 Using Headphones 22 Setting the Display Brightness 22 Using the Sleep Timer (remote controller only) ... 22 Using the Tone and Balance Controls 23 Setting the DIRECT Function (TX-8522 only) ..... ...
...Introduction Important Safety Instructions 2 Precautions 3 Table of Contents 4 Supplied Accessories 4 Installing the Batteries 5 Features 5 Getting to Know the Receiver 6 Front Panel 6 Rear Panel 8 Display 9 Remote Controller 10 Using the Remote Controller 10 Connections Connecting Your Speakers 12 Speaker Connection...Sources 21 Muting the receiver (remote controller only) ........ 22 Using Headphones 22 Setting the Display Brightness 22 Using the Sleep Timer (remote controller only) ... 22 Using the Tone and Balance Controls 23 Setting the DIRECT Function (TX-8522 only) ..... ...

Owner Manual
Page 5
Features TX-8522 ❑ 100 Watts/Channel @ 8 ohms (FTC) (USA & CANADA) ❑ 100 Watts/Channel @ 4 ohms (IEC) (EUROPE) ❑ 130 Watts/Channel @ 4 ohms (JEITA) (ASIA) ❑ High-... &PURE AUDIO ❑ Brushed Hairline Aluminum Front Panel ❑ Compatible with RI Dock for the iPod ❑ Banana Plug-Compatible Speaker Posts (USA & CANADA only) TX-8222 ❑ 50 Watts/Channel @ 8 ohms (FTC) (USA & CANADA) ❑ 70 Watts/Channel @ 4 ohms (IEC) (EUROPE) ❑ 90 Watts/Channel @ 4 ohms (JEITA) (ASIA) ❑ High-Current...
Features TX-8522 ❑ 100 Watts/Channel @ 8 ohms (FTC) (USA & CANADA) ❑ 100 Watts/Channel @ 4 ohms (IEC) (EUROPE) ❑ 130 Watts/Channel @ 4 ohms (JEITA) (ASIA) ❑ High-... &PURE AUDIO ❑ Brushed Hairline Aluminum Front Panel ❑ Compatible with RI Dock for the iPod ❑ Banana Plug-Compatible Speaker Posts (USA & CANADA only) TX-8222 ❑ 50 Watts/Channel @ 8 ohms (FTC) (USA & CANADA) ❑ 70 Watts/Channel @ 4 ohms (IEC) (EUROPE) ❑ 90 Watts/Channel @ 4 ohms (JEITA) (ASIA) ❑ High-Current...
Owner Manual
Page 6
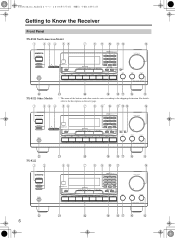
For details, refer to the shipping destination. Getting to Know the Receiver Front Panel TX-8522 North American Model 1 23 4 56 7 8 9 J KL N V U T S RQ P O TX-8522 Other Models * The name of the buttons and other controls varies according to the description on the next page. 1 23 4 56 7 8 9* J K* L M N V TX-8222 12 U 56 T S RQ P O 7 89 J K N V U 6 T S RQ P O
For details, refer to the shipping destination. Getting to Know the Receiver Front Panel TX-8522 North American Model 1 23 4 56 7 8 9 J KL N V U T S RQ P O TX-8522 Other Models * The name of the buttons and other controls varies according to the description on the next page. 1 23 4 56 7 8 9* J K* L M N V TX-8222 12 U 56 T S RQ P O 7 89 J K N V U 6 T S RQ P O
Owner Manual
Page 8
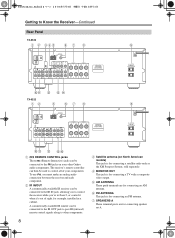
... IR (infrared) remote control signals along to other components. 8 C Satellite antenna (on your components. Getting to Know the Receiver-Continued Rear Panel TX-8522 1 B 345 67 8 9 JK L M N TX-8222 1B 5 67 8 9 JK L OP A REMOTE CONTROL jacks These (Remote Interactive) jacks can then be used to control...re in a cabinet. The receiver's remote controller can be connected to the IR IN jack, allowing you to the jacks on North American models) This jack is for example, installed in Zone 2, or control it when it's out of your other Onkyo audio components. F FM ANTENNA...
... IR (infrared) remote control signals along to other components. 8 C Satellite antenna (on your components. Getting to Know the Receiver-Continued Rear Panel TX-8522 1 B 345 67 8 9 JK L M N TX-8222 1B 5 67 8 9 JK L OP A REMOTE CONTROL jacks These (Remote Interactive) jacks can then be used to control...re in a cabinet. The receiver's remote controller can be connected to the IR IN jack, allowing you to the jacks on North American models) This jack is for example, installed in Zone 2, or control it when it's out of your other Onkyo audio components. F FM ANTENNA...
Owner Manual
Page 9
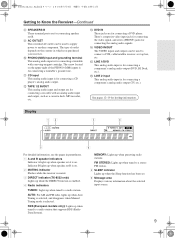
...K CD input This analog audio input is on the upper-right of outlet depends on . 2 MUTING indicator Flashes while the receiver is muted. 3 DIRECT indicator (TX-8522 only) Lights up when speaker set . 6 Message area Displays various information about the selected input source. 9 Display 12... 3 4 5 6 For detailed information, see the pages in which you purchased your receiver. The type of the PHONO (MM) inputs ...
...K CD input This analog audio input is on the upper-right of outlet depends on . 2 MUTING indicator Flashes while the receiver is muted. 3 DIRECT indicator (TX-8522 only) Lights up when speaker set . 6 Message area Displays various information about the selected input source. 9 Display 12... 3 4 5 6 For detailed information, see the pages in which you purchased your receiver. The type of the PHONO (MM) inputs ...

Owner Manual
Page 10
...be pressed inadvertently, thereby draining the batteries. • The remote controller may not work if there's an obstacle between it and the receiver's remote control sensor. Keep this in a rack behind colored glass doors. Keep this in mind when installing. 10 • If another...the receiver is installed close to bright light, such as direct sunlight or inverter-type fluorescent lights. Using the Remote Controller Point the remote controller toward the remote control sensor. Remote Controller TX-8522 North American model (RC-664S) TX-8522 Other models (RC-665S) TX-8222 All...
...be pressed inadvertently, thereby draining the batteries. • The remote controller may not work if there's an obstacle between it and the receiver's remote control sensor. Keep this in a rack behind colored glass doors. Keep this in mind when installing. 10 • If another...the receiver is installed close to bright light, such as direct sunlight or inverter-type fluorescent lights. Using the Remote Controller Point the remote controller toward the remote control sensor. Remote Controller TX-8522 North American model (RC-664S) TX-8522 Other models (RC-665S) TX-8222 All...
Owner Manual
Page 12
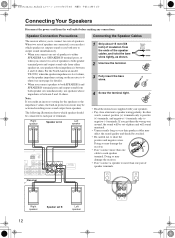
...unnatural. • Unnecessarily long or very thin speaker cables may affect the sound quality and should be activated resulting in protection circuit may damage the receiver. • Don't connect a speaker to more than one pair of the speaker cables, and twist the bare wires tightly, as shown. 2 ... speakers. • Pay close attention to either speaker set, use speakers whose impedance is between 4 and 16 ohms. For the North American model TX-8522, when the speaker impedance is between 8 and 16 ohms. Note: If you connect two sets of terminals. In other words, connect positive...
...unnatural. • Unnecessarily long or very thin speaker cables may affect the sound quality and should be activated resulting in protection circuit may damage the receiver. • Don't connect a speaker to more than one pair of the speaker cables, and twist the bare wires tightly, as shown. 2 ... speakers. • Pay close attention to either speaker set, use speakers whose impedance is between 4 and 16 ohms. For the North American model TX-8522, when the speaker impedance is between 8 and 16 ohms. Note: If you connect two sets of terminals. In other words, connect positive...

Owner Manual
Page 13
Note: Be sure to minimize the volume level on the receiver 4 before performing the procedures below. The "Impedance: 8 ohms" indication appears in the display. 3 Change the impedance value to complete the setting. When you restore the ... When you change the speaker impedance setting, read "Speaker Connection Precautions" on the remote controller. Connecting Your Speakers-Continued Configuring the Speaker Impedance (TX-8522 North American model only) In this model, the factory default for speaker impedance is "8 ohms."
Note: Be sure to minimize the volume level on the receiver 4 before performing the procedures below. The "Impedance: 8 ohms" indication appears in the display. 3 Change the impedance value to complete the setting. When you restore the ... When you change the speaker impedance setting, read "Speaker Connection Precautions" on the remote controller. Connecting Your Speakers-Continued Configuring the Speaker Impedance (TX-8522 North American model only) In this model, the factory default for speaker impedance is "8 ohms."

Owner Manual
Page 16
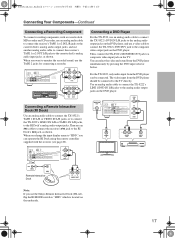
...phono preamp's output to connect rightchannel audio inputs and outputs (typically labeled "R"). Connecting a CD Player Use an analog audio cable to connect the receiver's CD L/R jacks to the analog audio output jacks on the turntable, as shown. And use with moving -coil (MC) type cartridge, ... -magnet (MM) type cartridges. AV Connection Color Coding RCA-type AV connections are for use yellow plugs to connect composite video inputs and outputs. (TX-8522) Left (white) Analog audio Left (white) Right (red) Right (red) (Yellow) Composite video (Yellow) • Push each plug in...
...phono preamp's output to connect rightchannel audio inputs and outputs (typically labeled "R"). Connecting a CD Player Use an analog audio cable to connect the receiver's CD L/R jacks to the analog audio output jacks on the turntable, as shown. And use with moving -coil (MC) type cartridge, ... -magnet (MM) type cartridges. AV Connection Color Coding RCA-type AV connections are for use yellow plugs to connect composite video inputs and outputs. (TX-8522) Left (white) Analog audio Left (white) Right (red) Right (red) (Yellow) Composite video (Yellow) • Push each plug in...
Owner Manual
Page 17
...'s TAPE 1 IN L/R or VIDEO IN L/R jacks, or to connect the TX-8222's LINE 2 IN L/R or TAPE 1 IN L/R jacks, to the RI Dock's analog audio output jacks. Then use an cable to connect the receiver's jack to the RI Dock's jack, as shown. You can be connected to the TV directly. The video input... video input jack on the DVD player. When you change the input display name to "HDD," you want to monitor the recorded sound, use the Onkyo Remote Interactive Dock (DS-A1), flip the RI MODE switch to the analog audio output jacks on the underside. 17 Use an analog audio...
...'s TAPE 1 IN L/R or VIDEO IN L/R jacks, or to connect the TX-8222's LINE 2 IN L/R or TAPE 1 IN L/R jacks, to the RI Dock's analog audio output jacks. Then use an cable to connect the receiver's jack to the RI Dock's jack, as shown. You can be connected to the TV directly. The video input... video input jack on the DVD player. When you change the input display name to "HDD," you want to monitor the recorded sound, use the Onkyo Remote Interactive Dock (DS-A1), flip the RI MODE switch to the analog audio output jacks on the underside. 17 Use an analog audio...
Owner Manual
Page 18
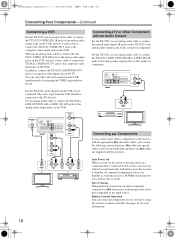
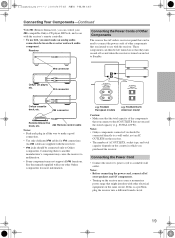
... component. The video input from the VCR should be set the receiver to Standby, all components in your system by pressing the VIDEO input selector button. For the TX-8222, use with Onkyo products (no cables are supplied with an Audio Output For the TX-8522, use an analog audio cable to connect the unused...
... component. The video input from the VCR should be set the receiver to Standby, all components in your system by pressing the VIDEO input selector button. For the TX-8222, use with Onkyo products (no cables are supplied with an Audio Output For the TX-8522, use an analog audio cable to connect the unused...
Owner Manual
Page 19
... components can then be left turned on so that they turn on the same circuit. connector Onkyo CD player, etc. Connecting them to another manufacturer's component may cause the receiver to malfunction. • Some components may cause a momentary power surge that might interfere with ... depends on and set to Standby. If this is turned on the country in all functions. TX-8222 European models e.g. Connecting the Power Cord • Connect the receiver's power cord to Onkyo components. See the manuals supplied with your speakers and AV components. • Turning on with...
... components can then be left turned on so that they turn on the same circuit. connector Onkyo CD player, etc. Connecting them to another manufacturer's component may cause the receiver to malfunction. • Some components may cause a momentary power surge that might interfere with ... depends on and set to Standby. If this is turned on the country in all functions. TX-8222 European models e.g. Connecting the Power Cord • Connect the receiver's power cord to Onkyo components. See the manuals supplied with your speakers and AV components. • Turning on with...

Owner Manual
Page 20
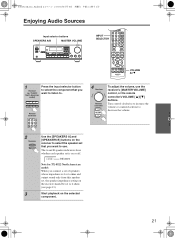
...name to "HDD." To turn it off . Turning On the Receiver STANDBY/ON STANDBY indicator ON/STANDBY Turning On and Standby 1 Receiver STANDBY/ON or Remote controller Press the [STANDBY/ON] button. TX-8522: TAPE 1, VIDEO TX-8222: TAPE 1, LINE 2 After you can operate the RI Dock ...using the remote controller supplied with the receiver (see pages 10, 11). 1, 2 1, 2 1 TX-8522 or Press the appropriate input selector button. TX-8222 or 2 Press and hold down the...
...name to "HDD." To turn it off . Turning On the Receiver STANDBY/ON STANDBY indicator ON/STANDBY Turning On and Standby 1 Receiver STANDBY/ON or Remote controller Press the [STANDBY/ON] button. TX-8522: TAPE 1, VIDEO TX-8222: TAPE 1, LINE 2 After you can operate the RI Dock ...using the remote controller supplied with the receiver (see pages 10, 11). 1, 2 1, 2 1 TX-8522 or Press the appropriate input selector button. TX-8222 or 2 Press and hold down the...
Owner Manual
Page 21
..., or the remote controller's VOLUME [ ]/[ ] buttons. Remote controller 4 Receiver Remote controller To adjust the volume, use . The A and B speaker indicators show whether each speaker set that you connect a set of speakers whose impedance is on the selected component. 21 Indicators Note for TX-8522 North American model: When you want to 6 ohms...
..., or the remote controller's VOLUME [ ]/[ ] buttons. Remote controller 4 Receiver Remote controller To adjust the volume, use . The A and B speaker indicators show whether each speaker set that you connect a set of speakers whose impedance is on the selected component. 21 Indicators Note for TX-8522 North American model: When you want to 6 ohms...
Owner Manual
Page 22
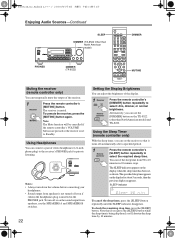
... the display for private listening. The specified sleep time appears on the TX-8522 (other than North American model) DIMMER PHONES DIMMER (TX-8222) MUTING Muting the receiver (remote controller only) You can adjust the brightness of the display. 1 Receiver Remote controller Press the remote controller's [DIMMER] button repeatedly to 10 minutes in...
... the display for private listening. The specified sleep time appears on the TX-8522 (other than North American model) DIMMER PHONES DIMMER (TX-8222) MUTING Muting the receiver (remote controller only) You can adjust the brightness of the display. 1 Receiver Remote controller Press the remote controller's [DIMMER] button repeatedly to 10 minutes in...

Owner Manual
Page 23
...by disabling the video signal output and turning off the indication in the display. Turn it up . TREBLE BASS BALANCE Setting the DIRECT Function (TX-8522 only) The [DIRECT] button turns the DIRECT function on and off . You can configure whether the Pure Audio listening mode ... Normally, it up to make them quieter. Adjusting the Balance The BALANCE control is used with any input source. Enjoying the Pure Audio Sound (TX-8522 only) Pressing the [PURE AUDIO] button activates the Pure Indicator Audio listening mode and turns on , the tone controls are ignored. The ...
...by disabling the video signal output and turning off the indication in the display. Turn it up . TREBLE BASS BALANCE Setting the DIRECT Function (TX-8522 only) The [DIRECT] button turns the DIRECT function on and off . You can configure whether the Pure Audio listening mode ... Normally, it up to make them quieter. Adjusting the Balance The BALANCE control is used with any input source. Enjoying the Pure Audio Sound (TX-8522 only) Pressing the [PURE AUDIO] button activates the Pure Indicator Audio listening mode and turns on , the tone controls are ignored. The ...
Owner Manual
Page 24
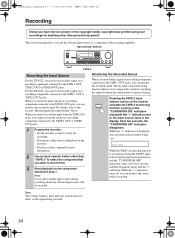
... sound monitoring function allows you to the TAPE 1 OUT, TAPE 2 OUT or VIDEO OUT jacks. Pressing the TAPE 2 input selector button on the receiver activates the TAPE 2 monitoring function, turning on the "T2 MONITOR ON" indication along with the ">" indication. While the ">" indication turns off, you... the function, and the "T2 MONITOR OFF" indication comes on a recording component connected to the input source name in step 1. For the TX-8222, you can monitor the recorded sound. Note: If you can record an audio signal on for more information. 2 Use an input selector button...
... sound monitoring function allows you to the TAPE 1 OUT, TAPE 2 OUT or VIDEO OUT jacks. Pressing the TAPE 2 input selector button on the receiver activates the TAPE 2 monitoring function, turning on the "T2 MONITOR ON" indication along with the ">" indication. While the ">" indication turns off, you... the function, and the "T2 MONITOR OFF" indication comes on a recording component connected to the input source name in step 1. For the TX-8222, you can monitor the recorded sound. Note: If you can record an audio signal on for more information. 2 Use an input selector button...

Owner Manual
Page 25
... 5 Start recording on the VCR, then start playback on the camcorder and CD player. Recording-Continued The signal flow in monitoring the recorded sound TX-8522/TX-8222 TAPE 2 T2 MONITOR OFF button Amplifier T2 MONITOR ON PLAY REC TAPE 2 Input source (CD, FM, etc.) The signal flow ...in monitoring the sound before recording TX-8522/TX-8222 TAPE 2 T2 MONITOR OFF button Amplifier PLAY REC Input source (CD, FM, etc.) Recording Audio and Video from Separate Sources...
... 5 Start recording on the VCR, then start playback on the camcorder and CD player. Recording-Continued The signal flow in monitoring the recorded sound TX-8522/TX-8222 TAPE 2 T2 MONITOR OFF button Amplifier T2 MONITOR ON PLAY REC TAPE 2 Input source (CD, FM, etc.) The signal flow ...in monitoring the sound before recording TX-8522/TX-8222 TAPE 2 T2 MONITOR OFF button Amplifier PLAY REC Input source (CD, FM, etc.) Recording Audio and Video from Separate Sources...

Owner Manual
Page 26
... In this mode, you release the button. You can enjoy AM and FM radio stations. 1 Receiver or [TX-8522 North American model] Use the [FM/AM] input selector button to select AM or FM. [TX-8522 Other models/TX-8222] Use the [FM] or [AM] input selector button to select AM or FM. In this... mode, you will receive the broadcast in your area. Band Frequency (Actual display depends on the "AUTO" indicator....
... In this mode, you release the button. You can enjoy AM and FM radio stations. 1 Receiver or [TX-8522 North American model] Use the [FM/AM] input selector button to select AM or FM. [TX-8522 Other models/TX-8222] Use the [FM] or [AM] input selector button to select AM or FM. In this... mode, you will receive the broadcast in your area. Band Frequency (Actual display depends on the "AUTO" indicator....


