
Instruction Manual
Page 1
INSTRUCTION MANUAL 10 series Plus Blood Pressure Monitor with ComFitTM Cuff Model BP791IT ESPAÑOL ENGLISH
INSTRUCTION MANUAL 10 series Plus Blood Pressure Monitor with ComFitTM Cuff Model BP791IT ESPAÑOL ENGLISH

Instruction Manual
Page 2
TABLE OF CONTENTS Before Using the Monitor Introduction 4 Safety Information 5 Operating the Device 5 Risk of Electrical Shock 7 Care and Maintenance 7 Before Taking a Measurement 8 Operating Instructions Know Your Unit 9 Unit Display 11 Display ...
TABLE OF CONTENTS Before Using the Monitor Introduction 4 Safety Information 5 Operating the Device 5 Risk of Electrical Shock 7 Care and Maintenance 7 Before Taking a Measurement 8 Operating Instructions Know Your Unit 9 Unit Display 11 Display ...

Instruction Manual
Page 4
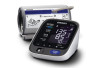
... your blood's movement through your brachial artery and converts the movements into a digital reading. Before Using the Monitor INTRODUCTION Thank you for purchasing the Omron® BP791IT 10 series Plus Automatic Blood Pressure Monitor with timed intervals for an average reading. Fill in English and Spanish • Quick Start Guide • AC Adapter •...
... your blood's movement through your brachial artery and converts the movements into a digital reading. Before Using the Monitor INTRODUCTION Thank you for purchasing the Omron® BP791IT 10 series Plus Automatic Blood Pressure Monitor with timed intervals for an average reading. Fill in English and Spanish • Quick Start Guide • AC Adapter •...

Instruction Manual
Page 5
...other literature in minor or moderate injury to the user or patient or damage to diagnose and treat High Blood Pressure. The monitor is qualified to the equipment or other property. SAFETY INFORMATION To assure the correct use of your physician or licensed healthcare provider.... CAUTION Indicates a potentially hazardous situation which , if not avoided, could result in this blood pressure monitor. SAFETY SYMBOLS USED IN THIS INSTRUCTION MANUAL WARNING Indicates a potentially hazardous situation which , if not avoided, may be a diagnostic device.
...other literature in minor or moderate injury to the user or patient or damage to diagnose and treat High Blood Pressure. The monitor is qualified to the equipment or other property. SAFETY INFORMATION To assure the correct use of your physician or licensed healthcare provider.... CAUTION Indicates a potentially hazardous situation which , if not avoided, could result in this blood pressure monitor. SAFETY SYMBOLS USED IN THIS INSTRUCTION MANUAL WARNING Indicates a potentially hazardous situation which , if not avoided, may be a diagnostic device.

Instruction Manual
Page 7
Do not overload power outlets. Store the device and the components in water. CARE AND MAINTENANCE Do not subject the monitor to repair the unit or components. 7 SAFETY INFORMATION RISK OF ELECTRICAL SHOCK Do not plug or unplug the power cord into the appropriate voltage outlet.... Do not submerge the device or any of the components in a clean, safe location. Changes or modification not approved by Omron Healthcare will void the user warranty. Do not disassemble or attempt to strong shocks, such as dropping the unit on the floor. Plug the device...
Do not overload power outlets. Store the device and the components in water. CARE AND MAINTENANCE Do not subject the monitor to repair the unit or components. 7 SAFETY INFORMATION RISK OF ELECTRICAL SHOCK Do not plug or unplug the power cord into the appropriate voltage outlet.... Do not submerge the device or any of the components in a clean, safe location. Changes or modification not approved by Omron Healthcare will void the user warranty. Do not disassemble or attempt to strong shocks, such as dropping the unit on the floor. Plug the device...

Instruction Manual
Page 10
KNOW YOUR UNIT Components: Air Tube Housing Cord Air Plug (Connects to Air Jack) Arm Cuff AC Adapter 4 "AA" Alkaline Batteries Storage Case USB Cable INSTRUCTION MANUAL 10 series Plus Blood Pressure Monitor with ComFitTM Cuff Model BP791IT ESPAÑOL ENGLISH Quick Start Guide Instruction Manual 10
KNOW YOUR UNIT Components: Air Tube Housing Cord Air Plug (Connects to Air Jack) Arm Cuff AC Adapter 4 "AA" Alkaline Batteries Storage Case USB Cable INSTRUCTION MANUAL 10 series Plus Blood Pressure Monitor with ComFitTM Cuff Model BP791IT ESPAÑOL ENGLISH Quick Start Guide Instruction Manual 10

Instruction Manual
Page 12
... user to take a measurement or when using the memory function. DISPLAY SYMBOLS IRREGULAR HEARTBEAT SYMBOL ( ) When the monitor detects an irregular rhythm two or more than the Blood average rhythm detected while the monitor pressure is defined as selected by less than 25% from Pulse the average rhythm or 25% more times...
... user to take a measurement or when using the memory function. DISPLAY SYMBOLS IRREGULAR HEARTBEAT SYMBOL ( ) When the monitor detects an irregular rhythm two or more than the Blood average rhythm detected while the monitor pressure is defined as selected by less than 25% from Pulse the average rhythm or 25% more times...

Instruction Manual
Page 13
Omron Healthcare recommends you contact your measurement values. 13 The monitor is a general guideline because blood pressure depends on the display with renal failure. MORNING HYPERTENSION SYMBOL ( ) The Morning Hypertension Symbol is displayed if the morning ...
Omron Healthcare recommends you contact your measurement values. 13 The monitor is a general guideline because blood pressure depends on the display with renal failure. MORNING HYPERTENSION SYMBOL ( ) The Morning Hypertension Symbol is displayed if the morning ...

Instruction Manual
Page 15
... position. Parts and accessories not approved for use an attachment plug adapter of the proper configuration for the power outlet. CAUTION Use only Omron authorized parts and accessories. The power unit (AC Adapter) is intended to reset the date and time if the AC Adapter is used..., you install the batteries even if the AC Adapter is disconnected. The measurement results will not be correctly oriented in the U.S.A., use with this monitor. • We recommend you may damage the unit. 15 DANGER TO REDUCE THE RISK OF FIRE OR ELECTRIC SHOCK, CAREFULLY FOLLOW THESE INSTRUCTIONS....
... position. Parts and accessories not approved for use an attachment plug adapter of the proper configuration for the power outlet. CAUTION Use only Omron authorized parts and accessories. The power unit (AC Adapter) is intended to reset the date and time if the AC Adapter is used..., you install the batteries even if the AC Adapter is disconnected. The measurement results will not be correctly oriented in the U.S.A., use with this monitor. • We recommend you may damage the unit. 15 DANGER TO REDUCE THE RISK OF FIRE OR ELECTRIC SHOCK, CAREFULLY FOLLOW THESE INSTRUCTIONS....
Instruction Manual
Page 16
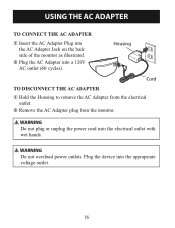
USING THE AC ADAPTER TO CONNECT THE AC ADAPTER ① Insert the AC Adapter Plug into the AC Adapter Jack on the back side of the monitor as illustrated. ② Plug the AC Adapter into the electrical outlet with wet hands. WARNING Do not plug or unplug the power cord into a 120V AC outlet (60 cycles). Housing Cord TO DISCONNECT THE AC ADAPTER ① Hold the Housing to remove the AC Adapter from the electrical outlet. ② Remove the AC Adapter plug from the monitor. Plug the device into the appropriate voltage outlet. 16 WARNING Do not overload power outlets.
USING THE AC ADAPTER TO CONNECT THE AC ADAPTER ① Insert the AC Adapter Plug into the AC Adapter Jack on the back side of the monitor as illustrated. ② Plug the AC Adapter into the electrical outlet with wet hands. WARNING Do not plug or unplug the power cord into a 120V AC outlet (60 cycles). Housing Cord TO DISCONNECT THE AC ADAPTER ① Hold the Housing to remove the AC Adapter from the electrical outlet. ② Remove the AC Adapter plug from the monitor. Plug the device into the appropriate voltage outlet. 16 WARNING Do not overload power outlets.

Instruction Manual
Page 18
..., you may cause environmental pollution. 18 BATTERY INSTALLATION BATTERY REPLACEMENT Low Battery Indicator When the Low Battery Indicator appears on the display screen turn the monitor off before replacing the batteries. If "-:--" appears on the display, refer to that of clean water. WARNING If battery fluid should get in your eyes...
..., you may cause environmental pollution. 18 BATTERY INSTALLATION BATTERY REPLACEMENT Low Battery Indicator When the Low Battery Indicator appears on the display screen turn the monitor off before replacing the batteries. If "-:--" appears on the display, refer to that of clean water. WARNING If battery fluid should get in your eyes...

Instruction Manual
Page 19
... stores up to the current date and time before taking a measurement for the 10- If the date and time are stored in the evening. The monitor also calculates weekly averages for the 10-minute period, this week and the last seven weeks. minute period, the average is based on the three... time are stored for this reading is stored in the memory for measurements in the morning and in the memory for the first time. The monitor can also calculate an average reading based on the two readings. • If one reading is displayed as the average. 19
... stores up to the current date and time before taking a measurement for the 10- If the date and time are stored in the evening. The monitor also calculates weekly averages for the 10-minute period, this week and the last seven weeks. minute period, the average is based on the three... time are stored for this reading is stored in the memory for measurements in the morning and in the memory for the first time. The monitor can also calculate an average reading based on the two readings. • If one reading is displayed as the average. 19

Instruction Manual
Page 22
Press the Up button ( ) to advance by one minute. SETTING THE MINUTE Press the Up button ( ) to advance by one hour. TO TURN THE MONITOR OFF Press the START/STOP button. 22 SETTING THE HOUR The time is set the current hour. SETTING THE DATE AND TIME 5. The minute flashes on the display. 6. Press the SET button to set the minute setting. 7. Press the SET button to set using AM or PM.
Press the Up button ( ) to advance by one minute. SETTING THE MINUTE Press the Up button ( ) to advance by one hour. TO TURN THE MONITOR OFF Press the START/STOP button. 22 SETTING THE HOUR The time is set the current hour. SETTING THE DATE AND TIME 5. The minute flashes on the display. 6. Press the SET button to set the minute setting. 7. Press the SET button to set using AM or PM.

Instruction Manual
Page 23
Press the Up or Down button ( / ) to alternate between each measurement. 1. Select your USER ID (A or B). 2. The TruReadTM symbol on and oFF. 23 NOTE: Press the Up or Down button to select on. Press the SET button. and the oFF setting appears 3. SETTING TRUREADTM The TruReadTM Mode takes three consecutive measurements. The monitor will inflate, take a measurement, and deflate three times separated by a short interval of time between on the display.
Press the Up or Down button ( / ) to alternate between each measurement. 1. Select your USER ID (A or B). 2. The TruReadTM symbol on and oFF. 23 NOTE: Press the Up or Down button to select on. Press the SET button. and the oFF setting appears 3. SETTING TRUREADTM The TruReadTM Mode takes three consecutive measurements. The monitor will inflate, take a measurement, and deflate three times separated by a short interval of time between on the display.

Instruction Manual
Page 25
SETTING TRUREADTM 7. To change the date and time, refer to turn the monitor off. If the date and time are correct, press the START/STOP button to "Setting the Date and Time". 25
SETTING TRUREADTM 7. To change the date and time, refer to turn the monitor off. If the date and time are correct, press the START/STOP button to "Setting the Date and Time". 25

Instruction Manual
Page 30
... the cuff is wrapped correctly, is detected, the Calibration Check System light flashes and "ER" will appear on and the unit starts monitoring your readings using the GUEST Mode are not stored in the memory for any other persons using measured results may be used to take ... and store the measurement values in the memory. Measurements taken using dual sensors. CUFF WRAP GUIDE This monitor checks whether the arm cuff is displayed. TAKING A MEASUREMENT The monitor is not displayed when using the GUEST Mode. WARNING Contact your physician or licensed healthcare provider. The ...
... the cuff is wrapped correctly, is detected, the Calibration Check System light flashes and "ER" will appear on and the unit starts monitoring your readings using the GUEST Mode are not stored in the memory for any other persons using measured results may be used to take ... and store the measurement values in the memory. Measurements taken using dual sensors. CUFF WRAP GUIDE This monitor checks whether the arm cuff is displayed. TAKING A MEASUREMENT The monitor is not displayed when using the GUEST Mode. WARNING Contact your physician or licensed healthcare provider. The ...

Instruction Manual
Page 31
Release the START/STOP button. A and B Symbols disappear 2. NOTE: To stop inflating, start deflation and turn off. 3. When the measurement is started. The cuff starts to inflate automatically. TAKING A MEASUREMENT USING THE GUEST MODE 1. Inflation stops and the measurement is completed, your blood pressure and pulse rate appear on the display. 31 Press and hold the START/STOP button. The monitor will stop the inflation press the START/STOP button. The A and B Symbols disappear from the display.
Release the START/STOP button. A and B Symbols disappear 2. NOTE: To stop inflating, start deflation and turn off. 3. When the measurement is started. The cuff starts to inflate automatically. TAKING A MEASUREMENT USING THE GUEST MODE 1. Inflation stops and the measurement is completed, your blood pressure and pulse rate appear on the display. 31 Press and hold the START/STOP button. The monitor will stop the inflation press the START/STOP button. The A and B Symbols disappear from the display.

Instruction Manual
Page 32
... values are used to select USER A or B. Slide the USER ID Selection Switch right or left to calculate the Morning Averages and Evening Averages. The monitor stores the measurement values in the memory by the USER ID selected. NOTE: The default value is set to take one measurement using the Single... USER ID when taking a measurement. TAKING A MEASUREMENT SELECTING THE USER ID Select your USER ID. USING THE USER ID After you select a USER ID, the monitor can be set to the Single Mode to "Setting TruReadTM". 32 Refer to take one measurement.
... values are used to select USER A or B. Slide the USER ID Selection Switch right or left to calculate the Morning Averages and Evening Averages. The monitor stores the measurement values in the memory by the USER ID selected. NOTE: The default value is set to take one measurement using the Single... USER ID when taking a measurement. TAKING A MEASUREMENT SELECTING THE USER ID Select your USER ID. USING THE USER ID After you select a USER ID, the monitor can be set to the Single Mode to "Setting TruReadTM". 32 Refer to take one measurement.

Instruction Manual
Page 33
...selected flashes on the display. Do not move your ideal inflation level. All symbols appear on the display. This monitor detects the pulse during inflation. The monitor will stop the inflation or measurement, press the START/STOP button. NOTE: To stop inflating, start deflating and will... turn off. 33 Press the START/STOP button. As the cuff inflates, the monitor automatically determines your arm and remain still until the entire measurement process is completed. The cuff starts to inflate automatically. Select your USER...
...selected flashes on the display. Do not move your ideal inflation level. All symbols appear on the display. This monitor detects the pulse during inflation. The monitor will stop the inflation or measurement, press the START/STOP button. NOTE: To stop inflating, start deflating and will... turn off. 33 Press the START/STOP button. As the cuff inflates, the monitor automatically determines your arm and remain still until the entire measurement process is completed. The cuff starts to inflate automatically. Select your USER...

Instruction Manual
Page 34
The Heartbeat Symbol ( ) flashes at every heartbeat. 4. TAKING A MEASUREMENT 3. Press the START/STOP button to turn off . NOTE: The monitor will automatically turn the monitor off after two minutes. 34 Inflation stops automatically and the measurement is complete, the arm cuff completely deflates. When the measurement is started. Your blood pressure and pulse rate are displayed. 5. As the cuff deflates, decreasing numbers appear on the display.
The Heartbeat Symbol ( ) flashes at every heartbeat. 4. TAKING A MEASUREMENT 3. Press the START/STOP button to turn off . NOTE: The monitor will automatically turn the monitor off after two minutes. 34 Inflation stops automatically and the measurement is complete, the arm cuff completely deflates. When the measurement is started. Your blood pressure and pulse rate are displayed. 5. As the cuff deflates, decreasing numbers appear on the display.


