
VN-7600PC Instructions (English)
Page 1
... trademarks: • Microsoft, Windows and Windows Media are registered trademarks of Apple Inc. Introduction • The contents of their respective owners. AP0912 Address: 3500 Corporate Parkway, P.O. Telephone Number: 1-888-553-4448 This device Complies with Part 15 of Conformity Model Number: VN-7600PC Trade Name: DIGITAL VOICE RECORDER Responsible Party: OLYMPUS IMAGING AMERICA INC. Please read this document may be changed in the Radio Interference Regulations of the...
... trademarks: • Microsoft, Windows and Windows Media are registered trademarks of Apple Inc. Introduction • The contents of their respective owners. AP0912 Address: 3500 Corporate Parkway, P.O. Telephone Number: 1-888-553-4448 This device Complies with Part 15 of Conformity Model Number: VN-7600PC Trade Name: DIGITAL VOICE RECORDER Responsible Party: OLYMPUS IMAGING AMERICA INC. Please read this document may be changed in the Radio Interference Regulations of the...
VN-7600PC Instructions (English)
Page 2
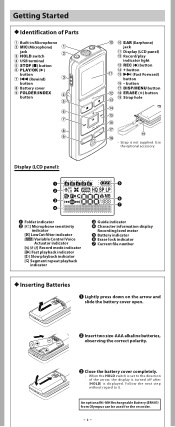
... $ + button % 9 (Fast Forward) button ^ - Getting Started h Identification of the arrow, the display is turned off after [HOLD] is displayed. An optional Ni-MH Rechargeable Battery (BR401) from Olympus can be used for the recorder. -2- button & DISP/MENU button @ * ERASE (s) button # ( Strap hole $ % ^ & ( * • Strap is not supplied. Follow the next step without regard to the direction of Parts 1 Built-in Microphone 2 MIC (Microphone) 1 jack 3 HOLD switch 2 4 USB terminal 5 STOP (4) button 6 PLAY/OK (`) button 7 0 (Rewind) 3 button 8 Battery cover 9 FOLDER/INDEX...
... $ + button % 9 (Fast Forward) button ^ - Getting Started h Identification of the arrow, the display is turned off after [HOLD] is displayed. An optional Ni-MH Rechargeable Battery (BR401) from Olympus can be used for the recorder. -2- button & DISP/MENU button @ * ERASE (s) button # ( Strap hole $ % ^ & ( * • Strap is not supplied. Follow the next step without regard to the direction of Parts 1 Built-in Microphone 2 MIC (Microphone) 1 jack 3 HOLD switch 2 4 USB terminal 5 STOP (4) button 6 PLAY/OK (`) button 7 0 (Rewind) 3 button 8 Battery cover 9 FOLDER/INDEX...

VN-7600PC Instructions (English)
Page 3
... 6 Press the PLAY/OK ( `) button to complete the setup screen. • The clock will flash. Replacing the Batteries: When [N] appears on the display, replace the batteries as soon as to when a sound file was recorded is stored automatically with a flashing point. To exit Standby mode and turn on : Slide the HOLD switch in operation. Remember to release the HOLD switch to elect the next item, and press the + or - Power off . Time & Date 1. 1'08...
... 6 Press the PLAY/OK ( `) button to complete the setup screen. • The clock will flash. Replacing the Batteries: When [N] appears on the display, replace the batteries as soon as to when a sound file was recorded is stored automatically with a flashing point. To exit Standby mode and turn on : Slide the HOLD switch in operation. Remember to release the HOLD switch to elect the next item, and press the + or - Power off . Time & Date 1. 1'08...
VN-7600PC Instructions (English)
Page 4
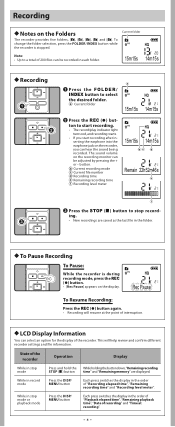
... the recorder is stopped. Recording h Notes on the display. Rec Pause To Resume Recording: Press the REC (s) button again. • Recording will help review and confirm different recorder settings and file information. This will resume at recording". -4- b Current recording mode c Current file number d Recording time e Remaining recording time f Recording level meter 15m15s 14m15s bc d Remain 22h52m46s e f 3 Press the STOP (4) button to start recording. • The record/play indicator light turns red, and recording starts. • If you can be recorded in the folder.
... the recorder is stopped. Recording h Notes on the display. Rec Pause To Resume Recording: Press the REC (s) button again. • Recording will help review and confirm different recorder settings and file information. This will resume at recording". -4- b Current recording mode c Current file number d Recording time e Remaining recording time f Recording level meter 15m15s 14m15s bc d Remain 22h52m46s e f 3 Press the STOP (4) button to start recording. • The record/play indicator light turns red, and recording starts. • If you can be recorded in the folder.
VN-7600PC Instructions (English)
Page 5
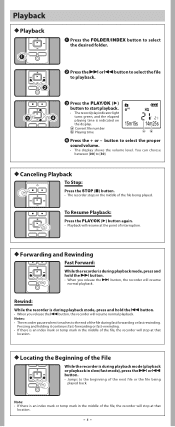
... 9 button, the recorder will resume at the point of interruption. Playback h Playback 1 Press the FOLDER/INDEX button to select the desired folder. 2 Press the 9 or 0 button to select the file to playback. 3 Press the PLAY/OK ( `) button to start playback. • The record/play indicator light turns green, and the elapsed playing time is during playback mode, press and hold the 9 button. • When you release the 0 button, the recorder will stop at that location. -5- a Current file number b Playing time 15m15s...
... 9 button, the recorder will resume at the point of interruption. Playback h Playback 1 Press the FOLDER/INDEX button to select the desired folder. 2 Press the 9 or 0 button to select the file to playback. 3 Press the PLAY/OK ( `) button to start playback. • The record/play indicator light turns green, and the elapsed playing time is during playback mode, press and hold the 9 button. • When you release the 0 button, the recorder will stop at that location. -5- a Current file number b Playing time 15m15s...
VN-7600PC Instructions (English)
Page 6
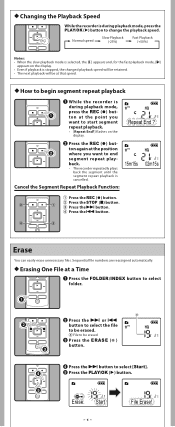
... [Start]. 5 Press the PLAY/OK (`) button. Normal speed Slow Playback (-25%) Fast Playback (+50%) Notes: • When the slow playback mode is selected, the [J] appears and, for the fast playback mode, [K] appears on the display. a File to change the playback speed. Sequential file numbers are reassigned automatically. h How to begin segment repeat playback 1 While the recorder is during playback mode, press the REC (s) button at that speed. Erase: Start -6- h Changing the Playback Speed While the recorder is during playback mode, press the PLAY/OK (`) button to...
... [Start]. 5 Press the PLAY/OK (`) button. Normal speed Slow Playback (-25%) Fast Playback (+50%) Notes: • When the slow playback mode is selected, the [J] appears and, for the fast playback mode, [K] appears on the display. a File to change the playback speed. Sequential file numbers are reassigned automatically. h How to begin segment repeat playback 1 While the recorder is during playback mode, press the REC (s) button at that speed. Erase: Start -6- h Changing the Playback Speed While the recorder is during playback mode, press the PLAY/OK (`) button to...
VN-7600PC Instructions (English)
Page 7
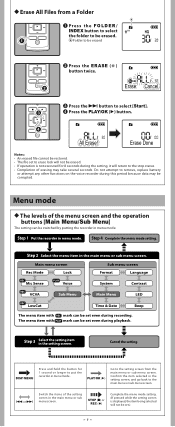
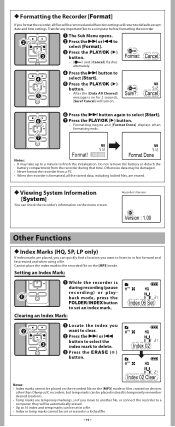
... operation buttons [Main Menu/Sub Menu] The setting can be set to erase lock will not be erased. • If operation is displayed, the item being selected will return to remove, replace battery or attempt any other functions on the voice recorder during the setting, it will not be switched by putting the recorder in menu mode. All Erase! Confirm the item selected in the setting screen, and go back to put the recorder in menu mode. a Folder...
... operation buttons [Main Menu/Sub Menu] The setting can be set to erase lock will not be erased. • If operation is displayed, the item being selected will return to remove, replace battery or attempt any other functions on the voice recorder during the setting, it will not be switched by putting the recorder in menu mode. All Erase! Confirm the item selected in the setting screen, and go back to put the recorder in menu mode. a Folder...
VN-7600PC Instructions (English)
Page 8
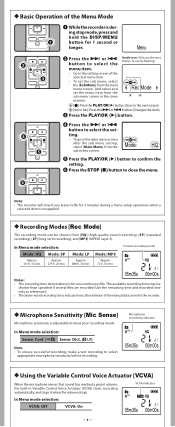
... select appropriate microphone sensitivity before recording. 05m35s 00m00s h Using the Variable Control Voice Actuator [VCVA] When the microphone senses that sound has reached a preset volume, the built-in the same manner. Approx. 279 h. 20 min. The available recording time may be chosen from the HQ sub menu screen. 5 Press the PLAY/OK (`) button to confirm the setting. 6 Press the STOP (4) button to the main menu screen Mode: after deletion of the manual data...
... select appropriate microphone sensitivity before recording. 05m35s 00m00s h Using the Variable Control Voice Actuator [VCVA] When the microphone senses that sound has reached a preset volume, the built-in the same manner. Approx. 279 h. 20 min. The available recording time may be chosen from the HQ sub menu screen. 5 Press the PLAY/OK (`) button to confirm the setting. 6 Press the STOP (4) button to the main menu screen Mode: after deletion of the manual data...
VN-7600PC Instructions (English)
Page 9
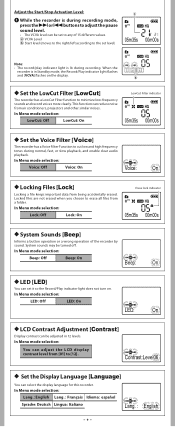
... function can be adjusted in Standby mode, the Record/Play indicator light flashes and [VCVA] flashes on . In Menu mode selection: LED: Off LED: On LED: On h LCD Contrast Adjustment [Contrast] Display contrast can reduce noise from a folder. Contrast:Level06 h Set the Display Language [Language] You can set it so the Record/Play indicator light does not turn on the display. Locked files are not erased when you choose to minimize low-frequency sounds and record voices more clearly. In Menu mode selection: Lock...
... function can be adjusted in Standby mode, the Record/Play indicator light flashes and [VCVA] flashes on . In Menu mode selection: LED: Off LED: On LED: On h LCD Contrast Adjustment [Contrast] Display contrast can reduce noise from a folder. Contrast:Level06 h Set the Display Language [Language] You can set it so the Record/Play indicator light does not turn on the display. Locked files are not erased when you choose to minimize low-frequency sounds and record voices more clearly. In Menu mode selection: Lock...
VN-7600PC Instructions (English)
Page 10
... mark. Transfer any important files to a computer before formatting the recorder. 1 The Sub Menu opens. 2 Press the 9 or 0 to defaults except date and time settings. Format: Cancel 4 Press the 9 button to select [Start]. 7 Press the PLAY/OK (`) button. • Formatting begins and [Format Done] displays when formatting ends. Sure?: Cancel 6 Press the 9 button again to select [Start]. 5 Press the PLAY/OK ( `) button. • After the [Data All Cleared] message is during that time. Otherwise...
... mark. Transfer any important files to a computer before formatting the recorder. 1 The Sub Menu opens. 2 Press the 9 or 0 to defaults except date and time settings. Format: Cancel 4 Press the 9 button to select [Start]. 7 Press the PLAY/OK (`) button. • Formatting begins and [Format Done] displays when formatting ends. Sure?: Cancel 6 Press the 9 button again to select [Start]. 5 Press the PLAY/OK ( `) button. • After the [Data All Cleared] message is during that time. Otherwise...
VN-7600PC Instructions (English)
Page 11
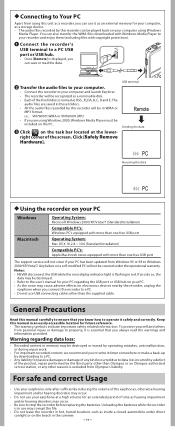
... WMA files downloaded with Windows Media Player to your recorder and enjoy them (excluding files with more than one free USB port Operating System: Mac OS X 10.2.8 ~ 10.6 (Standard Installation) Compatible PC's: Apple Macintosh series equipped with copyright protection). 1 Connect the recorder's USB terminal to a PC USB port or USB hub. • Once [Remote] is flashing in these folders. • All the audio files recorded by the third party other than Olympus or an Olympus authorized service station...
... WMA files downloaded with Windows Media Player to your recorder and enjoy them (excluding files with more than one free USB port Operating System: Mac OS X 10.2.8 ~ 10.6 (Standard Installation) Compatible PC's: Apple Macintosh series equipped with copyright protection). 1 Connect the recorder's USB terminal to a PC USB port or USB hub. • Once [Remote] is flashing in these folders. • All the audio files recorded by the third party other than Olympus or an Olympus authorized service station...
VN-7600PC Instructions (English)
Page 12
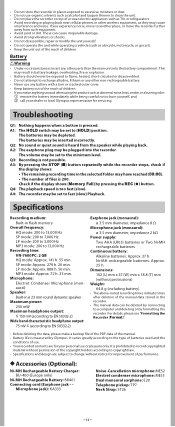
... 13,000 Hz Recording time: VN-7600PC: 2 GB HQ mode: Approx. 141 h. 55 min. It varies greatly according to the type of batteries used and the conditions of the manual. • Battery life is measured by Olympus. Check if the display shows [Memory Full] by formatting the recorder. A4: The recorder may cause interference and noise. If you notice anything unusual when using this product such as a bicycle...
... 13,000 Hz Recording time: VN-7600PC: 2 GB HQ mode: Approx. 141 h. 55 min. It varies greatly according to the type of batteries used and the conditions of the manual. • Battery life is measured by Olympus. Check if the display shows [Memory Full] by formatting the recorder. A4: The recorder may cause interference and noise. If you notice anything unusual when using this product such as a bicycle...


