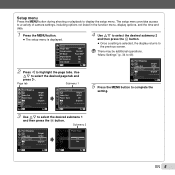
VG-140 Instruction Manual (English)
Page 5
... m button. ● The setup menu is selected, the display returns to select the desired submenu 2 and then press the Q button. ● Once a setting is displayed. 1 Reset 2 Image Size Compression AF Mode 1 Digital Zoom 2 AF Illuminat.
VG-140 Instruction Manual (English)
Page 6
... p. 30 3 Macro p. 30 4 Self-timer p. 31 5 Exposure compensation ...p. 31 6 White balance p. 32 7 ISO p. 32 8 Drive p. 33 9 # (Setup) X p (Shooting menu 1) Reset p. 34 Image Size p. 34 Compression p. 34 AF Mode p. 35 *1 VG-140/D-715 and VG-130/D-710 only Digital Zoom p. 36 AF Illuminat.*1 p. 36 Icon Guide p. 37 q (Shooting menu 2) Date Stamp p. 37 A (Movie menu...
VG-140 Instruction Manual (English)
Page 17
... MENU EN 17 Operation guide Operation guides displayed at the bottom of the screen indicate that the m button, Q button, or zoom buttons should be used. 1 Reset 2 Image Size Compression AF Mode 1 Digital Zoom 2 AF Illuminat. You can also choose the language for the menus and messages displayed in the monitor. 1 Press...
VG-140 Instruction Manual (English)
Page 34
Restoring the shooting functions to the default settings [Reset] p (Shooting menu 1) X Reset Submenu 2 Yes No Application Restores the following menu functions to the default settings. • Shooting mode (p. 26) • Flash (p. 30) • Macro (p. 30) • Self-...
VG-140 Instruction Manual (English)
Page 52
X Back MENU No Date Time Set OK 5 Use FG to select [Set], and press the Q button. Print Order 1 ( 1) Back MENU Set Cancel Set OK 6 Use FG to select the [X] (date print) screen option, and press the Q button. Submenu 2 No Date Time Application This prints the image only. This prints the image with the shooting time. Reserving one print each of all images on the card [U] 1 Follow Steps 1 and 2 in [ This prints the image with the shooting date. Use FG to select the image for print reservation. Press the Q button. 4 Use HI to select the quantity.
VG-140 Instruction Manual (English)
Page 53
Resetting the print reservation data for selected images 1 Follow Steps 1 and 2 in [
VG-140 Instruction Manual (English)
Page 54
... setting". ● If the batteries are removed and left for about a day*2, the date and time settings return to the default setting, and must be reset. *2 The time until #(flash charge) stops blinking before taking pictures. "Vertical lines appear on the screen". ● This condition may have occurred. Usage Tips...