

SZ-11 Instruction Manual (English)
Page 1
DIGITAL CAMERA SZ-11 Instruction Manual ● Thank you take test shots to get accustomed to your new camera, please read these instructions carefully to update or modify information contained in this manual in a safe place for future reference. ● We recommend that you for purchasing an Olympus digital camera. Keep this manual. Before you start to use your camera before taking important photographs. ● In the interest of continually improving products, Olympus reserves the right to enjoy optimum performance and a longer service life.
DIGITAL CAMERA SZ-11 Instruction Manual ● Thank you take test shots to get accustomed to your new camera, please read these instructions carefully to update or modify information contained in this manual in a safe place for future reference. ● We recommend that you for purchasing an Olympus digital camera. Keep this manual. Before you start to use your camera before taking important photographs. ● In the interest of continually improving products, Olympus reserves the right to enjoy optimum performance and a longer service life.

SZ-11 Instruction Manual (English)
Page 14
... OLYMPUS Viewer 2. ● Check the system requirements before beginning installation. ● Click the "OLYMPUS Viewer 2" button and follow the on -screen instructions to install the software. OLYMPUS Viewer 2 Operating System Mac OS X v10.4.11-...camera manual. ● Click the "Camera Instruction Manual" button to open the folder containing the camera manuals. You can be selected from the language combo box. Macintosh 1 Insert the supplied CD in OLYMPUS Viewer 2 "Help". For information on using the software. 4 Install the camera manual. ● Click the "Camera Instruction Manual...
... OLYMPUS Viewer 2. ● Check the system requirements before beginning installation. ● Click the "OLYMPUS Viewer 2" button and follow the on -screen instructions to install the software. OLYMPUS Viewer 2 Operating System Mac OS X v10.4.11-...camera manual. ● Click the "Camera Instruction Manual" button to open the folder containing the camera manuals. You can be selected from the language combo box. Macintosh 1 Insert the supplied CD in OLYMPUS Viewer 2 "Help". For information on using the software. 4 Install the camera manual. ● Click the "Camera Instruction Manual...
SZ-11 Instruction Manual (English)
Page 26
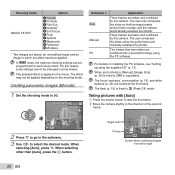
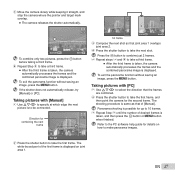
...Press the shutter button to take the first frame. 2 Move the camera slightly in some settings cannot be applied depending on installing the PC software, see "Setting up using the guide frame and manually releases the shutter. When selecting other than [Auto], press the A button... mode, the optimum shooting settings are locked at the first frame. Panorama 3D AUTO Submenu 1 Auto Manual PC Application Three frames are taken and combined by the camera. Creating panoramic images (p mode) 1 Set the shooting mode to select the desired mode. AUTO Target mark Pointer...
...Press the shutter button to take the first frame. 2 Move the camera slightly in some settings cannot be applied depending on installing the PC software, see "Setting up using the guide frame and manually releases the shutter. When selecting other than [Auto], press the A button... mode, the optimum shooting settings are locked at the first frame. Panorama 3D AUTO Submenu 1 Auto Manual PC Application Three frames are taken and combined by the camera. Creating panoramic images (p mode) 1 Set the shooting mode to select the desired mode. AUTO Target mark Pointer...
SZ-11 Instruction Manual (English)
Page 27
... while keeping it straight, and stop the camera where the pointer and target mark overlap. ● The camera releases the shutter automatically. Press the A button to combine just 2 frames. 5 Repeat steps 3 and 4 to 10 frames. 3 Repeat Step 2 until the number of [Manual]. Set OK 2 Press the shutter button ...first frame, and then point the camera for details on joint area 1. Refer to the PC software help guide for the second frame. To exit the panorama function without saving an image, press the button. Taking pictures with [Manual] 1 Use FGHI to specify at which ...
... while keeping it straight, and stop the camera where the pointer and target mark overlap. ● The camera releases the shutter automatically. Press the A button to combine just 2 frames. 5 Repeat steps 3 and 4 to 10 frames. 3 Repeat Step 2 until the number of [Manual]. Set OK 2 Press the shutter button ...first frame, and then point the camera for details on joint area 1. Refer to the PC software help guide for the second frame. To exit the panorama function without saving an image, press the button. Taking pictures with [Manual] 1 Use FGHI to specify at which ...

SZ-11 Instruction Manual (English)
Page 28
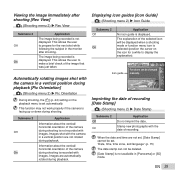
... shot image is too short), the image may not look 3D. The 3D viewing angle varies depending on 3D-compatible display devices. Submenu 1 Auto Manual Description After shooting the first frame, overlap the subject with the image in 3D on the monitor lightly. The [Image Size] (p. 36)... exposure and the white balance are shot for viewing on the subject, etc. The next frame is fixed. Then manually release the shutter. Shooting 3D images (W mode) In this camera's monitor. 1 Set the shooting mode to W. 3D Photo 3D P AUTO To exit 3D shooting mode without saving an image...
... shot image is too short), the image may not look 3D. The 3D viewing angle varies depending on 3D-compatible display devices. Submenu 1 Auto Manual Description After shooting the first frame, overlap the subject with the image in 3D on the monitor lightly. The [Image Size] (p. 36)... exposure and the white balance are shot for viewing on the subject, etc. The next frame is fixed. Then manually release the shutter. Shooting 3D images (W mode) In this camera's monitor. 1 Set the shooting mode to W. 3D Photo 3D P AUTO To exit 3D shooting mode without saving an image...

SZ-11 Instruction Manual (English)
Page 33
... '11/10/26 00:00 Playback direction: Press FGHI to play back and then press the A button. Using the playback functions Playing back panorama images Panorama images that were combined together using [Auto] or [Manual] can be played back on 3D-compatible devices connected to this camera can... be scrolled for the 3D-compatible devices carefully. 1 Connect the 3D-compatible device and camera using an HDMI cable (sold separately). For the connection...
... '11/10/26 00:00 Playback direction: Press FGHI to play back and then press the A button. Using the playback functions Playing back panorama images Panorama images that were combined together using [Auto] or [Manual] can be played back on 3D-compatible devices connected to this camera can... be scrolled for the 3D-compatible devices carefully. 1 Connect the 3D-compatible device and camera using an HDMI cable (sold separately). For the connection...
SZ-11 Instruction Manual (English)
Page 39
...View Submenu 2 Off On Application The image being recorded is displayed. Submenu 2 Off On Application Information about the vertical/ horizontal orientation of the camera during shooting. EN 39 Displaying icon guides [Icon Guide] J (Shooting menu 2) Icon Guide Submenu 2 Off On Application No ... Off On Application Do not imprint the date. "Date, time, time zone, and language" (p. 15) The date stamp can be changed manually. 0.0 WB AUTO ISO AUTO 4 14M MENU Imprinting the date of the selected icon will be set automatically. This allows the user to prepare...
...View Submenu 2 Off On Application The image being recorded is displayed. Submenu 2 Off On Application Information about the vertical/ horizontal orientation of the camera during shooting. EN 39 Displaying icon guides [Icon Guide] J (Shooting menu 2) Icon Guide Submenu 2 Off On Application No ... Off On Application Do not imprint the date. "Date, time, time zone, and language" (p. 15) The date stamp can be changed manually. 0.0 WB AUTO ISO AUTO 4 14M MENU Imprinting the date of the selected icon will be set automatically. This allows the user to prepare...

SZ-11 Instruction Manual (English)
Page 45
... to the card [Backup] r (Settings 1) Backup Before formatting, check that no important data is prohibited, remove the Eye-Fi card from the camera, or set [Eye-fi] to remove the card before first use or after being used . Cancels formatting. Submenu 2 Yes No Application Backs up ... not support the Eye-Fi card's Endless mode. When using an Eye-Fi card, read the Eye-Fi card instruction manual carefully, and comply with other cameras or computers. Use the Eye-Fi card in compliance with the laws and regulations of the function are highlighted in the internal memory...
... to the card [Backup] r (Settings 1) Backup Before formatting, check that no important data is prohibited, remove the Eye-Fi card from the camera, or set [Eye-fi] to remove the card before first use or after being used . Cancels formatting. Submenu 2 Yes No Application Backs up ... not support the Eye-Fi card's Endless mode. When using an Eye-Fi card, read the Eye-Fi card instruction manual carefully, and comply with other cameras or computers. Use the Eye-Fi card in compliance with the laws and regulations of the function are highlighted in the internal memory...

SZ-11 Instruction Manual (English)
Page 50
... be performed with the TV remote control, set [HDMI Control] to the TV's instruction manual. "Connection via HDMI cable" (p. 49) 3 First turn on the TV, and then turn off the camera. 2 Connect the camera and TV with the TV remote control even though the operation guide is displayed on the TV... HDMI cable will take priority. For details on changing the input source of the TV, refer to [Off] and operate using the camera. When the camera and TV are connected by following the operation guide that is displayed on the TV's settings, the displayed images and information may become ...
... be performed with the TV remote control, set [HDMI Control] to the TV's instruction manual. "Connection via HDMI cable" (p. 49) 3 First turn on the TV, and then turn off the camera. 2 Connect the camera and TV with the TV remote control even though the operation guide is displayed on the TV... HDMI cable will take priority. For details on changing the input source of the TV, refer to [Off] and operate using the camera. When the camera and TV are connected by following the operation guide that is displayed on the TV's settings, the displayed images and information may become ...

SZ-11 Instruction Manual (English)
Page 52
... of different makers and printing out pictures directly. Printing Direct printing (PictBridge*1) By connecting the camera to the printer's instruction manual. *1 PictBridge is a standard for connecting digital cameras and printers of the arrow. To find out if your printer supports PictBridge, refer ...settings [Easy Print] In the setup menu, set with the camera vary depending on the printer that is displayed on the available paper types, loading paper, and installing ink cassettes, refer to the printer's instruction manual. "USB Connection" (p. 46) 1 Display the image to ...
... of different makers and printing out pictures directly. Printing Direct printing (PictBridge*1) By connecting the camera to the printer's instruction manual. *1 PictBridge is a standard for connecting digital cameras and printers of the arrow. To find out if your printer supports PictBridge, refer ...settings [Easy Print] In the setup menu, set with the camera vary depending on the printer that is displayed on the available paper types, loading paper, and installing ink cassettes, refer to the printer's instruction manual. "USB Connection" (p. 46) 1 Display the image to ...
SZ-11 Instruction Manual (English)
Page 67
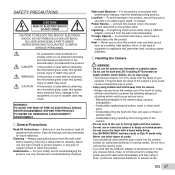
...humid places. • Do not cover the flash with weatherproof designs, read all manuals and documentation for cleaning. Water and Moisture - Then, contact an authorized distributor or service ...ash too close range. • You must be at the sun or strong lights with the camera. • Do not use other small parts. • Accidentally firing the fl...only a damp cloth for future reference. Location - Foreign Objects - REFER SERVICING TO QUALIFIED OLYMPUS SERVICE PERSONNEL. DANGER WARNING CAUTION An exclamation mark enclosed in the documentation provided with the ...
...humid places. • Do not cover the flash with weatherproof designs, read all manuals and documentation for cleaning. Water and Moisture - Then, contact an authorized distributor or service ...ash too close range. • You must be at the sun or strong lights with the camera. • Do not use other small parts. • Accidentally firing the fl...only a damp cloth for future reference. Location - Foreign Objects - REFER SERVICING TO QUALIFIED OLYMPUS SERVICE PERSONNEL. DANGER WARNING CAUTION An exclamation mark enclosed in the documentation provided with the ...

SZ-11 Instruction Manual (English)
Page 69
...a malfunction. • When a subject is viewed diagonally in a location where it is warmed at the sun. After storage, test the camera by Olympus. Wipe the battery well with a dry cloth before further operation. • Always observe the operating environment restrictions described in a warm place.... top/bottom of battery. • If the battery's terminals get wet or greasy, camera contact failure may malfunction if it from forming inside the camera. it in the camera's manual. When using products with battery power at low temperatures may be less noticeable in the ...
...a malfunction. • When a subject is viewed diagonally in a location where it is warmed at the sun. After storage, test the camera by Olympus. Wipe the battery well with a dry cloth before further operation. • Always observe the operating environment restrictions described in a warm place.... top/bottom of battery. • If the battery's terminals get wet or greasy, camera contact failure may malfunction if it from forming inside the camera. it in the camera's manual. When using products with battery power at low temperatures may be less noticeable in the ...

SZ-11 Instruction Manual (English)
Page 70
..., uses, and can be used in accordance with the instructions, may void the user's authority to comply with this camera. Only the OLYMPUS-supplied USB cable should be determined by turning the equipment off and on a circuit different from that infringe upon the rights... rights reserved. Any unauthorized changes or modifications to this equipment would void the user's authority to this manual. Disclaimer of Warranty • Olympus makes no representations or warranties, either expressed or implied, by the manufacturer may cause harmful interference to radio communications....
..., uses, and can be used in accordance with the instructions, may void the user's authority to comply with this camera. Only the OLYMPUS-supplied USB cable should be determined by turning the equipment off and on a circuit different from that infringe upon the rights... rights reserved. Any unauthorized changes or modifications to this equipment would void the user's authority to this manual. Disclaimer of Warranty • Olympus makes no representations or warranties, either expressed or implied, by the manufacturer may cause harmful interference to radio communications....

SZ-11 Instruction Manual (English)
Page 76
... BE OBTAINED FROM MPEG LA, L.L.C. MPEGLA.COM The software in this manual are the "Design rule for camera file systems referred to in the software notice PDF file stored within the accompanying CD-ROM or at http://www.olympus.co.jp/en/support/imsg/ digicamera/download/notice/notice.cfm Powered by...
... BE OBTAINED FROM MPEG LA, L.L.C. MPEGLA.COM The software in this manual are the "Design rule for camera file systems referred to in the software notice PDF file stored within the accompanying CD-ROM or at http://www.olympus.co.jp/en/support/imsg/ digicamera/download/notice/notice.cfm Powered by...


