
SP-600UZ Instruction Manual (English)
Page 1
... CAMERA SP-600UZ Instruction Manual ● Thank you for future reference. ● The application software and instruction manual PDF file are stored on the internal memory of the camera. ● We recommend that you start to use your camera before taking important photographs. ● In the interest of continually improving products, Olympus...
... CAMERA SP-600UZ Instruction Manual ● Thank you for future reference. ● The application software and instruction manual PDF file are stored on the internal memory of the camera. ● We recommend that you start to use your camera before taking important photographs. ● In the interest of continually improving products, Olympus...
SP-600UZ Instruction Manual (English)
Page 2
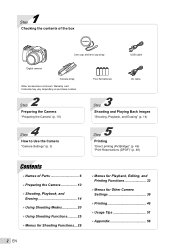
1 Step Checking the contents of the box Lens cap and lens cap strap USB cable Digital camera Camera strap Other accessories not shown: Warranty card Contents may vary depending on purchase location. 2 Step Preparing the Camera "Preparing the Camera" (p. 10) 4 Step How to Use the Camera "Camera Settings" (p. 3) Four AA batteries AV cable 3 Step Shooting and Playing Back Images "Shooting, Playback, and Erasing" (p. 14) 5 Step Printing "Direct printing (PictBridge)" (p. 46) "Print Reservations (DPOF)" (p. 49) Contents ¾ Names of Parts 6 ¾ Preparing the Camera 10 ¾ Shooting...
1 Step Checking the contents of the box Lens cap and lens cap strap USB cable Digital camera Camera strap Other accessories not shown: Warranty card Contents may vary depending on purchase location. 2 Step Preparing the Camera "Preparing the Camera" (p. 10) 4 Step How to Use the Camera "Camera Settings" (p. 3) Four AA batteries AV cable 3 Step Shooting and Playing Back Images "Shooting, Playback, and Erasing" (p. 14) 5 Step Printing "Direct printing (PictBridge)" (p. 46) "Print Reservations (DPOF)" (p. 49) Contents ¾ Names of Parts 6 ¾ Preparing the Camera 10 ¾ Shooting...
SP-600UZ Instruction Manual (English)
Page 3
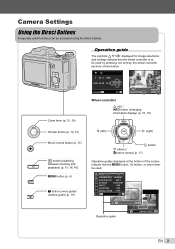
Zoom lever (p. 15, 18) Shutter button (p. 14, 51) Operation guide The symbols FGHI displayed for image selections and settings indicate that the m button, A button, or zoom lever be accessed using the direct buttons. IMAGE SET OK Operation guide OK ERASE/CANCEL MENU EN 3 Camera Settings Using the Direct Buttons Frequently used by pressing, not turning, the wheel controller sections shown below. X Y M D TIME 2010. 02 . 26 12 : 30 Y/M/D CANCEL MENU SET OK 4/30 SINGLE PRINT NORM 12M FILE 100 0004 '10/02/26 12:30 PRINT OK MORE Wheel controller F (up) / INFO button (changing ...
Zoom lever (p. 15, 18) Shutter button (p. 14, 51) Operation guide The symbols FGHI displayed for image selections and settings indicate that the m button, A button, or zoom lever be accessed using the direct buttons. IMAGE SET OK Operation guide OK ERASE/CANCEL MENU EN 3 Camera Settings Using the Direct Buttons Frequently used by pressing, not turning, the wheel controller sections shown below. X Y M D TIME 2010. 02 . 26 12 : 30 Y/M/D CANCEL MENU SET OK 4/30 SINGLE PRINT NORM 12M FILE 100 0004 '10/02/26 12:30 PRINT OK MORE Wheel controller F (up) / INFO button (changing ...

SP-600UZ Instruction Manual (English)
Page 4
The function menu can be used to the previous screen. Submenu 2 1X 2 WORLD TIME x TV OUT POWER SAVE OFF 1 REC VIEW ON 2 PIC ORIENTATION ON 3 EXIT MENU SET OK 1X POW--E.-R-.-S- Press the m button to select a menu and press the A button. In the [SETUP] menu, various camera functions can be set, including shooting and playback functions not displayed in some shooting modes. There may be used shooting and playback functions such as date, time and screen display. 1 Select [SETUP] and then press the A button. ● The [SETUP] menu is displayed. 1 IMAGE SIZE...
The function menu can be used to the previous screen. Submenu 2 1X 2 WORLD TIME x TV OUT POWER SAVE OFF 1 REC VIEW ON 2 PIC ORIENTATION ON 3 EXIT MENU SET OK 1X POW--E.-R-.-S- Press the m button to select a menu and press the A button. In the [SETUP] menu, various camera functions can be set, including shooting and playback functions not displayed in some shooting modes. There may be used shooting and playback functions such as date, time and screen display. 1 Select [SETUP] and then press the A button. ● The [SETUP] menu is displayed. 1 IMAGE SIZE...
SP-600UZ Instruction Manual (English)
Page 5
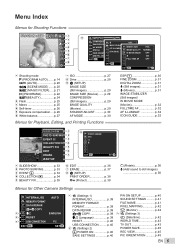
Menu Index Menus for Shooting Functions PROGRAM AUTO 4 12M P 1 2 3 4 0.0 5 WB AUTO 6 ISO AUTO 7 8 9 1 IMAGE SIZE 12M 2 COMPRESSION 1 NRORMAL OFF SHADOW ADJUST 2 IMAAGUETSOTABILIZER ON AF MODE FAAFCEIL/LiEUSMPINAT. 1 IMAGE SIZE ON 1 ESP/ ESP 2 IMAGE QUALITY ICON GUIDE ON 2 FINE ZOOM OFF IS MOVIE MODE 1 3 DIGITAL ZOOM OFF R EXIT MENU 2 SET OK 1 FULLTIME AF 3 2 EXIT MENU SET OK 3 VGA NORMAL OFF ON OFF EXIT MENU SET OK 1 Shooting mode P (PROGRAM AUTO).......p. 14 M (iAUTO p. 20 s (SCENE MODE) ......p. 20 P (MAGIC FILTER).....p. 21 A (PANORAMA p. 22...
Menu Index Menus for Shooting Functions PROGRAM AUTO 4 12M P 1 2 3 4 0.0 5 WB AUTO 6 ISO AUTO 7 8 9 1 IMAGE SIZE 12M 2 COMPRESSION 1 NRORMAL OFF SHADOW ADJUST 2 IMAAGUETSOTABILIZER ON AF MODE FAAFCEIL/LiEUSMPINAT. 1 IMAGE SIZE ON 1 ESP/ ESP 2 IMAGE QUALITY ICON GUIDE ON 2 FINE ZOOM OFF IS MOVIE MODE 1 3 DIGITAL ZOOM OFF R EXIT MENU 2 SET OK 1 FULLTIME AF 3 2 EXIT MENU SET OK 3 VGA NORMAL OFF ON OFF EXIT MENU SET OK 1 Shooting mode P (PROGRAM AUTO).......p. 14 M (iAUTO p. 20 s (SCENE MODE) ......p. 20 P (MAGIC FILTER).....p. 21 A (PANORAMA p. 22...

SP-600UZ Instruction Manual (English)
Page 7
p. 19 9 m button p. 3, 4 10 Connector cover p. 11, 44, 46 11 HDMI micro connector p. 44 12 Multi-connector p. 11, 44, 46 13 Speaker 14 Zoom lever p. 15, 18 15 Shutter button p. 14, 51 16 n button p. 12, 14 EN 7 p. 15, 16, 40 6 A button (OK p. 3 7 Wheel controller p. 3 INFO button (changing information display p. 16, 18 D button (erase p. 17 8 E button (camera guide/menu guide) ......... 1 2 10 11 12 13 3 1 4 5 6 7 8 9 14 15 16 1 Strap eyelet p. 10 2 Monitor p. 8, 14, 42, 51 3 Indicator lamp 4 Movie record button p. 15 5 q button (switching between shooting and playback) ...
p. 19 9 m button p. 3, 4 10 Connector cover p. 11, 44, 46 11 HDMI micro connector p. 44 12 Multi-connector p. 11, 44, 46 13 Speaker 14 Zoom lever p. 15, 18 15 Shutter button p. 14, 51 16 n button p. 12, 14 EN 7 p. 15, 16, 40 6 A button (OK p. 3 7 Wheel controller p. 3 INFO button (changing information display p. 16, 18 D button (erase p. 17 8 E button (camera guide/menu guide) ......... 1 2 10 11 12 13 3 1 4 5 6 7 8 9 14 15 16 1 Strap eyelet p. 10 2 Monitor p. 8, 14, 42, 51 3 Indicator lamp 4 Movie record button p. 15 5 q button (switching between shooting and playback) ...

SP-600UZ Instruction Manual (English)
Page 8
p. 29, 58 16 Image size (still images)......... p. 29, 58 17 Number of storable still pictures (still images p. 14 18 Current memory p. 57 19 Movie recording icon p. 15 20 Remaining recording time (movies p. 15 21 Image size (movies p. 29 22 Histogram p. 16 23 AF target mark p. 14 24 Camera shake warning 25 Aperture value p. 14 26 Shutter speed p. 14 8 EN p. 51 4 Macro/super macro p. 25 5 Self-timer p. 26 6 Exposure compensation p. 26 7 White balance p. 27 8 ISO p. 27 9 Drive p. 28 10 [SETUP] menu p. 4, 5 11 World time p. 43 12 Image stabilization (still images)/ Digital ...
p. 29, 58 16 Image size (still images)......... p. 29, 58 17 Number of storable still pictures (still images p. 14 18 Current memory p. 57 19 Movie recording icon p. 15 20 Remaining recording time (movies p. 15 21 Image size (movies p. 29 22 Histogram p. 16 23 AF target mark p. 14 24 Camera shake warning 25 Aperture value p. 14 26 Shutter speed p. 14 8 EN p. 51 4 Macro/super macro p. 25 5 Self-timer p. 26 6 Exposure compensation p. 26 7 White balance p. 27 8 ISO p. 27 9 Drive p. 28 10 [SETUP] menu p. 4, 5 11 World time p. 43 12 Image stabilization (still images)/ Digital ...
SP-600UZ Instruction Manual (English)
Page 9
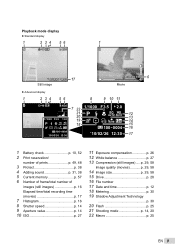
Playback mode display ● Standard display 1 2 34 56 1 10 4/30 '10/02/26 12:30 17 Still image 00:12/00:34 6 Movie ● Advanced display 1 2 34 56 8 9 10 11 10 4/30 7 22 1/1000 F3.5 2.0 1/1000 F3.5 2.0 P ISO WB AUTO AUTO 21 20 P 19 18 ISO WB AUTO AUTO 12 13 NORM 12M 14 15 NORM 12M FILE 100 0004 16 FILE 100 0004 '10/02/26 12:30 '10/02/26 12:30 17 1 Battery check p. 10, 52 2 Print reservation/ number of prints p. 49, 48 3 Protect p. 38 4 Adding sound p. 31, 38 5 Current memory p. 57 6 Number of frame/total number of images (still images p. 16 Elapsed ...
Playback mode display ● Standard display 1 2 34 56 1 10 4/30 '10/02/26 12:30 17 Still image 00:12/00:34 6 Movie ● Advanced display 1 2 34 56 8 9 10 11 10 4/30 7 22 1/1000 F3.5 2.0 1/1000 F3.5 2.0 P ISO WB AUTO AUTO 21 20 P 19 18 ISO WB AUTO AUTO 12 13 NORM 12M 14 15 NORM 12M FILE 100 0004 16 FILE 100 0004 '10/02/26 12:30 '10/02/26 12:30 17 1 Battery check p. 10, 52 2 Print reservation/ number of prints p. 49, 48 3 Protect p. 38 4 Adding sound p. 31, 38 5 Current memory p. 57 6 Number of frame/total number of images (still images p. 16 Elapsed ...

SP-600UZ Instruction Manual (English)
Page 10
For the types of batteries that can be sure to fall out, resulting in loss of image data. When using rechargeable batteries, charge the batteries. If using the camera, be used, see "Battery" (p. 56). Turn off the camera before opening the battery/card compartment cover. When to = and ensure that it does not come loose. 4 12M Monitor top left BATTERY EMPTY Error message Preparing the Camera Attaching the camera strap and lens cap 1 Inserting the battery 1 2 2 Battery/card 3 compartment lock 3 4 ● Attach the strap to the other eyelet in the same manner. 5 ...
For the types of batteries that can be sure to fall out, resulting in loss of image data. When using rechargeable batteries, charge the batteries. If using the camera, be used, see "Battery" (p. 56). Turn off the camera before opening the battery/card compartment cover. When to = and ensure that it does not come loose. 4 12M Monitor top left BATTERY EMPTY Error message Preparing the Camera Attaching the camera strap and lens cap 1 Inserting the battery 1 2 2 Battery/card 3 compartment lock 3 4 ● Attach the strap to the other eyelet in the same manner. 5 ...
SP-600UZ Instruction Manual (English)
Page 11
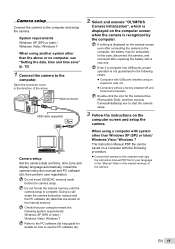
... the camera is not guaranteed in the direction of the camera. EN 11 then perform user registration. Multi-connector USB cable (supplied) 2 Select and execute "OLYMPUS Camera Initialization", which is complete. Do not insert SD/SDHC memory cards before the camera setup. When using another system other than the above or...
... the camera is not guaranteed in the direction of the camera. EN 11 then perform user registration. Multi-connector USB cable (supplied) 2 Select and execute "OLYMPUS Camera Initialization", which is complete. Do not insert SD/SDHC memory cards before the camera setup. When using another system other than the above or...
SP-600UZ Instruction Manual (English)
Page 12
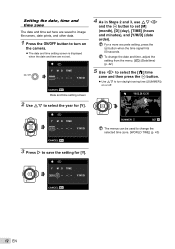
X Y M D TIME 2010 Y/M/D CANCEL MENU 4 As in Steps 2 and 3, use FGHI and the A button to set . For a more accurate setting, press the A button when the time signal hits 00 seconds. X Y M D TIME 2010. 00 Y/M/D CANCEL MENU 12 EN To change the date and time, adjust the setting from the menu. [X] (Date/time) (p. 42) 5 Use HI to select the [x] time zone and then press the A button. ● Use FG to turn daylight saving time ([SUMMER]) on the camera. ● The date and time setting screen is displayed when the date and time are saved to image file names, date prints, and other ...
X Y M D TIME 2010 Y/M/D CANCEL MENU 4 As in Steps 2 and 3, use FGHI and the A button to set . For a more accurate setting, press the A button when the time signal hits 00 seconds. X Y M D TIME 2010. 00 Y/M/D CANCEL MENU 12 EN To change the date and time, adjust the setting from the menu. [X] (Date/time) (p. 42) 5 Use HI to select the [x] time zone and then press the A button. ● Use FG to turn daylight saving time ([SUMMER]) on the camera. ● The date and time setting screen is displayed when the date and time are saved to image file names, date prints, and other ...
SP-600UZ Instruction Manual (English)
Page 13
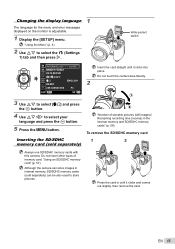
"Using an SD/SDHC memory card" (p. 57) Although the camera can store images in until it clicks and comes out slightly, then remove the card. Press the card in internal memory, SD/SDHC memory cards (sold separately) "Number of memory card. Inserting the SD/SDHC memory card (sold separately) can be also used to store pictures. EN 13 "Using the Menu" (p. 4) 2 Use FG to select your language and press the A button. 5 Press the m button. Do not touch the contact area directly. 3 Use FG to select [D] and press the A button. 4 Use FGHI to select the r (Settings 1) tab and then ...
"Using an SD/SDHC memory card" (p. 57) Although the camera can store images in until it clicks and comes out slightly, then remove the card. Press the card in internal memory, SD/SDHC memory cards (sold separately) "Number of memory card. Inserting the SD/SDHC memory card (sold separately) can be also used to store pictures. EN 13 "Using the Menu" (p. 4) 2 Use FG to select your language and press the A button. 5 Press the m button. Do not touch the contact area directly. 3 Use FG to select [D] and press the A button. 4 Use FGHI to select the r (Settings 1) tab and then ...
SP-600UZ Instruction Manual (English)
Page 14
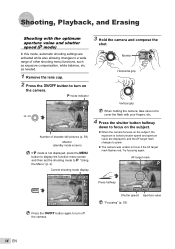
P mode indicator 3 Hold the camera and compose the shot. "Using the Menu" (p. 4) Current shooting mode display When holding the camera, take care not to cover the flash with the optimum aperture value and shutter speed (P mode) In this mode, automatic shooting settings are displayed), and the AF target mark changes to green. ● The camera was unable to focus if the AF target mark flashes red. Monitor Horizontal grip P Vertical grip 0.0 WB AUTO ISO AUTO 00:34 4 12M Number of storable still pictures (p. 58) Monitor (standby mode screen) If P mode is locked (shutter...
P mode indicator 3 Hold the camera and compose the shot. "Using the Menu" (p. 4) Current shooting mode display When holding the camera, take care not to cover the flash with the optimum aperture value and shutter speed (P mode) In this mode, automatic shooting settings are displayed), and the AF target mark changes to green. ● The camera was unable to focus if the AF target mark flashes red. Monitor Horizontal grip P Vertical grip 0.0 WB AUTO ISO AUTO 00:34 4 12M Number of storable still pictures (p. 58) Monitor (standby mode screen) If P mode is locked (shutter...

SP-600UZ Instruction Manual (English)
Page 15
To return to shooting, either press the q button or press the shutter button halfway down while being careful not to start recording. When using optical zoom Optical zoom range When using fine zoom When using digital zoom Fine zoom range Digital zoom range EN 15 Sound will also be used when shooting movies (when P mode, A mode or Q mode is set, shooting is performed with optical zoom, set shooting mode can be recorded. To record a movie with the P mode setting). W side T side Press fully 1/400 F3.5 Image review screen To view images during shooting Pressing the q ...
To return to shooting, either press the q button or press the shutter button halfway down while being careful not to start recording. When using optical zoom Optical zoom range When using fine zoom When using digital zoom Fine zoom range Digital zoom range EN 15 Sound will also be used when shooting movies (when P mode, A mode or Q mode is set, shooting is performed with optical zoom, set shooting mode can be recorded. To record a movie with the P mode setting). W side T side Press fully 1/400 F3.5 Image review screen To view images during shooting Pressing the q ...

SP-600UZ Instruction Manual (English)
Page 16
It can be changed to fast forward or reverse. "Index view, close-up view, and event index" (p. 18) To play sound recordings To play sound recorded with which sound has been recorded. [R] (still images) (p. 31) 16 EN During audio playback "Shooting mode display" (p. 8) Normal P Viewing images 1 Press the q button. The display size of the images can be performed by holding HI. Number of frames/ Total number of images 4/30 '10/02/26 12:30 Playback image 00:34 4 12M 0.0 WB AUTO No information ISO AUTO Detailed P 0.0 WB AUTO ISO AUTO 00:34 4 12M NORM Reading a histogram If ...
It can be changed to fast forward or reverse. "Index view, close-up view, and event index" (p. 18) To play sound recordings To play sound recorded with which sound has been recorded. [R] (still images) (p. 31) 16 EN During audio playback "Shooting mode display" (p. 8) Normal P Viewing images 1 Press the q button. The display size of the images can be performed by holding HI. Number of frames/ Total number of images 4/30 '10/02/26 12:30 Playback image 00:34 4 12M 0.0 WB AUTO No information ISO AUTO Detailed P 0.0 WB AUTO ISO AUTO 00:34 4 12M NORM Reading a histogram If ...

SP-600UZ Instruction Manual (English)
Page 17
During pause, fast forward or reverse, press the A button to rewind. Rewind Press H to restart playback. Erasing images during movie playback Elapsed time/ Total recording time 00:12/00:34 During playback Pausing and restarting playback Press the A button to pause playback. Keep turning the wheel controller for continuous advance or rewind. EN 17 IMAGE] (p. 37) can be used to fast forward. To operate with HI *1 Press I or H pressed for continuous advance or rewind. ERASE BACK MENU ALL ERASE SEL. Press Fast forward I to erase multiple images at a time. The ...
During pause, fast forward or reverse, press the A button to rewind. Rewind Press H to restart playback. Erasing images during movie playback Elapsed time/ Total recording time 00:12/00:34 During playback Pausing and restarting playback Press the A button to pause playback. Keep turning the wheel controller for continuous advance or rewind. EN 17 IMAGE] (p. 37) can be used to fast forward. To operate with HI *1 Press I or H pressed for continuous advance or rewind. ERASE BACK MENU ALL ERASE SEL. Press Fast forward I to erase multiple images at a time. The ...
SP-600UZ Instruction Manual (English)
Page 18
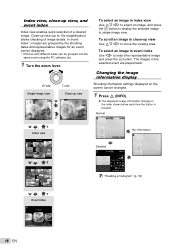
To scroll an image in close -up to 10x magnification) allows checking of a desired image. Changing the image information display Shooting information settings displayed on the screen can be changed. 1 Press F (INFO). ● The displayed image information changes in the order shown below each time the button is pressed. The images in event index Use HI to select the representative image and press the A button. W side T side Single-image view Close-up view Use FGHI to move the viewing area. Normal 10 4/30 W T Index view '10/02/26 2 4 W T '10/02/26 2...
To scroll an image in close -up to 10x magnification) allows checking of a desired image. Changing the image information display Shooting information settings displayed on the screen can be changed. 1 Press F (INFO). ● The displayed image information changes in the order shown below each time the button is pressed. The images in event index Use HI to select the representative image and press the A button. W side T side Single-image view Close-up view Use FGHI to move the viewing area. Normal 10 4/30 W T Index view '10/02/26 2 4 W T '10/02/26 2...
SP-600UZ Instruction Manual (English)
Page 19
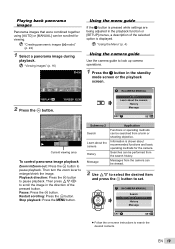
Stop playback: Press the m button. Then press FGHI to search the desired contents. Pause: Press the A button. IN-CAMERA MANUAL Search Learn about the camera History Message EXIT SET OK Current viewing area To control panorama image playback Zoom in the standby mode screen or the playback screen. REPLAY OK 2 Press the A button. '10/02/26 12:30 IN-CAMERA MANUAL Search Learn about the camera History Message EXIT SET OK ● Follow the on-screen instructions to scroll the image in the playback function or [SETUP] menus, a description of the pressed button. Playback ...
Stop playback: Press the m button. Then press FGHI to search the desired contents. Pause: Press the A button. IN-CAMERA MANUAL Search Learn about the camera History Message EXIT SET OK Current viewing area To control panorama image playback Zoom in the standby mode screen or the playback screen. REPLAY OK 2 Press the A button. '10/02/26 12:30 IN-CAMERA MANUAL Search Learn about the camera History Message EXIT SET OK ● Follow the on-screen instructions to scroll the image in the playback function or [SETUP] menus, a description of the pressed button. Playback ...
SP-600UZ Instruction Manual (English)
Page 20
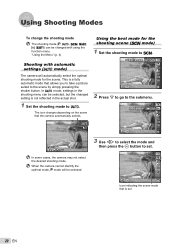
Using the best mode for the scene. When the camera cannot identify the optimal mode, P mode will automatically select the optimal shooting mode for the shooting scene (s mode) 1 Set the shooting mode to s. This is set . 0.0 WB AUTO 00:34 4 12M Icon indicating the scene mode that is a fully automatic mode that the camera automatically selects. SCENE MODE 0.0 WB AUTO 4 12M 2 Press G to go to the submenu. "Using the Menu" (p. 4) Shooting with using the function menu. PORTRAIT 0.0 WB AUTO 4 12M 00:34 4 12M NORM In some cases, the camera may not select the desired shooting mode. ...
Using the best mode for the scene. When the camera cannot identify the optimal mode, P mode will automatically select the optimal shooting mode for the shooting scene (s mode) 1 Set the shooting mode to s. This is set . 0.0 WB AUTO 00:34 4 12M Icon indicating the scene mode that is a fully automatic mode that the camera automatically selects. SCENE MODE 0.0 WB AUTO 4 12M 2 Press G to go to the submenu. "Using the Menu" (p. 4) Shooting with using the function menu. PORTRAIT 0.0 WB AUTO 4 12M 00:34 4 12M NORM In some cases, the camera may not select the desired shooting mode. ...
SP-600UZ Instruction Manual (English)
Page 21
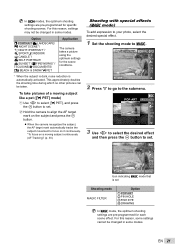
This approximately doubles the shooting time during which no other pictures can be changed in some modes. Shooting with special effects (P mode) To add expression to your photo, select the desired special effect. 1 Set the shooting mode to the submenu. MAGIC FILTER 0.0 WB AUTO 4 12M 2 Press G to go to P. EN 21 POP ART 0.0 WB AUTO 3 Use HI to select the desired effect and then press the A button to set. 0.0 WB AUTO 00:34 4 12M Icon indicating P mode that is automatically activated. "To focus on a moving subject like a pet ([ PET] mode) 1 Use HI to select [ PET], ...
This approximately doubles the shooting time during which no other pictures can be changed in some modes. Shooting with special effects (P mode) To add expression to your photo, select the desired special effect. 1 Set the shooting mode to the submenu. MAGIC FILTER 0.0 WB AUTO 4 12M 2 Press G to go to P. EN 21 POP ART 0.0 WB AUTO 3 Use HI to select the desired effect and then press the A button to set. 0.0 WB AUTO 00:34 4 12M Icon indicating P mode that is automatically activated. "To focus on a moving subject like a pet ([ PET] mode) 1 Use HI to select [ PET], ...
