FE-110 Advanced Manual (English)
Page 1
... instructions carefully to enjoy optimum performance and a longer service life. In the interest of continually improving products, Olympus reserves the right to your camera. Keep this manual. We recommend that you take test shots to get accustomed to update or modify information contained in this manual in this manual, all the functions for purchasing an Olympus digital camera.
... instructions carefully to enjoy optimum performance and a longer service life. In the interest of continually improving products, Olympus reserves the right to your camera. Keep this manual. We recommend that you take test shots to get accustomed to update or modify information contained in this manual in this manual, all the functions for purchasing an Olympus digital camera.
FE-110 Advanced Manual (English)
Page 2
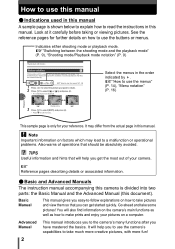
.... Note This sample page is divided into two parts: the Basic Manual and the Advanced Manual (this document). g Reference pages describing details or associated information. (Basic and Advanced Manuals The instruction manual accompanying this manual. See the reference pages for your camera. g"How to use the camera's capabilities to a malfunction or operational problems. Also warns of your...
.... Note This sample page is divided into two parts: the Basic Manual and the Advanced Manual (this document). g Reference pages describing details or associated information. (Basic and Advanced Manuals The instruction manual accompanying this manual. See the reference pages for your camera. g"How to use the camera's capabilities to a malfunction or operational problems. Also warns of your...
FE-110 Advanced Manual (English)
Page 3
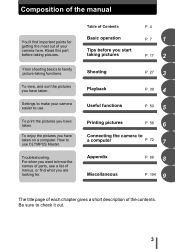
... have taken on a computer. From shooting basics to check it out. 3 To enjoy the pictures you have taken. Settings to make your camera here. Composition of the manual You'll find what you start taking pictures P. 4 P. 7 1 P. 17 2 Shooting P. 27 3 Playback P. 39 4 Useful functions... pictures P. 56 6 Connecting the camera to a computer P. 72 7 Appendix P. 88 8 Miscellaneous P. 104 9 The title page of each chapter gives a short description of the contents. To view, and sort the pictures you have taken. How to use OLYMPUS Master. Read this part before you...
... have taken on a computer. From shooting basics to check it out. 3 To enjoy the pictures you have taken. Settings to make your camera here. Composition of the manual You'll find what you start taking pictures P. 4 P. 7 1 P. 17 2 Shooting P. 27 3 Playback P. 39 4 Useful functions... pictures P. 56 6 Connecting the camera to a computer P. 72 7 Appendix P. 88 8 Miscellaneous P. 104 9 The title page of each chapter gives a short description of the contents. To view, and sort the pictures you have taken. How to use OLYMPUS Master. Read this part before you...
FE-110 Advanced Manual (English)
Page 4
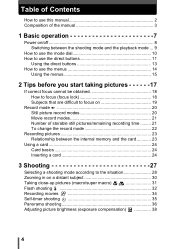
Table of Contents How to use this manual 2 Composition of the manual 3 1 Basic operation 7 Power on/off 8 Switching between the shooting mode and the playback mode ... 9 How to use the mode dial 10 How to use the ...
Table of Contents How to use this manual 2 Composition of the manual 3 1 Basic operation 7 Power on/off 8 Switching between the shooting mode and the playback mode ... 9 How to use the mode dial 10 How to use the ...
FE-110 Advanced Manual (English)
Page 9
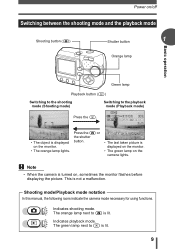
Shooting mode/Playback mode notation In this manual, the following icons indicate the camera mode necessary for using functions. The orange lamp next to k is lit. The green lamp next to l is lit. 9 Note • When the camera is displayed on the monitor. • The green lamp on , sometimes ...picture. Indicates shooting mode. Press the l or the shutter button. 05 10 27 5 • The last taken picture is turned on the camera lights. This is displayed on the monitor. • The orange lamp lights. Power on/off Switching between the shooting mode and the playback mode...
Shooting mode/Playback mode notation In this manual, the following icons indicate the camera mode necessary for using functions. The orange lamp next to k is lit. The green lamp next to l is lit. 9 Note • When the camera is displayed on the monitor. • The green lamp on , sometimes ...picture. Indicates shooting mode. Press the l or the shutter button. 05 10 27 5 • The last taken picture is turned on the camera lights. This is displayed on the monitor. • The orange lamp lights. Power on/off Switching between the shooting mode and the playback mode...

FE-110 Advanced Manual (English)
Page 16
Basic operation How to use the menus 4 Press . • The menu closes, and the camera is ready to shoot. 1 TIPS • Settings made in the menu are expressed as follows. • Ex: Steps 1 and 2 of setting the [SLEEP] function [SLEEP] i 16 Menu notation In this manual, procedures for using the menus are saved even if the camera is turned off. • Menu items common to both shooting mode and playback mode apply to the same setting, and the setting can be made from either mode.
Basic operation How to use the menus 4 Press . • The menu closes, and the camera is ready to shoot. 1 TIPS • Settings made in the menu are expressed as follows. • Ex: Steps 1 and 2 of setting the [SLEEP] function [SLEEP] i 16 Menu notation In this manual, procedures for using the menus are saved even if the camera is turned off. • Menu items common to both shooting mode and playback mode apply to the same setting, and the setting can be made from either mode.

FE-110 Advanced Manual (English)
Page 23
... When the card is inserted, the internal memory is being used for recording pictures you have taken. 2 Pictures recorded and stored in this manual) to store more pictures. You can also use the internal memory, remove the card. • You can easily be replaced or removed from the...or card) is disabled. Tips before you start taking pictures Recording pictures Pictures taken are traveling and you want to take a lot of a normal camera for shooting and displaying images. The card has greater capacity than the internal memory, and so, is convenient, for example, when you are stored...
... When the card is inserted, the internal memory is being used for recording pictures you have taken. 2 Pictures recorded and stored in this manual) to store more pictures. You can also use the internal memory, remove the card. • You can easily be replaced or removed from the...or card) is disabled. Tips before you start taking pictures Recording pictures Pictures taken are traveling and you want to take a lot of a normal camera for shooting and displaying images. The card has greater capacity than the internal memory, and so, is convenient, for example, when you are stored...

FE-110 Advanced Manual (English)
Page 38
... press i. • Plus [+] increases brightness and minus [-] decreases brightness. Note • If the flash is compensated (adjusted) manually. Shooting 3 Take the picture. Adjust toward - Adjusting picture brightness (exposure compensation) This function allows you may get better results when the exposure... that the camera sets is used, the image brightness (exposure) may differ from the intended brightness. • Exposure compensation cannot correct the...
... press i. • Plus [+] increases brightness and minus [-] decreases brightness. Note • If the flash is compensated (adjusted) manually. Shooting 3 Take the picture. Adjust toward - Adjusting picture brightness (exposure compensation) This function allows you may get better results when the exposure... that the camera sets is used, the image brightness (exposure) may differ from the intended brightness. • Exposure compensation cannot correct the...
FE-110 Advanced Manual (English)
Page 44
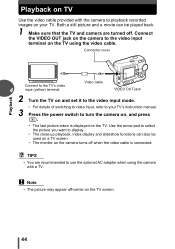
... arrow pad to select the picture you want to use the optional AC adapter when using the video cable. Connector cover Connect to turn the camera on, and press k. • The last picture taken is connected. Note • The picture may appear off . TIPS • You are turned off -... the video cable is displayed on the TV. Connect the VIDEO OUT jack on the camera to the video input terminal on the TV using the camera with the camera to playback recorded images on your TV's instruction manual. 3 Press the power switch to the TV's video 4 input (yellow) terminal. Playback Playback on...
... arrow pad to select the picture you want to use the optional AC adapter when using the video cable. Connector cover Connect to turn the camera on, and press k. • The last picture taken is connected. Note • The picture may appear off . TIPS • You are turned off -... the video cable is displayed on the TV. Connect the VIDEO OUT jack on the camera to the video input terminal on the TV using the camera with the camera to playback recorded images on your TV's instruction manual. 3 Press the power switch to the TV's video 4 input (yellow) terminal. Playback Playback on...
FE-110 Advanced Manual (English)
Page 57
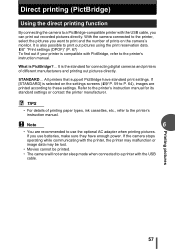
... "Print settings (DPOF)" (P. 67) To find out if your printer is PictBridge?... STANDARD... Refer to the printer's instruction manual for connecting digital cameras and printers of prints on the settings screens (gP. 59 to P. 64), images are recommended to a printer with PictBridge,... they have standard print settings. If the camera stops operating while communicating with the USB cable, you want to the printer's instruction manual. Printing pictures 57 Direct printing (PictBridge) Using the direct printing function By connecting the camera to these settings. It is selected on the...
... "Print settings (DPOF)" (P. 67) To find out if your printer is PictBridge?... STANDARD... Refer to the printer's instruction manual for connecting digital cameras and printers of prints on the settings screens (gP. 59 to P. 64), images are recommended to a printer with PictBridge,... they have standard print settings. If the camera stops operating while communicating with the USB cable, you want to the printer's instruction manual. Printing pictures 57 Direct printing (PictBridge) Using the direct printing function By connecting the camera to these settings. It is selected on the...
FE-110 Advanced Manual (English)
Page 58
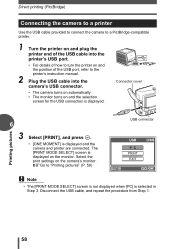
... [PRINT], and press i. • [ONE MOMENT] is displayed on the monitor. gGo to the printer's instruction manual. 2 Plug the USB cable into the camera's USB connector. • The camera turns on automatically. • The monitor turns on and the selection screen for the USB connection is displayed. The...connected. Disconnect the USB cable, and repeat the procedure from Step 1. Direct printing (PictBridge) Connecting the camera to a printer Use the USB cable provided to connect the camera to a PictBridge-compatible printer. 1 Turn the printer on and plug the printer end of the USB ...
... [PRINT], and press i. • [ONE MOMENT] is displayed on the monitor. gGo to the printer's instruction manual. 2 Plug the USB cable into the camera's USB connector. • The camera turns on automatically. • The monitor turns on and the selection screen for the USB connection is displayed. The...connected. Disconnect the USB cable, and repeat the procedure from Step 1. Direct printing (PictBridge) Connecting the camera to a printer Use the USB cable provided to connect the camera to a PictBridge-compatible printer. 1 Turn the printer on and plug the printer end of the USB ...
FE-110 Advanced Manual (English)
Page 59
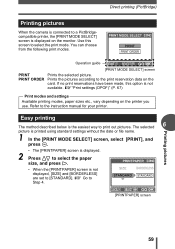
... paper size, and press ]. • When the [PRINTPAPER] screen is not displayed, [SIZE] and [BORDERLESS] are set to the instruction manual for your printer. Direct printing (PictBridge) Printing pictures When the camera is connected to select the print mode. Use this option is displayed on the monitor. PRINT ORDER Prints the pictures...
... paper size, and press ]. • When the [PRINTPAPER] screen is not displayed, [SIZE] and [BORDERLESS] are set to the instruction manual for your printer. Direct printing (PictBridge) Printing pictures When the camera is connected to select the print mode. Use this option is displayed on the monitor. PRINT ORDER Prints the pictures...
FE-110 Advanced Manual (English)
Page 66
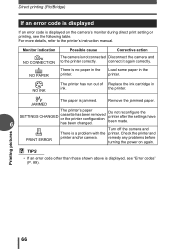
... displayed, see the following table. Monitor indication NO CONNECTION NO PAPER Possible cause Corrective action The camera is not connected Disconnect the camera and to the printer's instruction manual. remedy any problems before turning the power on the camera's monitor during direct print setting or printing, see "Error codes" (P. 89). Direct printing (PictBridge) If...
... displayed, see the following table. Monitor indication NO CONNECTION NO PAPER Possible cause Corrective action The camera is not connected Disconnect the camera and to the printer's instruction manual. remedy any problems before turning the power on the camera's monitor during direct print setting or printing, see "Error codes" (P. 89). Direct printing (PictBridge) If...
FE-110 Advanced Manual (English)
Page 67
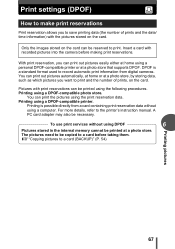
... Print reservation allows you want to print and the number of prints and the date/ time information) with recorded pictures into the camera before taking them. You can print out pictures automatically, at home or at a photo store that supports DPOF. You can be...)" (P. 54) Printing pictures 67 g"Copying pictures to the printer's instruction manual. Insert a card with the pictures stored on the card can print out pictures easily either at a photo store. DPOF is possible directly from digital cameras. Printing is a standard format used to print. Only the images stored on...
... Print reservation allows you want to print and the number of prints and the date/ time information) with recorded pictures into the camera before taking them. You can print out pictures automatically, at home or at a photo store that supports DPOF. You can be...)" (P. 54) Printing pictures 67 g"Copying pictures to the printer's instruction manual. Insert a card with the pictures stored on the card can print out pictures easily either at a photo store. DPOF is possible directly from digital cameras. Printing is a standard format used to print. Only the images stored on...
FE-110 Advanced Manual (English)
Page 73
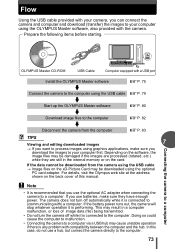
... make sure you download the images to your computer first. Connecting the camera to a computer OLYMPUS Master CD-ROM USB Cable Computer equipped with a USB port Install the OLYMPUS Master software gP. 75 Connect the camera to the computer using the USB cable gP. 79 Start up the...Using the USB cable provided with your camera, you can connect the camera and computer and download (transfer) the images to your computer using graphics applications, make sure they are processed (rotated, etc.) while they have enough power. In this manual. Prepare the following items before starting. ...
... make sure you download the images to your computer first. Connecting the camera to a computer OLYMPUS Master CD-ROM USB Cable Computer equipped with a USB port Install the OLYMPUS Master software gP. 75 Connect the camera to the computer using the USB cable gP. 79 Start up the...Using the USB cable provided with your camera, you can connect the camera and computer and download (transfer) the images to your computer using graphics applications, make sure they are processed (rotated, etc.) while they have enough power. In this manual. Prepare the following items before starting. ...
FE-110 Advanced Manual (English)
Page 74
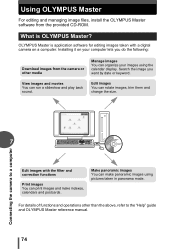
...ROM. Make panoramic images You can print images and make panoramic images using the calendar display. Connecting the camera to the "Help" guide and OLYMPUS Master reference manual. 74 View images and movies You can rotate images, trim them and change the size. What is ...Print images You can make indexes, calendars and postcards. Using OLYMPUS Master For editing and managing image files, install the OLYMPUS Master software from the camera or other than the above, refer to a computer 7 Edit images with a digital camera on your images using pictures taken in panorama mode.
...ROM. Make panoramic images You can print images and make panoramic images using the calendar display. Connecting the camera to the "Help" guide and OLYMPUS Master reference manual. 74 View images and movies You can rotate images, trim them and change the size. What is ...Print images You can make indexes, calendars and postcards. Using OLYMPUS Master For editing and managing image files, install the OLYMPUS Master software from the camera or other than the above, refer to a computer 7 Edit images with a digital camera on your images using pictures taken in panorama mode.
FE-110 Advanced Manual (English)
Page 75
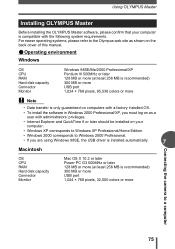
For newer operating systems, please refer to the Olympus web site as shown on the back cover of this manual. (Operating environment Windows OS CPU RAM Hard disk capacity Connector Monitor Windows ...in Windows 2000 Professional/XP, you must log on as a user with the following system requirements. Using OLYMPUS Master Installing OLYMPUS Master Before installing the OLYMPUS Master software, please confirm that your computer. • Windows XP corresponds to Windows XP Professional/Home Edition... port 1,024 × 768 pixels, 32,000 colors or more Connecting the camera to a computer 75
For newer operating systems, please refer to the Olympus web site as shown on the back cover of this manual. (Operating environment Windows OS CPU RAM Hard disk capacity Connector Monitor Windows ...in Windows 2000 Professional/XP, you must log on as a user with the following system requirements. Using OLYMPUS Master Installing OLYMPUS Master Before installing the OLYMPUS Master software, please confirm that your computer. • Windows XP corresponds to Windows XP Professional/Home Edition... port 1,024 × 768 pixels, 32,000 colors or more Connecting the camera to a computer 75
FE-110 Advanced Manual (English)
Page 77
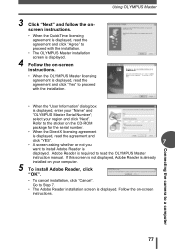
...agreement is displayed, read the OLYMPUS Master instruction manual. If this screen is not displayed, Adobe Reader is already installed on your "Name" and "OLYMPUS Master Serial Number"; Go ...proceed with the installation. • The OLYMPUS Master installation screen is displayed. 4 Follow the on-screen instructions. • When the OLYMPUS Master licensing agreement is displayed, read the...you 7 want to Step 7. • The Adobe Reader installation screen is displayed. Using OLYMPUS Master • When the "User Information" dialog box is required to proceed with the ...
...agreement is displayed, read the OLYMPUS Master instruction manual. If this screen is not displayed, Adobe Reader is already installed on your "Name" and "OLYMPUS Master Serial Number"; Go ...proceed with the installation. • The OLYMPUS Master installation screen is displayed. 4 Follow the on-screen instructions. • When the OLYMPUS Master licensing agreement is displayed, read the...you 7 want to Step 7. • The Adobe Reader installation screen is displayed. Using OLYMPUS Master • When the "User Information" dialog box is required to proceed with the ...
FE-110 Advanced Manual (English)
Page 79
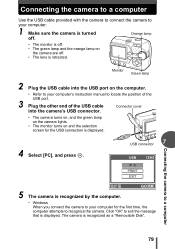
Click "OK" to exit the message that is recognized as a "Removable Disk". 79 USB connector 7 Connecting the camera to a computer 5 The camera is recognized by the computer. • Windows When you connect the camera to your computer's instruction manual to locate the position of the USB port. 3 Plug the other end of the USB cable...
Click "OK" to exit the message that is recognized as a "Removable Disk". 79 USB connector 7 Connecting the camera to a computer 5 The camera is recognized by the computer. • Windows When you connect the camera to your computer's instruction manual to locate the position of the USB port. 3 Plug the other end of the USB cable...
FE-110 Advanced Manual (English)
Page 88
8 Appendix 8 Appendix This chapter contains useful information from OLYMPUS. Refer to this section for basic troubleshooting, camera care and a full glossary to do when you will find what to understanding the terms used in this manual. Here you are stuck or don't understand the meaning of the terms used in this manual. ? ? 88
8 Appendix 8 Appendix This chapter contains useful information from OLYMPUS. Refer to this section for basic troubleshooting, camera care and a full glossary to do when you will find what to understanding the terms used in this manual. Here you are stuck or don't understand the meaning of the terms used in this manual. ? ? 88


