FE-170 Advanced Manual (English)
Page 3
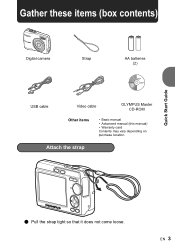
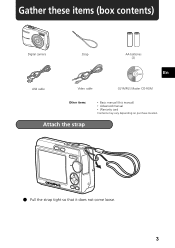
EN 3 Attach the strap Quick Start Guide ( Pull the strap tight so that it does not come loose. Gather these items (box contents) Digital camera Strap AA batteries (2) USB cable Video cable OLYMPUS Master CD-ROM Other items • Basic manual • Advanced manual (this manual) • Warranty card Contents may vary depending on purchase location.
EN 3 Attach the strap Quick Start Guide ( Pull the strap tight so that it does not come loose. Gather these items (box contents) Digital camera Strap AA batteries (2) USB cable Video cable OLYMPUS Master CD-ROM Other items • Basic manual • Advanced manual (this manual) • Warranty card Contents may vary depending on purchase location.
FE-170 Advanced Manual (English)
Page 29
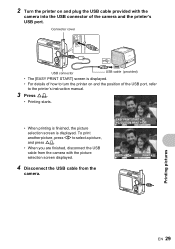
2 Turn the printer on and the position of the camera and the printer's USB port. Connector cover USB connector USB cable (provided) • The [EASY PRINT START] screen is displayed. • For details of how to turn the printer on and plug the USB cable provided with the camera into the USB connector of the USB port, refer to the printer's instruction manual. 3 Press O
2 Turn the printer on and the position of the camera and the printer's USB port. Connector cover USB connector USB cable (provided) • The [EASY PRINT START] screen is displayed. • For details of how to turn the printer on and plug the USB cable provided with the camera into the USB connector of the USB port, refer to the printer's instruction manual. 3 Press O

FE-170 Advanced Manual (English)
Page 30
... OK 3 Make the print settings according to procedure 1 and 2 on the right according to the operation guide. With the camera turned off or in shooting mode, connect the USB cable. g"EASY PRINT." (P.29), "CUSTOM PRINT" step 2. (P.30) Other print modes and print settings (CUSTOM PRINT) 1 Display... indicated on P.28, and press i. 2 Select [CUSTOM PRINT], and press i. Printing pictures 30 EN The selection screen for the USB connection is turned off or in shooting mode. You can use [EASY PRINT] even when the camera is displayed. 5 Disconnect the USB cable from the printer.
... OK 3 Make the print settings according to procedure 1 and 2 on the right according to the operation guide. With the camera turned off or in shooting mode, connect the USB cable. g"EASY PRINT." (P.29), "CUSTOM PRINT" step 2. (P.30) Other print modes and print settings (CUSTOM PRINT) 1 Display... indicated on P.28, and press i. 2 Select [CUSTOM PRINT], and press i. Printing pictures 30 EN The selection screen for the USB connection is turned off or in shooting mode. You can use [EASY PRINT] even when the camera is displayed. 5 Disconnect the USB cable from the printer.
FE-170 Advanced Manual (English)
Page 33
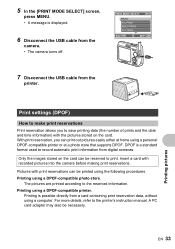
...using a DPOF-compatible printer. PRINT MODE SELECT PRINT ALL PRINT MULTI PRINT ALL INDEX EXIT MENU SET OK 7 Disconnect the USB cable from the camera. • The camera turns off. Insert a card with the pictures stored on the card can print out pictures easily either at home using a... personal DPOF-compatible printer or at a photo store that supports DPOF. DPOF is possible directly from digital cameras. Printing using the following procedures. Printing pictures EN 33 Print settings (DPOF) How to make print reservations Print reservation allows you can...
...using a DPOF-compatible printer. PRINT MODE SELECT PRINT ALL PRINT MULTI PRINT ALL INDEX EXIT MENU SET OK 7 Disconnect the USB cable from the camera. • The camera turns off. Insert a card with the pictures stored on the card can print out pictures easily either at home using a... personal DPOF-compatible printer or at a photo store that supports DPOF. DPOF is possible directly from digital cameras. Printing using the following procedures. Printing pictures EN 33 Print settings (DPOF) How to make print reservations Print reservation allows you can...
FE-170 Advanced Manual (English)
Page 37
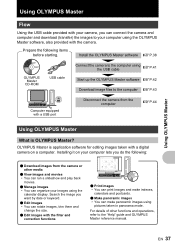
Prepare the following : ( Download images from the computer gP.44 Using OLYMPUS Master What is application software for editing images taken with a digital camera on your computer lets you do the following items before starting. Installing it on a computer. For details... display. Using OLYMPUS Master Using OLYMPUS Master Flow Using the USB cable provided with your camera, you can connect the camera and computer and download (transfer) the images to your images using the OLYMPUS Master software, also provided with the camera. EN 37 OLYMPUS Master is OLYMPUS Master? Search ...
Prepare the following : ( Download images from the computer gP.44 Using OLYMPUS Master What is application software for editing images taken with a digital camera on your computer lets you do the following items before starting. Installing it on a computer. For details... display. Using OLYMPUS Master Using OLYMPUS Master Flow Using the USB cable provided with your camera, you can connect the camera and computer and download (transfer) the images to your images using the OLYMPUS Master software, also provided with the camera. EN 37 OLYMPUS Master is OLYMPUS Master? Search ...

FE-170 Advanced Manual (English)
Page 39
...supported. • Operation is only guaranteed on the computer. Failure to do so could result in USB port. • QuickTime 6 or later and Safari 1.0 or later must be installed. • Be sure to use OLYMPUS Master. In this case, go to step 4. 3 Click "Next" and follow the on-...operation and the need to reboot. • Disconnect the cable connecting the camera to the computer • Turn off the camera • Open the camera's battery compartment/card cover Windows 1 Insert the CD-ROM into the CD-ROM drive. • The OLYMPUS Master setup screen is displayed. • If the screen...
...supported. • Operation is only guaranteed on the computer. Failure to do so could result in USB port. • QuickTime 6 or later and Safari 1.0 or later must be installed. • Be sure to use OLYMPUS Master. In this case, go to step 4. 3 Click "Next" and follow the on-...operation and the need to reboot. • Disconnect the cable connecting the camera to the computer • Turn off the camera • Open the camera's battery compartment/card cover Windows 1 Insert the CD-ROM into the CD-ROM drive. • The OLYMPUS Master setup screen is displayed. • If the screen...
FE-170 Advanced Manual (English)
Page 41
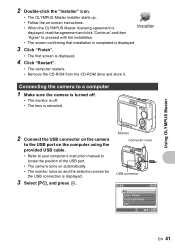
...OLYMPUS Master 2 Connect the USB connector on the camera to the USB port on the computer using the provided USB cable. • Refer to your computer's instruction manual to locate the position of the USB port. • The camera turns on automatically. • The monitor turns on -screen instructions. • When the OLYMPUS...screen is displayed. 3 Select [PC], and press i. Monitor Connector cover USB connector USB PC EASY PRINT CUSTOM PRINT EXIT SET OK EN 41 2 Double-click the "Installer" icon. • The OLYMPUS Master installer starts up. • Follow the on and the selection screen...
...OLYMPUS Master 2 Connect the USB connector on the camera to the USB port on the computer using the provided USB cable. • Refer to your computer's instruction manual to locate the position of the USB port. • The camera turns on automatically. • The monitor turns on -screen instructions. • When the OLYMPUS...screen is displayed. 3 Select [PC], and press i. Monitor Connector cover USB connector USB PC EASY PRINT CUSTOM PRINT EXIT SET OK EN 41 2 Double-click the "Installer" icon. • The OLYMPUS Master installer starts up. • Follow the on and the selection screen...

FE-170 Advanced Manual (English)
Page 44
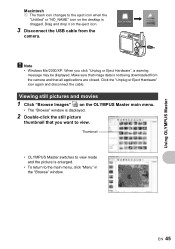
To disconnect the camera 1 Make sure that the hardware can be ejected safely, click "OK". 44 EN Card access lamp 2 Make the following preparations for disconnecting the USB cable. Using OLYMPUS Master Windows Me/2000/XP 1 Click the "Unplug or Eject Hardware" icon in the "Browse" window. Windows 98SE 1 Double-click the "My Computer" icon...
To disconnect the camera 1 Make sure that the hardware can be ejected safely, click "OK". 44 EN Card access lamp 2 Make the following preparations for disconnecting the USB cable. Using OLYMPUS Master Windows Me/2000/XP 1 Click the "Unplug or Eject Hardware" icon in the "Browse" window. Windows 98SE 1 Double-click the "My Computer" icon...
FE-170 Advanced Manual (English)
Page 45
... • OLYMPUS Master switches to the main menu, click "Menu" in the "Browse" window. Viewing still pictures and movies 1 Click "Browse Images" on the desktop is enlarged. • To return to view mode and the picture is dragged. Drag and drop it on the eject icon. 3 Disconnect the USB cable from the camera and... that image data is not being downloaded from the camera.
... • OLYMPUS Master switches to the main menu, click "Menu" in the "Browse" window. Viewing still pictures and movies 1 Click "Browse Images" on the desktop is enlarged. • To return to view mode and the picture is dragged. Drag and drop it on the eject icon. 3 Disconnect the USB cable from the camera and... that image data is not being downloaded from the camera.

FE-170 Advanced Manual (English)
Page 48
...from the following folders on the provided OLYMPUS Master CD-ROM. (Drive name): \USB\INSTALL.EXE • Data transfer is not guaranteed in the following environments, even if your computer is required to use the USB cable to connect the camera to your computer. The following environment ...using the USB cable provided with USB mass storage. You can connect the camera to your computer is compatible with the camera to download and save images to a computer without using OLYMPUS Master This camera is running Windows 98SE, you will need to install the USB driver. Using OLYMPUS Master ...
...from the following folders on the provided OLYMPUS Master CD-ROM. (Drive name): \USB\INSTALL.EXE • Data transfer is not guaranteed in the following environments, even if your computer is required to use the USB cable to connect the camera to your computer. The following environment ...using the USB cable provided with USB mass storage. You can connect the camera to your computer is compatible with the camera to download and save images to a computer without using OLYMPUS Master This camera is running Windows 98SE, you will need to install the USB driver. Using OLYMPUS Master ...
FE-170 Advanced Manual (English)
Page 49
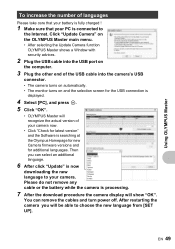
... Then you will show "OK". Click "Update Camera" on the OLYMPUS Master main menu. • After selecting the Update Camera function OLYMPUS Master shows a Window with security advices. 2 Plug the USB cable into the USB port on the computer. 3 Plug the other end of the USB cable into the camera's USB connector. • The camera turns on automatically. • The monitor turns...
... Then you will show "OK". Click "Update Camera" on the OLYMPUS Master main menu. • After selecting the Update Camera function OLYMPUS Master shows a Window with security advices. 2 Plug the USB cable into the USB port on the computer. 3 Plug the other end of the USB cable into the camera's USB connector. • The camera turns on automatically. • The monitor turns...
FE-170 Advanced Manual (English)
Page 67
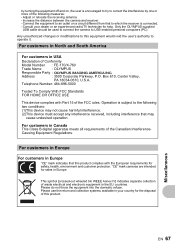
Consult your country for sales in Canada This Class B digital apparatus meets all requirements of the Canadian Interference- Box 610, Center Valley, PA 18034-0610, U.S.A. For customers in Europe. "CE" mark cameras are intended for the disposal of the following two conditions:... for help. Only the OLYMPUS-supplied USB cable should be used to connect the camera to which the receiver is connected. - Any unauthorized changes or modifications to this product complies with Part 15 of Conformity Model Number : FE-170/X-760 Trade Name : OLYMPUS Responsible Party : Address :...
Consult your country for sales in Canada This Class B digital apparatus meets all requirements of the Canadian Interference- Box 610, Center Valley, PA 18034-0610, U.S.A. For customers in Europe. "CE" mark cameras are intended for the disposal of the following two conditions:... for help. Only the OLYMPUS-supplied USB cable should be used to connect the camera to which the receiver is connected. - Any unauthorized changes or modifications to this product complies with Part 15 of Conformity Model Number : FE-170/X-760 Trade Name : OLYMPUS Responsible Party : Address :...

FE-170 Advanced Manual (English)
Page 75
U USB cable 29, 37, 41 USB connector 29, 41 USB driver 38, 48 V Video cable 27 VIDEO OUT 26 VIDEO OUT jack 27 X xD-Picture Card 19, 60 Z Zoom button 13 EN 75
U USB cable 29, 37, 41 USB connector 29, 41 USB driver 38, 48 V Video cable 27 VIDEO OUT 26 VIDEO OUT jack 27 X xD-Picture Card 19, 60 Z Zoom button 13 EN 75
FE-170 Basic Manual (English, Français, Español, Português)
Page 3
Gather these items (box contents) Digital camera Strap AA batteries (2) En USB cable Video cable OLYMPUS Master CD-ROM Other items Attach the strap • Basic manual (this manual) • Advanced manual • Warranty card Contents may vary depending on purchase location. ( Pull the strap tight so that it does not come loose. 3
Gather these items (box contents) Digital camera Strap AA batteries (2) En USB cable Video cable OLYMPUS Master CD-ROM Other items Attach the strap • Basic manual (this manual) • Advanced manual • Warranty card Contents may vary depending on purchase location. ( Pull the strap tight so that it does not come loose. 3

FE-170 Basic Manual (English, Français, Español, Português)
Page 17
You can print a picture with simple operations. 1 In playback mode, display the picture you may connect your camera directly to a PictBridge compatible printer such as the Olympus P-11 to print out on the monitor. 2 Connect one end of the provided USB cable into the camera's USB connector and the other end into the printer's USB connector. Direct Printing (PictBridge) Using the provided USB cable, you want to make prints. Connector Cover USB Connector En USB Cable < Button 3 Press
You can print a picture with simple operations. 1 In playback mode, display the picture you may connect your camera directly to a PictBridge compatible printer such as the Olympus P-11 to print out on the monitor. 2 Connect one end of the provided USB cable into the camera's USB connector and the other end into the printer's USB connector. Direct Printing (PictBridge) Using the provided USB cable, you want to make prints. Connector Cover USB Connector En USB Cable < Button 3 Press

FE-170 Basic Manual (English, Français, Español, Português)
Page 18
Transfer Images Install the software 1 Insert the OLYMPUS Master CD-ROM. 2 Windows: Click the "OLYMPUS Master" button. The monitor will now recognize your camera as a removable storage drive. Your PC will turn on -screen instructions. Macintosh: Double-click the "Installer" icon. 3 Simply follow the on automatically. USB Cable 2 1 2 Select [PC] on the monitor, and press i. USB PC EASY PRINT CUSTOM PRINT EXIT SET OK 18 En Connect the camera to the computer 1 Connect the camera and computer using the USB cable (included).
Transfer Images Install the software 1 Insert the OLYMPUS Master CD-ROM. 2 Windows: Click the "OLYMPUS Master" button. The monitor will now recognize your camera as a removable storage drive. Your PC will turn on -screen instructions. Macintosh: Double-click the "Installer" icon. 3 Simply follow the on automatically. USB Cable 2 1 2 Select [PC] on the monitor, and press i. USB PC EASY PRINT CUSTOM PRINT EXIT SET OK 18 En Connect the camera to the computer 1 Connect the camera and computer using the USB cable (included).
FE-170 Quick Start Guide (English, Português)
Page 1
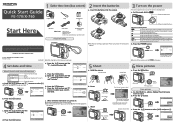
... batteries (2) This section explains how to turn off the camera, press the o button again. a. The first two digits of the year are locked. Press the O< button and the NY button to select [D]. Y# button c. Focus Shutter button ... Basic & Advanced Manuals or visit: www.olympusamerica.com/support USB cable Other items Video cable OLYMPUS Master CD-ROM • Basic manual • Advanced manual • Warranty card Contents may vary depending on the power Quick Start Guide FE-170/X-760 Digital camera Strap a. b. After all items have not been set ,...
... batteries (2) This section explains how to turn off the camera, press the o button again. a. The first two digits of the year are locked. Press the O< button and the NY button to select [D]. Y# button c. Focus Shutter button ... Basic & Advanced Manuals or visit: www.olympusamerica.com/support USB cable Other items Video cable OLYMPUS Master CD-ROM • Basic manual • Advanced manual • Warranty card Contents may vary depending on the power Quick Start Guide FE-170/X-760 Digital camera Strap a. b. After all items have not been set ,...


