
FE-120 Advanced Manual (English)
Page 78
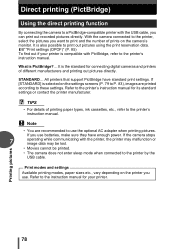
... data may be lost. • Movies cannot be printed. • The camera does not enter sleep mode when connected to the printer by the USB cable. Refer to the printer's instruction manual for your printer is the standard for connecting digital cameras and printers of different manufacturers and printing out pictures directly. What is...
... data may be lost. • Movies cannot be printed. • The camera does not enter sleep mode when connected to the printer by the USB cable. Refer to the printer's instruction manual for your printer is the standard for connecting digital cameras and printers of different manufacturers and printing out pictures directly. What is...
FE-120 Advanced Manual (English)
Page 79
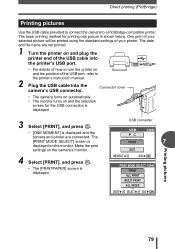
...ALL PRINT MULTI PRINT ALL INDEX EXIT SELECT GO OK Printing pictures 79 The basic printing method for the USB connection is displayed. 3 Select [PRINT], and press Z. • [ONE MOMENT] is displayed and the camera and printer are not printed. 1 Turn the printer on and plug the printer end of the... USB cable into the printer's USB port. • For details of how to turn the printer on and the selection screen for...
...ALL PRINT MULTI PRINT ALL INDEX EXIT SELECT GO OK Printing pictures 79 The basic printing method for the USB connection is displayed. 3 Select [PRINT], and press Z. • [ONE MOMENT] is displayed and the camera and printer are not printed. 1 Turn the printer on and plug the printer end of the... USB cable into the printer's USB port. • For details of how to turn the printer on and the selection screen for...

FE-120 Advanced Manual (English)
Page 81
Direct printing (PictBridge) PRINT MODE SELECT PRINT ALL PRINT MULTI PRINT ALL INDEX EXIT SELECT GO OK 10Remove the USB cable from the camera. • The camera turns off. 8 In the [PRINT MODE SELECT] screen, press b. • A message is not displayed in Step 4. Disconnect the USB cable, and repeat the procedure from Step 1. 7 Printing pictures 81 Note • When the [USB] mode is set to [PC], the [PRINT MODE SELECT] screen is displayed. 9 Remove the USB cable from the printer.
Direct printing (PictBridge) PRINT MODE SELECT PRINT ALL PRINT MULTI PRINT ALL INDEX EXIT SELECT GO OK 10Remove the USB cable from the camera. • The camera turns off. 8 In the [PRINT MODE SELECT] screen, press b. • A message is not displayed in Step 4. Disconnect the USB cable, and repeat the procedure from Step 1. 7 Printing pictures 81 Note • When the [USB] mode is set to [PC], the [PRINT MODE SELECT] screen is displayed. 9 Remove the USB cable from the printer.
FE-120 Advanced Manual (English)
Page 92
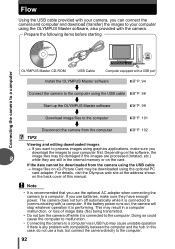
... so could cause the computer to malfunction. • Connecting the camera to a computer OLYMPUS Master CD-ROM USB Cable Computer equipped with compatibility between the computer and the hub. Connecting the camera to a computer via a USB hub may cause unstable operation if there is performing. If the battery... • Do not turn off while it is any problem with a USB port Install the OLYMPUS Master software gP. 94 Connect the camera to the computer using the USB cable gP. 98 Start up the OLYMPUS Master software gP. 99 Download image files to the computer gP. 101 ...
... so could cause the computer to malfunction. • Connecting the camera to a computer OLYMPUS Master CD-ROM USB Cable Computer equipped with compatibility between the computer and the hub. Connecting the camera to a computer via a USB hub may cause unstable operation if there is performing. If the battery... • Do not turn off while it is any problem with a USB port Install the OLYMPUS Master software gP. 94 Connect the camera to the computer using the USB cable gP. 98 Start up the OLYMPUS Master software gP. 99 Download image files to the computer gP. 101 ...
FE-120 Advanced Manual (English)
Page 94
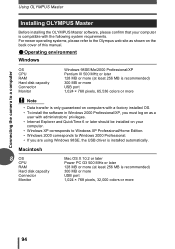
Connecting the camera to Windows 2000 Professional. • If you must log on as shown...later Power PC G3 500 MHz or later 128 MB or more 94 For newer operating systems, please refer to the Olympus web site as a user with administrators' privileges. • Internet Explorer and QuickTime 6 or later should be installed ... Edition. • Windows 2000 corresponds to a computer Using OLYMPUS Master Installing OLYMPUS Master Before installing the OLYMPUS Master software, please confirm that your computer is recommended) 300 MB or more USB port 1,024 × 768 pixels, 32,000 colors or...
Connecting the camera to Windows 2000 Professional. • If you must log on as shown...later Power PC G3 500 MHz or later 128 MB or more 94 For newer operating systems, please refer to the Olympus web site as a user with administrators' privileges. • Internet Explorer and QuickTime 6 or later should be installed ... Edition. • Windows 2000 corresponds to a computer Using OLYMPUS Master Installing OLYMPUS Master Before installing the OLYMPUS Master software, please confirm that your computer is recommended) 300 MB or more USB port 1,024 × 768 pixels, 32,000 colors or...

FE-120 Advanced Manual (English)
Page 95
... • Disconnect the cable connecting the camera to the computer • Turn off the camera • Open the camera's card cover • Open the camera's battery compartment cover Windows 1 Insert the CD-ROM into the CD-ROM drive. • The OLYMPUS Master setup screen is displayed. •... the following operations. Failure to do so could result in USB port. • QuickTime 6 or later and Safari 1.0 or later must be installed. • Be sure to use OLYMPUS Master. Connecting the camera to a computer Using OLYMPUS Master Note • Operation is only guaranteed on the computer...
... • Disconnect the cable connecting the camera to the computer • Turn off the camera • Open the camera's card cover • Open the camera's battery compartment cover Windows 1 Insert the CD-ROM into the CD-ROM drive. • The OLYMPUS Master setup screen is displayed. •... the following operations. Failure to do so could result in USB port. • QuickTime 6 or later and Safari 1.0 or later must be installed. • Be sure to use OLYMPUS Master. Connecting the camera to a computer Using OLYMPUS Master Note • Operation is only guaranteed on the computer...

FE-120 Advanced Manual (English)
Page 98
... automatically, so close this application and start OLYMPUS Master. When you connect the camera to your digital camera for the first time, the computer attempts to recognize the camera. Connecting the camera to a computer Use the USB cable provided with the camera to connect the camera to your computer. 1 Make sure the camera is turned off. • The monitor is...
... automatically, so close this application and start OLYMPUS Master. When you connect the camera to your digital camera for the first time, the computer attempts to recognize the camera. Connecting the camera to a computer Use the USB cable provided with the camera to connect the camera to your computer. 1 Make sure the camera is turned off. • The monitor is...

FE-120 Advanced Manual (English)
Page 102
... Disk" icon to the eject icon when the "Untitled" or "NO_NAME" icon on the desktop is off. 2 Make the following preparations for disconnecting the USB cable. Windows Me/2000/XP 1 Click the "Unplug or Eject Hardware" icon in the system tray. 2 Click the message that is displayed. 3 When... a message is displayed saying 8 that the hardware can disconnect the camera after downloading the images to your computer. 1 Make sure that the card access lamp is dragged. Macintosh 1 The trash icon changes to display the ...
... Disk" icon to the eject icon when the "Untitled" or "NO_NAME" icon on the desktop is off. 2 Make the following preparations for disconnecting the USB cable. Windows Me/2000/XP 1 Click the "Unplug or Eject Hardware" icon in the system tray. 2 Click the message that is displayed. 3 When... a message is displayed saying 8 that the hardware can disconnect the camera after downloading the images to your computer. 1 Make sure that the card access lamp is dragged. Macintosh 1 The trash icon changes to display the ...

FE-120 Advanced Manual (English)
Page 103
... 1 Click "Browse Images" on the OLYMPUS Master main menu. 2 • The "Browse" window is enlarged. • To return to view mode and the picture is displayed. Click the "Unplug or Eject Hardware" icon again and disconnect the cable. Thumbnail 8 • The camera switches to the main menu, click "...Menu" in the "Browse" window. 103 Make sure that image data is not being downloaded from the camera. Connecting the camera to view. Double-click the still picture thumbnail that all applications are closed. Note • Windows Me/2000/XP: When you want ...
... 1 Click "Browse Images" on the OLYMPUS Master main menu. 2 • The "Browse" window is enlarged. • To return to view mode and the picture is displayed. Click the "Unplug or Eject Hardware" icon again and disconnect the cable. Thumbnail 8 • The camera switches to the main menu, click "...Menu" in the "Browse" window. 103 Make sure that image data is not being downloaded from the camera. Connecting the camera to view. Double-click the still picture thumbnail that all applications are closed. Note • Windows Me/2000/XP: When you want ...
FE-120 Advanced Manual (English)
Page 106
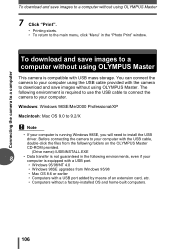
...built computers. 106 Connecting the camera to a computer To download and save images without using the USB cable provided with USB mass storage. To download and save images to a computer without using OLYMPUS Master This camera is compatible with the camera to download and save images ...to a computer without using OLYMPUS Master 7 Click "Print". • ...
...built computers. 106 Connecting the camera to a computer To download and save images without using the USB cable provided with USB mass storage. To download and save images to a computer without using OLYMPUS Master This camera is compatible with the camera to download and save images ...to a computer without using OLYMPUS Master 7 Click "Print". • ...
FE-120 Advanced Manual (English)
Page 115
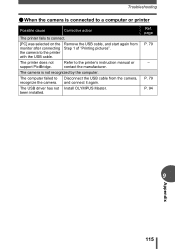
... the USB cable. The USB driver has not Install OLYMPUS Master. P. 79 P. 94 Appendix 9 115 Troubleshooting (When the camera is not recognized by the computer. The printer does not support PictBridge. The computer failed to Disconnect the USB cable from Step 1 of "Printing pictures". The camera is ...connected to a computer or printer Possible cause Corrective action The printer fails to connect. [PC] was selected on the monitor after connecting the camera to the printer's instruction ...
... the USB cable. The USB driver has not Install OLYMPUS Master. P. 79 P. 94 Appendix 9 115 Troubleshooting (When the camera is not recognized by the computer. The printer does not support PictBridge. The computer failed to Disconnect the USB cable from Step 1 of "Printing pictures". The camera is ...connected to a computer or printer Possible cause Corrective action The printer fails to connect. [PC] was selected on the monitor after connecting the camera to the printer's instruction ...
FE-120 Advanced Manual (English)
Page 121
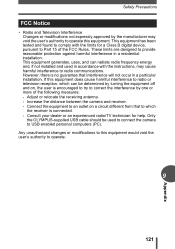
...authority to operate this equipment. Consult your dealer or an experienced radio/TV technician for a Class B digital device, pursuant to provide reasonable protection against harmful interference in accordance with the limits for help. Safety ...camera and receiver. - Connect the equipment to radio communications. However, there is encouraged to try to correct the interference by the manufacturer may cause harmful interference to an outlet on a circuit different from that interference will not occur in a particular installation. Only the OLYMPUS-supplied USB...
...authority to operate this equipment. Consult your dealer or an experienced radio/TV technician for a Class B digital device, pursuant to provide reasonable protection against harmful interference in accordance with the limits for help. Safety ...camera and receiver. - Connect the equipment to radio communications. However, there is encouraged to try to correct the interference by the manufacturer may cause harmful interference to an outlet on a circuit different from that interference will not occur in a particular installation. Only the OLYMPUS-supplied USB...

FE-120 Advanced Manual (English)
Page 131
VISUAL INDEX Names of parts Camera Shutter button gP. 24 POWER switch gP. 9 Flash gP. 42 Miscellaneous Lens Self-timer lamp gP. 49 USB connector gP. 79, 98 DC-IN jack gP. 117 10 Connector cover gP. 79, 98, 117 131
VISUAL INDEX Names of parts Camera Shutter button gP. 24 POWER switch gP. 9 Flash gP. 42 Miscellaneous Lens Self-timer lamp gP. 49 USB connector gP. 79, 98 DC-IN jack gP. 117 10 Connector cover gP. 79, 98, 117 131
FE-120 Advanced Manual (English)
Page 137
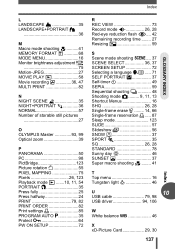
... 27 MOVIE PLAY q 58 Movie recording n 36, 47 MULTI PRINT 82 N NIGHT SCENE z 35 NIGHT+PORTRAIT 36 NORMAL 57 Number of storable still pictures 27 O OLYMPUS Master 93, 99 Optical zoom 39 P PANORAMA 50 PC 98 PictBridge 123 Picture rotation y 55 PIXEL MAPPING 75 Pixels 26, 123 Playback mode q .......10, 11... 37 SPORT j 35 SQ 26, 28 STANDARD 78 Sunny day 5 46 SUNSET 37 Super macro shooting % ........ 41 Index T Top menu 16 Tungsten light 1 46 U 10 USB cable 79, 98 USB driver 94, 106 W White balance WB 46 X xD-Picture Card 29, 30 137
... 27 MOVIE PLAY q 58 Movie recording n 36, 47 MULTI PRINT 82 N NIGHT SCENE z 35 NIGHT+PORTRAIT 36 NORMAL 57 Number of storable still pictures 27 O OLYMPUS Master 93, 99 Optical zoom 39 P PANORAMA 50 PC 98 PictBridge 123 Picture rotation y 55 PIXEL MAPPING 75 Pixels 26, 123 Playback mode q .......10, 11... 37 SPORT j 35 SQ 26, 28 STANDARD 78 Sunny day 5 46 SUNSET 37 Super macro shooting % ........ 41 Index T Top menu 16 Tungsten light 1 46 U 10 USB cable 79, 98 USB driver 94, 106 W White balance WB 46 X xD-Picture Card 29, 30 137

FE-120 Basic Manual (English, Français, Español, Português)
Page 3
d4271_basic_e.fm Page 3 Monday, July 4, 2005 10:33 PM CAMERA DIAGRAM USB connector DC-IN jack Self-timer lamp Flash En Battery compartment cover POWER switch Shooting button (#) Shutter button Monitor Playback button ($) Erase button (S) Card access lamp Lens Zoom button (W/T, GU) Mode dial Strap eyelet Arrow pad (acbd) Tripod socket Card cover 3
d4271_basic_e.fm Page 3 Monday, July 4, 2005 10:33 PM CAMERA DIAGRAM USB connector DC-IN jack Self-timer lamp Flash En Battery compartment cover POWER switch Shooting button (#) Shutter button Monitor Playback button ($) Erase button (S) Card access lamp Lens Zoom button (W/T, GU) Mode dial Strap eyelet Arrow pad (acbd) Tripod socket Card cover 3
FE-120 Basic Manual (English, Français, Español, Português)
Page 4
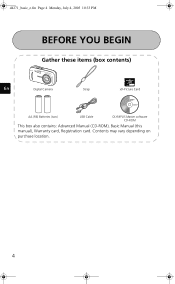
d4271_basic_e.fm Page 4 Monday, July 4, 2005 10:33 PM BEFORE YOU BEGIN Gather these items (box contents) En Digital Camera Strap xD-Picture Card AA (R6) Batteries (two) USB Cable OLYMPUS Master software CD-ROM This box also contains: Advanced Manual (CD-ROM), Basic Manual (this manual), Warranty card, Registration card. Contents may vary depending on purchase location. 4
d4271_basic_e.fm Page 4 Monday, July 4, 2005 10:33 PM BEFORE YOU BEGIN Gather these items (box contents) En Digital Camera Strap xD-Picture Card AA (R6) Batteries (two) USB Cable OLYMPUS Master software CD-ROM This box also contains: Advanced Manual (CD-ROM), Basic Manual (this manual), Warranty card, Registration card. Contents may vary depending on purchase location. 4
FE-120 Basic Manual (English, Français, Español, Português)
Page 8
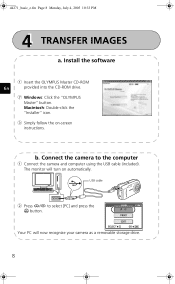
...: Double-click the "Installer" icon. 3 Simply follow the on automatically. USB cable 2 Press a/c to the computer 1 Connect the camera and computer using the USB cable (included). P C PRINT SELECT EXIT GO OK Your PC will turn on -screen instructions. Install the software 1 Insert the OLYMPUS Master CD-ROM En provided into the CD-ROM drive...
...: Double-click the "Installer" icon. 3 Simply follow the on automatically. USB cable 2 Press a/c to the computer 1 Connect the camera and computer using the USB cable (included). P C PRINT SELECT EXIT GO OK Your PC will turn on -screen instructions. Install the software 1 Insert the OLYMPUS Master CD-ROM En provided into the CD-ROM drive...

FE-120 Basic Manual (English, Français, Español, Português)
Page 19
USB P C PRINT SELECT EXIT GO OK 19 After the [ONE MOMENT] screen closes, the camera and printer are connected. d4271_basic_e.fm Page 19 Monday, July 4, 2005 10:33 PM CONNECTING THE CAMERA Direct printing (PictBridge) Using the provided USB cable, you may connect your camera directly to a PictBridge compatible printer such as the Olympus P-11 to make prints. 1 Connect one end of the provided USB cable into the camera's En USB connector and the other end into the printer's USB connector. 2 Select [PRINT] on the camera's monitor and press Z.
USB P C PRINT SELECT EXIT GO OK 19 After the [ONE MOMENT] screen closes, the camera and printer are connected. d4271_basic_e.fm Page 19 Monday, July 4, 2005 10:33 PM CONNECTING THE CAMERA Direct printing (PictBridge) Using the provided USB cable, you may connect your camera directly to a PictBridge compatible printer such as the Olympus P-11 to make prints. 1 Connect one end of the provided USB cable into the camera's En USB connector and the other end into the printer's USB connector. 2 Select [PRINT] on the camera's monitor and press Z.
FE-120 Basic Manual (English, Français, Español, Português)
Page 21
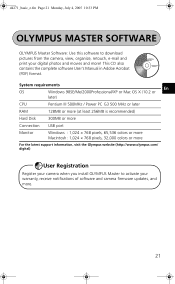
...USB port Monitor Windows : 1,024 × 768 pixels, 65,536 colors or more Macintosh : 1,024 × 768 pixels, 32,000 colors or more For the latest support information, visit the Olympus website (http://www.olympus.com/ digital) User Registration Register your camera when you install OLYMPUS... Master to download pictures from the camera, view, organize, retouch, e-mail and print your warranty, receive ...
...USB port Monitor Windows : 1,024 × 768 pixels, 65,536 colors or more Macintosh : 1,024 × 768 pixels, 32,000 colors or more For the latest support information, visit the Olympus website (http://www.olympus.com/ digital) User Registration Register your camera when you install OLYMPUS... Master to download pictures from the camera, view, organize, retouch, e-mail and print your warranty, receive ...
FE-120 Basic Manual (English, Français, Español, Português)
Page 22
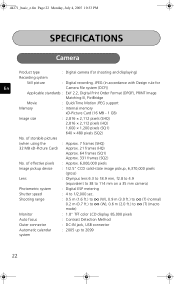
...-state image pickup, 6,370,000 pixels (gross) Lens : Olympus lens 6.3 to 18.9 mm, f2.8 to 4.9 (equivalent to 38 to 114 mm on a 35 mm camera) Photometric system : Digital ESP metering Shutter speed Shooting range : 4 to 1/2,000 sec.... : 0.5 m (1.6 ft.) to ) (W), 0.9 m (3.0 ft.) to ) (T) (normal) 0.2 m (0.7 ft.) to ) (W), 0.6 m (2.0 ft.) to ) (T) (macro mode) Monitor : 1.8" TFT color LCD display, 85,000 pixels Auto focus : Contrast Detection Method Outer connector : DC-IN jack, USB...
...-state image pickup, 6,370,000 pixels (gross) Lens : Olympus lens 6.3 to 18.9 mm, f2.8 to 4.9 (equivalent to 38 to 114 mm on a 35 mm camera) Photometric system : Digital ESP metering Shutter speed Shooting range : 4 to 1/2,000 sec.... : 0.5 m (1.6 ft.) to ) (W), 0.9 m (3.0 ft.) to ) (T) (normal) 0.2 m (0.7 ft.) to ) (W), 0.6 m (2.0 ft.) to ) (T) (macro mode) Monitor : 1.8" TFT color LCD display, 85,000 pixels Auto focus : Contrast Detection Method Outer connector : DC-IN jack, USB...


