
FE-120 Advanced Manual (English)
Page 78
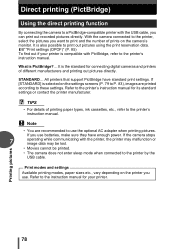
What is the standard for connecting digital cameras and printers of different manufacturers and printing out pictures directly. If the camera stops 7 operating while communicating with the USB cable, you want to the printer's instruction manual. Refer to the printer by the USB cable. It is PictBridge?... Note • You are printed according to print out pictures using...
What is the standard for connecting digital cameras and printers of different manufacturers and printing out pictures directly. If the camera stops 7 operating while communicating with the USB cable, you want to the printer's instruction manual. Refer to the printer by the USB cable. It is PictBridge?... Note • You are printed according to print out pictures using...
FE-120 Advanced Manual (English)
Page 79
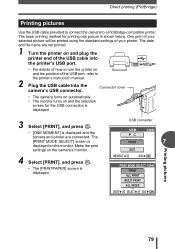
... monitor turns on and the selection screen for printing one picture is displayed and the camera and printer are not printed. 1 Turn the printer on and plug the printer end of the USB cable into the printer's USB port. • For details of how to turn the printer on the monitor. ...Make the print settings on the camera's monitor. 4 Select [PRINT], and press Z. • The [PRINTPAPER] screen is displayed...
... monitor turns on and the selection screen for printing one picture is displayed and the camera and printer are not printed. 1 Turn the printer on and plug the printer end of the USB cable into the printer's USB port. • For details of how to turn the printer on the monitor. ...Make the print settings on the camera's monitor. 4 Select [PRINT], and press Z. • The [PRINTPAPER] screen is displayed...

FE-120 Advanced Manual (English)
Page 81
Disconnect the USB cable, and repeat the procedure from the printer. 8 In the [PRINT MODE SELECT] screen, press b. • A message is not displayed in Step 4. Note • When the [USB] mode is set to [PC], the [PRINT MODE SELECT] screen is displayed. 9 Remove the USB cable from the camera. • The camera turns off. Direct printing (PictBridge) PRINT MODE SELECT PRINT ALL PRINT MULTI PRINT ALL INDEX EXIT SELECT GO OK 10Remove the USB cable from Step 1. 7 Printing pictures 81
Disconnect the USB cable, and repeat the procedure from the printer. 8 In the [PRINT MODE SELECT] screen, press b. • A message is not displayed in Step 4. Note • When the [USB] mode is set to [PC], the [PRINT MODE SELECT] screen is displayed. 9 Remove the USB cable from the camera. • The camera turns off. Direct printing (PictBridge) PRINT MODE SELECT PRINT ALL PRINT MULTI PRINT ALL INDEX EXIT SELECT GO OK 10Remove the USB cable from Step 1. 7 Printing pictures 81
FE-120 Advanced Manual (English)
Page 92
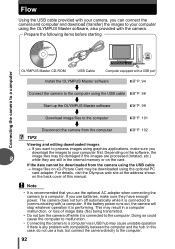
... download the images to your computer using the optional PC card adapter. Prepare the following items before starting. Connecting the camera to a computer OLYMPUS Master CD-ROM USB Cable Computer equipped with compatibility between the computer and the hub. Depending on xD-Picture Card may result in the internal memory or on the back...
... download the images to your computer using the optional PC card adapter. Prepare the following items before starting. Connecting the camera to a computer OLYMPUS Master CD-ROM USB Cable Computer equipped with compatibility between the computer and the hub. Depending on xD-Picture Card may result in the internal memory or on the back...

FE-120 Advanced Manual (English)
Page 95
In this case, go to step 4. 8 95 Failure to do so could result in USB port. • QuickTime 6 or later and Safari 1.0 or later must be installed. • Be sure to remove the media (drag & drop onto the trash icon) ... operation and the need to reboot. • Disconnect the cable connecting the camera to the computer • Turn off the camera • Open the camera's card cover • Open the camera's battery compartment cover Windows 1 Insert the CD-ROM into the CD-ROM drive. • The OLYMPUS Master setup screen is displayed. • If the screen...
In this case, go to step 4. 8 95 Failure to do so could result in USB port. • QuickTime 6 or later and Safari 1.0 or later must be installed. • Be sure to remove the media (drag & drop onto the trash icon) ... operation and the need to reboot. • Disconnect the cable connecting the camera to the computer • Turn off the camera • Open the camera's card cover • Open the camera's battery compartment cover Windows 1 Insert the CD-ROM into the CD-ROM drive. • The OLYMPUS Master setup screen is displayed. • If the screen...

FE-120 Advanced Manual (English)
Page 98
... the message that is the default application for managing digital images. Connecting the camera to a computer Use the USB cable provided with the camera to connect the camera to your digital camera for the first time, the iPhoto application starts automatically, so close this application and start OLYMPUS Master. The camera is recognized as a "Removable Disk". • Macintosh The iPhoto...
... the message that is the default application for managing digital images. Connecting the camera to a computer Use the USB cable provided with the camera to connect the camera to your digital camera for the first time, the iPhoto application starts automatically, so close this application and start OLYMPUS Master. The camera is recognized as a "Removable Disk". • Macintosh The iPhoto...

FE-120 Advanced Manual (English)
Page 102
...Removable Disk" icon to the eject icon when the "Untitled" or "NO_NAME" icon on the desktop is off. 2 Make the following preparations for disconnecting the USB cable. Card access lamp 102 Windows Me/2000/XP 1 Click the "Unplug or Eject Hardware" icon in the system tray. 2 Click the message that is displayed.... 3 When a message is displayed saying 8 that the hardware can disconnect the camera after downloading the images to your computer. 1 Make sure that the card access lamp is dragged. Connecting the...
...Removable Disk" icon to the eject icon when the "Untitled" or "NO_NAME" icon on the desktop is off. 2 Make the following preparations for disconnecting the USB cable. Card access lamp 102 Windows Me/2000/XP 1 Click the "Unplug or Eject Hardware" icon in the system tray. 2 Click the message that is displayed.... 3 When a message is displayed saying 8 that the hardware can disconnect the camera after downloading the images to your computer. 1 Make sure that the card access lamp is dragged. Connecting the...

FE-120 Advanced Manual (English)
Page 103
... a computer Viewing still pictures and movies 3 Disconnect the USB cable from the camera and that all applications are closed. Double-click the still picture thumbnail that image data is displayed. Note • Windows Me/2000/XP: When you...displayed. Click the "Unplug or Eject Hardware" icon again and disconnect the cable. Viewing still pictures and movies 1 Click "Browse Images" on the OLYMPUS Master main menu. 2 • The "Browse" window is not being downloaded from the camera. Thumbnail 8 • The camera switches to view mode and the picture is enlarged. • To ...
... a computer Viewing still pictures and movies 3 Disconnect the USB cable from the camera and that all applications are closed. Double-click the still picture thumbnail that image data is displayed. Note • Windows Me/2000/XP: When you...displayed. Click the "Unplug or Eject Hardware" icon again and disconnect the cable. Viewing still pictures and movies 1 Click "Browse Images" on the OLYMPUS Master main menu. 2 • The "Browse" window is not being downloaded from the camera. Thumbnail 8 • The camera switches to view mode and the picture is enlarged. • To ...
FE-120 Advanced Manual (English)
Page 106
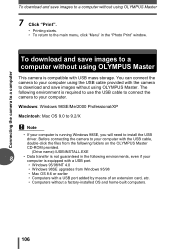
... in the "Photo Print" window. Connecting the camera to a computer To download and save images to a computer without using OLYMPUS Master This camera is compatible with USB mass storage. Before connecting the camera to your computer with the USB cable, double-click the files from Windows 95/98 ... an extension card, etc. • Computers without using the USB cable provided with the camera to install the USB driver. The following environments, even if your computer using OLYMPUS Master. You can connect the camera to your computer is running Windows 98SE, you will need to...
... in the "Photo Print" window. Connecting the camera to a computer To download and save images to a computer without using OLYMPUS Master This camera is compatible with USB mass storage. Before connecting the camera to your computer with the USB cable, double-click the files from Windows 95/98 ... an extension card, etc. • Computers without using the USB cable provided with the camera to install the USB driver. The following environments, even if your computer using OLYMPUS Master. You can connect the camera to your computer is running Windows 98SE, you will need to...
FE-120 Advanced Manual (English)
Page 115
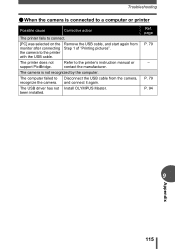
... the printer's instruction manual or contact the manufacturer. Ref. and connect it again. been installed. page P. 79 - The computer failed to Disconnect the USB cable from Step 1 of "Printing pictures". Remove the USB cable, and start again from the camera, recognize the camera. The USB driver has not Install OLYMPUS Master. P. 79 P. 94 Appendix 9 115 Troubleshooting (When the...
... the printer's instruction manual or contact the manufacturer. Ref. and connect it again. been installed. page P. 79 - The computer failed to Disconnect the USB cable from Step 1 of "Printing pictures". Remove the USB cable, and start again from the camera, recognize the camera. The USB driver has not Install OLYMPUS Master. P. 79 P. 94 Appendix 9 115 Troubleshooting (When the...
FE-120 Advanced Manual (English)
Page 121
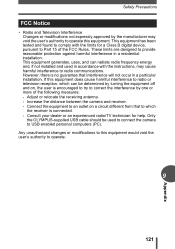
...not expressly approved by one or more of the FCC Rules. Consult your dealer or an experienced radio/TV technician for a Class B digital device, pursuant to radio or television reception, which the receiver is connected. - However, there is encouraged to try to correct the ...user is no guarantee that to which can radiate radio frequency energy and, if not installed and used to connect the camera to this equipment. Only the OLYMPUS-supplied USB cable should be determined by turning the equipment off and on a circuit different from that interference will not occur in a...
...not expressly approved by one or more of the FCC Rules. Consult your dealer or an experienced radio/TV technician for a Class B digital device, pursuant to radio or television reception, which the receiver is connected. - However, there is encouraged to try to correct the ...user is no guarantee that to which can radiate radio frequency energy and, if not installed and used to connect the camera to this equipment. Only the OLYMPUS-supplied USB cable should be determined by turning the equipment off and on a circuit different from that interference will not occur in a...
FE-120 Advanced Manual (English)
Page 137
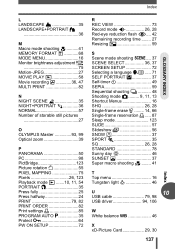
... 27 MOVIE PLAY q 58 Movie recording n 36, 47 MULTI PRINT 82 N NIGHT SCENE z 35 NIGHT+PORTRAIT 36 NORMAL 57 Number of storable still pictures 27 O OLYMPUS Master 93, 99 Optical zoom 39 P PANORAMA 50 PC 98 PictBridge 123 Picture rotation y 55 PIXEL MAPPING 75 Pixels 26, 123 Playback mode q .......10, 11... 37 SPORT j 35 SQ 26, 28 STANDARD 78 Sunny day 5 46 SUNSET 37 Super macro shooting % ........ 41 Index T Top menu 16 Tungsten light 1 46 U 10 USB cable 79, 98 USB driver 94, 106 W White balance WB 46 X xD-Picture Card 29, 30 137
... 27 MOVIE PLAY q 58 Movie recording n 36, 47 MULTI PRINT 82 N NIGHT SCENE z 35 NIGHT+PORTRAIT 36 NORMAL 57 Number of storable still pictures 27 O OLYMPUS Master 93, 99 Optical zoom 39 P PANORAMA 50 PC 98 PictBridge 123 Picture rotation y 55 PIXEL MAPPING 75 Pixels 26, 123 Playback mode q .......10, 11... 37 SPORT j 35 SQ 26, 28 STANDARD 78 Sunny day 5 46 SUNSET 37 Super macro shooting % ........ 41 Index T Top menu 16 Tungsten light 1 46 U 10 USB cable 79, 98 USB driver 94, 106 W White balance WB 46 X xD-Picture Card 29, 30 137
FE-120 Basic Manual (English, Français, Español, Português)
Page 4
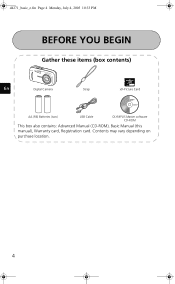
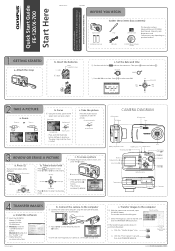
Contents may vary depending on purchase location. 4 d4271_basic_e.fm Page 4 Monday, July 4, 2005 10:33 PM BEFORE YOU BEGIN Gather these items (box contents) En Digital Camera Strap xD-Picture Card AA (R6) Batteries (two) USB Cable OLYMPUS Master software CD-ROM This box also contains: Advanced Manual (CD-ROM), Basic Manual (this manual), Warranty card, Registration card.
Contents may vary depending on purchase location. 4 d4271_basic_e.fm Page 4 Monday, July 4, 2005 10:33 PM BEFORE YOU BEGIN Gather these items (box contents) En Digital Camera Strap xD-Picture Card AA (R6) Batteries (two) USB Cable OLYMPUS Master software CD-ROM This box also contains: Advanced Manual (CD-ROM), Basic Manual (this manual), Warranty card, Registration card.
FE-120 Basic Manual (English, Français, Español, Português)
Page 8
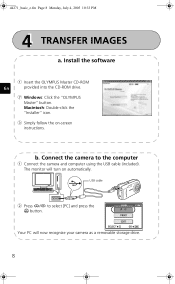
... provided into the CD-ROM drive. 2 Windows: Click the "OLYMPUS Master" button. The monitor will now recognize your camera as a removable storage drive. 8 Macintosh: Double-click the "Installer" icon. 3 Simply follow the on automatically. USB cable 2 Press a/c to the computer 1 Connect the camera and computer using the USB cable (included). b. d4271_basic_e.fm Page 8 Monday, July 4, 2005 10...
... provided into the CD-ROM drive. 2 Windows: Click the "OLYMPUS Master" button. The monitor will now recognize your camera as a removable storage drive. 8 Macintosh: Double-click the "Installer" icon. 3 Simply follow the on automatically. USB cable 2 Press a/c to the computer 1 Connect the camera and computer using the USB cable (included). b. d4271_basic_e.fm Page 8 Monday, July 4, 2005 10...

FE-120 Basic Manual (English, Français, Español, Português)
Page 19
After the [ONE MOMENT] screen closes, the camera and printer are connected. d4271_basic_e.fm Page 19 Monday, July 4, 2005 10:33 PM CONNECTING THE CAMERA Direct printing (PictBridge) Using the provided USB cable, you may connect your camera directly to a PictBridge compatible printer such as the Olympus P-11 to make prints. 1 Connect one end of the provided USB cable into the camera's En USB connector and the other end into the printer's USB connector. 2 Select [PRINT] on the camera's monitor and press Z. USB P C PRINT SELECT EXIT GO OK 19
After the [ONE MOMENT] screen closes, the camera and printer are connected. d4271_basic_e.fm Page 19 Monday, July 4, 2005 10:33 PM CONNECTING THE CAMERA Direct printing (PictBridge) Using the provided USB cable, you may connect your camera directly to a PictBridge compatible printer such as the Olympus P-11 to make prints. 1 Connect one end of the provided USB cable into the camera's En USB connector and the other end into the printer's USB connector. 2 Select [PRINT] on the camera's monitor and press Z. USB P C PRINT SELECT EXIT GO OK 19
FE-120 Quick Start Guide (English, Português)
Page 1
...Advanced Manual or visit www.olympusamerica.com/support 1AG6P1P2735-- Quick Start Guide FE-120/X-700 Start Here For more information, please refer to the computer 1 With the camera now connected, open OLYMPUS Master. USB Cable OLYMPUS Master software CD-ROM GETTING STARTED a. Mode dial POWER 2 Press ...button (W/T, GU) Mode dial Strap eyelet Arrow pad (acbd) Tripod socket Card cover TRANSFER IMAGES a. USB cable 2 Press a/c to scroll around. VH193801 BEFORE YOU BEGIN Digital Camera AA (R6) Batteries (two) Gather these items (box contents) This box also contains: Advanced Manual...
...Advanced Manual or visit www.olympusamerica.com/support 1AG6P1P2735-- Quick Start Guide FE-120/X-700 Start Here For more information, please refer to the computer 1 With the camera now connected, open OLYMPUS Master. USB Cable OLYMPUS Master software CD-ROM GETTING STARTED a. Mode dial POWER 2 Press ...button (W/T, GU) Mode dial Strap eyelet Arrow pad (acbd) Tripod socket Card cover TRANSFER IMAGES a. USB cable 2 Press a/c to scroll around. VH193801 BEFORE YOU BEGIN Digital Camera AA (R6) Batteries (two) Gather these items (box contents) This box also contains: Advanced Manual...


