FE-115 Advanced Manual (English)
Page 39
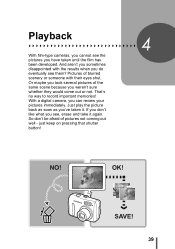
..., erase and take it . just keep on pressing that shutter button! Pictures of the same scene because you sometimes disappointed with their eyes shut. With a digital camera, you have taken until the film has been developed. NO! And aren't you weren't sure whether they would come out or not. Just play the... results when you 've taken it again. OK! So don't be afraid of pictures not coming out well - SAVE! 39 4 Playback Playback 4 With film-type cameras, you cannot see the pictures you can review your pictures immediately.
..., erase and take it . just keep on pressing that shutter button! Pictures of the same scene because you sometimes disappointed with their eyes shut. With a digital camera, you have taken until the film has been developed. NO! And aren't you weren't sure whether they would come out or not. Just play the... results when you 've taken it again. OK! So don't be afraid of pictures not coming out well - SAVE! 39 4 Playback Playback 4 With film-type cameras, you cannot see the pictures you can review your pictures immediately.

FE-115 Basic Manual (English, Français, Español, Português)
Page 2
...safety precautions at the end of this manual may differ from the actual product. 2 Table of Contents CAMERA DIAGRAM 3 BEFORE YOU BEGIN 4 GETTING STARTED 5 Step 1 GETTING STARTED 5 Step 2 TAKE A PICTURE 6 Step 3 REVIEW OR ERASE A PICTURE 7 Step 4 TRANSFER IMAGES 8 En BASIC OPERATION 10 Shooting Tips 10 Shooting...Menu...15 Erase All Pictures 15 Select a Language 16 Monitor Symbols & Icons 17 Thumbnail (Index) Display 18 CONNECTING THE CAMERA 19 Playback on a TV 19 Direct Printing (PictBridge 20 OLYMPUS Master SOFTWARE 21 SPECIFICATIONS 22 SAFETY PRECAUTIONS 24 Before using your...
...safety precautions at the end of this manual may differ from the actual product. 2 Table of Contents CAMERA DIAGRAM 3 BEFORE YOU BEGIN 4 GETTING STARTED 5 Step 1 GETTING STARTED 5 Step 2 TAKE A PICTURE 6 Step 3 REVIEW OR ERASE A PICTURE 7 Step 4 TRANSFER IMAGES 8 En BASIC OPERATION 10 Shooting Tips 10 Shooting...Menu...15 Erase All Pictures 15 Select a Language 16 Monitor Symbols & Icons 17 Thumbnail (Index) Display 18 CONNECTING THE CAMERA 19 Playback on a TV 19 Direct Printing (PictBridge 20 OLYMPUS Master SOFTWARE 21 SPECIFICATIONS 22 SAFETY PRECAUTIONS 24 Before using your...

FE-115 Basic Manual (English, Français, Español, Português)
Page 7
Press k The last picture taken will be displayed. picture Next picture Arrow pad Press l to return to scroll around. En Prev. c. Playback button (k) Zoom button b. Press [/\ or ^/] to shooting mode. To erase a picture Erase button ( ) OK button 1 Display the picture you want to enlarge the image. Take a closer look Press T (U) to erase. 2 Press . 3 Select [YES], and press i. Press W (G) to return to normal. The picture is permanently erased. 7 Step 3 REVIEW OR ERASE A PICTURE REVIEW OR ERASE A PICTURE a.
Press k The last picture taken will be displayed. picture Next picture Arrow pad Press l to return to scroll around. En Prev. c. Playback button (k) Zoom button b. Press [/\ or ^/] to shooting mode. To erase a picture Erase button ( ) OK button 1 Display the picture you want to enlarge the image. Take a closer look Press T (U) to erase. 2 Press . 3 Select [YES], and press i. Press W (G) to return to normal. The picture is permanently erased. 7 Step 3 REVIEW OR ERASE A PICTURE REVIEW OR ERASE A PICTURE a.

FE-115 Basic Manual (English, Français, Español, Português)
Page 18
Playback mode 2 3 2 11 1 5 1 5 4 6 4 6 7 7 8 8 06 02 10 9 06 02 10 9 10 10 Still picture Movie Items En 1 Battery check 2 Current memory 3 Print reservation/Number of prints 4 File number 5 Protect 6 Record mode 7 Image size 8 Exposure compensation 9 Date and time Number of frames 10 Elapsed time/total recording time (movie) 11 Movie Indications e=full power, f=low power [IN] (internal memory), [xD] (card) (Monitor -
Playback mode 2 3 2 11 1 5 1 5 4 6 4 6 7 7 8 8 06 02 10 9 06 02 10 9 10 10 Still picture Movie Items En 1 Battery check 2 Current memory 3 Print reservation/Number of prints 4 File number 5 Protect 6 Record mode 7 Image size 8 Exposure compensation 9 Date and time Number of frames 10 Elapsed time/total recording time (movie) 11 Movie Indications e=full power, f=low power [IN] (internal memory), [xD] (card) (Monitor -

FE-115 Quick Start Guide (English)
Page 1
...REVIEW OR ERASE A PICTURE a. c. Install the software 1 Insert the OLYMPUS Master CD-ROM. 2 Windows: Click the "OLYMPUS Master" button. Connect the camera to shooting mode. USB Cable (light gray) Video Cable (black) OLYMPUS... Master software CD-ROM GETTING STARTED a. Set the date and time 1 Turn the mode dial to and press the power switch to register your subject. z The green lamp indicates focus is permanently erased. z The picture is locked. The [Transfer Images] window is not displayed automatically: a. Quick Start Guide FE-115...contents) Digital Camera This...
...REVIEW OR ERASE A PICTURE a. c. Install the software 1 Insert the OLYMPUS Master CD-ROM. 2 Windows: Click the "OLYMPUS Master" button. Connect the camera to shooting mode. USB Cable (light gray) Video Cable (black) OLYMPUS... Master software CD-ROM GETTING STARTED a. Set the date and time 1 Turn the mode dial to and press the power switch to register your subject. z The green lamp indicates focus is permanently erased. z The picture is locked. The [Transfer Images] window is not displayed automatically: a. Quick Start Guide FE-115...contents) Digital Camera This...

