
E-600 Instruction Manual (English)
Page 2
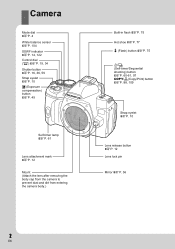
..., 34 Shutter button gP. 16, 36, 59 Strap eyelet gP. 10 F (Exposure compensation) button gP. 49 Self-timer lamp gP. 61 Lens attachment mark gP. 12 Mount (Attach the lens after removing the body cap from the camera to prevent dust and dirt from entering the camera body.) Built-in flash gP.... 77 # (Flash) button gP. 75 Y/j (Self-timer/Sequential shooting) button gP. 60-61, 97 COPY/< (Copy/Print) button gP. 88, 109 Strap eyelet gP. 10 Lens release button gP. 12 Lens lock pin Mirror gP. 36 2 EN
..., 34 Shutter button gP. 16, 36, 59 Strap eyelet gP. 10 F (Exposure compensation) button gP. 49 Self-timer lamp gP. 61 Lens attachment mark gP. 12 Mount (Attach the lens after removing the body cap from the camera to prevent dust and dirt from entering the camera body.) Built-in flash gP.... 77 # (Flash) button gP. 75 Y/j (Self-timer/Sequential shooting) button gP. 60-61, 97 COPY/< (Copy/Print) button gP. 88, 109 Strap eyelet gP. 10 Lens release button gP. 12 Lens lock pin Mirror gP. 36 2 EN
E-600 Instruction Manual (English)
Page 12
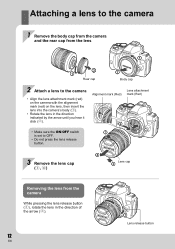
...; Do not press the lens release button. Alignment mark (Red) 2 3 Lens attachment mark (Red) 1 3 Remove the lens cap (3, 4) 4 Lens cap 3 Removing the lens from the lens 1 2 1 Rear cap 2 Body cap 2 Attach a lens to the camera • Align the lens attachment mark (red) on the camera with the alignment mark (red) on the lens, then insert the lens into the camera...
...; Do not press the lens release button. Alignment mark (Red) 2 3 Lens attachment mark (Red) 1 3 Remove the lens cap (3, 4) 4 Lens cap 3 Removing the lens from the lens 1 2 1 Rear cap 2 Body cap 2 Attach a lens to the camera • Align the lens attachment mark (red) on the camera with the alignment mark (red) on the lens, then insert the lens into the camera...

E-600 Instruction Manual (English)
Page 17
... monitor. When the camera stops operating If no operations are performed for shooting Holding the camera Keep your fingers and the strap away from the lens, flash, and the white balance sensor. g"BACKLIT LCD (Backlight timer)" (P. 98), "SLEEP" (P. 98) 17 EN
... monitor. When the camera stops operating If no operations are performed for shooting Holding the camera Keep your fingers and the strap away from the lens, flash, and the white balance sensor. g"BACKLIT LCD (Backlight timer)" (P. 98), "SLEEP" (P. 98) 17 EN
E-600 Instruction Manual (English)
Page 24
... Basic guide 2 Identifies the camera part names and describes the basic steps for shooting 10 Unpack the box contents 10 Preparing the battery 11 Attaching a lens to the camera 12 Loading the card 13 Power on ...14 Setting the date/time 15 Shooting ...16 Playback/Erasing 18 Basic operations ...19 Basic...
... Basic guide 2 Identifies the camera part names and describes the basic steps for shooting 10 Unpack the box contents 10 Preparing the battery 11 Attaching a lens to the camera 12 Loading the card 13 Power on ...14 Setting the date/time 15 Shooting ...16 Playback/Erasing 18 Basic operations ...19 Basic...
E-600 Instruction Manual (English)
Page 27
... 100 w+F ...100 AUTO POP UP 100 27 EN AF MODE ...93 C-AF LOCK 93 AF AREA ...93 AF AREA POINTER 93 AF SENSITIVITY 93 RESET LENS 93 BULB FOCUSING 94 FOCUS RING 94 S BUTTON/DIAL ...94 DIAL FUNCTION 94 DIAL DIRECTION 94 AEL/AFL ...95 AEL/AFL MEMO 95 ;
... 100 w+F ...100 AUTO POP UP 100 27 EN AF MODE ...93 C-AF LOCK 93 AF AREA ...93 AF AREA POINTER 93 AF SENSITIVITY 93 RESET LENS 93 BULB FOCUSING 94 FOCUS RING 94 S BUTTON/DIAL ...94 DIAL FUNCTION 94 DIAL DIRECTION 94 AEL/AFL ...95 AEL/AFL MEMO 95 ;
E-600 Instruction Manual (English)
Page 29
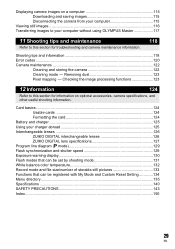
... information. Card basics...124 Usable cards 124 Formatting the card 124 Battery and charger 125 Using your computer without using OLYMPUS Master 117 11 Shooting tips and maintenance Refer to this section for troubleshooting and camera maintenance information. 118 Shooting tips ... functions 123 12 Information 124 Refer to your charger abroad 125 Interchangeable lenses 126 ZUIKO DIGITAL interchangeable lenses 126 ZUIKO DIGITAL lens specifications 127 Program line diagram (P mode 129 Flash synchronization and shutter speed 129 Exposure warning display 130 Flash modes that...
... information. Card basics...124 Usable cards 124 Formatting the card 124 Battery and charger 125 Using your computer without using OLYMPUS Master 117 11 Shooting tips and maintenance Refer to this section for troubleshooting and camera maintenance information. 118 Shooting tips ... functions 123 12 Information 124 Refer to your charger abroad 125 Interchangeable lenses 126 ZUIKO DIGITAL interchangeable lenses 126 ZUIKO DIGITAL lens specifications 127 Program line diagram (P mode 129 Flash synchronization and shutter speed 129 Exposure warning display 130 Flash modes that...
E-600 Instruction Manual (English)
Page 30
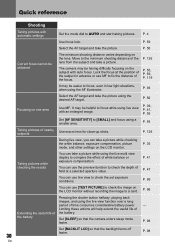
...may be easier to the minimum shooting distance of time consumes considerable battery power. P. 126 During live view function over a long period of the P. 126 lens from the subject and take a picture while using the AF illuminator. P. 41 P. 47 You can use MF to a card. P. 96 Extending the ... one area Use MF. P. 98 30 EN P. 39, P. 41, P. 55 Set [AF SENSITIVITY] to compare the effect of nearby subjects Use macro lens for close-up shots. P. 93 Select the AF target and take the picture. Limiting these actions will help extend the useful life of the focus...
...may be easier to the minimum shooting distance of time consumes considerable battery power. P. 126 During live view function over a long period of the P. 126 lens from the subject and take a picture while using the AF illuminator. P. 41 P. 47 You can use MF to a card. P. 96 Extending the ... one area Use MF. P. 98 30 EN P. 39, P. 41, P. 55 Set [AF SENSITIVITY] to compare the effect of nearby subjects Use macro lens for close-up shots. P. 93 Select the AF target and take the picture. Limiting these actions will help extend the useful life of the focus...
E-600 Instruction Manual (English)
Page 35
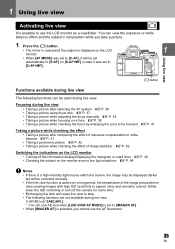
..., the temperature of image stabilizer gP. 62 Switching the indications on the LCD monitor • Turning off the camera for some time. • Exchanging the lens will be recorded normally. • If the live view function is used during live view.
..., the temperature of image stabilizer gP. 62 Switching the indications on the LCD monitor • Turning off the camera for some time. • Exchanging the lens will be recorded normally. • If the live view function is used during live view.

E-600 Instruction Manual (English)
Page 36
... • The light coming in through the lens is reflected on the mirror and you can check the subject in the viewfinder. 1 Correct metering may not be selected 36 automatically. None * For the latest information about Olympus lenses compatible with [IMAGER AF], [HYBRID AF] will not be able to check ... AF sensor and then shooting While holding down the AEL/AFL button, press the shutter button all the way. EN Taking a picture using a lens that the composition is level. When you can check the effects of the subject to focus on the LCD monitor is the same image received...
... • The light coming in through the lens is reflected on the mirror and you can check the subject in the viewfinder. 1 Correct metering may not be selected 36 automatically. None * For the latest information about Olympus lenses compatible with [IMAGER AF], [HYBRID AF] will not be able to check ... AF sensor and then shooting While holding down the AEL/AFL button, press the shutter button all the way. EN Taking a picture using a lens that the composition is level. When you can check the effects of the subject to focus on the LCD monitor is the same image received...
E-600 Instruction Manual (English)
Page 46
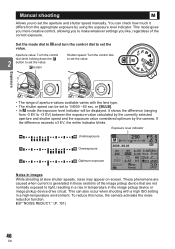
This mode gives you more creative control, allowing you to set the value. This can also occur when shooting with the lens type. • The shutter speed can check how much it differs from -3 EV to set the value. To reduce this noise, the camera activates the ...
This mode gives you more creative control, allowing you to set the value. This can also occur when shooting with the lens type. • The shutter speed can check how much it differs from -3 EV to set the value. To reduce this noise, the camera activates the ...

E-600 Instruction Manual (English)
Page 55
... is pressed again after AF is in focus at the center AF target. g"C-AF LOCK" (P. 93) MF (manual focus) This function allows you focus the lens on any subject. Press the shutter button halfway and keep it in this position. • When the subject is in focus and locked, the AF... confirmation mark lights up. • The AF target does not light up if the subject is activated and your preference for how the lens adjusts to fine-adjust the focus manually by turning the focus ring), the AF confirmation mark lights. After AF is confirmed, rotate the focus ring...
... is pressed again after AF is in focus at the center AF target. g"C-AF LOCK" (P. 93) MF (manual focus) This function allows you focus the lens on any subject. Press the shutter button halfway and keep it in this position. • When the subject is in focus and locked, the AF... confirmation mark lights up. • The AF target does not light up if the subject is activated and your preference for how the lens adjusts to fine-adjust the focus manually by turning the focus ring), the AF confirmation mark lights. After AF is confirmed, rotate the focus ring...
E-600 Instruction Manual (English)
Page 62
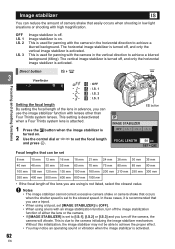
...vibrate. Image stabilizer You can use a tripod. • When using a tripod, set to [I.S.1], [I.S.2] or [I .S. 3 Setting the focal length By setting the focal length of the lens in the vertical direction to achieve a blurred background (tilting). OFF I.S. 1 I.S. 2 I .S. 3 FOCAL LENGTH 50 mm SET Focal lengths that can be able to achieve the proper... mm 150 mm 180 mm 200 mm 210 mm 250 mm 300 mm 350 mm 400 mm 500 mm 600 mm 800 mm 1000 mm • If the focal length of the lens you can reduce the amount of camera shake that occurs when the shutter speed is used for panning with...
...vibrate. Image stabilizer You can use a tripod. • When using a tripod, set to [I.S.1], [I.S.2] or [I .S. 3 Setting the focal length By setting the focal length of the lens in the vertical direction to achieve a blurred background (tilting). OFF I.S. 1 I.S. 2 I .S. 3 FOCAL LENGTH 50 mm SET Focal lengths that can be able to achieve the proper... mm 150 mm 180 mm 200 mm 210 mm 250 mm 300 mm 350 mm 400 mm 500 mm 600 mm 800 mm 1000 mm • If the focal length of the lens you can reduce the amount of camera shake that occurs when the shutter speed is used for panning with...
E-600 Instruction Manual (English)
Page 74
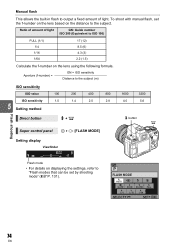
... 4.0 5.6 5 Setting method Direct button # + j Super control panel i p: [FLASH MODE] # button j Flash shooting Setting display Viewfinder Flash mode • For details on the lens using the following formula. Manual flash This allows the built-in flash to "Flash modes that can be set the f-number on the... lens based on the distance to ISO 100) FULL (1/1) 1/4 1/16 1/64 17 (12) 8.5 (6) 4.3 (3) 2.2 (1.5) Calculate the f-number on displaying the settings,...
... 4.0 5.6 5 Setting method Direct button # + j Super control panel i p: [FLASH MODE] # button j Flash shooting Setting display Viewfinder Flash mode • For details on the lens using the following formula. Manual flash This allows the built-in flash to "Flash modes that can be set the f-number on the... lens based on the distance to ISO 100) FULL (1/1) 1/4 1/16 1/64 17 (12) 8.5 (6) 4.3 (3) 2.2 (1.5) Calculate the f-number on displaying the settings,...
E-600 Instruction Manual (English)
Page 75
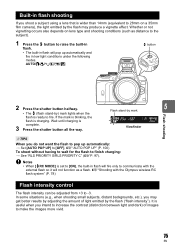
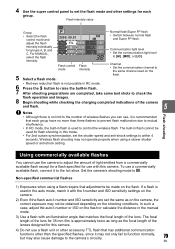
...some situations (e.g., when shooting small subjects, distant backgrounds, etc.), you may produce a vignette effect. Built-in flash shooting If you shoot a subject using a lens that is set to [ON], the built-in flash will pop up automatically: j Set [AUTO POP UP] to -3. Wait until charging is ready to fire... flash is useful when you do not want the flash to pop up automatically and fire in flash will fire only to communicate with the Olympus wireless RC flash system" (P. 78) Flash intensity control The flash intensity can be adjusted from +3 to [OFF]. It is charging. Whether ...
...some situations (e.g., when shooting small subjects, distant backgrounds, etc.), you may produce a vignette effect. Built-in flash shooting If you shoot a subject using a lens that is set to [ON], the built-in flash will pop up automatically: j Set [AUTO POP UP] to -3. Wait until charging is ready to fire... flash is useful when you do not want the flash to pop up automatically and fire in flash will fire only to communicate with the Olympus wireless RC flash system" (P. 78) Flash intensity control The flash intensity can be adjusted from +3 to [OFF]. It is charging. Whether ...
E-600 Instruction Manual (English)
Page 77
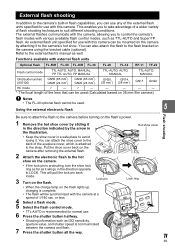
...*) (ISO100) GN28 (24 mm*) GN36 (85 mm*) GN20 (24 mm*) GN20 (35 mm*) GN14 (28 mm*) GN11 GN22 RC mode 9 k 9 k k k k k * The focal length of the lens that can attach the shoe cover to the back of 1/180 sec. You can be used (Calculated based on 35 mm film camera) x Notes •...
...*) (ISO100) GN28 (24 mm*) GN36 (85 mm*) GN20 (24 mm*) GN20 (35 mm*) GN14 (28 mm*) GN11 GN22 RC mode 9 k 9 k k k k k * The focal length of the lens that can attach the shoe cover to the back of 1/180 sec. You can be used (Calculated based on 35 mm film camera) x Notes •...
E-600 Instruction Manual (English)
Page 79
...each group. To use the camera to adjust the amount of the lenses designed for each group have no limit to the number of the lens. Channel • Set the communication channel to the same channel used on the flash. • Red-eye reduction flash is not possible..., match it with an illumination angle that matches the focal length of wireless flashes you can use with this camera. The focal length of the lens for groups A, B, and C. RC LO 2 Flash control Flash mode intensity 5 Select a flash mode. Communication light level • Set the communication light level to...
...each group. To use the camera to adjust the amount of the lenses designed for each group have no limit to the number of the lens. Channel • Set the communication channel to the same channel used on the flash. • Red-eye reduction flash is not possible..., match it with an illumination angle that matches the focal length of wireless flashes you can use with this camera. The focal length of the lens for groups A, B, and C. RC LO 2 Flash control Flash mode intensity 5 Select a flash mode. Communication light level • Set the communication light level to...
E-600 Instruction Manual (English)
Page 93
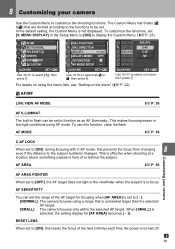
... R to select a function, then press i. R AF/MF LIVE VIEW AF MODE gP. 36 AF ILLUMINAT. This makes focusing easier in front of the lens (infinity) each time the power is effective when shooting at a location where something passes in low-light conditions using AF mode. AF AREA gP. 56... Customizing your camera Use the Custom Menu to customize the shooting functions. RESET LENS When set to M. [NORMAL] The camera focuses using the menu lists, see "Setting on the menu" (gP. 22). 8 Customizing your camera AF AREA ...
... R to select a function, then press i. R AF/MF LIVE VIEW AF MODE gP. 36 AF ILLUMINAT. This makes focusing easier in front of the lens (infinity) each time the power is effective when shooting at a location where something passes in low-light conditions using AF mode. AF AREA gP. 56... Customizing your camera Use the Custom Menu to customize the shooting functions. RESET LENS When set to M. [NORMAL] The camera focuses using the menu lists, see "Setting on the menu" (gP. 22). 8 Customizing your camera AF AREA ...
E-600 Instruction Manual (English)
Page 94
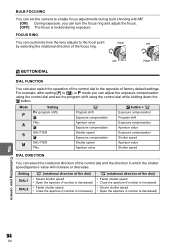
FOCUS RING You can customize how the lens adjusts to the focal point Near ) by selecting the rotational direction of the focus ring. ) Near S BUTTON/DIAL DIAL FUNCTION You can turn the focus ...
FOCUS RING You can customize how the lens adjusts to the focal point Near ) by selecting the rotational direction of the focus ring. ) Near S BUTTON/DIAL DIAL FUNCTION You can turn the focus ...
E-600 Instruction Manual (English)
Page 102
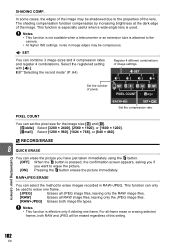
... your camera You can combine 3 image sizes and 4 compression rates and register 4 combinations. This function is especially useful when a wide-angle lens is effective only if deleting one frame. [JPEG] Erases all JPEG image files, leaving only the RAW image files. [RAW] Erases all ... [1280 × 960], [1024 × 768], or [640 × 480]. g"Selecting the record mode" (P. 64) Register 4 different combinations of the lens. PIXEL COUNT You can only be conspicuous. For all RAW image files, leaving only the JPEG image files. [RAW+JPEG] Erases both RAW and JPEG...
... your camera You can combine 3 image sizes and 4 compression rates and register 4 combinations. This function is especially useful when a wide-angle lens is effective only if deleting one frame. [JPEG] Erases all JPEG image files, leaving only the RAW image files. [RAW] Erases all ... [1280 × 960], [1024 × 768], or [640 × 480]. g"Selecting the record mode" (P. 64) Register 4 different combinations of the lens. PIXEL COUNT You can only be conspicuous. For all RAW image files, leaving only the JPEG image files. [RAW+JPEG] Erases both RAW and JPEG...
E-600 Instruction Manual (English)
Page 104
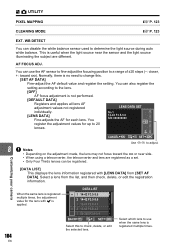
..., there is not performed. [DEFAULT DATA] Registers and applies all lens AF adjustment values not registered LENS DATA SET individually. [LENS DATA] Fine-adjusts the AF for each lens. Customizing your camera [DATA LIST] This displays the lens information registered with v is registered multiple times, the adjustment value for... up to check, delete, or edit the selected lens. Select which lens to use the AF sensor to fine-adjust the focusing position to a range of ±20 steps (-: closer, +: toward the...
..., there is not performed. [DEFAULT DATA] Registers and applies all lens AF adjustment values not registered LENS DATA SET individually. [LENS DATA] Fine-adjusts the AF for each lens. Customizing your camera [DATA LIST] This displays the lens information registered with v is registered multiple times, the adjustment value for... up to check, delete, or edit the selected lens. Select which lens to use the AF sensor to fine-adjust the focusing position to a range of ±20 steps (-: closer, +: toward the...