
Auto-Connect USB Instructions for E-10 (English)
Page 1
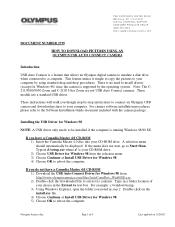
... from http://www.olympusamerica.com/files/AutoConnDriv_Win98SE.exe. 2) Double-click the downloaded file to your computer by -step instructions to connect an Olympus USB camera and download pictures to extract its contents. Page 1 of your CD-ROM drive. There is no need to install... simple to copy the pictures to the Software Installation Guide document included with the camera package. Note: The C211/3000/3030 Zoom and C-2100 Ultra Zoom are not USB Auto Connect cameras. For camera software installation procedures, please refer to your computer. Installing the USB Driver for ...
... from http://www.olympusamerica.com/files/AutoConnDriv_Win98SE.exe. 2) Double-click the downloaded file to your computer by -step instructions to connect an Olympus USB camera and download pictures to extract its contents. Page 1 of your CD-ROM drive. There is no need to install... simple to copy the pictures to the Software Installation Guide document included with the camera package. Note: The C211/3000/3030 Zoom and C-2100 Ultra Zoom are not USB Auto Connect cameras. For camera software installation procedures, please refer to your computer. Installing the USB Driver for ...
Auto-Connect USB Instructions for E-10 (English)
Page 2
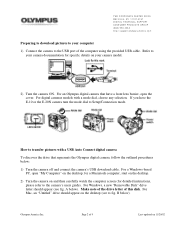
.... For a Windows-based PC, open the cover. B below ). Refer to your camera documentation for detailed instructions, please refer to fig. Olympus America Inc. For digital cameras models with a USB Auto Connect digital camera To discover the drive that have the E-10 or the E-20N camera turn the mode dial to the USB port of the computer...
.... For a Windows-based PC, open the cover. B below ). Refer to your camera documentation for detailed instructions, please refer to fig. Olympus America Inc. For digital cameras models with a USB Auto Connect digital camera To discover the drive that have the E-10 or the E-20N camera turn the mode dial to the USB port of the computer...
Auto-Connect USB Instructions for E-10 (English)
Page 3
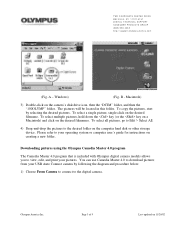
...11/20/02 Downloading pictures using the Olympus Camedia Master 4.0 program The Camedia Master 4.0 program that is included with Olympus digital camera models allows you to view, edit, and print your USB Auto Connect camera by selecting the desired pictures. Olympus America Inc. TWO CORPORATE CENTER DRIVE ... go to Edit > Select All. 4) Drag-and-drop the pictures to the digital camera. You can use Camedia Master 4.0 to your operating system or computer user's guide for instructions on the computer hard disk or other storage device. Please refer to download pictures from your...
...11/20/02 Downloading pictures using the Olympus Camedia Master 4.0 program The Camedia Master 4.0 program that is included with Olympus digital camera models allows you to view, edit, and print your USB Auto Connect camera by selecting the desired pictures. Olympus America Inc. TWO CORPORATE CENTER DRIVE ... go to Edit > Select All. 4) Drag-and-drop the pictures to the digital camera. You can use Camedia Master 4.0 to your operating system or computer user's guide for instructions on the computer hard disk or other storage device. Please refer to download pictures from your...

D-510 Zoom Instruction Manual
Page 21
... physical shock to the card. • Read the provided SmartMedia instruction manual carefully. • Do not touch the contact area of memory card this camera uses. Getting Started Compatible SmartMedia cards • Provided 8 MB standard card. 1 • Optional Olympus 4 MB/8 MB/16 MB/ 32 MB/64 MB/128 MB... the Card Card Basics What is the type of the card. 11 Humidity: up to 90 % • Put the card into contact with the camera. Index area Use the provided index label to 149°F); Note: • Operating temperature: 0°C to 55°C (32°F to protect...
... physical shock to the card. • Read the provided SmartMedia instruction manual carefully. • Do not touch the contact area of memory card this camera uses. Getting Started Compatible SmartMedia cards • Provided 8 MB standard card. 1 • Optional Olympus 4 MB/8 MB/16 MB/ 32 MB/64 MB/128 MB... the Card Card Basics What is the type of the card. 11 Humidity: up to 90 % • Put the card into contact with the camera. Index area Use the provided index label to 149°F); Note: • Operating temperature: 0°C to 55°C (32°F to protect...

D-510 Zoom Instruction Manual
Page 45
3 Playing Images Back The previous chapter explained how to use. 35 Once you've taken a few shots with the camera according to the instructions in Chapter 2, read the following section "Getting Started", then refer to the appropriate pages to start learning about the playback functions you are finished shooting, as well functions like connecting the camera to your television set for convenient playback. Chapter 3 explains how to check all of the pictures you have taken together once you want to take still pictures and check them immediately.
3 Playing Images Back The previous chapter explained how to use. 35 Once you've taken a few shots with the camera according to the instructions in Chapter 2, read the following section "Getting Started", then refer to the appropriate pages to start learning about the playback functions you are finished shooting, as well functions like connecting the camera to your television set for convenient playback. Chapter 3 explains how to check all of the pictures you have taken together once you want to take still pictures and check them immediately.

D-510 Zoom Instruction Manual
Page 52
...5 inserting one end into the video OUT jack on the camera and the other end into the video IN jack on the television. 3 Turn on the television, and set 4 to "video input." • Refer to your television instructions manual for further 3 information. 4 Press the monitor button ...( ) on the camera. • Power turns on in playback mode, and the last image taken is displayed on the television screen....
...5 inserting one end into the video OUT jack on the camera and the other end into the video IN jack on the television. 3 Turn on the television, and set 4 to "video input." • Refer to your television instructions manual for further 3 information. 4 Press the monitor button ...( ) on the camera. • Power turns on in playback mode, and the last image taken is displayed on the television screen....

D-510 Zoom Instruction Manual
Page 53
... illuminate when the video cable is adjusted, the picture may be undesirable as the power source for the camera. 3 • Pictures that have been taken with the camera held vertically can be rotated for information about displaying video images. • Images shown on how your television... (sold separately) as it also appears if the image is printed using a conventional video printer. • Refer to your TV/VCR instruction manual for easier viewing (p.112). Playing Images Back 43 center on the television screen. • Your television may produce a black frame around...
... illuminate when the video cable is adjusted, the picture may be undesirable as the power source for the camera. 3 • Pictures that have been taken with the camera held vertically can be rotated for information about displaying video images. • Images shown on how your television... (sold separately) as it also appears if the image is printed using a conventional video printer. • Refer to your TV/VCR instruction manual for easier viewing (p.112). Playing Images Back 43 center on the television screen. • Your television may produce a black frame around...

D-510 Zoom Instruction Manual
Page 84
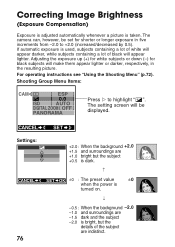
". Switching to the center of the image area. Shooting Group Menu Items: CAM [ ESP ] [ 0.0 ] ISO [ AUTO ] DIGITAL ZOOM [ OFF ] PANORAMA Press ୴ to highlight " setting screen will be calculated based on an average of the light available in the shooting menu....appear too dark. However, the calculation will yield the best exposure results in this , switch the camera over to the spot metering mode in the image area. The center will be displayed. For operating instructions see "Using the Shooting Menu" (p.72). To compensate for this mode. The CANCEL Settings: SET...
". Switching to the center of the image area. Shooting Group Menu Items: CAM [ ESP ] [ 0.0 ] ISO [ AUTO ] DIGITAL ZOOM [ OFF ] PANORAMA Press ୴ to highlight " setting screen will be calculated based on an average of the light available in the shooting menu....appear too dark. However, the calculation will yield the best exposure results in this , switch the camera over to the spot metering mode in the image area. The center will be displayed. For operating instructions see "Using the Shooting Menu" (p.72). To compensate for this mode. The CANCEL Settings: SET...
D-510 Zoom Instruction Manual
Page 86
For operating instructions see "Using the Shooting Menu" (p.72). The setting screen will be set for black subjects will appear lighter. Adjusting the exposure up (+) for white ... the details of black will make them appear lighter or darker, respectively, in five increments from -2.0 to highlight " ". The camera can, however, be displayed. Shooting Group Menu Items: CAM [ ESP ] [ 0.0 ] ISO [ AUTO ] DIGITAL ZOOM [ OFF ] PANORAMA Press ୴ to +2.0 (increased/decreased by 0.5). CANCEL SET Settings: 0 +2.0 : When the background +2.0 +1.5 and surroundings are +1.0 ...
For operating instructions see "Using the Shooting Menu" (p.72). The setting screen will be set for black subjects will appear lighter. Adjusting the exposure up (+) for white ... the details of black will make them appear lighter or darker, respectively, in five increments from -2.0 to highlight " ". The camera can, however, be displayed. Shooting Group Menu Items: CAM [ ESP ] [ 0.0 ] ISO [ AUTO ] DIGITAL ZOOM [ OFF ] PANORAMA Press ୴ to +2.0 (increased/decreased by 0.5). CANCEL SET Settings: 0 +2.0 : When the background +2.0 +1.5 and surroundings are +1.0 ...

D-510 Zoom Instruction Manual
Page 88
...for reference only. * Raising the ISO sensitivity by playing it is turned on. For operating instructions see "Using the Shooting Menu" (p.72). Good results with moderately fast moving subjects and ...lowers the picture quality. * To determine if the selected setting is based on conventional camera film speeds, and therefore the values are for bright 100 outdoor conditions. CANCEL SET Settings...Shooting Group Menu Items: CAM [ ESP ] [ 0.0 ] ISO [ AUTO ] DIGITAL ZOOM [ OFF ] PANORAMA Press ୴ to slow shutter speeds and excess movement of the subject. ISO Light Sensitivity Level...
...for reference only. * Raising the ISO sensitivity by playing it is turned on. For operating instructions see "Using the Shooting Menu" (p.72). Good results with moderately fast moving subjects and ...lowers the picture quality. * To determine if the selected setting is based on conventional camera film speeds, and therefore the values are for bright 100 outdoor conditions. CANCEL SET Settings...Shooting Group Menu Items: CAM [ ESP ] [ 0.0 ] ISO [ AUTO ] DIGITAL ZOOM [ OFF ] PANORAMA Press ୴ to slow shutter speeds and excess movement of the subject. ISO Light Sensitivity Level...

D-510 Zoom Instruction Manual
Page 90
...Zoom) If you find that the camera's normal optical zoom does not provide enough magnification, use the digital zoom function to increase magnification to up to 9x using digital zoom. Settings: DIGITAL ZOOM OFF ON CANCEL SET OK OFF (default setting at 3x. ON: 3x zoom uses optical zoom only, with zooms... 3x to 9x. When set at power on): Optical zoom is set to highlight "DIGITAL ZOOM". The setting screen will illuminate. For operating instructions see "Using the Shooting Menu" (p.72). Shooting...
...Zoom) If you find that the camera's normal optical zoom does not provide enough magnification, use the digital zoom function to increase magnification to up to 9x using digital zoom. Settings: DIGITAL ZOOM OFF ON CANCEL SET OK OFF (default setting at 3x. ON: 3x zoom uses optical zoom only, with zooms... 3x to 9x. When set at power on): Optical zoom is set to highlight "DIGITAL ZOOM". The setting screen will illuminate. For operating instructions see "Using the Shooting Menu" (p.72). Shooting...

D-510 Zoom Instruction Manual
Page 92
For operating instructions see "Using the Shooting Menu" (p.72). Taking Panoramic shots Select "PANORAMA", ...join the images into a single panoramic shot. Shooting Group Menu Items: CAM [ ESP ] [ 0.0 ] ISO [ AUTO ] DIGITAL ZOOM [ OFF ] PANORAMA CANCEL GO Highlight "PANORAMA" and press ୴. This function is possible to use CAMEDIA Master to the right. Panorama.... The lower left . ̅: Connect up. ̃: Connect down. 82 Take the current shot, then move camera to the right for the next shot. ୵: Connect to shoot panoramic shots easily. With multiple images in the ...
For operating instructions see "Using the Shooting Menu" (p.72). Taking Panoramic shots Select "PANORAMA", ...join the images into a single panoramic shot. Shooting Group Menu Items: CAM [ ESP ] [ 0.0 ] ISO [ AUTO ] DIGITAL ZOOM [ OFF ] PANORAMA CANCEL GO Highlight "PANORAMA" and press ୴. This function is possible to use CAMEDIA Master to the right. Panorama.... The lower left . ̅: Connect up. ̃: Connect down. 82 Take the current shot, then move camera to the right for the next shot. ୵: Connect to shoot panoramic shots easily. With multiple images in the ...

D-510 Zoom Instruction Manual
Page 95
... the white balance settings. For operation instructions see "Using the Shooting Menu" (p.72). However, it back on . (You should leave this as your default setting.) Shooting outside in full daylight (sunny weather) Shooting outside in a naturallooking tone. Adjusting the Color Tone (White Balance) This camera uses auto white balance to lighting or...
... the white balance settings. For operation instructions see "Using the Shooting Menu" (p.72). However, it back on . (You should leave this as your default setting.) Shooting outside in full daylight (sunny weather) Shooting outside in a naturallooking tone. Adjusting the Color Tone (White Balance) This camera uses auto white balance to lighting or...

D-510 Zoom Instruction Manual
Page 97
For operating instructions see "Using the Shooting Menu" (p.72). Image Group Menu Items: PIC WB [ AUTO ] [ HQ ] Press &#...Settings Compression Size of pictures that can be stored. Selecting higher image resolutions will result in the camera (p.21). The "TIFF" mode is very slow and can be selected depending on whether you to store ...more pictures. Quantity (Record Mode) The camera offers four different recording modes (resolutions) that can store relatively few pictures. * The initial setting is illuminated...
For operating instructions see "Using the Shooting Menu" (p.72). Image Group Menu Items: PIC WB [ AUTO ] [ HQ ] Press &#...Settings Compression Size of pictures that can be stored. Selecting higher image resolutions will result in the camera (p.21). The "TIFF" mode is very slow and can be selected depending on whether you to store ...more pictures. Quantity (Record Mode) The camera offers four different recording modes (resolutions) that can store relatively few pictures. * The initial setting is illuminated...
D-510 Zoom Instruction Manual
Page 100
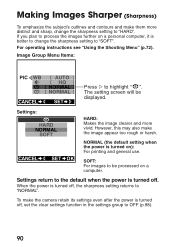
... SET Press ୴ to "HARD". Making Images Sharper (Sharpness) To emphasize the subject's outlines and contours and make them more vivid. For operating instructions see "Using the Shooting Menu" (p.72). NORMAL (the default setting when the power is turned on a personal computer, it is turned off . ... change the sharpness setting to highlight " ". The setting screen will be processed on a computer. However, this may also make the camera retain its settings even after the power is turned off , the sharpness setting returns to OFF (p.98). 90 Settings return to the ...
... SET Press ୴ to "HARD". Making Images Sharper (Sharpness) To emphasize the subject's outlines and contours and make them more vivid. For operating instructions see "Using the Shooting Menu" (p.72). NORMAL (the default setting when the power is turned on a personal computer, it is turned off . ... change the sharpness setting to highlight " ". The setting screen will be processed on a computer. However, this may also make the camera retain its settings even after the power is turned off , the sharpness setting returns to OFF (p.98). 90 Settings return to the ...

D-510 Zoom Instruction Manual
Page 101
... pictures that will be processed further using a personal computer. 91 CANCEL SET OK NORMAL (the default mode when the power is better to set the camera's contrast to "HIGH". However, high contrast may cause bright areas to become too white or dark areas to highlight " ". Advanced Shooting Techniques Settings: HIGH NORMAL...
... pictures that will be processed further using a personal computer. 91 CANCEL SET OK NORMAL (the default mode when the power is better to set the camera's contrast to "HIGH". However, high contrast may cause bright areas to become too white or dark areas to highlight " ". Advanced Shooting Techniques Settings: HIGH NORMAL...

D-510 Zoom Instruction Manual
Page 103
... the monitor is on, it displays whatever subject is being seen through the camera's lens. The Rec View setting remains even after shooting, without using the playback mode set Rec View to "ON". For operating instructions see "Using the Shooting Menu" (p.72). If the monitor is turned off..., it is being seen through the camera's lens (except directly after taking a picture, at which time the monitor will turn on...
... the monitor is on, it displays whatever subject is being seen through the camera's lens. The Rec View setting remains even after shooting, without using the playback mode set Rec View to "ON". For operating instructions see "Using the Shooting Menu" (p.72). If the monitor is turned off..., it is being seen through the camera's lens (except directly after taking a picture, at which time the monitor will turn on...

D-510 Zoom Instruction Manual
Page 105
... in this folder. ✽2 The months January through 9. It is turned off. The camera automatically assigns file and folder numbers. For operating instructions see "Using the Shooting Menu" (p.72). Advanced Shooting Techniques 95 This setting remains in the camera's memory media as follows. File names and folder names Image files and folders are...
... in this folder. ✽2 The months January through 9. It is turned off. The camera automatically assigns file and folder numbers. For operating instructions see "Using the Shooting Menu" (p.72). Advanced Shooting Techniques 95 This setting remains in the camera's memory media as follows. File names and folder names Image files and folders are...

D-510 Zoom Instruction Manual
Page 108
... Press ୴ to highlight " ". RESET (default setting): Those items marked with a ̅ can be set by the Playback Menu. However, removal of the camera's battery will be changed and reset to retain the new setting in memory even after the power is turned off . HOLD: All the settings for...is a ̅ under the memory column of the chart in "Functions of the charts on p.71, p.103 to return to their defaults. For operating instructions see "Using the Shooting Menu" (p.72). Those items marked with ć hold the last setting used. 98 Settings that are retained include those for the...
... Press ୴ to highlight " ". RESET (default setting): Those items marked with a ̅ can be set by the Playback Menu. However, removal of the camera's battery will be changed and reset to retain the new setting in memory even after the power is turned off . HOLD: All the settings for...is a ̅ under the memory column of the chart in "Functions of the charts on p.71, p.103 to return to their defaults. For operating instructions see "Using the Shooting Menu" (p.72). Those items marked with ć hold the last setting used. 98 Settings that are retained include those for the...

D-510 Zoom Instruction Manual
Page 109
For operating instructions see "Using the Shooting Menu" (p.72). In such cases, the beep sound can be set by the Playback Menu. Also settings can be set to ... "OFF". Settings: OFF ON OFF: The warning beep does not sound. Turning Off Warning Sounds (Beep Sound) When shooting weddings or for wildlife shots, the camera warning sounds can be SET CANCEL SET displayed. This setting remains in memory even after the power is turned off.
For operating instructions see "Using the Shooting Menu" (p.72). In such cases, the beep sound can be set by the Playback Menu. Also settings can be set to ... "OFF". Settings: OFF ON OFF: The warning beep does not sound. Turning Off Warning Sounds (Beep Sound) When shooting weddings or for wildlife shots, the camera warning sounds can be SET CANCEL SET displayed. This setting remains in memory even after the power is turned off.


