
Users Guide
Page 2
.... All Rights Reserved Document: MICROLINE ML186 Plus User's Guide First Edition: May, 2017 We invite you to visit OKI Data global web site at: http://www.oki.com/printing/. Oki Data assumes no responsibility for the results of errors or omissions beyond its control. Every effort has been made by other manufacturers and referred to in this document is a registered trademark of software products manufactured...
.... All Rights Reserved Document: MICROLINE ML186 Plus User's Guide First Edition: May, 2017 We invite you to visit OKI Data global web site at: http://www.oki.com/printing/. Oki Data assumes no responsibility for the results of errors or omissions beyond its control. Every effort has been made by other manufacturers and referred to in this document is a registered trademark of software products manufactured...
Users Guide
Page 3
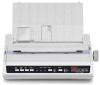
... Cartridge 7 Installing the Platen Knob 10 Adjusting the Head Gap 11 Installing the Paper Separator 12 Setting Up Your Printer 13 Power Connection 13 Loading Paper 14 Testing Your Printer 30 Computer Connections 31 Setting up the Printer to Work with Your Computer 36 Operating Your Printer 39 Front Panel Operation 39 Setting Printer Defaults 42 Using the Pull Tractor Unit 51 Using the Roll Paper Stand 54 Maintenance 58 Replacing the Ribbon Cartridge 58 Testing Your Printer 60 Cleaning the Housing 62 Troubleshooting 64 General Information 64 Clearing Paper Jams 69 Parts...
... Cartridge 7 Installing the Platen Knob 10 Adjusting the Head Gap 11 Installing the Paper Separator 12 Setting Up Your Printer 13 Power Connection 13 Loading Paper 14 Testing Your Printer 30 Computer Connections 31 Setting up the Printer to Work with Your Computer 36 Operating Your Printer 39 Front Panel Operation 39 Setting Printer Defaults 42 Using the Pull Tractor Unit 51 Using the Roll Paper Stand 54 Maintenance 58 Replacing the Ribbon Cartridge 58 Testing Your Printer 60 Cleaning the Housing 62 Troubleshooting 64 General Information 64 Clearing Paper Jams 69 Parts...

Users Guide
Page 9
4. up knob slightly until you feel it on the ribbon plate. 5. Unpack the ribbon cartridge and install it click into place. 9 • Getting Started Press gently on the ribbon cartridge until the x-shaped notch on the bottom of the ribbon cartridge aligns with the x-shaped insert on the printhead. Note If the ribbon won't load easily, turn the take-
4. up knob slightly until you feel it on the ribbon plate. 5. Unpack the ribbon cartridge and install it click into place. 9 • Getting Started Press gently on the ribbon cartridge until the x-shaped notch on the bottom of the ribbon cartridge aligns with the x-shaped insert on the printhead. Note If the ribbon won't load easily, turn the take-
Users Guide
Page 11
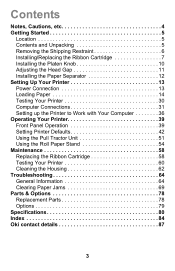
...; Getting Started Use the recommended head gap to have a larger gap than when using plain paper. Adjusting the Head Gap The head gap is the distance between the printhead and the platen roller. Incorrect setting of the head gap can cause printhead damage or ribbon jams. To avoid these problems set the head gap for the type of media being used ... ...as detailed in the following table: Paper Type Single Sheets, up to the correct position for the type...
...; Getting Started Use the recommended head gap to have a larger gap than when using plain paper. Adjusting the Head Gap The head gap is the distance between the printhead and the platen roller. Incorrect setting of the head gap can cause printhead damage or ribbon jams. To avoid these problems set the head gap for the type of media being used ... ...as detailed in the following table: Paper Type Single Sheets, up to the correct position for the type...

Users Guide
Page 22
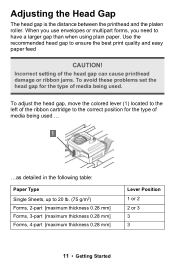
Pull the bail arm lever (3) - on the right side of the platen forward, then adjust the sprocket wheels (B) so that the sprockets align with the holes in position. 7. toward the front of the printer to lift the bail arm. 8. Pull the lock levers (A) on the left side of the printer to lock the sprocket wheels in the continuous forms you are using. 6. Move the paper lever (4) - on the sprocket wheels at either end of the printer - 5. Push the levers back to the continuous forms symbol. 22 • Setting Up Your Printer toward the front of the printer -
Pull the bail arm lever (3) - on the right side of the platen forward, then adjust the sprocket wheels (B) so that the sprockets align with the holes in position. 7. toward the front of the printer to lift the bail arm. 8. Pull the lock levers (A) on the left side of the printer to lock the sprocket wheels in the continuous forms you are using. 6. Move the paper lever (4) - on the sprocket wheels at either end of the printer - 5. Push the levers back to the continuous forms symbol. 22 • Setting Up Your Printer toward the front of the printer -
Users Guide
Page 30
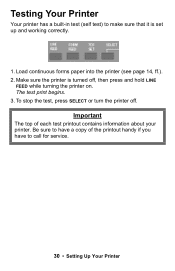
Make sure the printer is set up and working correctly. 1. Important The top of the printout handy if you have to call for service. 30 • Setting Up Your Printer Be sure to have a copy of each test printout contains information about your printer. The test print begins. 3. To stop the test, press SELECT or turn the printer off , then press and hold LINE FEED while turning the printer on. Testing Your Printer Your printer has a built-in test (self test) to make sure that it is turned off . Load continuous forms paper into the printer (see page 14, ff.). 2.
Make sure the printer is set up and working correctly. 1. Important The top of the printout handy if you have to call for service. 30 • Setting Up Your Printer Be sure to have a copy of each test printout contains information about your printer. The test print begins. 3. To stop the test, press SELECT or turn the printer off , then press and hold LINE FEED while turning the printer on. Testing Your Printer Your printer has a built-in test (self test) to make sure that it is turned off . Load continuous forms paper into the printer (see page 14, ff.). 2.

Users Guide
Page 36
... your printer. 36 • Setting Up Your Printer This driver incorporates commands which use the full capability of the printer and automatically switches the printer to the correct emulation regardless of which emulation is selected in the printer menu or via the front panel. Install the Windows Printer Driver To print from a Windows-based system, install the printer driver located in the Drivers folder on -screen instructions to install the driver to be used with your printer. Setting up the Printer to Work...
... your printer. 36 • Setting Up Your Printer This driver incorporates commands which use the full capability of the printer and automatically switches the printer to the correct emulation regardless of which emulation is selected in the printer menu or via the front panel. Install the Windows Printer Driver To print from a Windows-based system, install the printer driver located in the Drivers folder on -screen instructions to install the driver to be used with your printer. Setting up the Printer to Work...
Users Guide
Page 38
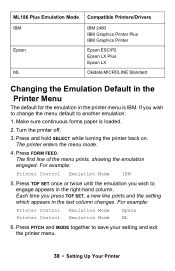
... FORM FEED. Make sure continuous forms paper is IBM. Each time you wish to change the menu default to save your setting and exit the printer menu. 38 • Setting Up Your Printer ML186 Plus Emulation Mode IBM Epson ML Compatible Printers/Drivers IBM 2480 IBM Graphics Printer Plus IBM Graphics Printer Epson ESC/P2 Epson LX Plus Epson LX Okidata MICROLINE Standard Changing the Emulation Default in the Printer Menu The default for the emulation in the printer menu is loaded. 2. If you press TOF SET, a new line prints...
... FORM FEED. Make sure continuous forms paper is IBM. Each time you wish to change the menu default to save your setting and exit the printer menu. 38 • Setting Up Your Printer ML186 Plus Emulation Mode IBM Epson ML Compatible Printers/Drivers IBM 2480 IBM Graphics Printer Plus IBM Graphics Printer Epson ESC/P2 Epson LX Plus Epson LX Okidata MICROLINE Standard Changing the Emulation Default in the Printer Menu The default for the emulation in the printer menu is loaded. 2. If you press TOF SET, a new line prints...

Users Guide
Page 41
...Sets print mode (NLQ, Utility, HSD). Not applicable. 41 • Operating Your Printer Front Panel Buttons Button Print Mode Menu Mode Held at Power Up Advances the paper one line Scrolls through the items for each menu group. Sets a new top of form or ejects single sheet from the printer. Selects the character pitch setting (cpi). Initiates printer Self Test (see page 61). Places printer in hex dump mode (see page 60). PITCH + MODE = save settings and exit to the next top of form (TOF) position. Prints list of current menu settings. FORM FEED + SELECT...
...Sets print mode (NLQ, Utility, HSD). Not applicable. 41 • Operating Your Printer Front Panel Buttons Button Print Mode Menu Mode Held at Power Up Advances the paper one line Scrolls through the items for each menu group. Sets a new top of form or ejects single sheet from the printer. Selects the character pitch setting (cpi). Initiates printer Self Test (see page 61). Places printer in hex dump mode (see page 60). PITCH + MODE = save settings and exit to the next top of form (TOF) position. Prints list of current menu settings. FORM FEED + SELECT...

Users Guide
Page 43
Sample Default Menu Printout Printer Control Emulation Mode IBM Font Font Font Font Font Font Print Mode DRAFT Mode Pitch Proportional Spacing Style Size Utility SSD 10 CPI No Normal Single Symbol Sets Symbol Sets Symbol Sets Symbol Sets Character Set Language Set Zero Character Code Page Set I American Slashed USA Vertical Control Vertical Control Vertical Control Line Spacing Skip Over Perforation Page Length 6 LPI No 11" Set-Up Graphics Uni-directional Set-Up Receive Buffer Size 64K Set-Up Paper Out Override No Set-Up Print Registration 0 Set-Up Operator Panel ...
Sample Default Menu Printout Printer Control Emulation Mode IBM Font Font Font Font Font Font Print Mode DRAFT Mode Pitch Proportional Spacing Style Size Utility SSD 10 CPI No Normal Single Symbol Sets Symbol Sets Symbol Sets Symbol Sets Character Set Language Set Zero Character Code Page Set I American Slashed USA Vertical Control Vertical Control Vertical Control Line Spacing Skip Over Perforation Page Length 6 LPI No 11" Set-Up Graphics Uni-directional Set-Up Receive Buffer Size 64K Set-Up Paper Out Override No Set-Up Print Registration 0 Set-Up Operator Panel ...

Users Guide
Page 46
... line prints: Printer Control Emulation Mode IBM 2. The following line prints: Symbol Sets Zero Character Unslashed 5. Press PITCH and MODE together to unslashed: 1. Press FORM FEED repetitively until the Symbol Sets group line appears: Symbol Sets Character Set SetI 3. For Example The default setting for the zero character is slashed. Press TOF SET once. Press LINE FEED several times until the Zero Character item line appears: Symbol Sets Zero Character Slashed 4. Press and hold SELECT while turning the printer on. To change the setting to save...
... line prints: Printer Control Emulation Mode IBM 2. The following line prints: Symbol Sets Zero Character Unslashed 5. Press PITCH and MODE together to unslashed: 1. Press FORM FEED repetitively until the Symbol Sets group line appears: Symbol Sets Character Set SetI 3. For Example The default setting for the zero character is slashed. Press TOF SET once. Press LINE FEED several times until the Zero Character item line appears: Symbol Sets Zero Character Slashed 4. Press and hold SELECT while turning the printer on. To change the setting to save...

Users Guide
Page 50
... Signal Valid, Invalid (Serial I/F) DTR Signal Ready on Power Up, Ready on Select (Serial I /F) Auto Feed XT Valid, Invalid EPSON emulation only. Group Item Setting (Set-Up) Impact Mode Normal, Quiet (Set-Up) Power Saving Enable, Disable (Set-Up) Power Save Time 5 min, 10 min, 15 min, 30 min, 60 min Parallel I/F I-Prime Invalid, Buffer Print, Buffer Clear (Parallel I/F) (Parallel I /F) Busy Time 200 ms, 1 sec 50 • Operating Your Printer Bi-Direction Enable, Disable Serial I/F Parity Only appears for printers equipped with Serial Interface.
... Signal Valid, Invalid (Serial I/F) DTR Signal Ready on Power Up, Ready on Select (Serial I /F) Auto Feed XT Valid, Invalid EPSON emulation only. Group Item Setting (Set-Up) Impact Mode Normal, Quiet (Set-Up) Power Saving Enable, Disable (Set-Up) Power Save Time 5 min, 10 min, 15 min, 30 min, 60 min Parallel I/F I-Prime Invalid, Buffer Print, Buffer Clear (Parallel I/F) (Parallel I /F) Busy Time 200 ms, 1 sec 50 • Operating Your Printer Bi-Direction Enable, Disable Serial I/F Parity Only appears for printers equipped with Serial Interface.

Users Guide
Page 57
... and exits the printer going over the separator (see "Correct Paper Path" diagram on the platen. 12. Replace the access cover: a. Note To save this position as the permanent Top of the printer-to the continuous forms position-and make sure the paper is straight by adjusting it clears the paper out detector. 11. Pull the paper lever (right side of printer) toward the front of Form, press the TOF button. 57 • Operating Your Printer
... and exits the printer going over the separator (see "Correct Paper Path" diagram on the platen. 12. Replace the access cover: a. Note To save this position as the permanent Top of the printer-to the continuous forms position-and make sure the paper is straight by adjusting it clears the paper out detector. 11. Pull the paper lever (right side of printer) toward the front of Form, press the TOF button. 57 • Operating Your Printer
Users Guide
Page 60
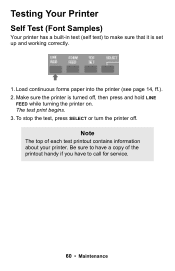
The test print begins. 3. Be sure to have a copy of each test printout contains information about your printer. Testing Your Printer Self Test (Font Samples) Your printer has a built-in test (self test) to call for service. 60 • Maintenance Load continuous forms paper into the printer (see page 14, ff.). 2. Make sure the printer is set up and working correctly. 1. Note The top of the printout handy if you have to make sure that it is turned off . To stop the test, press SELECT or turn the printer off , then press and hold LINE FEED while turning the printer on.
The test print begins. 3. Be sure to have a copy of each test printout contains information about your printer. Testing Your Printer Self Test (Font Samples) Your printer has a built-in test (self test) to call for service. 60 • Maintenance Load continuous forms paper into the printer (see page 14, ff.). 2. Make sure the printer is set up and working correctly. 1. Note The top of the printout handy if you have to make sure that it is turned off . To stop the test, press SELECT or turn the printer off , then press and hold LINE FEED while turning the printer on.

Users Guide
Page 61
... stop the test, press SELECT or turn the printer off . With the printer turned off, press and hold SELECT and FORM FEED while turning the printer on. • To disengage the Hex Dump Mode, turn the printer off , then on . Make sure continuous forms paper is loaded. 2. To run the test: 1. Hex Dump Mode In Hex Dump Mode, all data sent to the printer, including text and printer commands, prints in both hexadecimal and ASCII format. • To place the printer in the Hex Dump Mode, press...
... stop the test, press SELECT or turn the printer off . With the printer turned off, press and hold SELECT and FORM FEED while turning the printer on. • To disengage the Hex Dump Mode, turn the printer off , then on . Make sure continuous forms paper is loaded. 2. To run the test: 1. Hex Dump Mode In Hex Dump Mode, all data sent to the printer, including text and printer commands, prints in both hexadecimal and ASCII format. • To place the printer in the Hex Dump Mode, press...
Users Guide
Page 65
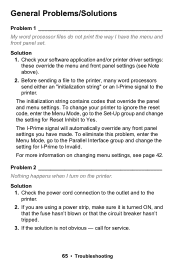
... the panel and menu settings. call for Reset Inhibit to the printer. 2. General Problems/Solutions Problem 1 My word processor files do not print the way I turn on changing menu settings, see Note above). 2. Check your printer to ignore the reset code, enter the Menu Mode, go to the Parallel Interface group and change the setting for service. 65 • Troubleshooting To change your software application and/or printer driver settings: these override the menu and front panel settings (see page 42. Problem 2 Nothing...
... the panel and menu settings. call for Reset Inhibit to the printer. 2. General Problems/Solutions Problem 1 My word processor files do not print the way I turn on changing menu settings, see Note above). 2. Check your printer to ignore the reset code, enter the Menu Mode, go to the Parallel Interface group and change the setting for service. 65 • Troubleshooting To change your software application and/or printer driver settings: these override the menu and front panel settings (see page 42. Problem 2 Nothing...
Users Guide
Page 66
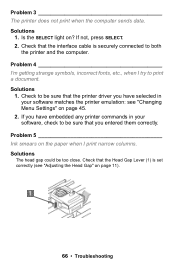
... SELECT light on the paper when I try to both the printer and the computer. Solutions The head gap could be sure that the printer driver you entered them correctly. If you have selected in your software matches the printer emulation: see "Adjusting the Head Gap" on page 45. 2. Problem 3 The printer does not print when the computer sends data. Check that the interface cable is set correctly (see "Changing Menu Settings" on page 11). 66 • Troubleshooting...
... SELECT light on the paper when I try to both the printer and the computer. Solutions The head gap could be sure that the printer driver you entered them correctly. If you have selected in your software matches the printer emulation: see "Adjusting the Head Gap" on page 45. 2. Problem 3 The printer does not print when the computer sends data. Check that the interface cable is set correctly (see "Changing Menu Settings" on page 11). 66 • Troubleshooting...
Users Guide
Page 68
... not covered by a number of printer) is always set properly. Solution The most likely cause is that the paper sensor groove at the left end of the platen is in the single sheet position. If the light still blinks, call for service. Problem 9 The Print Quality and Character Pitch keys on again. Check with your system manager before changing any menu settings. Solution Try turning the printer off, then back on the front panel don't work.
... not covered by a number of printer) is always set properly. Solution The most likely cause is that the paper sensor groove at the left end of the platen is in the single sheet position. If the light still blinks, call for service. Problem 9 The Print Quality and Character Pitch keys on again. Check with your system manager before changing any menu settings. Solution Try turning the printer off, then back on the front panel don't work.

Users Guide
Page 84
... connections parallel 33-34 serial 34-35 USB 31 Continuous forms loading bottom feed 21-24 rear feed 16-20 specifications 81 Cut sheet paper 81 D Default menu settings 47 Defaults 42-43 menu mode 49 Dimensions 82 Drivers, printer 36 E Electrical specifications 82 Emulations 80 Environmental specifications ... 82 F FORM FEED button 41 Frequency 82 Front panel 39-41 buttons 41 lights 39-40 G Gap, printhead 11 H Head gap 11 lever 14 Hex dump mode 61 Humidity specifications 82 I Important boxes 4 Interfaces parallel 83 serial 83 USB 83 I-Prime 50 J Jams, paper rear...
... connections parallel 33-34 serial 34-35 USB 31 Continuous forms loading bottom feed 21-24 rear feed 16-20 specifications 81 Cut sheet paper 81 D Default menu settings 47 Defaults 42-43 menu mode 49 Dimensions 82 Drivers, printer 36 E Electrical specifications 82 Emulations 80 Environmental specifications ... 82 F FORM FEED button 41 Frequency 82 Front panel 39-41 buttons 41 lights 39-40 G Gap, printhead 11 H Head gap 11 lever 14 Hex dump mode 61 Humidity specifications 82 I Important boxes 4 Interfaces parallel 83 serial 83 USB 83 I-Prime 50 J Jams, paper rear...
Users Guide
Page 85
... sheets ...... 25-26, 28-29 Paper separator installing 12 replacement 78 Paper specifications 81 Parallel computer connection ......33-34 interface menu settings ........ 50 PITCH button 41 PITCH lights 39 Platen knob 10 replacement 78 Power connection 13 Power cord replacement 78 POWER light 39 Print speed 80 Printer defaults 42 dimensions 82 drivers 36 reliability 81 weight 82 Printhead 78 gap 11 life 81 shipping restraint 6 specifications 80 Pull tractor 79 using 51, 53 R Rear feed paper loading 16-17, 19-20 Reliability 81 Replacement parts 78 Ribbon cartridge...
... sheets ...... 25-26, 28-29 Paper separator installing 12 replacement 78 Paper specifications 81 Parallel computer connection ......33-34 interface menu settings ........ 50 PITCH button 41 PITCH lights 39 Platen knob 10 replacement 78 Power connection 13 Power cord replacement 78 POWER light 39 Print speed 80 Printer defaults 42 dimensions 82 drivers 36 reliability 81 weight 82 Printhead 78 gap 11 life 81 shipping restraint 6 specifications 80 Pull tractor 79 using 51, 53 R Rear feed paper loading 16-17, 19-20 Reliability 81 Replacement parts 78 Ribbon cartridge...


