C610, C711 User's Guide (English)
Page 3
... with cold water and soap to induce vomiting. Note: Images used in this manual may include optional features that your product does not have installed. 3 - C610/C711 User's Guide DO NOT attempt to help reduce risk of cold water and seek medical attention. Seek medical attention. Emergency First Aid Take care...
... with cold water and soap to induce vomiting. Note: Images used in this manual may include optional features that your product does not have installed. 3 - C610/C711 User's Guide DO NOT attempt to help reduce risk of cold water and seek medical attention. Seek medical attention. Emergency First Aid Take care...
C610, C711 User's Guide (English)
Page 5
... Major Printer Components and Paper Path 70 Paper Sensor Error Codes 71 Clearing Paper Jams 72 Replacing Consumables and Maintenance Items 83 Order Information 83 Toner Cartridge Replacement 84 Image Drum Replacement 90 Replacing the Transfer Belt Unit 96 Fuser Replacement 101 Cleaning the LED Head 104 Utilities 106 Summary of...
... Major Printer Components and Paper Path 70 Paper Sensor Error Codes 71 Clearing Paper Jams 72 Replacing Consumables and Maintenance Items 83 Order Information 83 Toner Cartridge Replacement 84 Image Drum Replacement 90 Replacing the Transfer Belt Unit 96 Fuser Replacement 101 Cleaning the LED Head 104 Utilities 106 Summary of...

C610, C711 User's Guide (English)
Page 8
... of single sheets when required. 5. Also for feeding heavier paper stocks, envelopes and other special media. Front cover release lever 7. Toner cartridges (C,M,Y,K) 12. Holds up to 250 sheets at 80 g/m². 2. C610/C711 User's Guide Top cover release button 9. Duplex unit (when fitted) *The display language can be changed to show English...
... of single sheets when required. 5. Also for feeding heavier paper stocks, envelopes and other special media. Front cover release lever 7. Toner cartridges (C,M,Y,K) 12. Holds up to 250 sheets at 80 g/m². 2. C610/C711 User's Guide Top cover release button 9. Duplex unit (when fitted) *The display language can be changed to show English...
C610, C711 User's Guide (English)
Page 10
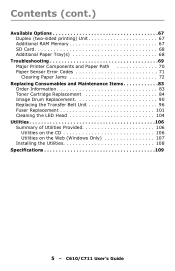
...Paper level indicator 6. Front cover release lever 7. LED heads 10. C711 Front View 9 13 10 11 13 8 7 12 3 5 1 2 7 4 6 1. Toner cartridges (C,M,Y,K) 12. Also for feeding heavier paper stocks, envelopes and other special media. Multi-purpose tray release recess 8. Fuser release levers 11. Duplex unit (when... fitted) *The display language can be changed to 350 sheets at 80g/m². 2. C610/C711 User's Guide Multi purpose tray Used for manual feeding of 80g/m² paper. 4. Output stacker, face down Standard printed copy ...
...Paper level indicator 6. Front cover release lever 7. LED heads 10. C711 Front View 9 13 10 11 13 8 7 12 3 5 1 2 7 4 6 1. Toner cartridges (C,M,Y,K) 12. Also for feeding heavier paper stocks, envelopes and other special media. Multi-purpose tray release recess 8. Fuser release levers 11. Duplex unit (when... fitted) *The display language can be changed to 350 sheets at 80g/m². 2. C610/C711 User's Guide Multi purpose tray Used for manual feeding of 80g/m² paper. 4. Output stacker, face down Standard printed copy ...
C610, C711 User's Guide (English)
Page 25
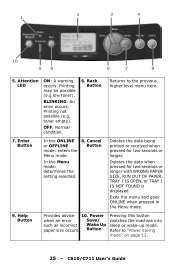
... 6 7 8 5. Printing not possible (e.g. Enter Button In the ONLINE or OFFLINE mode: enters the Menu mode. 8. C610/C711 User's Guide BLINKING: An error occurs. Refer to the previous higher level menu item. 7. Printing may be possible (e.g low toner). toner empty). Help Button Provides advice when an error such as incorrect paper size occurs 10...
... 6 7 8 5. Printing not possible (e.g. Enter Button In the ONLINE or OFFLINE mode: enters the Menu mode. 8. C610/C711 User's Guide BLINKING: An error occurs. Refer to the previous higher level menu item. 7. Printing may be possible (e.g low toner). toner empty). Help Button Provides advice when an error such as incorrect paper size occurs 10...
C610, C711 User's Guide (English)
Page 28
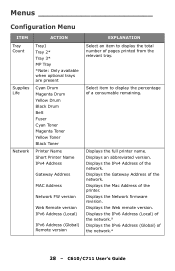
... MP Tray *Note: Only available when optional trays are present Cyan Drum Magenta Drum Yellow Drum Black Drum Belt Fuser Cyan Toner Magenta Toner Yellow Toner Black Toner Printer Name Short Printer Name IPv4 Address Gateway Address MAC Address Network FW version Web Remote version IPv6 Address (Local) IPv6...Address of pages printed from the relevant tray. Select item to display the total number of the printer. Displays the Web remote version. C610/C711 User's Guide Displays the IPv6 Address (Local) of the network.a Displays the IPv6 Address (Global) of a consumable remaining. Displays...
... MP Tray *Note: Only available when optional trays are present Cyan Drum Magenta Drum Yellow Drum Black Drum Belt Fuser Cyan Toner Magenta Toner Yellow Toner Black Toner Printer Name Short Printer Name IPv4 Address Gateway Address MAC Address Network FW version Web Remote version IPv6 Address (Local) IPv6...Address of pages printed from the relevant tray. Select item to display the total number of the printer. Displays the Web remote version. C610/C711 User's Guide Displays the IPv6 Address (Local) of the network.a Displays the IPv6 Address (Global) of a consumable remaining. Displays...

C610, C711 User's Guide (English)
Page 35
.... Select from X Adjust/Y Adjust/ Duplex X Adjust/Duplex Y adjust. Select from On/Off. Define measurement. 35 - Select action to take when toner sensor indicates low toner. Select by scroll and Enter button. Select from On/Off. Select by scroll and Enter button. Select by scroll and Enter button. Select from... Select from On/Off. PS job only. Select by scroll and Enter button. Select from 1/2/3/4/5/10/15/ 30/60/120/180 Minutes. C610/C711 User's Guide Select by scroll and Enter button. Select by scroll and Enter button. Select by scroll and Enter button.
.... Select from X Adjust/Y Adjust/ Duplex X Adjust/Duplex Y adjust. Select from On/Off. Define measurement. 35 - Select action to take when toner sensor indicates low toner. Select by scroll and Enter button. Select from On/Off. Select by scroll and Enter button. Select by scroll and Enter button. Select from... Select from On/Off. PS job only. Select by scroll and Enter button. Select from 1/2/3/4/5/10/15/ 30/60/120/180 Minutes. C610/C711 User's Guide Select by scroll and Enter button. Select by scroll and Enter button. Select by scroll and Enter button.
C610, C711 User's Guide (English)
Page 41
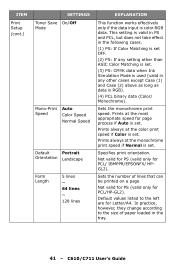
Specifies print orientation. Prints always at the color print speed if Color is set . C610/C711 User's Guide This setting is valid in PS and PCL, but does not take effect in the following cases. (1) PS: If Color Matching is ... if Auto is RGB). (4) PCL binary data (Color/ Monochrome). Prints always at the most appropriate speed for PCL/HP-GL2). ITEM Print Setup (cont.) SETTINGS Toner Save On/Off Mode Mono-Print Speed Auto Color Speed Normal Speed Default Portrait Orientation Landscape Form Length 5 lines ~ 64 lines ~ 128 lines EXPLANATION This...
Specifies print orientation. Prints always at the color print speed if Color is set . C610/C711 User's Guide This setting is valid in PS and PCL, but does not take effect in the following cases. (1) PS: If Color Matching is ... if Auto is RGB). (4) PCL binary data (Color/ Monochrome). Prints always at the most appropriate speed for PCL/HP-GL2). ITEM Print Setup (cont.) SETTINGS Toner Save On/Off Mode Mono-Print Speed Auto Color Speed Normal Speed Default Portrait Orientation Landscape Form Length 5 lines ~ 64 lines ~ 128 lines EXPLANATION This...

C610, C711 User's Guide (English)
Page 49
... simulates standard colors in PS. thus 100% output is limited to an appropriate area. CMYK On/Off Conversion Setting to the toner layer thickness. UCR = Under Color Removal. Ordinarily, the TRC compensation function holds control for special purposes such as specification in CMYK... including the TRC compensation function is not always possible. This function is for the appropriate print density; PS only 49 - C610/C711 User's Guide ITEM Color Setup SETTINGS EXPLANATION Ink Simulation Off SWOP Euroscale Japan The machine has its own process simulation engine ...
... simulates standard colors in PS. thus 100% output is limited to an appropriate area. CMYK On/Off Conversion Setting to the toner layer thickness. UCR = Under Color Removal. Ordinarily, the TRC compensation function holds control for special purposes such as specification in CMYK... including the TRC compensation function is not always possible. This function is for the appropriate print density; PS only 49 - C610/C711 User's Guide ITEM Color Setup SETTINGS EXPLANATION Ink Simulation Off SWOP Euroscale Japan The machine has its own process simulation engine ...

C610, C711 User's Guide (English)
Page 53
.... Attention LED is lit when enabled, not lit if disabled. (Displays LCD message.) The temporary recovery by opening and closing of toner, drum, fuser, or belt occurs. Are You Sure? C610/C711 User's Guide When the Enter button is put into the memory and formatting will be executed at power Off/On...
.... Attention LED is lit when enabled, not lit if disabled. (Displays LCD message.) The temporary recovery by opening and closing of toner, drum, fuser, or belt occurs. Are You Sure? C610/C711 User's Guide When the Enter button is put into the memory and formatting will be executed at power Off/On...
C610, C711 User's Guide (English)
Page 73
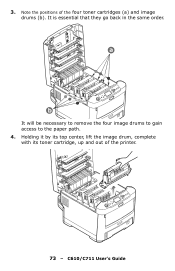
Note the positions of the printer. 73 - C610/C711 User's Guide Holding it by its top center, lift the image drum, complete with its toner cartridge, up and out of the four toner cartridges (a) and image drums (b). It is essential that they go back in the same order. a b It will be necessary to remove the four image drums to gain access to the paper path. 4. 3.
Note the positions of the printer. 73 - C610/C711 User's Guide Holding it by its top center, lift the image drum, complete with its toner cartridge, up and out of the four toner cartridges (a) and image drums (b). It is essential that they go back in the same order. a b It will be necessary to remove the four image drums to gain access to the paper path. 4. 3.

C610, C711 User's Guide (English)
Page 74
... expose the drum to avoid damaging the green drum surface, and cover. The green image drum surface at the base of paper to prevent toner from light. C610/C711 User's Guide 5. Repeat this , wrap the cartridge inside a black plastic bag to keep it to normal room light for more than this removal...
... expose the drum to avoid damaging the green drum surface, and cover. The green image drum surface at the base of paper to prevent toner from light. C610/C711 User's Guide 5. Repeat this , wrap the cartridge inside a black plastic bag to keep it to normal room light for more than this removal...
C610, C711 User's Guide (English)
Page 83
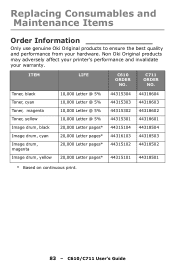
Toner, black Toner, cyan Toner, magenta Toner, yellow Image drum, black Image drum, cyan Image drum, magenta Image drum, yellow 10,000 Letter @ 5% 10,000 Letter @ 5% 10,000 Letter @ 5% 10,000 Letter @ 5% ... 44318502 44318501 * Based on continuous print. 83 - C711 ORDER NO. Replacing Consumables and Maintenance Items Order Information Only use genuine Oki Original products to ensure the best quality and performance from your warranty. C610/C711 User's Guide Non Oki Original products may adversely affect your printer's performance and invalidate your hardware. ITEM LIFE...
Toner, black Toner, cyan Toner, magenta Toner, yellow Image drum, black Image drum, cyan Image drum, magenta Image drum, yellow 10,000 Letter @ 5% 10,000 Letter @ 5% 10,000 Letter @ 5% 10,000 Letter @ 5% ... 44318502 44318501 * Based on continuous print. 83 - C711 ORDER NO. Replacing Consumables and Maintenance Items Order Information Only use genuine Oki Original products to ensure the best quality and performance from your warranty. C610/C711 User's Guide Non Oki Original products may adversely affect your printer's performance and invalidate your hardware. ITEM LIFE...
C610, C711 User's Guide (English)
Page 84
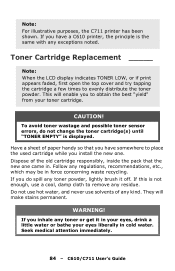
..., lightly brush it in your eyes, drink a little water or bathe your toner cartridge. C610/C711 User's Guide This will make stains permanent. Have a sheet of the old cartridge responsibly, inside the pack that you install the new one came ..., and never use a cool, damp cloth to place the used cartridge while you have a C610 printer, the principle is not enough, use solvents of any exceptions noted. Toner Cartridge Replacement _____ Note: When the LCD display indicates TONER LOW, or if print appears faded, first open the top cover and try tapping the...
..., lightly brush it in your eyes, drink a little water or bathe your toner cartridge. C610/C711 User's Guide This will make stains permanent. Have a sheet of the old cartridge responsibly, inside the pack that you install the new one came ..., and never use a cool, damp cloth to place the used cartridge while you have a C610 printer, the principle is not enough, use solvents of any exceptions noted. Toner Cartridge Replacement _____ Note: When the LCD display indicates TONER LOW, or if print appears faded, first open the top cover and try tapping the...
C610, C711 User's Guide (English)
Page 86
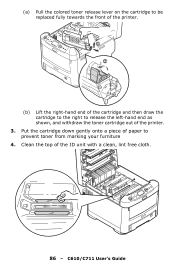
(a) Pull the colored toner release lever on the cartridge to be replaced fully towards the front of the printer. 2b 2a (b) Lift the right-hand end of the cartridge and then draw the cartridge to the right to prevent toner from marking your furniture 4. Clean the top of the printer. 3. Put the cartridge down gently onto a piece of paper to release the left-hand end as shown, and withdraw the toner cartridge out of the ID unit with a clean, lint free cloth. 86 - C610/C711 User's Guide
(a) Pull the colored toner release lever on the cartridge to be replaced fully towards the front of the printer. 2b 2a (b) Lift the right-hand end of the cartridge and then draw the cartridge to the right to prevent toner from marking your furniture 4. Clean the top of the printer. 3. Put the cartridge down gently onto a piece of paper to release the left-hand end as shown, and withdraw the toner cartridge out of the ID unit with a clean, lint free cloth. 86 - C610/C711 User's Guide
C610, C711 User's Guide (English)
Page 87
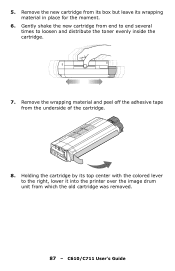
Holding the cartridge by its wrapping material in place for the moment. 6. Gently shake the new cartridge from which the old cartridge was removed. 87 - Remove the wrapping material and peel off the adhesive tape from its box but leave its top center with the colored lever to the right, lower it into the printer over the image drum unit from end to end several times to loosen and distribute the toner evenly inside the cartridge. 7. C610/C711 User's Guide Remove the new cartridge from the underside of the cartridge. 8. 5.
Holding the cartridge by its wrapping material in place for the moment. 6. Gently shake the new cartridge from which the old cartridge was removed. 87 - Remove the wrapping material and peel off the adhesive tape from its box but leave its top center with the colored lever to the right, lower it into the printer over the image drum unit from end to end several times to loosen and distribute the toner evenly inside the cartridge. 7. C610/C711 User's Guide Remove the new cartridge from the underside of the cartridge. 8. 5.
C610, C711 User's Guide (English)
Page 88
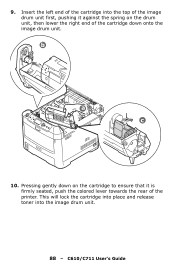
Insert the left end of the cartridge into the image drum unit. 88 - C610/C711 User's Guide b a c 10. This will lock the cartridge into place and release toner into the top of the image drum unit first, pushing it is firmly seated, push the colored lever towards the rear of the cartridge down onto the image drum unit. Pressing gently down on the cartridge to ensure that it against the spring on the drum unit, then lower the right end of the printer. 9.
Insert the left end of the cartridge into the image drum unit. 88 - C610/C711 User's Guide b a c 10. This will lock the cartridge into place and release toner into the top of the image drum unit first, pushing it is firmly seated, push the colored lever towards the rear of the cartridge down onto the image drum unit. Pressing gently down on the cartridge to ensure that it against the spring on the drum unit, then lower the right end of the printer. 9.
C610, C711 User's Guide (English)
Page 91
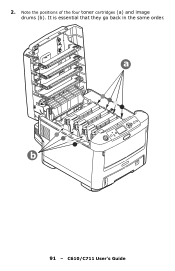
Note the positions of the four toner cartridges (a) and image drums (b). 2. C610/C711 User's Guide It is essential that they go back in the same order. a b 91 -
Note the positions of the four toner cartridges (a) and image drums (b). 2. C610/C711 User's Guide It is essential that they go back in the same order. a b 91 -
C610, C711 User's Guide (English)
Page 92
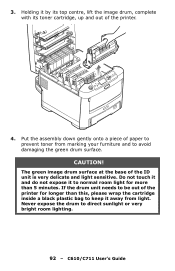
Do not touch it and do not expose it to direct sunlight or very bright room lighting. 92 - C610/C711 User's Guide Never expose the drum to normal room light for longer than 5 minutes. The green image drum surface at the base of the ... the cartridge inside a black plastic bag to avoid damaging the green drum surface. If the drum unit needs to be out of paper to prevent toner from light. Holding it away from marking your furniture and to keep it by its top centre, lift the image drum, complete with its...
Do not touch it and do not expose it to direct sunlight or very bright room lighting. 92 - C610/C711 User's Guide Never expose the drum to normal room light for longer than 5 minutes. The green image drum surface at the base of the ... the cartridge inside a black plastic bag to avoid damaging the green drum surface. If the drum unit needs to be out of paper to prevent toner from light. Holding it away from marking your furniture and to keep it by its top centre, lift the image drum, complete with its...
C610, C711 User's Guide (English)
Page 93
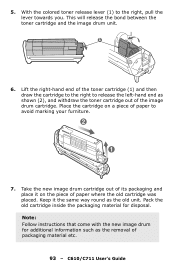
Keep it on a piece of paper to release the left-hand end as shown (2), and withdraw the toner cartridge out of the toner cartridge (1) and then draw the cartridge to the right to avoid marking your furniture. 2 1 7. Note: Follow instructions that come with the new image drum ...the old cartridge was placed. Pack the old cartridge inside the packaging material for additional information such as the old unit. C610/C711 User's Guide This will release the bond between the toner cartridge and the image drum unit. 1 6. Lift the right-hand end of the image drum cartridge. With the colored...
Keep it on a piece of paper to release the left-hand end as shown (2), and withdraw the toner cartridge out of the toner cartridge (1) and then draw the cartridge to the right to avoid marking your furniture. 2 1 7. Note: Follow instructions that come with the new image drum ...the old cartridge was placed. Pack the old cartridge inside the packaging material for additional information such as the old unit. C610/C711 User's Guide This will release the bond between the toner cartridge and the image drum unit. 1 6. Lift the right-hand end of the image drum cartridge. With the colored...


