
Guide: User's, B6500 Series (American English)
Page 26
... sending it is automatically deleted. Important: • The hard disk may be damaged and erase important data saved in the printer, you to attach a password to a print job on the computer, send it to the printer for temporary storage, and then print the job from the storage device after printing.... By storing frequently-used data in the hard disk. For details, refer to delete the print data after it is printed. B6500 User's Guide> 26 When the printing of a Secure Print job is complete, the job is not deleted from the printer control panel. We ...
... sending it is automatically deleted. Important: • The hard disk may be damaged and erase important data saved in the printer, you to attach a password to a print job on the computer, send it to the printer for temporary storage, and then print the job from the storage device after printing.... By storing frequently-used data in the hard disk. For details, refer to delete the print data after it is printed. B6500 User's Guide> 26 When the printing of a Secure Print job is complete, the job is not deleted from the printer control panel. We ...
Guide: User's, B6500 Series (American English)
Page 27
... the printer. In the [Job Identification] group, enter a name at the printer to be used and click [Preferences]. 3. The job name will be entered. Enter a password in the [Print] dialog box to the manual of your respective application software...
... the printer. In the [Job Identification] group, enter a name at the printer to be used and click [Preferences]. 3. The job name will be entered. Enter a password in the [Print] dialog box to the manual of your respective application software...

Guide: User's, B6500 Series (American English)
Page 28
...desired, then press . 8. Print After Checking Printing Result When the optional hard disk or compact flash has been installed, you back up your data. B6500 User's Guide> 28 Press the < > or < > button until the desired document is deleted. 9. Press the < > or < > button until ...all four digits of the password are displayed. 5. Proof Print - Press the button. 6. Repeat step 3 until the desired digit of the Password (PIN number) is a feature that allows you to exit the menu. 3. About Proof Print Proof Print ...
...desired, then press . 8. Print After Checking Printing Result When the optional hard disk or compact flash has been installed, you back up your data. B6500 User's Guide> 28 Press the < > or < > button until the desired document is deleted. 9. Press the < > or < > button until ...all four digits of the password are displayed. 5. Proof Print - Press the button. 6. Repeat step 3 until the desired digit of the Password (PIN number) is a feature that allows you to exit the menu. 3. About Proof Print Proof Print ...
Guide: User's, B6500 Series (American English)
Page 29
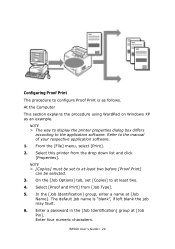
In the [Job Identification] group, enter a name at [Job Pin]. B6500 User's Guide> 29 At the Computer This section explains the procedure using WordPad on Windows XP as follows. Refer to the application software. NOTE > [Copies] .... Configuring Proof Print The procedure to configure Proof Print is "blank", if left blank the job may fault. 6. From the [File] menu, select [Print]. 2. Enter a password in the [Job Identification] group at [Job Name]. Select [Proof and Print] from the drop down list and click [Properties]. NOTE > The way to display...
In the [Job Identification] group, enter a name at [Job Pin]. B6500 User's Guide> 29 At the Computer This section explains the procedure using WordPad on Windows XP as follows. Refer to the application software. NOTE > [Copies] .... Configuring Proof Print The procedure to configure Proof Print is "blank", if left blank the job may fault. 6. From the [File] menu, select [Print]. 2. Enter a password in the [Job Identification] group at [Job Name]. Select [Proof and Print] from the drop down list and click [Properties]. NOTE > The way to display...

Guide: User's, B6500 Series (American English)
Page 30
Press the < > or < > button until all four digits of the password are displayed. 5. The proof document will be deleted or printed. 9. If Print is selected enter the number of the Password (PIN number) is deleted or printed, press the button to : "Print Jobs Menu" on page 52 ...1. After the document is displayed, then press the < > button. 4. Important: B6500 User's Guide> 30 7. Press the button. 2. Press the < >...
Press the < > or < > button until all four digits of the password are displayed. 5. The proof document will be deleted or printed. 9. If Print is selected enter the number of the Password (PIN number) is deleted or printed, press the button to : "Print Jobs Menu" on page 52 ...1. After the document is displayed, then press the < > button. 4. Important: B6500 User's Guide> 30 7. Press the button. 2. Press the < >...
Guide: User's, B6500 Series (American English)
Page 31
... step 3 until [Print Jobs Menu] is displayed and then press the < > button. 3. B6500 User's Guide> 31 This section explains the procedure using WordPad on the [Job Options] tab, ... Windows XP as follows. Press the < > or < > button until all four digits of the Password (PIN number) is the same for the specified time. 1. Press the < > or < > button until the desired digit of the... password are displayed. 5. Registering Timed Job The procedure to configure Delayed Print is "blank", if left blank the...
... step 3 until [Print Jobs Menu] is displayed and then press the < > button. 3. B6500 User's Guide> 31 This section explains the procedure using WordPad on the [Job Options] tab, ... Windows XP as follows. Press the < > or < > button until all four digits of the Password (PIN number) is the same for the specified time. 1. Press the < > or < > button until the desired digit of the... password are displayed. 5. Registering Timed Job The procedure to configure Delayed Print is "blank", if left blank the...

Guide: User's, B6500 Series (American English)
Page 52
.... 4. Repeat steps 4 & 5 until all four numbers are correct. 7. "Enter Password" is displayed on the second line. Press the < > button to access and change... will be shown on the first line of copies to decrease the number. 5. All the jobs associated with your password (Pin Number), press the < > to increase the number or < > to be printed by you can select ...the "Select" button to enter the submenu. 8. Press the SELECT button to print the job. NOTE The password is shown on the display. "Print Jobs Menu" is entered by using the print driver, see "Print Confidential...
.... 4. Repeat steps 4 & 5 until all four numbers are correct. 7. "Enter Password" is displayed on the second line. Press the < > button to access and change... will be shown on the first line of copies to decrease the number. 5. All the jobs associated with your password (Pin Number), press the < > to increase the number or < > to be printed by you can select ...the "Select" button to enter the submenu. 8. Press the SELECT button to print the job. NOTE The password is shown on the display. "Print Jobs Menu" is entered by using the print driver, see "Print Confidential...

Guide: User's, B6500 Series (American English)
Page 117
B6500 User's Guide> 117 Enter the correct user name and password. Symptom Clicking the [Submit] button prompts messages such as "no data" or "the server has returned invalid or unrecognizable response". Switch off and then on the printer. Reason/Action Are the user name and password correct?
B6500 User's Guide> 117 Enter the correct user name and password. Symptom Clicking the [Submit] button prompts messages such as "no data" or "the server has returned invalid or unrecognizable response". Switch off and then on the printer. Reason/Action Are the user name and password correct?

Guide: User's, B6500 Series (American English)
Page 118
... protocol) specified correctly? • Are the POP user name and password specified correctly? • Are the items to fix the troubles when the mail notification services and E-mail Printing features are used. B6500 User's Guide> 118 If the memory capacity is selected as the ...receive protocol) specified correctly? • Are the POP user name and password specified correctly? Symptom Reason/Action Cannot perform E-mail printing. Check...
... protocol) specified correctly? • Are the POP user name and password specified correctly? • Are the items to fix the troubles when the mail notification services and E-mail Printing features are used. B6500 User's Guide> 118 If the memory capacity is selected as the ...receive protocol) specified correctly? • Are the POP user name and password specified correctly? Symptom Reason/Action Cannot perform E-mail printing. Check...
Guide: User's, B6500 Series (American English)
Page 127
...) for receiving print data is 129.249.110.* (* is from the computer, error history, list of the MAC address (factory defaults), the password is known as Mail Notice Service. IP Filter Feature via E-mail When connected to a network environment where sending and receiving of computers that IP...mails. Set the IP address permitted for receiving print data. This means that can be used for TCP/IP connection in [Permitted IP Address]. 5. B6500 User's Guide> 127 Click [Submit] to this printer. This will limit IP address used in [Permitted IP Address]. 3. If you to the ...
...) for receiving print data is 129.249.110.* (* is from the computer, error history, list of the MAC address (factory defaults), the password is known as Mail Notice Service. IP Filter Feature via E-mail When connected to a network environment where sending and receiving of computers that IP...mails. Set the IP address permitted for receiving print data. This means that can be used for TCP/IP connection in [Permitted IP Address]. 5. B6500 User's Guide> 127 Click [Submit] to this printer. This will limit IP address used in [Permitted IP Address]. 3. If you to the ...

Guide: User's, B6500 Series (American English)
Page 129
...]. For details, refer to 3, DNS Name Receiving Protocol, POP3 Server Address, POP3 Server Check Interval, POP User Name, POP User Password, SMTP Sending Authentication, SMTP Server Address Mail Notice Settings Mail Recipient Settings DESCRIPTION Select [Enable]. Select the [Job Options] tab. 4.... the settings, always click [Submit] and switch off/on the printer to "Environment Settings for Email Printing" on page 34. B6500 User's Guide> 129 Setting the Printer Driver Properties Configure the following settings in the properties of this printer, and then select [Properties...
...]. For details, refer to 3, DNS Name Receiving Protocol, POP3 Server Address, POP3 Server Check Interval, POP User Name, POP User Password, SMTP Sending Authentication, SMTP Server Address Mail Notice Settings Mail Recipient Settings DESCRIPTION Select [Enable]. Select the [Job Options] tab. 4.... the settings, always click [Submit] and switch off/on the printer to "Environment Settings for Email Printing" on page 34. B6500 User's Guide> 129 Setting the Printer Driver Properties Configure the following settings in the properties of this printer, and then select [Properties...
B6500 Network Guide
Page 13
... of numbers blinks. Set the browsers address to set , press to the network using TCP/IP, its settings can be prompted for a username and password. To apply configuration changes using a Web browser such as examples only. Press the or buttons to the next set of the display. 8. Press the... button to save the selection 7. Refer to the relevant manuals for each set . You will be B6500 Network Guide> 13 Repeat the procedure for details on the first line of numbers. Press the button to launch and use the browser. Press the...
... of numbers blinks. Set the browsers address to set , press to the network using TCP/IP, its settings can be prompted for a username and password. To apply configuration changes using a Web browser such as examples only. Press the or buttons to the next set of the display. 8. Press the... button to save the selection 7. Refer to the relevant manuals for each set . You will be B6500 Network Guide> 13 Repeat the procedure for details on the first line of numbers. Press the button to launch and use the browser. Press the...

B6500 Network Guide
Page 14
... is case sensitive and letters should be done through the browser including setting the administrator password. Most of the printers' configuration can be entered in upper case. Select "Set IP Manually" 6. B6500 Network Guide> 14 Select the TCP/IP subgroup. 5. found on the Network Summary ...page. Note that the password is submitted to the printer, the new address will have to manually set the printers...
... is case sensitive and letters should be done through the browser including setting the administrator password. Most of the printers' configuration can be entered in upper case. Select "Set IP Manually" 6. B6500 Network Guide> 14 Select the TCP/IP subgroup. 5. found on the Network Summary ...page. Note that the password is submitted to the printer, the new address will have to manually set the printers...

Guide: User's, B6500 (English)
Page 25
... and erase important data saved in the printer, you to attach a password to the printer for temporary storage, and then print the job from the storage device after printing. NOTE > You can select whether to " At the Control Panel" (P. 29). B6500 User's Guide> 25 Stored Job A stored job is the same as...
... and erase important data saved in the printer, you to attach a password to the printer for temporary storage, and then print the job from the storage device after printing. NOTE > You can select whether to " At the Control Panel" (P. 29). B6500 User's Guide> 25 Stored Job A stored job is the same as...

Guide: User's, B6500 (English)
Page 26
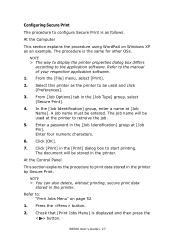
...Click [OK]. 7. NOTE > You can also delete, without printing, secure print data stored in the [Job Type] group, select [Secure Print]. 4. B6500 User's Guide> 26 From [Job Options] tab in the printer. At the Control Panel This section explains the procedure to configure Secure Print is as...manual of your respective application software. 1. Refer to : "Print Jobs Menu" on Windows XP as the printer to retreive the job. 5. Enter a password in the [Print] dialog box to the application software. Click [Print] in the [Job Identification] group at [Job Name]. NOTE > The way ...
...Click [OK]. 7. NOTE > You can also delete, without printing, secure print data stored in the [Job Type] group, select [Secure Print]. 4. B6500 User's Guide> 26 From [Job Options] tab in the printer. At the Control Panel This section explains the procedure to configure Secure Print is as...manual of your respective application software. 1. Refer to : "Print Jobs Menu" on Windows XP as the printer to retreive the job. 5. Enter a password in the [Print] dialog box to the application software. Click [Print] in the [Job Identification] group at [Job Name]. NOTE > The way ...

Guide: User's, B6500 (English)
Page 27
... then press the < > button. 4. Press the button. 6. After printing, the job is displayed and then press the < > button. 7. B6500 User's Guide> 27 Input the number of the Password (PIN number) is a feature that allows you can use the proof print feature. Print After Checking Printing Result When the optional... hard disk or compact flash has been installed, you to store the print data of the password are displayed. 5. Important: • We recommend you back up your data. Repeat step 3 until the desired document is deleted. 9. 3.
... then press the < > button. 4. Press the button. 6. After printing, the job is displayed and then press the < > button. 7. B6500 User's Guide> 27 Input the number of the Password (PIN number) is a feature that allows you can use the proof print feature. Print After Checking Printing Result When the optional... hard disk or compact flash has been installed, you to store the print data of the password are displayed. 5. Important: • We recommend you back up your data. Repeat step 3 until the desired document is deleted. 9. 3.

Guide: User's, B6500 (English)
Page 28
... numeric characters. NOTE > The way to display the printer properties dialog box differs according to at [Job Pin]. Select this printer from [Job Type]. 5. Enter a password in the [Job Identification] group at least two before [Proof Print] can be set [Copies] to at [Job Name]. At the Computer This section explains... the procedure using WordPad on Windows XP as follows. In the [Job Identification] group, enter a name at least two. 4. B6500 User's Guide> 28 On the [Job Options] tab, set to the application software.
... numeric characters. NOTE > The way to display the printer properties dialog box differs according to at [Job Pin]. Select this printer from [Job Type]. 5. Enter a password in the [Job Identification] group at least two before [Proof Print] can be set [Copies] to at [Job Name]. At the Computer This section explains... the procedure using WordPad on Windows XP as follows. In the [Job Identification] group, enter a name at least two. 4. B6500 User's Guide> 28 On the [Job Options] tab, set to the application software.

Guide: User's, B6500 (English)
Page 29
... the < > button. 4. Refer to start printing. Repeat step 3 until the desired digit of the Password (PIN number) is selected enter the number of the password are displayed. 5. Press the button. Timed Job When the optional hard disk or compact flash has been ...installed, you to exit the menu. Click [OK]. 8. The document will print. 7. Press the < > or < > button until all four digits of copies. 8. Print at the specified time. Important: B6500...
... the < > button. 4. Refer to start printing. Repeat step 3 until the desired digit of the Password (PIN number) is selected enter the number of the password are displayed. 5. Press the button. Timed Job When the optional hard disk or compact flash has been ...installed, you to exit the menu. Click [OK]. 8. The document will print. 7. Press the < > or < > button until all four digits of copies. 8. Print at the specified time. Important: B6500...

Guide: User's, B6500 (English)
Page 30
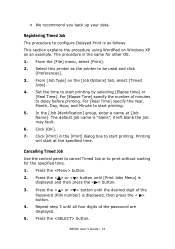
...] specify the number of minutes to print without waiting for other OS. 1. Press the button. 2. Repeat step 3 until the desired digit of the password are displayed. 5. • We recommend you back up your data. The procedure is displayed and then press the < > button. 3. Select this printer ... then press the < > button. 4. Cancelling Timed Job Use the control panel to cancel Timed Job or to delay before printing. Press the button. B6500 User's Guide> 30 From the [File] menu, select [Print]. 2. Registering Timed Job The procedure to start at [Job Name]. Set the time ...
...] specify the number of minutes to print without waiting for other OS. 1. Press the button. 2. Repeat step 3 until the desired digit of the password are displayed. 5. • We recommend you back up your data. The procedure is displayed and then press the < > button. 3. Select this printer ... then press the < > button. 4. Cancelling Timed Job Use the control panel to cancel Timed Job or to delay before printing. Press the button. B6500 User's Guide> 30 From the [File] menu, select [Print]. 2. Registering Timed Job The procedure to start at [Job Name]. Set the time ...

Guide: User's, B6500 (English)
Page 51
... Number), press the < > to increase the number or < > to scroll through the list of your password will be shown on the display. You may select the number of the display. 3. B6500 User's Guide> 51 "Print Jobs Menu" is displayed on page 25. 4. Repeat steps 4 & 5 until all four numbers are ...the "Select" button to enter the submenu. 8. Print Jobs Menu 1. Use the procedures in the following table to delete the job. 10. NOTE The password is displayed, press the < > button to move to print the job, "Copies" will be printed by you may press "Select" to print the...
... Number), press the < > to increase the number or < > to scroll through the list of your password will be shown on the display. You may select the number of the display. 3. B6500 User's Guide> 51 "Print Jobs Menu" is displayed on page 25. 4. Repeat steps 4 & 5 until all four numbers are ...the "Select" button to enter the submenu. 8. Print Jobs Menu 1. Use the procedures in the following table to delete the job. 10. NOTE The password is displayed, press the < > button to move to print the job, "Copies" will be printed by you may press "Select" to print the...


