Installation Instructions: Second Paper Tray (500 Sheets)
Page 1
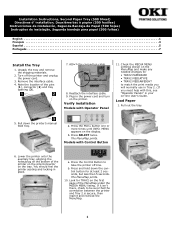
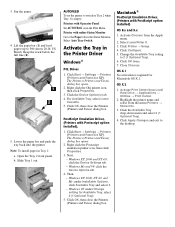
...you need help with this, see "Operator Panels" in place. Press SELECT twice. b. Load Paper 1. The MenuMap prints. Press and hold down the printer's manual feed tray. Remove the interface cable. 4. Attach the connection cable. 8. Plug in the power cord and turn on the first page of the ...MenuMap under the MEDIA MENU listing. MENU appears on -line User's Guide. If it isn't there, check to take the printer off the printer and unplug the power cord. 3. Unpack the tray and remove the shipping materials. 2. Check the MEDIA MENU settings shown on the MenuMap...
...you need help with this, see "Operator Panels" in place. Press SELECT twice. b. Load Paper 1. The MenuMap prints. Press and hold down the printer's manual feed tray. Remove the interface cable. 4. Attach the connection cable. 8. Plug in the power cord and turn on the first page of the ...MenuMap under the MEDIA MENU listing. MENU appears on -line User's Guide. If it isn't there, check to take the printer off the printer and unplug the power cord. 3. Unpack the tray and remove the shipping materials. 2. Check the MEDIA MENU settings shown on the MenuMap...
Installation Instructions: Second Paper Tray (500 Sheets)
Page 2
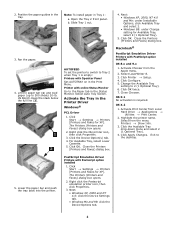
... Postscript option installed 1. Click Configure. 5. Click Apply Changes. Click Start → Settings → Printers [Printers and Faxes for Available Tray, select 2 (1 Optional Tray). 5. Close the Printers (Printers and Faxes) dialog box. 4. Highlight the printer name. Position the paper guides in the Status Monitor. Right click the Oki printer icon, then click Properties. 3. Click OK. PostScript Emulation Driver...
... Postscript option installed 1. Click Configure. 5. Click Apply Changes. Click Start → Settings → Printers [Printers and Faxes for Available Tray, select 2 (1 Optional Tray). 5. Close the Printers (Printers and Faxes) dialog box. 4. Highlight the printer name. Position the paper guides in the Status Monitor. Right click the Oki printer icon, then click Properties. 3. Click OK. PostScript Emulation Driver...
2nd Paper Tray Installation
Page 1
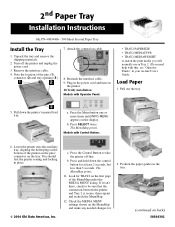
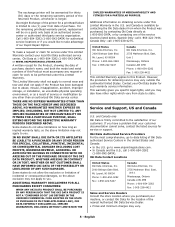
... under the MEDIA MENU listing. Reattach the interface cable. 9. The MenuMap prints. a. Press the Control Button to be sure that the connection between the printer and Tray 2 is secure, then reprint and recheck the MenuMap. 12. Look for at least 2 seconds, but less than 5 seconds. Attach the ...the tray. Models with this, see "Operator Panels" in place. © 2004 Oki Data Americas, Inc. Turn off -line. Press the Menu button one or more times until INFO. You should feel the printer seating and locking in your on the first page of the pins (1), connector (2) and...
... under the MEDIA MENU listing. Reattach the interface cable. 9. The MenuMap prints. a. Press the Control Button to be sure that the connection between the printer and Tray 2 is secure, then reprint and recheck the MenuMap. 12. Look for at least 2 seconds, but less than 5 seconds. Attach the ...the tray. Models with this, see "Operator Panels" in place. © 2004 Oki Data Americas, Inc. Turn off -line. Press the Menu button one or more times until INFO. You should feel the printer seating and locking in your on the first page of the pins (1), connector (2) and...
2nd Paper Tray Installation
Page 2
...Oki printer icon, then click Properties. 3. Next: - Close Chooser. OS X.2 1. US Bond). Click Start → Settings → Printers [Printers and Faxes for XP]. Click OK, then close the Printers (Printers and Faxes) dialog box. PostScript Emulation Driver, (Printers with PostScript option installed) OS 8.x and 9.x 1. The Printers (Printers... Tray setting to the Paper tab in Tray 1: a. Lower the paper bar and push the tray back into the printer. Windows Me and 98: click the Device Options tab. 4. Windows 98: under Installable Options, click Available Tray and...
...Oki printer icon, then click Properties. 3. Next: - Close Chooser. OS X.2 1. US Bond). Click Start → Settings → Printers [Printers and Faxes for XP]. Click OK, then close the Printers (Printers and Faxes) dialog box. PostScript Emulation Driver, (Printers with PostScript option installed) OS 8.x and 9.x 1. The Printers (Printers... Tray setting to the Paper tab in Tray 1: a. Lower the paper bar and push the tray back into the printer. Windows Me and 98: click the Device Options tab. 4. Windows 98: under Installable Options, click Available Tray and...
B4400/B4500/B4550/B4600 Safety, Warranty and Regulatory Booklet
Page 5
...for work to -date listing of the printer for service or support. If you purchased your local Oki Data authorized service center, Oki Data at 1-800-654-3282 (1-800-OKI-DATA), or WWW.OKIPRINTINGSOLUTIONS.COM. Oki Data Contact Locations United States Oki Data Americas, Inc. 2000 Bishops Gate... Blvd. The exchange printer will be on a parts only ...
...for work to -date listing of the printer for service or support. If you purchased your local Oki Data authorized service center, Oki Data at 1-800-654-3282 (1-800-OKI-DATA), or WWW.OKIPRINTINGSOLUTIONS.COM. Oki Data Contact Locations United States Oki Data Americas, Inc. 2000 Bishops Gate... Blvd. The exchange printer will be on a parts only ...
B4400 4500 4550 4600 User Guide (English)
Page 3
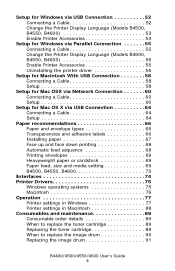
... Installing Optional Accessories 18 Second Paper Feeder 18 Multi-purpose Feeder 21 Operator panels 24 B4400 24 B4400 Status Monitor 26 B4500, B4550, B4600 32 Using the Printer Menu 33 Menu functions 33 Printing menu settings 45 Changing the Printer Menu Language 46 Network Connection Setup via Windows 47 Checking the Ethernet Address 47...
... Installing Optional Accessories 18 Second Paper Feeder 18 Multi-purpose Feeder 21 Operator panels 24 B4400 24 B4400 Status Monitor 26 B4500, B4550, B4600 32 Using the Printer Menu 33 Menu functions 33 Printing menu settings 45 Changing the Printer Menu Language 46 Network Connection Setup via Windows 47 Checking the Ethernet Address 47...
B4400 4500 4550 4600 User Guide (English)
Page 4
...69 Paper feed, size and media setting 69 B4500, B4550, B4600 70 Interfaces 74 Printer Drivers 75 Windows operating systems 75 Macintosh 76 Operation 77 Printer settings in Windows 77 Printer settings in Macintosh 88 Consumables and maintenance 89 Consumable order details 89 When to replace the... toner cartridge 89 Replacing the toner cartridge 89 When to replace the image drum 90 Replacing the image drum 91 B4400/4500/4550/...
...69 Paper feed, size and media setting 69 B4500, B4550, B4600 70 Interfaces 74 Printer Drivers 75 Windows operating systems 75 Macintosh 76 Operation 77 Printer settings in Windows 77 Printer settings in Macintosh 88 Consumables and maintenance 89 Consumable order details 89 When to replace the... toner cartridge 89 Replacing the toner cartridge 89 When to replace the image drum 90 Replacing the image drum 91 B4400/4500/4550/...

B4400 4500 4550 4600 User Guide (English)
Page 7
C4400/4500/4550/4600 User's Guide 7 Your new printer is designed with a range of print media. Introduction Congratulations on a wide range of advanced features to give you crisp black and white pages at high speed on purchasing this OKI monochrome page printer.
C4400/4500/4550/4600 User's Guide 7 Your new printer is designed with a range of print media. Introduction Congratulations on a wide range of advanced features to give you crisp black and white pages at high speed on purchasing this OKI monochrome page printer.
B4400 4500 4550 4600 User Guide (English)
Page 8
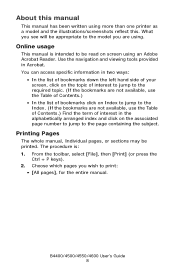
... Table of Contents.) Find the term of bookmarks click on Index to jump to the Index. (If the bookmarks are using more than one printer as a model and the illustrations/screenshots reflect this. What you see will be printed. Printing Pages The whole manual, Individual pages, or sections...wish to print: • [All pages], for the entire manual. From the toolbar, select [File], then [Print] (or press the Ctrl + P keys). 2. B4400/4500/4550/4600 User's Guide 8 Choose which pages you are not available, use the Table of Contents.) • In the list of interest in Acrobat.
... Table of Contents.) Find the term of bookmarks click on Index to jump to the Index. (If the bookmarks are using more than one printer as a model and the illustrations/screenshots reflect this. What you see will be printed. Printing Pages The whole manual, Individual pages, or sections...wish to print: • [All pages], for the entire manual. From the toolbar, select [File], then [Print] (or press the Ctrl + P keys). 2. B4400/4500/4550/4600 User's Guide 8 Choose which pages you are not available, use the Table of Contents.) • In the list of interest in Acrobat.
B4400 4500 4550 4600 User Guide (English)
Page 9
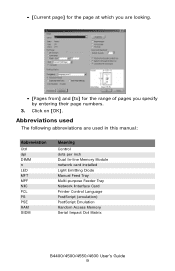
...-line Memory Module network card installed Light Emitting Diode Manual Feed Tray Multi-purpose Feeder Tray Network Interface Card Printer Control Language PostScript (emulation) PostScript Emulation Random Access Memory Serial Impact Dot Matrix B4400/4500/4550/4600 User's Guide 9 Click on [OK]. Abbreviations used The following abbreviations are looking. acroprint.jpg •...
...-line Memory Module network card installed Light Emitting Diode Manual Feed Tray Multi-purpose Feeder Tray Network Interface Card Printer Control Language PostScript (emulation) PostScript Emulation Random Access Memory Serial Impact Dot Matrix B4400/4500/4550/4600 User's Guide 9 Click on [OK]. Abbreviations used The following abbreviations are looking. acroprint.jpg •...
B4400 4500 4550 4600 User Guide (English)
Page 10
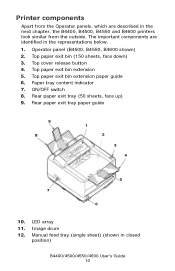
...tray paper guide Fig1_05.jpg 9 8 1 2 3 4 5 7 6 10. The important components are described in the next chapter, the B4400, B4500, B4550 and B4600 printers look similar from the Operator panels, which are identified in the representations below. 1. Paper tray content indicator 7. Rear paper exit tray (50 ...sheets, face up) 9. LED array 11. ON/OFF switch 8. Image drum 12. Top cover release button 4. Printer components Apart from the outside. Top paper exit bin (150 sheets, face down) 3. Top paper exit bin extension 5. Manual feed tray (single sheet...
...tray paper guide Fig1_05.jpg 9 8 1 2 3 4 5 7 6 10. The important components are described in the next chapter, the B4400, B4500, B4550 and B4600 printers look similar from the Operator panels, which are identified in the representations below. 1. Paper tray content indicator 7. Rear paper exit tray (50 ...sheets, face up) 9. LED array 11. ON/OFF switch 8. Image drum 12. Top cover release button 4. Printer components Apart from the outside. Top paper exit bin (150 sheets, face down) 3. Top paper exit bin extension 5. Manual feed tray (single sheet...
B4400 4500 4550 4600 User Guide (English)
Page 13
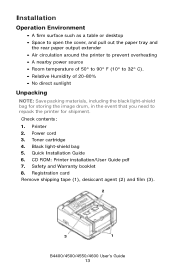
... tape (1), desiccant agent (2) and film (3). Check contents: 1. Toner cartridge 4. Quick Installation Guide 6. Fig1_09.jpg 2 3 1 B4400/4500/4550/4600 User's Guide 13 CD ROM: Printer installation/User Guide pdf 7. Safety and Warranty booklet 8. Power cord 3. Installation Operation Environment • A firm surface such as a...8226; Space to open the cover, and pull out the paper tray and the rear paper output extender • Air circulation around the printer to prevent overheating • A nearby power source • Room temperature of 50° to 90° F (10° to...
... tape (1), desiccant agent (2) and film (3). Check contents: 1. Toner cartridge 4. Quick Installation Guide 6. Fig1_09.jpg 2 3 1 B4400/4500/4550/4600 User's Guide 13 CD ROM: Printer installation/User Guide pdf 7. Safety and Warranty booklet 8. Power cord 3. Installation Operation Environment • A firm surface such as a...8226; Space to open the cover, and pull out the paper tray and the rear paper output extender • Air circulation around the printer to prevent overheating • A nearby power source • Room temperature of 50° to 90° F (10° to...
B4400 4500 4550 4600 User Guide (English)
Page 14
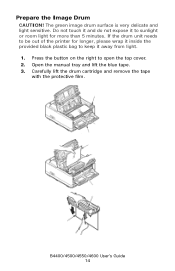
Press the button on the right to sunlight or room light for more than 5 minutes. Fig1_36.jpg Fig1_35.jpg B4400/4500/4550/4600 User's Guide 14 If the drum unit needs to be out of the printer for longer, please wrap it inside the provided black plastic bag to keep it to open the top cover. 2. Carefully lift the drum cartridge and remove the tape with the protective film. Open the manual tray and lift the blue tape. 3. The green image drum surface is very delicate and light sensitive. Prepare the Image Drum CAUTION! Do not touch it and do not expose it away from light. 1.
Press the button on the right to sunlight or room light for more than 5 minutes. Fig1_36.jpg Fig1_35.jpg B4400/4500/4550/4600 User's Guide 14 If the drum unit needs to be out of the printer for longer, please wrap it inside the provided black plastic bag to keep it to open the top cover. 2. Carefully lift the drum cartridge and remove the tape with the protective film. Open the manual tray and lift the blue tape. 3. The green image drum surface is very delicate and light sensitive. Prepare the Image Drum CAUTION! Do not touch it and do not expose it away from light. 1.

B4400 4500 4550 4600 User Guide (English)
Page 16
Installing paper 1. Hold the cartridge down in place, then push the blue lever to the back of the printer as far as shown. Fig1_14.jpg 6. B4400/4500/4550/4600 User's Guide 16 Lower the right side, making sure the cartridge is seated securely. 7. F12_04.jpg NOTE: If TONER LOW displays on the operator panel or the online Status Monitor after installing a toner cartridge, reinstall it will go. Insert the cartridge into the image drum, left side first as it . Pull the paper cassette out. 5.
Installing paper 1. Hold the cartridge down in place, then push the blue lever to the back of the printer as far as shown. Fig1_14.jpg 6. B4400/4500/4550/4600 User's Guide 16 Lower the right side, making sure the cartridge is seated securely. 7. F12_04.jpg NOTE: If TONER LOW displays on the operator panel or the online Status Monitor after installing a toner cartridge, reinstall it will go. Insert the cartridge into the image drum, left side first as it . Pull the paper cassette out. 5.

B4400 4500 4550 4600 User Guide (English)
Page 18
Fig1_24.jpg Fig1_25.jpg 3. Fig1_22.jpg 2. B4400/4500/4550/4600 User's Guide 18 Turn OFF the power and detach the power cord and printer cable. Prepare the feeder: pull the front cover, then move the sheet guide in the printer driver. Open the manual tray. Second Paper Feeder The optional second paper tray provide...
Fig1_24.jpg Fig1_25.jpg 3. Fig1_22.jpg 2. B4400/4500/4550/4600 User's Guide 18 Turn OFF the power and detach the power cord and printer cable. Prepare the feeder: pull the front cover, then move the sheet guide in the printer driver. Open the manual tray. Second Paper Feeder The optional second paper tray provide...
B4400 4500 4550 4600 User Guide (English)
Page 19
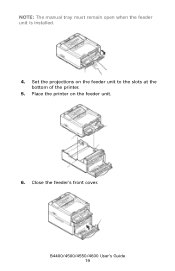
Place the printer on the feeder unit to the slots at the bottom of the printer. 5. Set the projections on the feeder unit. Fig1_26.jpg 4. Fig1_27.jpg 6. Fig1_28.jpg B4400/4500/4550/4600 User's Guide 19 Close the feeder's front cover. NOTE: The manual tray must remain open when the feeder unit is installed.
Place the printer on the feeder unit to the slots at the bottom of the printer. 5. Set the projections on the feeder unit. Fig1_26.jpg 4. Fig1_27.jpg 6. Fig1_28.jpg B4400/4500/4550/4600 User's Guide 19 Close the feeder's front cover. NOTE: The manual tray must remain open when the feeder unit is installed.
B4400 4500 4550 4600 User Guide (English)
Page 20
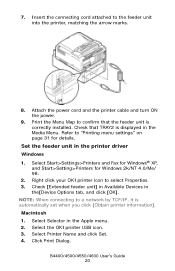
...the Apple menu. 2. NOTE: When connecting to the feeder unit into the printer, matching the arrow marks. Macintosh 1. Select Selector in the Media Menu. Right click your OKI printer icon to confirm that TRAY2 is correctly installed. Click Print Dialog. 7. ...Fig1_29.jpg 8. Attach the power cord and the printer cable and turn ON the power. 9. Print the Menu Map to select Properties. 3. Select Start>Settings>Printers and Fax for Windows® XP, and Start>Setting>Printers for details. B4400...
...the Apple menu. 2. NOTE: When connecting to the feeder unit into the printer, matching the arrow marks. Macintosh 1. Select Selector in the Media Menu. Right click your OKI printer icon to confirm that TRAY2 is correctly installed. Click Print Dialog. 7. ...Fig1_29.jpg 8. Attach the power cord and the printer cable and turn ON the power. 9. Print the Menu Map to select Properties. 3. Select Start>Settings>Printers and Fax for Windows® XP, and Start>Setting>Printers for details. B4400...
B4400 4500 4550 4600 User Guide (English)
Page 21
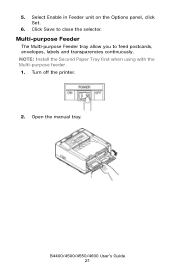
Select Enable in Feeder unit on the Options panel, click Set. 6. Open the manual tray. Fig1_26.jpg B4400/4500/4550/4600 User's Guide 21 NOTE: Install the Second Paper Tray first when using with the Multi-purpose feeder. 1. Fig1_22.jpg 2. Turn off the printer. Click Save to feed postcards, envelopes, labels and transparencies continuously. Multi-purpose Feeder The Multi-purpose Feeder tray allow you to close the selector. 5.
Select Enable in Feeder unit on the Options panel, click Set. 6. Open the manual tray. Fig1_26.jpg B4400/4500/4550/4600 User's Guide 21 NOTE: Install the Second Paper Tray first when using with the Multi-purpose feeder. 1. Fig1_22.jpg 2. Turn off the printer. Click Save to feed postcards, envelopes, labels and transparencies continuously. Multi-purpose Feeder The Multi-purpose Feeder tray allow you to close the selector. 5.
B4400 4500 4550 4600 User Guide (English)
Page 22
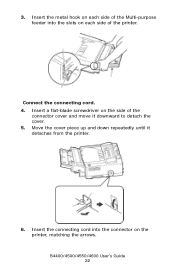
Fig1_31.jpg Connect the connecting cord. 4. Insert a flat-blade screwdriver on the printer, matching the arrows. Move the cover piece up and down repeatedly until it downward to detach the cover. 5. Insert the connecting cord into the slots on each side of the Multi-purpose feeder into the connector on the side of the printer. Fig1_32.jpg 6. B4400/4500/4550/4600 User's Guide 22 Insert the metal hook on each side of the connector cover and move it detaches from the printer. 3.
Fig1_31.jpg Connect the connecting cord. 4. Insert a flat-blade screwdriver on the printer, matching the arrows. Move the cover piece up and down repeatedly until it downward to detach the cover. 5. Insert the connecting cord into the slots on each side of the Multi-purpose feeder into the connector on the side of the printer. Fig1_32.jpg 6. B4400/4500/4550/4600 User's Guide 22 Insert the metal hook on each side of the connector cover and move it detaches from the printer. 3.
B4400 4500 4550 4600 User Guide (English)
Page 23
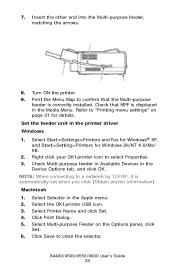
... Set. 6. Macintosh 1. B4400/4500/4550/4600 User's Guide 23 Select Multi-purpose Feeder on page 31 for Windows 2k/NT 4.0/Me/ 98. 2. Click Save to select Properties. 3. Check that the Multi-purpose feeder is automatically set when you click [Obtain printer information]. Fig1_33.jpg 8. Turn ON the printer. 9. Right click your OKI printer icon to...
... Set. 6. Macintosh 1. B4400/4500/4550/4600 User's Guide 23 Select Multi-purpose Feeder on page 31 for Windows 2k/NT 4.0/Me/ 98. 2. Click Save to select Properties. 3. Check that the Multi-purpose feeder is automatically set when you click [Obtain printer information]. Fig1_33.jpg 8. Turn ON the printer. 9. Right click your OKI printer icon to...


