PrintSuperVision Configuration Guide
Page 74
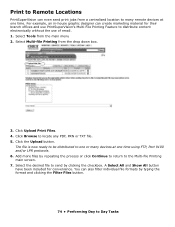
... Upload button. A Select All and Show All button have been included for their branch offices and use PrintSuperVision's Multi-File Printing Feature to locate any PDF, PRN or TXT file. 5. Click Upload Print Files. 4. The file is now ready to be distributed to the Multi-file Printing main screen. 7. Select Multi...
... Upload button. A Select All and Show All button have been included for their branch offices and use PrintSuperVision's Multi-File Printing Feature to locate any PDF, PRN or TXT file. 5. Click Upload Print Files. 4. The file is now ready to be distributed to the Multi-file Printing main screen. 7. Select Multi...

Flash DIMM Option Kits
Page 13
... your CD-ROM drive and double-click Install.exe, then click OK.) 2. Installing the Software 9 Follow the on Using Storage Device Manager See the Reference PDF file in your CD-ROM drive and wait for it to the Flash DIMM: 1. Browse to complete the installation. 3. Exit the Menu Installer. Installing the... autorun. (If the CD does not autorun, click Start → Run → Browse. To Open Storage Device Manager Click Start → Programs → Okidata → Oki Storage Device Manager → Oki Storage Device Manager. Place the CD in the root directory of the CD.
... your CD-ROM drive and double-click Install.exe, then click OK.) 2. Installing the Software 9 Follow the on Using Storage Device Manager See the Reference PDF file in your CD-ROM drive and wait for it to the Flash DIMM: 1. Browse to complete the installation. 3. Exit the Menu Installer. Installing the... autorun. (If the CD does not autorun, click Start → Run → Browse. To Open Storage Device Manager Click Start → Programs → Okidata → Oki Storage Device Manager → Oki Storage Device Manager. Place the CD in the root directory of the CD.

Flash DIMM Option Kits
Page 14
... number is 5. Macro Control: Enable/Disable Macro 10 PCL Macro Control Codes For a complete list of control codes supported by the printer, see the Reference PDF file in the root directory of the CD supplied with the Flash DIMM. Command ESC&f#Y ESC&f#X Explanation Macro ID. # = ID number (number you don't know...
... number is 5. Macro Control: Enable/Disable Macro 10 PCL Macro Control Codes For a complete list of control codes supported by the printer, see the Reference PDF file in the root directory of the CD supplied with the Flash DIMM. Command ESC&f#Y ESC&f#X Explanation Macro ID. # = ID number (number you don't know...

Job Accounting Technical Reference
Page 10
... ID assigned for you by your System Administrator handy. Before starting , have the Job Accounting ID assigned for you by your printer's software installation guide. pdf 5. Click Save. MacOS10.2AND3 _JA_Setup.pdf 6. Double click the Print Job Accounting icon. Installation - 10 - To activate the Job Acccounting Client software once it is installed: 1.
... ID assigned for you by your System Administrator handy. Before starting , have the Job Accounting ID assigned for you by your printer's software installation guide. pdf 5. Click Save. MacOS10.2AND3 _JA_Setup.pdf 6. Double click the Print Job Accounting icon. Installation - 10 - To activate the Job Acccounting Client software once it is installed: 1.

Job Accounting Technical Reference
Page 11
Double click the Print Job Accounting icon. Click New, then enter your LoginName, UserName and JobAccountingID (as established by the System Administrator) and click Save.. MacOS10.2A ND3_JA_ID. pdf 4. MacOS10.2AND3 _JA_Setup.pdf 5. MacOS10. 3_JA_Clie ntInstall.pd f 3. Installation 2. Click Go → Applications → OKIDATA → Print Job Accounting. Click Save. - 11 -
Double click the Print Job Accounting icon. Click New, then enter your LoginName, UserName and JobAccountingID (as established by the System Administrator) and click Save.. MacOS10.2A ND3_JA_ID. pdf 4. MacOS10.2AND3 _JA_Setup.pdf 5. MacOS10. 3_JA_Clie ntInstall.pd f 3. Installation 2. Click Go → Applications → OKIDATA → Print Job Accounting. Click Save. - 11 -
