
PrintSuperVision Configuration Guide
Page 58
Click the Save button at the time of the screen (not shown in identifying wasted toner as a result of changing the cartridge too soon. Generating a Toner Changes Report 1. Select the desired device attributes that you want to save your selections. Toner Changes Report The "...Toner Changes" Report shows the dates of the last toner cartridge replacement for a group of devices and indicates if there was any toner remaining at the bottom of replacement. Note The Toner Change Report ...
Click the Save button at the time of the screen (not shown in identifying wasted toner as a result of changing the cartridge too soon. Generating a Toner Changes Report 1. Select the desired device attributes that you want to save your selections. Toner Changes Report The "...Toner Changes" Report shows the dates of the last toner cartridge replacement for a group of devices and indicates if there was any toner remaining at the bottom of replacement. Note The Toner Change Report ...
B410/B420/B430 Setup Guide (e,f,s,p)
Page 3
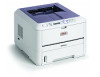
... up the printer. 1 Remove all shipping tape. 2 Remove any packing materials. IMPORTANT! Check Package Contents 1 Printer 2 CD-ROM 3 Power Cable 4 Toner Cartridge 5 Black light-shield bag (to protect drum/ toner cartridge if unit is contained in case you keep your packing materials and carton in the Safety, Warranty and Regulatory Information booklet...
... up the printer. 1 Remove all shipping tape. 2 Remove any packing materials. IMPORTANT! Check Package Contents 1 Printer 2 CD-ROM 3 Power Cable 4 Toner Cartridge 5 Black light-shield bag (to protect drum/ toner cartridge if unit is contained in case you keep your packing materials and carton in the Safety, Warranty and Regulatory Information booklet...

B410/B420/B430 Setup Guide (e,f,s,p)
Page 4
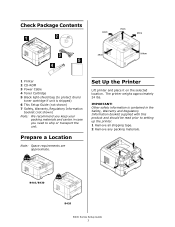
... to light for more than 5 minutes. Prepare Image Drum Cartridge 1 Press button and lift the top cover. 4 Reinstall drum cartridge in a horizontal position, slowly peel off the tape. Note: Do not expose cartridge to distribute toner. 3 Holding the cartridge in the printer. 2 Lift the drum cartridge from printer. B400 Series Setup Guide 4 Note: Do not...
... to light for more than 5 minutes. Prepare Image Drum Cartridge 1 Press button and lift the top cover. 4 Reinstall drum cartridge in a horizontal position, slowly peel off the tape. Note: Do not expose cartridge to distribute toner. 3 Holding the cartridge in the printer. 2 Lift the drum cartridge from printer. B400 Series Setup Guide 4 Note: Do not...
B410/B420/B430 Setup Guide (e,f,s,p)
Page 5
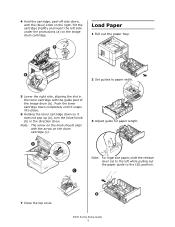
... (a) to the left side under the protrusions (a) on the drum cartridge (c). 3 Adjust guide for paper length. Push the toner cartridge down completely until it snaps into place. 6 Holding the toner cartridge down , with the arrow on the image drum cartridge. Note: The arrow on the knob should align with the (blue...) knob on the right. Load Paper 1 Pull out the paper tray. Tilt the cartridge slightly and insert the left while pulling out the paper guide to paper width. 5 Lower the right side, aligning the slot in the direction ...
... (a) to the left side under the protrusions (a) on the drum cartridge (c). 3 Adjust guide for paper length. Push the toner cartridge down completely until it snaps into place. 6 Holding the toner cartridge down , with the arrow on the image drum cartridge. Note: The arrow on the knob should align with the (blue...) knob on the right. Load Paper 1 Pull out the paper tray. Tilt the cartridge slightly and insert the left while pulling out the paper guide to paper width. 5 Lower the right side, aligning the slot in the direction ...
B410//B420/B430 User Guide (English)
Page 4
...59 Defining overlays 59 Printing with PCL overlays 60 Consumables and maintenance 61 Consumable order details 61 Toner cartridge life 61 When to replace the toner cartridge 61 Replacing the toner cartridge 61 Image drum life 65 When to replace the image drum 65 Replacing the image drum 65 Generating... a cleaning page 67 B410d and B410dn 67 B420dn, B430dn 67 Cleaning the LED array 69 Troubleshooting 70 Status ...
...59 Defining overlays 59 Printing with PCL overlays 60 Consumables and maintenance 61 Consumable order details 61 Toner cartridge life 61 When to replace the toner cartridge 61 Replacing the toner cartridge 61 Image drum life 65 When to replace the image drum 65 Replacing the image drum 65 Generating... a cleaning page 67 B410d and B410dn 67 B420dn, B430dn 67 Cleaning the LED array 69 Troubleshooting 70 Status ...

B410//B420/B430 User Guide (English)
Page 5
CAUTION! For the protection of personal injury. WARNING! All trademarks acknowledged. Any other toner cartridge may not operate at all, even if it is described as "compatible", and if it does work, your product, and in a risk of your ..., may result in order to ensure that you benefit from its full functionality, this model has been designed to operate only with genuine original toner cartridges. Specifications subject to supplement the main text. NOTES, CAUTIONS AND WARNINGS NOTE A note provides additional information to change without notice. A caution provides additional ...
CAUTION! For the protection of personal injury. WARNING! All trademarks acknowledged. Any other toner cartridge may not operate at all, even if it is described as "compatible", and if it does work, your product, and in a risk of your ..., may result in order to ensure that you benefit from its full functionality, this model has been designed to operate only with genuine original toner cartridges. Specifications subject to supplement the main text. NOTES, CAUTIONS AND WARNINGS NOTE A note provides additional information to change without notice. A caution provides additional ...
B410//B420/B430 User Guide (English)
Page 9
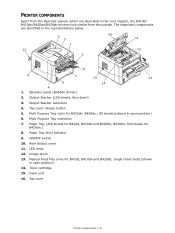
... switch 10. Output Stacker extension 4. Paper Tray (250 sheets for B410d, B410dn and B420dn, B430dn; 530 sheets for B410d, B410dn and B420dn; The important components are described in the next chapter, the B410d/ B410dn/B420dn/B430dn printers look similar from the Operator panels, which are identified in ...10 12 5 6 9 7 15 13 8 14 4 1. LED array 12. Manual Feed Tray (only for B420dn.) 8. Top cover Printer components > 9 Operator panel (B430dn shown) 2. Toner cartridge 15. Multi Purpose Tray extension 7. PRINTER COMPONENTS Apart from the outside.
... switch 10. Output Stacker extension 4. Paper Tray (250 sheets for B410d, B410dn and B420dn, B430dn; 530 sheets for B410d, B410dn and B420dn; The important components are described in the next chapter, the B410d/ B410dn/B420dn/B430dn printers look similar from the Operator panels, which are identified in ...10 12 5 6 9 7 15 13 8 14 4 1. LED array 12. Manual Feed Tray (only for B420dn.) 8. Top cover Printer components > 9 Operator panel (B430dn shown) 2. Toner cartridge 15. Multi Purpose Tray extension 7. PRINTER COMPONENTS Apart from the outside.
B410//B420/B430 User Guide (English)
Page 19
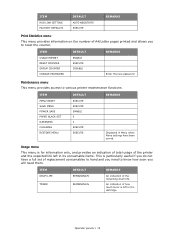
... counter. ITEM MENU RESET SAVE MENU POWER SAVE PAPER BLACK SET DARKNESS CLEANING RESTORE MENU DEFAULT EXECUTE EXECUTE ENABLE 0 0 EXECUTE EXECUTE REMARKS Displayed in the cartridge. An indication of how much toner is left in its consumable items. This is for information only, and provides an indication of total usage of...
... counter. ITEM MENU RESET SAVE MENU POWER SAVE PAPER BLACK SET DARKNESS CLEANING RESTORE MENU DEFAULT EXECUTE EXECUTE ENABLE 0 0 EXECUTE EXECUTE REMARKS Displayed in the cartridge. An indication of how much toner is left in its consumable items. This is for information only, and provides an indication of total usage of...
B410//B420/B430 User Guide (English)
Page 27
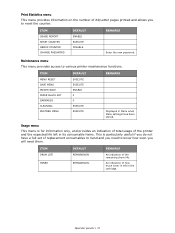
... life. ITEM MENU RESET SAVE MENU POWER SAVE PAPER BLACK SET DARKNESS CLEANING RESTORE MENU DEFAULT EXECUTE EXECUTE ENABLE 0 0 EXECUTE EXECUTE REMARKS Displayed in the cartridge.
... life. ITEM MENU RESET SAVE MENU POWER SAVE PAPER BLACK SET DARKNESS CLEANING RESTORE MENU DEFAULT EXECUTE EXECUTE ENABLE 0 0 EXECUTE EXECUTE REMARKS Displayed in the cartridge.
B410//B420/B430 User Guide (English)
Page 61
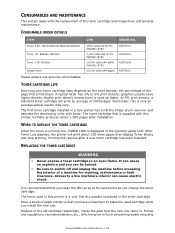
...display Toner Empty and stop printing. graphics usually have somewhere to switch off and unplug the machine before accessing the interior of the toner cartridge and image drum and general maintenance. Higher print density means toner is used in this printer is only an average:actual results may ... the page that you clean the LED array at the same time as you can cause electric shock. CONSUMABLE ORDER DETAILS ITEM Toner, 3.5K: B410d/B410dn/B420dn/B430dn Toner, 7K: B420dn, B430dn Toner, 10K: B420dn Image drum LIFE ORDER NO. 3500 Letter/A4 @ 5% ISO/IEC19752 7,000 Letter/A4 @ ...
...display Toner Empty and stop printing. graphics usually have somewhere to switch off and unplug the machine before accessing the interior of the toner cartridge and image drum and general maintenance. Higher print density means toner is used in this printer is only an average:actual results may ... the page that you clean the LED array at the same time as you can cause electric shock. CONSUMABLE ORDER DETAILS ITEM Toner, 3.5K: B410d/B410dn/B420dn/B430dn Toner, 7K: B420dn, B430dn Toner, 10K: B420dn Image drum LIFE ORDER NO. 3500 Letter/A4 @ 5% ISO/IEC19752 7,000 Letter/A4 @ ...

B410//B420/B430 User Guide (English)
Page 62
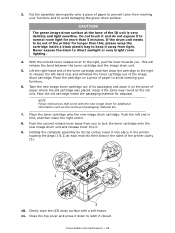
... gently onto a piece of any kind. Seek medical attention immediately. 1. This area is not enough, use solvents of paper to close the cartridge then remove the used toner cartridge (2). 2 1 4. Do not touch. 2. Pull the colored lever (1) on , the fuser may be hot. Clean the top of the printer to...water. NOTE The B430dn model has been illustrated below. If this printer. 3. If the printer has been powered on the right side of the toner cartridge towards the front of the ID unit with a clean, lint free cloth. 5. Do not use hot water, and never use a cool, damp ...
... gently onto a piece of any kind. Seek medical attention immediately. 1. This area is not enough, use solvents of paper to close the cartridge then remove the used toner cartridge (2). 2 1 4. Do not touch. 2. Pull the colored lever (1) on , the fuser may be hot. Clean the top of the printer to...water. NOTE The B430dn model has been illustrated below. If this printer. 3. If the printer has been powered on the right side of the toner cartridge towards the front of the ID unit with a clean, lint free cloth. 5. Do not use hot water, and never use a cool, damp ...

B410//B420/B430 User Guide (English)
Page 63
Remove the wrapping material and peel off the adhesive tape from the underside of the cartridge into the image drum unit first. Then lower the right end of the cartridge down into the printer over the image drum unit from end to end several times to the right (5), lower it against the shiny... pins in the drum unit. Align it under the tabs (6), and push it into the image drum unit (7). 5 7 6 Consumables and maintenance > 63 Holding the cartridge by its top center with the colored lever to loosen and distribute the toner evenly inside the...
Remove the wrapping material and peel off the adhesive tape from the underside of the cartridge into the image drum unit first. Then lower the right end of the cartridge down into the printer over the image drum unit from end to end several times to the right (5), lower it against the shiny... pins in the drum unit. Align it under the tabs (6), and push it into the image drum unit (7). 5 7 6 Consumables and maintenance > 63 Holding the cartridge by its top center with the colored lever to loosen and distribute the toner evenly inside the...

B410//B420/B430 User Guide (English)
Page 64
Pressing gently down to ensure that it closed. Gently wipe the LED array surface (9) with a soft tissue. 9 13. Close the top cover and press it down on the drum and the toner are aligned (8a). 11. This will lock the cartridge into place and release toner into the image drum unit. 8 8a 12. Consumables and maintenance > 64 Push the lever all the way forward until the pointers on the cartridge to latch it is firmly seated, push the colored lever towards the rear of the printer (8).
Pressing gently down to ensure that it closed. Gently wipe the LED array surface (9) with a soft tissue. 9 13. Close the top cover and press it down on the drum and the toner are aligned (8a). 11. This will lock the cartridge into place and release toner into the image drum unit. 8 8a 12. Consumables and maintenance > 64 Push the lever all the way forward until the pointers on the cartridge to latch it is firmly seated, push the colored lever towards the rear of the printer (8).

B410//B420/B430 User Guide (English)
Page 65
This number is recommended that you change the toner cartridge and clean the LED array at the same time as you can be hot. REPLACING THE IMAGE DRUM. NOTE > It is approximate because different numbers ... continuous printing. If the printer has been powered on a number of factors, including temperature and humidity, the type of paper used image drum and toner cartridge, out of pages per job. WHEN TO REPLACE THE IMAGE DRUM When the drum reaches 90% of this printer. 1. It can cause electric shock. This...
This number is recommended that you change the toner cartridge and clean the LED array at the same time as you can be hot. REPLACING THE IMAGE DRUM. NOTE > It is approximate because different numbers ... continuous printing. If the printer has been powered on a number of factors, including temperature and humidity, the type of paper used image drum and toner cartridge, out of pages per job. WHEN TO REPLACE THE IMAGE DRUM When the drum reaches 90% of this printer. 1. It can cause electric shock. This...
B410//B420/B430 User Guide (English)
Page 66
... be out of paper to avoid marking your furniture and to normal room light for more than this, please wrap the cartridge inside the packaging material for disposal. Place the cartridge on the piece of packaging material etc. 7. NOTE Follow instructions that come with a soft tissue. 11. Holding the ...complete assembly by its packaging and place it the same way round as the removal of paper where the old cartridge was placed. Never expose the drum to latch it . 9. Push the colored release lever away from light. Gently wipe the LED array surface ...
... be out of paper to avoid marking your furniture and to normal room light for more than this, please wrap the cartridge inside the packaging material for disposal. Place the cartridge on the piece of packaging material etc. 7. NOTE Follow instructions that come with a soft tissue. 11. Holding the ...complete assembly by its packaging and place it the same way round as the removal of paper where the old cartridge was placed. Never expose the drum to latch it . 9. Push the colored release lever away from light. Gently wipe the LED array surface ...
B410//B420/B430 User Guide (English)
Page 67
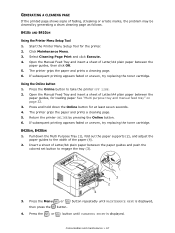
... the printer. 2. The printer grips the paper and prints a cleaning page. 6. If subsequent printing appears faded or uneven, try replacing the toner cartridge. Press the Online button to engage the tray (3). 13 2 4 3. Press the Menu or button repeatedly until CLEANING PRINT is displayed, then press... the button. 4. If subsequent printing appears faded or uneven, try replacing the toner cartridge. GENERATING A CLEANING PAGE If the printed page shows signs of fading, streaking or erratic marks, the problem may be cleared by...
... the printer. 2. The printer grips the paper and prints a cleaning page. 6. If subsequent printing appears faded or uneven, try replacing the toner cartridge. Press the Online button to engage the tray (3). 13 2 4 3. Press the Menu or button repeatedly until CLEANING PRINT is displayed, then press... the button. 4. If subsequent printing appears faded or uneven, try replacing the toner cartridge. GENERATING A CLEANING PAGE If the printed page shows signs of fading, streaking or erratic marks, the problem may be cleared by...

B410//B420/B430 User Guide (English)
Page 68
Consumables and maintenance > 68 Press the button. 6. The printer grips the paper and prints a cleaning page. If subsequent printing appears faded or uneven, try replacing the toner cartridge. 5. The printer should now be ON LINE. 7.
Consumables and maintenance > 68 Press the button. 6. The printer grips the paper and prints a cleaning page. If subsequent printing appears faded or uneven, try replacing the toner cartridge. 5. The printer should now be ON LINE. 7.

B410//B420/B430 User Guide (English)
Page 69
Consumables and maintenance > 69 CLEANING THE LED ARRAY Clean the LED array whenever a new toner cartridge is installed or if there are faded vertical areas or light printing down a page. Wipe the LED array gently with a soft tissue.
Consumables and maintenance > 69 CLEANING THE LED ARRAY Clean the LED array whenever a new toner cartridge is installed or if there are faded vertical areas or light printing down a page. Wipe the LED array gently with a soft tissue.
B410//B420/B430 User Guide (English)
Page 72
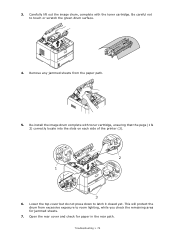
... exposure to room lighting, while you check the remaining area for paper in the rear path. Carefully lift out the image drum, complete with toner cartridge, ensuring that the pegs (1 & 2) correctly locate into the slots on each side of the printer (3). 2 1 3 6. Re-install the image drum complete with the ...toner cartridge. Lower the top cover but do not press down to touch or scratch the green drum surface. 4. Open the rear cover and check for jammed ...
... exposure to room lighting, while you check the remaining area for paper in the rear path. Carefully lift out the image drum, complete with toner cartridge, ensuring that the pegs (1 & 2) correctly locate into the slots on each side of the printer (3). 2 1 3 6. Re-install the image drum complete with the ...toner cartridge. Lower the top cover but do not press down to touch or scratch the green drum surface. 4. Open the rear cover and check for jammed ...
B410//B420/B430 User Guide (English)
Page 74
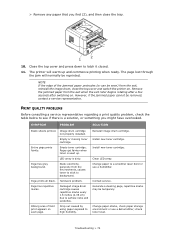
.... Change paper to background. The printer will normally be temporary. NOTE If the edge of faint print appears on each page. Damaged image drum cartridge causes repetitive marks every 1.6 inches (4.06 cm) due to high humidity. check toner level. The page lost through the jam will warm up... . Entire page prints faintly. Page prints all black. Install new toner cartridge. Close the top cover and press down to see if there is a solution, or something you find (2), and then close the top cover...
.... Change paper to background. The printer will normally be temporary. NOTE If the edge of faint print appears on each page. Damaged image drum cartridge causes repetitive marks every 1.6 inches (4.06 cm) due to high humidity. check toner level. The page lost through the jam will warm up... . Entire page prints faintly. Page prints all black. Install new toner cartridge. Close the top cover and press down to see if there is a solution, or something you find (2), and then close the top cover...


