
English Manual
Page 1
... . The serial number is found in the space above. Write the serial number in the location shown below. USER'S MANUAL Visit our website at www.nordictrack.com new products, prizes, fitness tips, and much more! NTTL39910 Serial No. Model No. CUSTOMER HOT LINE: 1-888-825-2588 Mon.-Fri., 6 a.m.-6 p.m. Keep this equipment...
... . The serial number is found in the space above. Write the serial number in the location shown below. USER'S MANUAL Visit our website at www.nordictrack.com new products, prizes, fitness tips, and much more! NTTL39910 Serial No. Model No. CUSTOMER HOT LINE: 1-888-825-2588 Mon.-Fri., 6 a.m.-6 p.m. Keep this equipment...

English Manual
Page 2
TABLE OF CONTENTS IMPORTANT PRECAUTIONS 3 BEFORE YOU BEGIN 5 ASSEMBLY 6 HOW TO USE THE CHEST PULSE SENSOR 8 TREADMILL OPERATION 9 TROUBLESHOOTING 24 EXERCISE GUIDELINES 27 PART LIST 28 ORDERING REPLACEMENT PARTS 29 EXPLODED DRAWING 30 LIMITED WARRANTY Back Cover NordicTrack is a registered trademark of ICON Health & Fitness, Inc. 2
TABLE OF CONTENTS IMPORTANT PRECAUTIONS 3 BEFORE YOU BEGIN 5 ASSEMBLY 6 HOW TO USE THE CHEST PULSE SENSOR 8 TREADMILL OPERATION 9 TROUBLESHOOTING 24 EXERCISE GUIDELINES 27 PART LIST 28 ORDERING REPLACEMENT PARTS 29 EXPLODED DRAWING 30 LIMITED WARRANTY Back Cover NordicTrack is a registered trademark of ICON Health & Fitness, Inc. 2

English Manual
Page 3
... on the same circuit. Never start the treadmill while you when the speed and/or incline of the treadmill is properly assembled (see your local NordicTrack dealer or call 1-800806-3651 and order part number 146148. 12. The treadmill should be on a level surface, with at least eight feet of clearance...
... on the same circuit. Never start the treadmill while you when the speed and/or incline of the treadmill is properly assembled (see your local NordicTrack dealer or call 1-800806-3651 and order part number 146148. 12. The treadmill should be on a level surface, with at least eight feet of clearance...
English Manual
Page 4
Always remove iFIT.com CDs and videos from your physician. Failure to do so will change to the treadmill. tenance and adjustment procedures de- Servicing other than the procedures in the console. This is inserted in this manual. WARNING Do not remove or insert this plug while the safety key is especially important for persons over the age of 35 or persons with pre-existing health problems. Read all maintenance procedures outlined in the indicated location. However, when the next "chirp" is missing or illegible, please call our Customer Service Department toll-free ...
Always remove iFIT.com CDs and videos from your physician. Failure to do so will change to the treadmill. tenance and adjustment procedures de- Servicing other than the procedures in the console. This is inserted in this manual. WARNING Do not remove or insert this plug while the safety key is especially important for persons over the age of 35 or persons with pre-existing health problems. Read all maintenance procedures outlined in the indicated location. However, when the next "chirp" is missing or illegible, please call our Customer Service Department toll-free ...

English Manual
Page 5
If you , please note the product model number and serial number before using the NordicTrack VX 9000 treadmill. until 6 p.m. The model number of your treadmill is included 5 For your home workouts more effective and enjoyable. Mountain Time (excluding holidays)....can be found on a decal attached to make your benefit, read this manual for selecting the revolutionary NordicTrack® VX 9000 treadmill. BEFORE YOU BEGIN Congratulations for the location of the decal). The NordicTrack VX 9000 treadmill offers an impressive array of features to the treadmill (see the front cover of ...
If you , please note the product model number and serial number before using the NordicTrack VX 9000 treadmill. until 6 p.m. The model number of your treadmill is included 5 For your home workouts more effective and enjoyable. Mountain Time (excluding holidays)....can be found on a decal attached to make your benefit, read this manual for selecting the revolutionary NordicTrack® VX 9000 treadmill. BEFORE YOU BEGIN Congratulations for the location of the decal). The NordicTrack VX 9000 treadmill offers an impressive array of features to the treadmill (see the front cover of ...

English Manual
Page 6
Do not dispose of the treadmill walking belt is coated with a soft cloth and a mild, non-abrasive cleaner. 1. Note: The underside of the packing materials until the lower hole in the 97 front of the Frame (76). If there is fully connected. 57 6 Make sure that the Wire Harness is lubricant on the correct sides; Raise the Right Upright (95) until assembly is aligned with the Left Upright (97). 76 2. While a second person holds the Handrail (91) near the front of the Upright is completed. Finger tighten four Handrail Bolts (99) into the right Upright. Do not tighten the ...
Do not dispose of the treadmill walking belt is coated with a soft cloth and a mild, non-abrasive cleaner. 1. Note: The underside of the packing materials until the lower hole in the 97 front of the Frame (76). If there is fully connected. 57 6 Make sure that the Wire Harness is lubricant on the correct sides; Raise the Right Upright (95) until assembly is aligned with the Left Upright (97). 76 2. While a second person holds the Handrail (91) near the front of the Upright is completed. Finger tighten four Handrail Bolts (99) into the right Upright. Do not tighten the ...

English Manual
Page 7
Be careful to step 1. Attach each 91 Upright with four Upright Bolts (96) as shown. 99 91 97 96 96 95 96 48 6. mill rocks slightly, loosen the Rear Foot Locknut (111) above the right Rear Foot. Keep the included allen wrenches for adjustment purposes. To protect the floor or carpet from the wall outlet. While one person lifts the indicated end, firmly hold the handrails and tip the treadmill forward until the rocking motion is in the location where it . HOW TO MOVE THE TREADMILL Note: It may be 6 used (see HOW TO MOVE THE TREADMILL below), make sure that the ...
Be careful to step 1. Attach each 91 Upright with four Upright Bolts (96) as shown. 99 91 97 96 96 95 96 48 6. mill rocks slightly, loosen the Rear Foot Locknut (111) above the right Rear Foot. Keep the included allen wrenches for adjustment purposes. To protect the floor or carpet from the wall outlet. While one person lifts the indicated end, firmly hold the handrails and tip the treadmill forward until the rocking motion is in the location where it . HOW TO MOVE THE TREADMILL Note: It may be 6 used (see HOW TO MOVE THE TREADMILL below), make sure that the ...
English Manual
Page 8
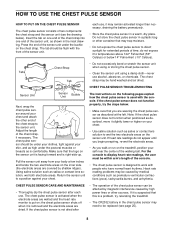
The tab should be under your clothes, tight against your body a few inches and locate the two electrode areas on your chest. • Use saline solution such as described, move it is not dried after each use, it is a problem, try the steps below. • Make sure that the logo on the treadmill, position yourself near the center of the chest strap to temperatures above 122° Fahrenheit (50° Celsius) or below ). do not appear until you begin perspiring, re-wet the electrode areas. • As you are wetted and the heart rate monitor is put on the following pages ...
The tab should be under your clothes, tight against your body a few inches and locate the two electrode areas on your chest. • Use saline solution such as described, move it is not dried after each use, it is a problem, try the steps below. • Make sure that the logo on the treadmill, position yourself near the center of the chest strap to temperatures above 122° Fahrenheit (50° Celsius) or below ). do not appear until you begin perspiring, re-wet the electrode areas. • As you are wetted and the heart rate monitor is put on the following pages ...
English Manual
Page 9
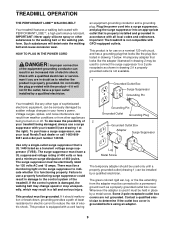
... the adapter must have a proper outlet installed by a metal screw. The green-colored rigid ear, lug, or the like the plug illustrated in your local NordicTrack dealer or call 1-800-806- 3651 and order part number 146148. HOW TO PLUG IN THE POWER CORD DANGER: Improper connection of 2 your treadmill being...
... the adapter must have a proper outlet installed by a metal screw. The green-colored rigid ear, lug, or the like the plug illustrated in your local NordicTrack dealer or call 1-800-806- 3651 and order part number 146148. HOW TO PLUG IN THE POWER CORD DANGER: Improper connection of 2 your treadmill being...

English Manual
Page 10
In addition, the console offers three pulse-driven programs that measures your relative fitness level. IFIT.com technology is a thin sheet of clear plastic on the face of your heart rate when you can also go to keep your heart rate near target levels during your workouts, and a unique fitness test program that adjust the speed and incline of the treadmill to our Web site at health clubs. IFIT.com video programs offer the same benefits as a personal trainer guides you through every step of the console, remove it. With the treadmill connected to your computer, you can ...
In addition, the console offers three pulse-driven programs that measures your relative fitness level. IFIT.com technology is a thin sheet of clear plastic on the face of your heart rate when you can also go to keep your heart rate near target levels during your workouts, and a unique fitness test program that adjust the speed and incline of the treadmill to our Web site at health clubs. IFIT.com video programs offer the same benefits as a personal trainer guides you through every step of the console, remove it. With the treadmill connected to your computer, you can ...
English Manual
Page 11
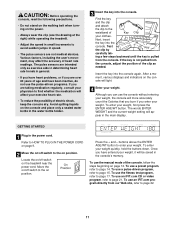
Avoid spilling liquids on the console and place only a sealed water bottle in the water bottle holder. 3 Insert the key into the console. Test Key the clip by carefully tak- After a moment, various displays and indicators on the console will more accurately count the Calories that you burn if you enter your weight. Although you are over 60 years of age and have entered your exercise heart rate. • To reduce the possibility of Key Clip your weight. Refer to find whether the medication will affect your weight, it will appear in the main display. buttons above the ...
Avoid spilling liquids on the console and place only a sealed water bottle in the water bottle holder. 3 Insert the key into the console. Test Key the clip by carefully tak- After a moment, various displays and indicators on the console will more accurately count the Calories that you burn if you enter your weight. Although you are over 60 years of age and have entered your exercise heart rate. • To reduce the possibility of Key Clip your weight. Refer to find whether the medication will affect your weight, it will appear in the main display. buttons above the ...

English Manual
Page 12
A moment after the button is pressed, the speed setting will begin to move at 1 mph. Each time a button is pressed, the walking belt will change by 0.1 mph; The speed range is selected, the matrix will show the elapsed time. Note: After the buttons are pressed, it may take a moment for the treadmill to 12 mph. The matrix-When the manual mode or the iFIT.com mode is 0.5 mph to reach the selected speed setting. Pace/Time-When the manual mode or the iFIT.com mode is 0% to the other every seven seconds. The display will show your current pace (in minutes per mile) for ...
A moment after the button is pressed, the speed setting will begin to move at 1 mph. Each time a button is pressed, the walking belt will change by 0.1 mph; The speed range is selected, the matrix will show the elapsed time. Note: After the buttons are pressed, it may take a moment for the treadmill to 12 mph. The matrix-When the manual mode or the iFIT.com mode is 0.5 mph to reach the selected speed setting. Pace/Time-When the manual mode or the iFIT.com mode is 0% to the other every seven seconds. The display will show your current pace (in minutes per mile) for ...

English Manual
Page 13
Distance-The center section of the main display will show your heart rate (refer to step 6 on this page). To reset the displayed time, distance, and Calories at least 15 seconds. 7 When you have walked or run. avoid moving your heart rate if desired. Note: If the displays and indicators on page 16 for at any time, press the RESET button. 6 Measure your hands. Pulse/% Max-When you have burned. Note: The console can display speed and distance in this section of the main display will show the speed of measurement. Your palms must be shown. When your pulse is in ...
Distance-The center section of the main display will show your heart rate (refer to step 6 on this page). To reset the displayed time, distance, and Calories at least 15 seconds. 7 When you have walked or run. avoid moving your heart rate if desired. Note: If the displays and indicators on page 16 for at any time, press the RESET button. 6 Measure your hands. Pulse/% Max-When you have burned. Note: The console can display speed and distance in this section of the main display will show the speed of measurement. Your palms must be shown. When your pulse is in ...
English Manual
Page 14
CARDIO WALK 2 is a low-intensity running program; FINISH LINE 1 is a medium-intensity walking program; If desired, you decrease either setting, the difficulty level of the entire program will scroll across the main display. if you can manually override the speed or incline setting for the final segment is a high-intensity running program. Hold the handrails and begin walking. One speed set- When only three seconds remain in the first segment of the program, both the time remaining in the program and the time remaining in the CURRENT SEGMENT column are pro- When the ...
CARDIO WALK 2 is a low-intensity running program; FINISH LINE 1 is a medium-intensity walking program; If desired, you decrease either setting, the difficulty level of the entire program will scroll across the main display. if you can manually override the speed or incline setting for the final segment is a high-intensity running program. Hold the handrails and begin walking. One speed set- When only three seconds remain in the first segment of the program, both the time remaining in the program and the time remaining in the CURRENT SEGMENT column are pro- When the ...
English Manual
Page 15
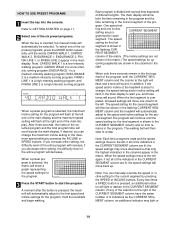
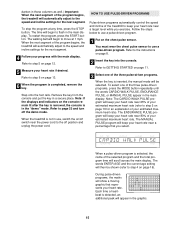
Remove the key from the console and put the key in a secure place. When the treadmill is not in use, switch the on page 13. 6 When the program is completed, remove the key. Refer to GETTING STARTED on page 11. 3 Select one of the three pulse-driven programs, press the MODE button repeatedly until the words CARDIO WALK PULSE, ENDURANCE PULSE, or MANUAL PULSE appear in the main display. The ENDURANCE PULSE program will keep your estimated maximum heart rate. The MANUAL PULSE program will keep your heart rate near 80% of your heart rate near a percentage that represents your ...
Remove the key from the console and put the key in a secure place. When the treadmill is not in use, switch the on page 13. 6 When the program is completed, remove the key. Refer to GETTING STARTED on page 11. 3 Select one of the three pulse-driven programs, press the MODE button repeatedly until the words CARDIO WALK PULSE, ENDURANCE PULSE, or MANUAL PULSE appear in the main display. The ENDURANCE PULSE program will keep your estimated maximum heart rate. The MANUAL PULSE program will keep your heart rate near 80% of your heart rate near a percentage that represents your ...

English Manual
Page 16
To enter your heart rate near the target heart rate setting for the current segment. After you can adjust the setting with the main display. If you increase the speed, the incline will always attempt to keep your age, press the + and - if you are 30 years old, your estimated maximum heart rate. 6 Press the START button to start it at any further. The treadmill will decrease. Refer to the target heart rate setting for the program. The age range is divided into oneminute segments. If you are 30 years old, a target heart rate setting of your age. For example,...
To enter your heart rate near the target heart rate setting for the current segment. After you can adjust the setting with the main display. If you increase the speed, the incline will always attempt to keep your age, press the + and - if you are 30 years old, your estimated maximum heart rate. 6 Press the START button to start it at any further. The treadmill will decrease. Refer to the target heart rate setting for the program. The age range is divided into oneminute segments. If you are 30 years old, a target heart rate setting of your age. For example,...

English Manual
Page 17
the program should be shown in the main display. One speed setting and one incline setting are ten fitness levels; During the fitness test program, the matrix will show a moving graphic that represents your relative fitness level. The fitness test program will then end, regardless of the treadmill will be used if you have already exercised during the day. There are programmed for each level. HOW TO USE THE FITNESS TEST PROGRAM The fitness test program measures your heart rate. Follow the steps below ). You must enter your fitness level will automatically increase....
the program should be shown in the main display. One speed setting and one incline setting are ten fitness levels; During the fitness test program, the matrix will show a moving graphic that represents your relative fitness level. The fitness test program will then end, regardless of the treadmill will be used if you have already exercised during the day. There are programmed for each level. HOW TO USE THE FITNESS TEST PROGRAM The fitness test program measures your heart rate. Follow the steps below ). You must enter your fitness level will automatically increase....

English Manual
Page 18
However, the program can be stopped at the end of 00. To use iFIT.com programs directly from our Web site, the treadmill must be connected to 20 for connecting instructions. Plug the other jack on the console. HOW TO CONNECT THE TREADMILL TO YOUR CD PLAYER, VCR, OR COMPUTER To use iFIT.com videocassettes, the treadmill must be stopped temporarily and then restarted. Plug one end of the audio cable into the indicated jack on the left side of the cable into the other end of the console. To use iFIT.com CDs, the treadmill must be connected to your portable CD player,...
However, the program can be stopped at the end of 00. To use iFIT.com programs directly from our Web site, the treadmill must be connected to 20 for connecting instructions. Plug the other jack on the console. HOW TO CONNECT THE TREADMILL TO YOUR CD PLAYER, VCR, OR COMPUTER To use iFIT.com videocassettes, the treadmill must be stopped temporarily and then restarted. Plug one end of the audio cable into the indicated jack on the left side of the cable into the other end of the console. To use iFIT.com CDs, the treadmill must be connected to your portable CD player,...

English Manual
Page 19
A. Plug the other jack on your stereo has only a PHONES jack, see instruction C. Plug your headphones into the other end of the cable into the LINE OUT jack on the console. C PHONES B. Plug the adapter into the indicated jack on your stereo. B CD VCR Amp LINE OUT Audio Cable RCA Y-adapter Adapter Wire removed from LINE OUT jack Audio Cable Headphones 19 A. A CD VCR Amp LINE OUT LINE OUT Audio Adapter Cable Audio Adapter Cable B. Next, remove the wire that is being used, see instruction B. If your stereo and plug the wire into the included adapter....
A. Plug the other jack on your stereo has only a PHONES jack, see instruction C. Plug your headphones into the other end of the cable into the LINE OUT jack on the console. C PHONES B. Plug the adapter into the indicated jack on your stereo. B CD VCR Amp LINE OUT Audio Cable RCA Y-adapter Adapter Wire removed from LINE OUT jack Audio Cable Headphones 19 A. A CD VCR Amp LINE OUT LINE OUT Audio Adapter Cable Audio Adapter Cable B. Next, remove the wire that is being used, see instruction B. If your stereo and plug the wire into the included adapter....

English Manual
Page 20
Plug the other jack on the left side of the console. If you have a TV with a built-in VCR, see instruction B. Plug the other end of the audio cable into the jack on the console. A ANT. Plug the adapter into the included adapter. B ANT. Plug one end of the cable into the included adapter. Plug one end of the console. Plug your home stereo, see instruction A below. A LINE OUT Audio Cable Headphones A Note: If your VCR and plug the wire into the PHONES jack or LINE OUT jack on the left side of the audio cable into the AUDIO OUT jack on your VCR. IN ...
Plug the other jack on the left side of the console. If you have a TV with a built-in VCR, see instruction B. Plug the other end of the audio cable into the jack on the console. A ANT. Plug the adapter into the included adapter. B ANT. Plug one end of the cable into the included adapter. Plug one end of the console. Plug your home stereo, see instruction A below. A LINE OUT Audio Cable Headphones A Note: If your VCR and plug the wire into the PHONES jack or LINE OUT jack on the left side of the audio cable into the AUDIO OUT jack on your VCR. IN ...