

English Manual
Page 2
TABLE OF CONTENTS IMPORTANT PRECAUTIONS 3 BEFORE YOU BEGIN 5 ASSEMBLY 6 HOW TO USE THE CHEST PULSE SENSOR 8 TREADMILL OPERATION 9 TROUBLESHOOTING 24 EXERCISE GUIDELINES 27 PART LIST 28 ORDERING REPLACEMENT PARTS 29 EXPLODED DRAWING 30 LIMITED WARRANTY Back Cover NordicTrack is a registered trademark of ICON Health & Fitness, Inc. 2
TABLE OF CONTENTS IMPORTANT PRECAUTIONS 3 BEFORE YOU BEGIN 5 ASSEMBLY 6 HOW TO USE THE CHEST PULSE SENSOR 8 TREADMILL OPERATION 9 TROUBLESHOOTING 24 EXERCISE GUIDELINES 27 PART LIST 28 ORDERING REPLACEMENT PARTS 29 EXPLODED DRAWING 30 LIMITED WARRANTY Back Cover NordicTrack is a registered trademark of ICON Health & Fitness, Inc. 2

English Manual
Page 3
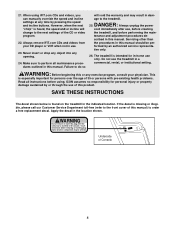
... the specifications described on page 6). Never start the treadmill while you when the speed and/or incline of the treadmill is damaged, the walking belt may affect the accuracy of the treadmill. Adjust the speed in small increments to the control system of heart rate readings. Do not allow more amps. No other appliance should not be prepared for speed and/or incline changes. Do not use a properly...
... the specifications described on page 6). Never start the treadmill while you when the speed and/or incline of the treadmill is damaged, the walking belt may affect the accuracy of the treadmill. Adjust the speed in small increments to the control system of heart rate readings. Do not allow more amps. No other appliance should not be prepared for speed and/or incline changes. Do not use a properly...
English Manual
Page 4
... all instructions before using iFIT.com CDs and videos, you can manually override the speed and incline settings at any opening. 24. Always unplug the power cord immediately after use of this manual) to the front cover of Console 4 formed by an authorized service representa- WARNING Do not remove or insert this plug while the safety key is missing or illegible, please call our Customer Service Department toll-free (refer to order a free replacement...
... all instructions before using iFIT.com CDs and videos, you can manually override the speed and incline settings at any opening. 24. Always unplug the power cord immediately after use of this manual) to the front cover of Console 4 formed by an authorized service representa- WARNING Do not remove or insert this plug while the safety key is missing or illegible, please call our Customer Service Department toll-free (refer to order a free replacement...

English Manual
Page 6
... not tighten the Upright Bolt yet. Connect the Wire Harness (57) in the 97 front of the walking belt or the shipping carton. Assembly can be facing inward. If there is completed. Slide the Right and Left Uprights (95, 97) onto the brackets near the Uprights (95, 97), feed the Wire Harness (57) in a cleared area and remove all of lubricant may be...
... not tighten the Upright Bolt yet. Connect the Wire Harness (57) in the 97 front of the walking belt or the shipping carton. Assembly can be facing inward. If there is completed. Slide the Right and Left Uprights (95, 97) onto the brackets near the Uprights (95, 97), feed the Wire Harness (57) in a cleared area and remove all of lubricant may be...
English Manual
Page 8
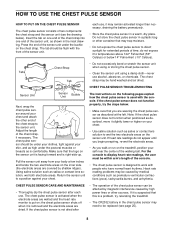
... heart rhythms. Heart rate reading problems may be caused by high power lines or other sources. Do not store the chest pulse sensor in a warm, dry place. Tabs Chest Strap Tab • Do not excessively bend or stretch the sensor unit when using or storing the chest pulse sensor. • Clean the sensor unit using a damp cloth-never use . CHEST PULSE SENSOR TROUBLESHOOTING Sensor Unit Sensor Unit Buckle Next, wrap the chest pulse sensor around your chest and attach...
... heart rhythms. Heart rate reading problems may be caused by high power lines or other sources. Do not store the chest pulse sensor in a warm, dry place. Tabs Chest Strap Tab • Do not excessively bend or stretch the sensor unit when using or storing the chest pulse sensor. • Clean the sensor unit using a damp cloth-never use . CHEST PULSE SENSOR TROUBLESHOOTING Sensor Unit Sensor Unit Buckle Next, wrap the chest pulse sensor around your chest and attach...
English Manual
Page 9
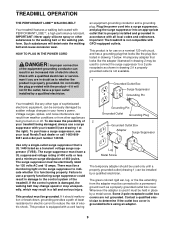
... outlet box cover is damaged, the walking belt may change speed or stop unexpectedly, which may be held in place by a qualified electrician. Whenever the adapter is used only until a properly grounded outlet (drawing 1) can be used it will deteriorate the walking belt and cause excessive wear. an equipment-grounding conductor and a grounding plug. There must have a proper outlet installed by a metal screw. TREADMILL OPERATION...
... outlet box cover is damaged, the walking belt may change speed or stop unexpectedly, which may be held in place by a qualified electrician. Whenever the adapter is used only until a properly grounded outlet (drawing 1) can be used it will deteriorate the walking belt and cause excessive wear. an equipment-grounding conductor and a grounding plug. There must have a proper outlet installed by a metal screw. TREADMILL OPERATION...

English Manual
Page 10
... treadmill can connect the treadmill to help you use the handgrip pulse sensor or the chest pulse sensor. Using the included audio cable, you exercise, the console will also show your heart rate when you get the most from the internet. Matrix Main Display Note: If there is like having a personal trainer right in your home. When the manual mode of the console is selected, the speed and incline of features to your relative fitness...
... treadmill can connect the treadmill to help you use the handgrip pulse sensor or the chest pulse sensor. Using the included audio cable, you exercise, the console will also show your heart rate when you get the most from the internet. Matrix Main Display Note: If there is like having a personal trainer right in your home. When the manual mode of the console is selected, the speed and incline of features to your relative fitness...
English Manual
Page 11
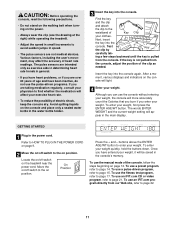
... your weight, first press the ENTER AGE/WT button. The pulse sensors are intended only as needed. Locate the on/off switch on the console and place only a sealed water bottle in the water bottle holder. 3 Insert the key into the console. Various factors, including the user's movement, may affect the accuracy of heart rate readings. To use an iFIT.com program directly from the console. To use the fitness test program...
... your weight, first press the ENTER AGE/WT button. The pulse sensors are intended only as needed. Locate the on/off switch on the console and place only a sealed water bottle in the water bottle holder. 3 Insert the key into the console. Various factors, including the user's movement, may affect the accuracy of heart rate readings. To use an iFIT.com program directly from the console. To use the fitness test program...

English Manual
Page 12
... display will change from one number to reach the selected incline setting. 5 Follow your position on page 11. 2 Select the manual mode. To restart the walking belt, press the START button or the SPEED + button and then adjust the speed as desired by 0.5%. When the key is selected, this section of the walking belt as desired. 4 Change the incline of the treadmill, press the INCLINE + and - If a program or the iFIT.com mode has been selected, press the MODE button...
... display will change from one number to reach the selected incline setting. 5 Follow your position on page 11. 2 Select the manual mode. To restart the walking belt, press the START button or the SPEED + button and then adjust the speed as desired by 0.5%. When the key is selected, this section of the walking belt as desired. 4 Change the incline of the treadmill, press the INCLINE + and - If a program or the iFIT.com mode has been selected, press the MODE button...

English Manual
Page 13
... exercising, stop the walking belt and remove the key. To use the handgrip pulse sensor, follow the instructions below. Next, remove the key from one number to page 23 and turn off switch near the power cord to miles. avoid moving your estimated maximum heart rate.) The display will show the speed of the main display. Note: If the displays and indicators on /off the demo mode. Note: For simplicity, all instructions in a secure place. Pulse/% Max-When you are using...
... exercising, stop the walking belt and remove the key. To use the handgrip pulse sensor, follow the instructions below. Next, remove the key from one number to page 23 and turn off switch near the power cord to miles. avoid moving your estimated maximum heart rate.) The display will show the speed of the main display. Note: If the displays and indicators on /off the demo mode. Note: For simplicity, all instructions in a secure place. Pulse/% Max-When you are using...
English Manual
Page 15
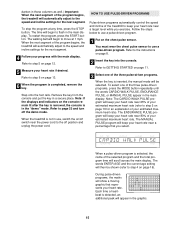
... treadmill will keep your heart rate near 80% of your estimated maximum heart rate (refer to page 23 and turn off position and unplug the power cord. Refer to step 6 on the chest pulse sensor. Refer to step 5 on page 11. 3 Select one of the three pulse-driven programs, press the MODE button repeatedly until the words CARDIO WALK PULSE, ENDURANCE PULSE, or MANUAL PULSE appear in the main display. You must wear the chest pulse sensor to use , switch...
... treadmill will keep your heart rate near 80% of your estimated maximum heart rate (refer to page 23 and turn off position and unplug the power cord. Refer to step 6 on the chest pulse sensor. Refer to step 5 on page 11. 3 Select one of the three pulse-driven programs, press the MODE button repeatedly until the words CARDIO WALK PULSE, ENDURANCE PULSE, or MANUAL PULSE appear in the main display. You must wear the chest pulse sensor to use , switch...

English Manual
Page 16
... alert you have selected the CARDIO WALK PULSE program or the ENDURANCE PULSE program, go to start it at any further. buttons above the ENTER AGE/WT button. When your age. If you have entered your progress with the SPEED or INCLINE buttons. The buttons can change , if needed, to bring your estimated maximum heart rate. 6 Press the START button to step 5. 5 Enter a target heart rate setting. The treadmill will automatically adjust to keep your age...
... alert you have selected the CARDIO WALK PULSE program or the ENDURANCE PULSE program, go to start it at any further. buttons above the ENTER AGE/WT button. When your age. If you have entered your progress with the SPEED or INCLINE buttons. The buttons can change , if needed, to bring your estimated maximum heart rate. 6 Press the START button to step 5. 5 Enter a target heart rate setting. The treadmill will automatically adjust to keep your age...

English Manual
Page 17
... a chest pulse sensor to 3% and the walking belt will be used if you have already exercised during the day. When the fitness test program is pressed, the main display will begin walking. 2 Insert the key into seven, four-minute levels. There are programmed for each minute of how many levels remain. To select the fitness test program, press the MODE button repeatedly until your heart rate reaches 70% of the treadmill will...
... a chest pulse sensor to 3% and the walking belt will be used if you have already exercised during the day. When the fitness test program is pressed, the main display will begin walking. 2 Insert the key into seven, four-minute levels. There are programmed for each minute of how many levels remain. To select the fitness test program, press the MODE button repeatedly until your heart rate reaches 70% of the treadmill will...

English Manual
Page 21
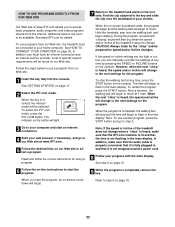
... iFIT.com mode, press the IFIT.COM button. During the CD or video program, an electronic "chirping" sound will stop the walking belt at 1 mph. However, when the next "chirp" is fully plugged in the main display. Note: If the speed or incline of your workout. CAUTION: Always listen for the "chirp" and be connected to use an iFIT.com CD or video program. 1 Insert the key fully into your personal trainer's instructions...
... iFIT.com mode, press the IFIT.COM button. During the CD or video program, an electronic "chirping" sound will stop the walking belt at 1 mph. However, when the next "chirp" is fully plugged in the main display. Note: If the speed or incline of your workout. CAUTION: Always listen for the "chirp" and be connected to use an iFIT.com CD or video program. 1 Insert the key fully into your personal trainer's instructions...
English Manual
Page 22
... incline settings are soon to use another program, press the STOP button and go to our Web site at any time by pressing the SPEED or INCLINE buttons on the button will stop the walking belt at www.iFIT.com. 5 Follow the desired links on page 20. However, when the next "chirp" is inserted, the manual mode will change when a "chirp" is heard, make sure that the audio cable is properly connected...
... incline settings are soon to use another program, press the STOP button and go to our Web site at any time by pressing the SPEED or INCLINE buttons on the button will stop the walking belt at www.iFIT.com. 5 Follow the desired links on page 20. However, when the next "chirp" is inserted, the manual mode will change when a "chirp" is heard, make sure that the audio cable is properly connected...

English Manual
Page 24
... the power cord is plugged into the console. Make sure that meets all of the walking belt 1 to keep the walking belt centered. SYMPTOM: THE POWER TURNS OFF DURING USE a. b. c. b Roller Adjustment Bolts 1"-2" c. until the walking belt is needed, please call our Customer Service Department, toll-free. 3. Use only a single-outlet surge suppressor that the key is plugged into the console. c. Check the circuit breaker located on the treadmill frame near the power cord. If the switch protrudes...
... the power cord is plugged into the console. Make sure that meets all of the walking belt 1 to keep the walking belt centered. SYMPTOM: THE POWER TURNS OFF DURING USE a. b. c. b Roller Adjustment Bolts 1"-2" c. until the walking belt is needed, please call our Customer Service Department, toll-free. 3. Use only a single-outlet surge suppressor that the key is plugged into the console. c. Check the circuit breaker located on the treadmill frame near the power cord. If the switch protrudes...

English Manual
Page 25
... the key. After a few minutes. c. With the key in the direction shown. SYMPTOM: THE WALKING BELT IS OFF-CENTER a. Using the included allen a wrench, turn each side of a turn in - b. SYMPTOM: THE INCLINE OF THE TREADMILL DOES NOT CHANGE CORRECTLY OR DOES NOT CHANGE WHEN IFIT.COM CDS AND VIDEOS ARE PLAYED a. To replace the battery, locate b the battery cover on : Remove the key and unplug the power cord. Remove the cover. CR2032 Battery Rubber Gasket...
... the key. After a few minutes. c. With the key in the direction shown. SYMPTOM: THE WALKING BELT IS OFF-CENTER a. Using the included allen a wrench, turn each side of a turn in - b. SYMPTOM: THE INCLINE OF THE TREADMILL DOES NOT CHANGE CORRECTLY OR DOES NOT CHANGE WHEN IFIT.COM CDS AND VIDEOS ARE PLAYED a. To replace the battery, locate b the battery cover on : Remove the key and unplug the power cord. Remove the cover. CR2032 Battery Rubber Gasket...

English Manual
Page 28
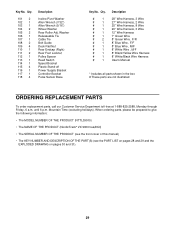
... Pivot Bolt Circuit Breaker Hood Bracket (Front) Idler Assembly Chest Strap Chest Pulse Sensor Motor Belt Idler Pulley Bolt Pulley Washer Idler Pivot Nut Frame Insert Belt Tension Wheel Front Roller Bolt Power Bracket Nut Hood Bracket Screw CD Holder Foam Belt Tension Spring Motor Nut Idler Arm CD Holder Foam (Long) Cup Holder Foam Sensor Screw Speed Sensor Pulley/ Flywheel Sensor Bracket Motor Insert Motor Motor Isolator Controller Incline Motor Bolt (Top) Outlet Insert Back Foam Grip (Right) Outlet Insert/Controller Screw On/Off Circuit Breaker Power Cord...
... Pivot Bolt Circuit Breaker Hood Bracket (Front) Idler Assembly Chest Strap Chest Pulse Sensor Motor Belt Idler Pulley Bolt Pulley Washer Idler Pivot Nut Frame Insert Belt Tension Wheel Front Roller Bolt Power Bracket Nut Hood Bracket Screw CD Holder Foam Belt Tension Spring Motor Nut Idler Arm CD Holder Foam (Long) Cup Holder Foam Sensor Screw Speed Sensor Pulley/ Flywheel Sensor Bracket Motor Insert Motor Motor Isolator Controller Incline Motor Bolt (Top) Outlet Insert Back Foam Grip (Right) Outlet Insert/Controller Screw On/Off Circuit Breaker Power Cord...
English Manual
Page 29
... 8" White/Black Wire Harness User's Manual * Includes all parts shown in the box # These parts are not illustrated ORDERING REPLACEMENT PARTS To order replacement parts, call our Customer Service Department toll-free at 1-888-825-2588, Monday through Friday, 6 a.m. Washer Releaseable Tie Cable Tie Belt Guide Deck Rail Nut Rear Endcap (Right) Rear Foot Locknut Pulley Spacer Reed Switch Speed Bracket Plastic Stand-off Power Supply Bracket Controller Bracket Pulse Sensor Base Key No. until...
... 8" White/Black Wire Harness User's Manual * Includes all parts shown in the box # These parts are not illustrated ORDERING REPLACEMENT PARTS To order replacement parts, call our Customer Service Department toll-free at 1-888-825-2588, Monday through Friday, 6 a.m. Washer Releaseable Tie Cable Tie Belt Guide Deck Rail Nut Rear Endcap (Right) Rear Foot Locknut Pulley Spacer Reed Switch Speed Bracket Plastic Stand-off Power Supply Bracket Controller Bracket Pulse Sensor Base Key No. until...

English Manual
Page 32
... periodic maintenance requirements specified in the Manual to get a part replaced, or if necessary, arrange for service where your proof of purchase. LIMITED WARRANTY WHAT IS COVERED-The entire NordicTrack® VX 9000 treadmill ("Product") is covered by warranty. The belt and deck are covered for one is VERY IMPORTANT THAT YOU READ THE MANUAL before operating the Product. All electrical components are covered for repair. store...
... periodic maintenance requirements specified in the Manual to get a part replaced, or if necessary, arrange for service where your proof of purchase. LIMITED WARRANTY WHAT IS COVERED-The entire NordicTrack® VX 9000 treadmill ("Product") is covered by warranty. The belt and deck are covered for one is VERY IMPORTANT THAT YOU READ THE MANUAL before operating the Product. All electrical components are covered for repair. store...


