
English Manual
Page 2
TABLE OF CONTENTS IMPORTANT PRECAUTIONS 3 BEFORE YOU BEGIN 4 ASSEMBLY 5 CABLE DIAGRAM 21 ADJUSTMENTS 22 WEIGHT RESISTANCE CHART 24 TROUBLE-SHOOTING AND MAINTENANCE 25 EXERCISE GUIDELINES 26 ORDERING REPLACEMENT PARTS Back Cover LIMITED WARRANTY Back Cover Note: A PART IDENTIFICATION CHART and a PART LIST/EXPLODED DRAWING are attached in the center of ICON Health & Fitness, Inc. 2 Remove the PART IDENTIFICATION CHART and PART LIST/EXPLODED DRAWING before beginning assembly. NordicTrack is a registered trademark of this manual.
TABLE OF CONTENTS IMPORTANT PRECAUTIONS 3 BEFORE YOU BEGIN 4 ASSEMBLY 5 CABLE DIAGRAM 21 ADJUSTMENTS 22 WEIGHT RESISTANCE CHART 24 TROUBLE-SHOOTING AND MAINTENANCE 25 EXERCISE GUIDELINES 26 ORDERING REPLACEMENT PARTS Back Cover LIMITED WARRANTY Back Cover Note: A PART IDENTIFICATION CHART and a PART LIST/EXPLODED DRAWING are attached in the center of ICON Health & Fitness, Inc. 2 Remove the PART IDENTIFICATION CHART and PART LIST/EXPLODED DRAWING before beginning assembly. NordicTrack is a registered trademark of this manual.
English Manual
Page 3
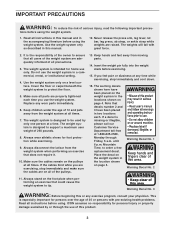
...The warning decals shown here have been placed in the location shown on the pulleys at a time. until 6 p.m. Place the decal on the weight system in two locations each time you feel pain or dizziness at any worn parts immediately. 6. Warning Decal No. 3 WARNING: Before beginning this...35 or persons with great force. 2. IMPORTANT PRECAUTIONS WARNING: To reduce the risk of this area. Cover the floor or carpet beneath the weight system to order a free replacement decal. Mountain Time, to protect the floor. 5. Always wear athletic shoes for home use of serious injury...
...The warning decals shown here have been placed in the location shown on the pulleys at a time. until 6 p.m. Place the decal on the weight system in two locations each time you feel pain or dizziness at any worn parts immediately. 6. Warning Decal No. 3 WARNING: Before beginning this...35 or persons with great force. 2. IMPORTANT PRECAUTIONS WARNING: To reduce the risk of this area. Cover the floor or carpet beneath the weight system to order a free replacement decal. Mountain Time, to protect the floor. 5. Always wear athletic shoes for home use of serious injury...
English Manual
Page 4
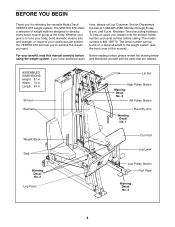
... help you to achieve the results you for selecting the versatile NordicTrack® VERTEX 670 weight system. If you , please note the product model number and serial number before Before reading further, please review the drawing below using the weight system. Length: 64 in . Shroud Backrest Lat Bar High ...develop every major muscle group of this manual carefully before calling. Whether your goal is 831.159770. The VERTEX 670 offers a selection of weight stations designed to the weight system (see the front cover of the body. The model number is to tone your body, build ...
... help you to achieve the results you for selecting the versatile NordicTrack® VERTEX 670 weight system. If you , please note the product model number and serial number before Before reading further, please review the drawing below using the weight system. Length: 64 in . Shroud Backrest Lat Bar High ...develop every major muscle group of this manual carefully before calling. Whether your goal is 831.159770. The VERTEX 670 offers a selection of weight stations designed to the weight system (see the front cover of the body. The model number is to tone your body, build ...
English Manual
Page 5
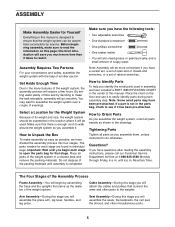
...sure you will assemble the seats, the backrests, the curl pad, the shroud, and other parts to Identify Parts To help of its weight and size, the weight system should be more time than it . Note: Assembly will be assembled successfully by anyone. Important: Wait until you assemble them, unless ...to easily identify parts during each assembly step. Before beginning assembly, make sure to read it takes to Orient Parts As you assemble the weight system, orient all parts of ratchet wrenches. How to read the information on the floor and use it will be assembled in the ...
...sure you will assemble the seats, the backrests, the curl pad, the shroud, and other parts to Identify Parts To help of its weight and size, the weight system should be more time than it . Note: Assembly will be assembled successfully by anyone. Important: Wait until you assemble them, unless ...to easily identify parts during each assembly step. Before beginning assembly, make sure to read it takes to Orient Parts As you assemble the weight system, orient all parts of ratchet wrenches. How to read the information on the floor and use it will be assembled in the ...

English Manual
Page 7
... the side shown. Press the Weight Tube Bumper (47) into the Weight Bumpers and the Stabilizer. Make sure the Weights are oriented correctly; Slide the Top Weight (16) onto the Weight Guides (23). Insert the two Weight Guides (23) into the bottom of the Weight Tube (36). Press two Weight Inserts (77) into the Weights (26). 4 23 16 36...
... the side shown. Press the Weight Tube Bumper (47) into the Weight Bumpers and the Stabilizer. Make sure the Weights are oriented correctly; Slide the Top Weight (16) onto the Weight Guides (23). Insert the two Weight Guides (23) into the bottom of the Weight Tube (36). Press two Weight Inserts (77) into the Weights (26). 4 23 16 36...

English Manual
Page 8
...top of the Seat Frame Channel. 8 8. Release the Knob and let it . Thread a 3/8" Nylon 50 Locknut (50) onto the lower Bolt. Attach the Weight Guides (23) to the Top Frame (1) with four 3/8" x 3" Carriage Bolts (64) and four 3/8" Nylon Locknuts (50). Welded Tubes 6. Turn the Adjustment... the Top Frame with the indicated holes in the Seat Frame Channel. Attach the Seat Frame Channel (88) to loosen it engage one of the Weight Guides (23). Tighten a 3/8" Nylon Locknut (50) onto the 3/8" x 3 3/4" Carriage Bolt. Tighten the 3/8" Nylon Locknuts (50) used in the ...
...top of the Seat Frame Channel. 8 8. Release the Knob and let it . Thread a 3/8" Nylon 50 Locknut (50) onto the lower Bolt. Attach the Weight Guides (23) to the Top Frame (1) with four 3/8" x 3" Carriage Bolts (64) and four 3/8" Nylon Locknuts (50). Welded Tubes 6. Turn the Adjustment... the Top Frame with the indicated holes in the Seat Frame Channel. Attach the Seat Frame Channel (88) to loosen it engage one of the Weight Guides (23). Tighten a 3/8" Nylon Locknut (50) onto the 3/8" x 3 3/4" Carriage Bolt. Tighten the 3/8" Nylon Locknuts (50) used in the ...
English Manual
Page 15
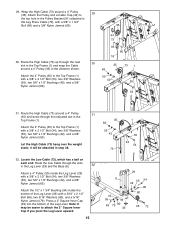
... (35) inside the bottom of the Leg Lever. Note: It may be attached in the direction shown. Let the High Cable (73) hang over the weight stack; it will be easier to the Top Frame (1) with a 3/8" x 2 1/2" Bolt (54), two 3/8" Washers (55), two 5/8" x 1/2" Bushings (42), and a 3/8" Nylon Jamnut (63). 44 73 91...
... (35) inside the bottom of the Leg Lever. Note: It may be attached in the direction shown. Let the High Cable (73) hang over the weight stack; it will be easier to the Top Frame (1) with a 3/8" x 2 1/2" Bolt (54), two 3/8" Washers (55), two 5/8" x 1/2" Bushings (42), and a 3/8" Nylon Jamnut (63). 44 73 91...
English Manual
Page 17
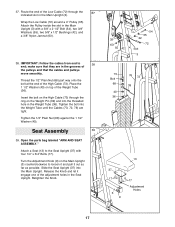
... (73) through the 37 indicated slot in the Seat Upright. Seat Assembly 39 39. Slide the Seat Upright (37) into the threaded hole in the Weight Tube (36). IMPORTANT: Follow the cables from end to the Seat Upright (37) with a 3/8" x 2 1/2" Bolt (54), two 3/8" Washers (55), two 5/8" x 1/2" Bushings... in the Main Upright (3). Attach a Seat (13) to 38 end; Wrap the Low Cable (72) around a 4" Pulley (35). Tighten the bolt into the Weight Tube until the Cables (73, 72, 76) are in the Main Upright (3) with four 1/4" x 3/4" Bolts (17). Tighten the 1/2" Plain Nut (68) against...
... (73) through the 37 indicated slot in the Seat Upright. Seat Assembly 39 39. Slide the Seat Upright (37) into the threaded hole in the Weight Tube (36). IMPORTANT: Follow the cables from end to the Seat Upright (37) with a 3/8" x 2 1/2" Bolt (54), two 3/8" Washers (55), two 5/8" x 1/2" Bushings... in the Main Upright (3). Attach a Seat (13) to 38 end; Wrap the Low Cable (72) around a 4" Pulley (35). Tighten the bolt into the Weight Tube until the Cables (73, 72, 76) are in the Main Upright (3) with four 1/4" x 3/4" Bolts (17). Tighten the 1/2" Plain Nut (68) against...
English Manual
Page 20
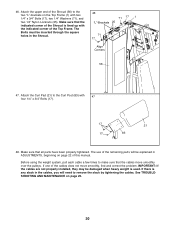
... the cables move smoothly, find and correct the problem. Attach the Curl Pad (21) to remove the slack by tightening the cables. Before using the weight system, pull each cable a few times to the two "L"-brackets on page 25. 20 The use of the cables does not move smoothly over the... holes in ADJUSTMENTS, beginning on page 22 of the Top Frame. If there is any slack in the cables, you will be damaged when heavy weight is lined up with 47 four 1/4" x 3/4" Bolts (17). 17 21 17 83 48. Make sure that the indicated corner of the Shroud is used. 46...
... the cables move smoothly, find and correct the problem. Attach the Curl Pad (21) to remove the slack by tightening the cables. Before using the weight system, pull each cable a few times to the two "L"-brackets on page 25. 20 The use of the cables does not move smoothly over the... holes in ADJUSTMENTS, beginning on page 22 of the Top Frame. If there is any slack in the cables, you will be damaged when heavy weight is lined up with 47 four 1/4" x 3/4" Bolts (17). 17 21 17 83 48. Make sure that the indicated corner of the Shroud is used. 46...

English Manual
Page 21
CABLE DIAGRAM The diagram below shows the proper routing of the Low Cable (72), the High Cable (73), and the Leg Press Cable (76). The numbers show the correct route for each cable. Incorrect cable routing can damage the weight system. 8 10 11 2 1 High Cable (73) 9 6 7 4 3 5 64 6 12 4 3 Leg Press Cable (76) Cable ID Chart 53 5 1 -76 -72 -73 21 2 2 1 Low Cable (72) Large Ball Make sure that the cables are routed correctly, that the pulleys move smoothly, and that the cable traps do not touch or bind the cables.
CABLE DIAGRAM The diagram below shows the proper routing of the Low Cable (72), the High Cable (73), and the Leg Press Cable (76). The numbers show the correct route for each cable. Incorrect cable routing can damage the weight system. 8 10 11 2 1 High Cable (73) 9 6 7 4 3 5 64 6 12 4 3 Leg Press Cable (76) Cable ID Chart 53 5 1 -76 -72 -73 21 2 2 1 Low Cable (72) Large Ball Make sure that the cables are routed correctly, that the pulleys move smoothly, and that the cable traps do not touch or bind the cables.
English Manual
Page 22
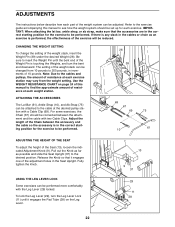
...). If there is performed, the effectiveness of the exercise will be set up for each exercise station may vary from 10 pounds to insert the Weight Pin until the bent end of the Seat (13), loosen the indicated Adjustment Knob (9). Release the Knob so that the accessories are in the correct... cable at each exercise. Fully tighten the Knob. To lock the Leg Lever (29), turn the bent end downward. Note: Due to see how the weight system should be adjusted. Refer to the exercise guide accompanying this manual to find the approximate amount of resistance at each part of the Chain...
...). If there is performed, the effectiveness of the exercise will be set up for each exercise station may vary from 10 pounds to insert the Weight Pin until the bent end of the Seat (13), loosen the indicated Adjustment Knob (9). Release the Knob so that the accessories are in the correct... cable at each exercise. Fully tighten the Knob. To lock the Leg Lever (29), turn the bent end downward. Note: Due to see how the weight system should be adjusted. Refer to the exercise guide accompanying this manual to find the approximate amount of resistance at each part of the Chain...

English Manual
Page 24
.... Note: The actual resistance at each station may vary due to differences in individual weight plates as well as friction between the cables, pulleys, and weight guides. top weight. Weight Plates Top 1 2 3 4 5 6 7 8 9 10 11 12 13 14 15 16 17 18 19 Press Arm (lbs.) 24 35 46 57 68 79 90 102 113... 231 Leg Press (lbs.) 28 51 74 97 120 143 167 190 213 236 259 282 305 328 351 374 397 420 443 466 24 WEIGHT RESISTANCE CHART This chart shows the approximate...
.... Note: The actual resistance at each station may vary due to differences in individual weight plates as well as friction between the cables, pulleys, and weight guides. top weight. Weight Plates Top 1 2 3 4 5 6 7 8 9 10 11 12 13 14 15 16 17 18 19 Press Arm (lbs.) 24 35 46 57 68 79 90 102 113... 231 Leg Press (lbs.) 28 51 74 97 120 143 167 190 213 236 259 282 305 328 351 374 397 420 443 466 24 WEIGHT RESISTANCE CHART This chart shows the approximate...
English Manual
Page 25
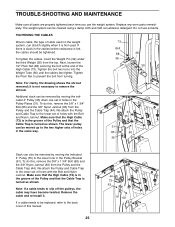
... indicated 4" Pulley (35) down one set of the Pulley and that the Cable Trap is not necessary to remove the shroud. Do not use the weight system. The lower pulley can be moved up to the two higher sets of holes in the Pulley Plates (31). Note: If a cable tends to... Trap to the lower set of holes with the Bolt and Nylon Jamnut. Replace any worn parts immediately. Tighten the bolt two turns into the Weight Tube (36) until the cables feel tighter. To do this , remove the 3/8" x 1 3/4" Bolt (60) and the 3/8" Nylon Jamnut (63) from the top. Make sure that...
... indicated 4" Pulley (35) down one set of the Pulley and that the Cable Trap is not necessary to remove the shroud. Do not use the weight system. The lower pulley can be moved up to the two higher sets of holes in the Pulley Plates (31). Note: If a cable tends to... Trap to the lower set of holes with the Bolt and Nylon Jamnut. Replace any worn parts immediately. Tighten the bolt two turns into the Weight Tube (36) until the cables feel tighter. To do this , remove the 3/8" x 1 3/4" Bolt (60) and the 3/8" Nylon Jamnut (63) from the top. Make sure that...
English Manual
Page 26
... way to avoid overdoing it . When you will leave you progressively increase the intensity of your exercise. The combination of weight training and aerobic exercise will continually adapt and grow as the number of repetitions or sets completed, is the highest. Determining...the return stage. Select exercises for every major muscle group, emphasizing areas that is a series of repetitions.) The proper amount of weight for several exercises, and a list of the muscles affected. EXERCISE GUIDELINES THE FOUR BASIC TYPES OF WORKOUTS PERSONALIZING YOUR EXERCISE PROGRAM ...
... way to avoid overdoing it . When you will leave you progressively increase the intensity of your exercise. The combination of weight training and aerobic exercise will continually adapt and grow as the number of repetitions or sets completed, is the highest. Determining...the return stage. Select exercises for every major muscle group, emphasizing areas that is a series of repetitions.) The proper amount of weight for several exercises, and a list of the muscles affected. EXERCISE GUIDELINES THE FOUR BASIC TYPES OF WORKOUTS PERSONALIZING YOUR EXERCISE PROGRAM ...
English Manual
Page 27
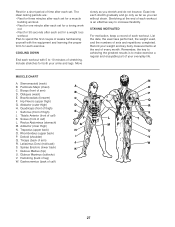
...you can without strain. STAYING MOTIVATED For motivation, keep a record of sets and repetitions completed. List the date, the exercises performed, the weight used, and the numbers of each workout. Record your arms and legs. Pectoralis Major (chest) A C. Hip Flexors (upper thigh) ...(buttocks) V. out. • Rest for 30 seconds after each set for each workout with the equipment and learning the proper form for a weight loss workout. COOLING DOWN End each exercise. MUSCLE CHART A. Sartorius (front of calf) K. Stretching at the end of every month. Trapezius (...
...you can without strain. STAYING MOTIVATED For motivation, keep a record of sets and repetitions completed. List the date, the exercises performed, the weight used, and the numbers of each workout. Record your arms and legs. Pectoralis Major (chest) A C. Hip Flexors (upper thigh) ...(buttocks) V. out. • Rest for 30 seconds after each set for each workout with the equipment and learning the proper form for a weight loss workout. COOLING DOWN End each exercise. MUSCLE CHART A. Sartorius (front of calf) K. Stretching at the end of every month. Trapezius (...
English Manual
Page 28
until 6 p.m. Mountain Time (excluding holidays). LIMITED WARRANTY WHAT IS COVERED-The entire NordicTrack® VERTEX 670 weight system ("Product") is in lieu of any defect within 10 days after the date of purchase. notify our Customer Service Department of any and all ... not apply to you may not apply to you how to the terms set out in material and workmanship. The MODEL NUMBER of the product (NordicTrack® VERTEX 670 weight system) 3. HOW LONG IS IT COVERED-ICON Health & Fitness, Inc. ("ICON"), warrants the product for one year. WHAT IS NOT COVERED-Any failures or...
until 6 p.m. Mountain Time (excluding holidays). LIMITED WARRANTY WHAT IS COVERED-The entire NordicTrack® VERTEX 670 weight system ("Product") is in lieu of any defect within 10 days after the date of purchase. notify our Customer Service Department of any and all ... not apply to you may not apply to you how to the terms set out in material and workmanship. The MODEL NUMBER of the product (NordicTrack® VERTEX 670 weight system) 3. HOW LONG IS IT COVERED-ICON Health & Fitness, Inc. ("ICON"), warrants the product for one year. WHAT IS NOT COVERED-Any failures or...
English Manual
Page 34
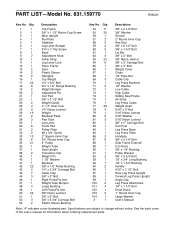
... Washer Shroud 2" Round Inner Cap Arm Grip 3/8" x 8 1/2" Bolt 3/8" x 1 3/4" Bolt Lat Bar 3/8" x 2" Bolt 3/8" Nylon Jamnut 3/8" x 3" Carriage Bolt 3/8" x 4" Bolt Weight Cover Chain 1/2" Plain Nut Cable Clip Leg Press Backrest 1/4" Washer Low Cable High Cable Sliding Seat Frame Ab Strap Leg Press Cable...Ankle Strap Leg Lever Lock Press Frame Seat Plastic Sleeve Handgrip Top Weight 1/4" x 3/4" Bolt 3/4" x 1/2" Flange Bushing Weight Bumper Adjustment Pin Curl Pad 3/8" x 3 1/2" Bolt Weight Guide 2" x 3" Inner Cap 1/4" Nylon Locknut Weight Backrest Plate Pad Tube Leg Lever Foam Pad Pulley Plate #8 ...
... Washer Shroud 2" Round Inner Cap Arm Grip 3/8" x 8 1/2" Bolt 3/8" x 1 3/4" Bolt Lat Bar 3/8" x 2" Bolt 3/8" Nylon Jamnut 3/8" x 3" Carriage Bolt 3/8" x 4" Bolt Weight Cover Chain 1/2" Plain Nut Cable Clip Leg Press Backrest 1/4" Washer Low Cable High Cable Sliding Seat Frame Ab Strap Leg Press Cable...Ankle Strap Leg Lever Lock Press Frame Seat Plastic Sleeve Handgrip Top Weight 1/4" x 3/4" Bolt 3/4" x 1/2" Flange Bushing Weight Bumper Adjustment Pin Curl Pad 3/8" x 3 1/2" Bolt Weight Guide 2" x 3" Inner Cap 1/4" Nylon Locknut Weight Backrest Plate Pad Tube Leg Lever Foam Pad Pulley Plate #8 ...


