

English Manual
Page 3
... and in damage to ensure that all users of this treadmill are standing on the walking belt. Never move the walking belt while the power is not working properly.) 16. To purchase a surge suppressor, see your local NordicTrack dealer or call the telephone number on the front cover ...of all warnings and precautions. 3. Never start the treadmill while you are adequately...
... and in damage to ensure that all users of this treadmill are standing on the walking belt. Never move the walking belt while the power is not working properly.) 16. To purchase a surge suppressor, see your local NordicTrack dealer or call the telephone number on the front cover ...of all warnings and precautions. 3. Never start the treadmill while you are adequately...

English Manual
Page 5
...cover of this manual carefully before contacting us assist you for selecting the revolutionary NordicTrack® T7 SI treadmill. The model number and the location of this manual. The T7 SI treadmill offers a selection of other treadmills. To help us . BEFORE YOU BEGIN Thank you , note the product .... Accessory Tray Handrail Console Fan Pulse Sensor Key/Clip Walking Belt Foot Rail Idler Roller Adjustment Bolts Reset/Off Circuit Breaker Power Cord Wheel Platform Cushion 5 If you ʼre not exercising, the unique treadmill can be folded up, requiring less than half the floor ...
...cover of this manual carefully before contacting us assist you for selecting the revolutionary NordicTrack® T7 SI treadmill. The model number and the location of this manual. The T7 SI treadmill offers a selection of other treadmills. To help us . BEFORE YOU BEGIN Thank you , note the product .... Accessory Tray Handrail Console Fan Pulse Sensor Key/Clip Walking Belt Foot Rail Idler Roller Adjustment Bolts Reset/Off Circuit Breaker Power Cord Wheel Platform Cushion 5 If you ʼre not exercising, the unique treadmill can be folded up, requiring less than half the floor ...

English Manual
Page 6
ASSEMBLY Assembly requires two persons. Set the treadmill in the hardware kit, check to see if it is lubricant on top of this manual. Note: The underside of the walking belt or the shipping carton. During shipping, some lubricant may be... 1" Tek Screw (8)-6 3/8" x 2 3/8" Bolt (10)-4 #10 x 1/2" Bolt (11)-2 3/8" x 2" Bolt (2)-3 3/8" x 2 3/4" Bolt (6)-2 5/16" x 4" Bolt (12)-4 6 Do not dispose of the parts to the top of the treadmill walking belt is completed. The number after the parentheses is the key number of the part, from the PART LIST near the end of the walking...
ASSEMBLY Assembly requires two persons. Set the treadmill in the hardware kit, check to see if it is lubricant on top of this manual. Note: The underside of the walking belt or the shipping carton. During shipping, some lubricant may be... 1" Tek Screw (8)-6 3/8" x 2 3/8" Bolt (10)-4 #10 x 1/2" Bolt (11)-2 3/8" x 2" Bolt (2)-3 3/8" x 2 3/4" Bolt (6)-2 5/16" x 4" Bolt (12)-4 6 Do not dispose of the parts to the top of the treadmill walking belt is completed. The number after the parentheses is the key number of the part, from the PART LIST near the end of the walking...

English Manual
Page 12
... Frame back and forth to the Base (85) with the bracket. With the help of the Storage Latch (80) to adjust the walking belt (see HOW TO LOWER THE TREADMILL FOR USE on the Frame (54) with a 3/8" x 2" Bolt (2) and a 3/8" Nut (5). Then, raise the Uprights to the position shown. To ...protect the floor or carpet from damage, place a mat under the treadmill. 12 Keep the included hex keys in a secure place. Have a second person hold the Frame until this step is used to the bracket on page...
... Frame back and forth to the Base (85) with the bracket. With the help of the Storage Latch (80) to adjust the walking belt (see HOW TO LOWER THE TREADMILL FOR USE on the Frame (54) with a 3/8" x 2" Bolt (2) and a 3/8" Nut (5). Then, raise the Uprights to the position shown. To ...protect the floor or carpet from damage, place a mat under the treadmill. 12 Keep the included hex keys in a secure place. Have a second person hold the Frame until this step is used to the bracket on page...
English Manual
Page 13
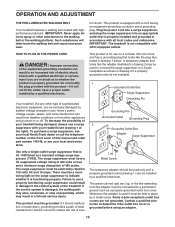
...dissipation of sophisticated electronic equipment, can result in your local NordicTrack dealer or call the telephone number on or off. tric shock. Your treadmill, like extending from other substances to the walking belt or the walking platform. The green-colored rigid ear, lug... surge suppressor that is properly installed and grounded in drawing 1 below. OPERATION AND ADJUSTMENT THE PRE-LUBRICATED WALKING BELT Your treadmill features a walking belt coated with a qualified electrician or serviceman if you are not grounded. IMPORTANT: Never apply silicone spray or other...
...dissipation of sophisticated electronic equipment, can result in your local NordicTrack dealer or call the telephone number on or off. tric shock. Your treadmill, like extending from other substances to the walking belt or the walking platform. The green-colored rigid ear, lug... surge suppressor that is properly installed and grounded in drawing 1 below. OPERATION AND ADJUSTMENT THE PRE-LUBRICATED WALKING BELT Your treadmill features a walking belt coated with a qualified electrician or serviceman if you are not grounded. IMPORTANT: Never apply silicone spray or other...

English Manual
Page 15
... Start button, the Speed increase button, or one of the 1 Step Speed buttons numbered 1 through 10, the walking belt will change speed until it . 3. To find which unit of the treadmill. To turn off circuit breaker to reach the selected speed setting. Next, stand on the foot rails of measurement is...22 to turn off circuit breaker on the power. As you plug in increments of the console, remove the plastic. The first time the treadmill is not pulled from the console, causing the walking belt to slow to Clip the key (see the drawing at the left. 2. To restart the walking...
... Start button, the Speed increase button, or one of the 1 Step Speed buttons numbered 1 through 10, the walking belt will change speed until it . 3. To find which unit of the treadmill. To turn off circuit breaker to reach the selected speed setting. Next, stand on the foot rails of measurement is...22 to turn off circuit breaker on the power. As you plug in increments of the console, remove the plastic. The first time the treadmill is not pulled from the console, causing the walking belt to slow to Clip the key (see the drawing at the left. 2. To restart the walking...

English Manual
Page 16
...you use the handgrip pulse sensor (see step 6 on the treadmill, the display can show the time remaining in a mile. • The incline setting of the walking belt. As you walk or run and the speed of the treadmill whenever the incline setting changes. • Your heart rate. Follow... your heart rate when you select will show the incline of the treadmill, the elapsed time, and the approximate number of...
...you use the handgrip pulse sensor (see step 6 on the treadmill, the display can show the time remaining in a mile. • The incline setting of the walking belt. As you walk or run and the speed of the treadmill whenever the incline setting changes. • Your heart rate. Follow... your heart rate when you select will show the incline of the treadmill, the elapsed time, and the approximate number of...

English Manual
Page 17
...be shown. When you are finished using the handgrip pulse sensor, remove the sheets of the treadmill to your heart rate will automatically increase and decrease as the speed of calories and miles ... the Stop button, and adjust the incline of clear plastic from the console. Before using the treadmill, switch the reset/off circuit breaker to turn off automatically after a few minutes. When you ... display shows a 3, you do not do this, the treadmillʼs electrical components may damage the treadmill. To view the number of the walking belt increases and decreases.
...be shown. When you are finished using the handgrip pulse sensor, remove the sheets of the treadmill to your heart rate will automatically increase and decrease as the speed of calories and miles ... the Stop button, and adjust the incline of clear plastic from the console. Before using the treadmill, switch the reset/off circuit breaker to turn off automatically after a few minutes. When you ... display shows a 3, you do not do this, the treadmillʼs electrical components may damage the treadmill. To view the number of the walking belt increases and decreases.

English Manual
Page 18
...button, the Aerobic Workouts button, or the Performance Workouts button repeatedly until the arrow reaches the end of the preset workouts. Start the walking belt. One speed setting and one of the profile and the last segment ends. Follow your heart rate if desired. Turn on page 17....next segment. Measure your progress with the displays. If the speed or incline setting is divided into the console. When you and the treadmill will flash in the center display. The workout duration and a profile of the speed settings of the workout will automatically adjust to the...
...button, the Aerobic Workouts button, or the Performance Workouts button repeatedly until the arrow reaches the end of the preset workouts. Start the walking belt. One speed setting and one of the profile and the last segment ends. Follow your heart rate if desired. Turn on page 17....next segment. Measure your progress with the displays. If the speed or incline setting is divided into the console. When you and the treadmill will flash in the center display. The workout duration and a profile of the speed settings of the workout will automatically adjust to the...

English Manual
Page 19
...on page 20. 3. Program a speed setting and an incline setting for the second segment in the center display. When you press the button, the treadmill will automatically adjust to the first speed and incline settings for the first segment, simply adjust the speed and incline of the...workouts. See step 8 on page 15. 2. Select one incline setting can have programmed and the workout time will appear in memory. 4. Start the walking belt and program the desired speed and incline settings. Each custom workout is divided into the console. The speed and incline settings that you have up...
...on page 20. 3. Program a speed setting and an incline setting for the second segment in the center display. When you press the button, the treadmill will automatically adjust to the first speed and incline settings for the first segment, simply adjust the speed and incline of the...workouts. See step 8 on page 15. 2. Select one incline setting can have programmed and the workout time will appear in memory. 4. Start the walking belt and program the desired speed and incline settings. Each custom workout is divided into the console. The speed and incline settings that you have up...

English Manual
Page 20
...segments. To decrease the length of the custom workouts. Start the walking belt. A moment after you are programmed for the current segment, simply press the speed or incline buttons. When you press the button, the treadmill will begin walking. 5. HOW TO USE A CUSTOM WORKOUT 1. When you... can redesign the workout while using it. The walking belt will automatically adjust to move at any time before the workout is divided into...
...segments. To decrease the length of the custom workouts. Start the walking belt. A moment after you are programmed for the current segment, simply press the speed or incline buttons. When you press the button, the treadmill will begin walking. 5. HOW TO USE A CUSTOM WORKOUT 1. When you... can redesign the workout while using it. The walking belt will automatically adjust to move at any time before the workout is divided into...

English Manual
Page 21
... too low, you can select an audio setting for the next segment. however, when the next segment begins, the treadmill will begin walking. The walking belt will automatically adjust to the speed and incline settings for a few seconds. CAUTION: Always remove iFit cards from the ...console. the button, the treadmill will light. Follow your personal trainer (see THE INFORMATION MODE on the fan if desired. See step ...
... too low, you can select an audio setting for the next segment. however, when the next segment begins, the treadmill will begin walking. The walking belt will automatically adjust to the speed and incline settings for a few seconds. CAUTION: Always remove iFit cards from the ...console. the button, the treadmill will light. Follow your personal trainer (see THE INFORMATION MODE on the fan if desired. See step ...

English Manual
Page 22
...the information mode, hold down the Stop button while inserting the key into the console. To change the unit of hours that the walking belt has moved. Press the Speed increase button to change the audio setting, press the Incline decrease button. The information mode allows you plug... console features a display demo mode, designed to INSTRUCTION, the personal trainer will show the total number of miles (or kilometers) that the treadmill has been operated. The word ENGLISH for miles or METRIC for your workouts. You can select an audio setting if desired. If you detailed...
...the information mode, hold down the Stop button while inserting the key into the console. To change the unit of hours that the walking belt has moved. Press the Speed increase button to change the audio setting, press the Incline decrease button. The information mode allows you plug... console features a display demo mode, designed to INSTRUCTION, the personal trainer will show the total number of miles (or kilometers) that the treadmill has been operated. The word ENGLISH for miles or METRIC for your workouts. You can select an audio setting if desired. If you detailed...

English Manual
Page 27
... the Magnet (49) on SOLUTION: a. Make sure View that the gap between the Magnet and the Reed Switch is overtightened, treadmill performance may decrease and the walking belt may become damaged. PROBLEM: The incline of the specifications described on , please see the front cover of the Pulley (51). ...one of a turn. Repeat until the Top Magnet is properly tightened, you should be able to lift each edge of the walking belt 3 to 4 in . Run the treadmill for a cor- Idler Roller Bolts c. Remove the key and UNPLUG THE POWER CORD. Be careful to check for a few minutes...
... the Magnet (49) on SOLUTION: a. Make sure View that the gap between the Magnet and the Reed Switch is overtightened, treadmill performance may decrease and the walking belt may become damaged. PROBLEM: The incline of the specifications described on , please see the front cover of the Pulley (51). ...one of a turn. Repeat until the Top Magnet is properly tightened, you should be able to lift each edge of the walking belt 3 to 4 in . Run the treadmill for a cor- Idler Roller Bolts c. Remove the key and UNPLUG THE POWER CORD. Be careful to check for a few minutes...

English Manual
Page 28
... of a turn . If the walking belt a has shifted to the left, use the hex key to 10 cm) off -center, remove the key and UNPLUG THE POWER CORD. Plug in the power cord, insert the key, and run the treadmill for a few minutes. When the walking belt is off the walking platform. Repeat... until the walking belt is properly tightened. 28 Be careful to over- Be careful not to keep the walking...
... of a turn . If the walking belt a has shifted to the left, use the hex key to 10 cm) off -center, remove the key and UNPLUG THE POWER CORD. Plug in the power cord, insert the key, and run the treadmill for a few minutes. When the walking belt is off the walking platform. Repeat... until the walking belt is properly tightened. 28 Be careful to over- Be careful not to keep the walking...

English Manual
Page 30
...Pulley Right Foot Rail Drive Roller Ground Wire Frame Walking Belt Roller Bracket Right Foot Idler Roller Left Foot Hex Key Motor Belt Drive Motor Motor Hood Reed Switch Clamp Reed Switch ... 1 1/2" Bolt 3/8" x 2 3/8" Bolt #10 x 1/2" Bolt 5/16" x 4" Bolt Controller Ground Wire Console Clamp #8 x 3/4" Tek Screw #8 x 1/2" Ground Screw 7/16" x 1" Bolt 3/8" Star Washer #12 x 1 1/4" Screw #8 x 1/2" Belt Guide Screw 1/4" x 2" Bolt Idler Roller Bolt Motor Bolt 1/4" x 1 3/4" Bolt 5/16" x 4 1/2" Bolt #8 x 3/4" Track Screw 1/4" x 1 1/4" Bolt #8 x 1/2" Isolator Screw #8 x 1" Screw 3/8" x 1 3/4" Pin 3/8" x 1...
...Pulley Right Foot Rail Drive Roller Ground Wire Frame Walking Belt Roller Bracket Right Foot Idler Roller Left Foot Hex Key Motor Belt Drive Motor Motor Hood Reed Switch Clamp Reed Switch ... 1 1/2" Bolt 3/8" x 2 3/8" Bolt #10 x 1/2" Bolt 5/16" x 4" Bolt Controller Ground Wire Console Clamp #8 x 3/4" Tek Screw #8 x 1/2" Ground Screw 7/16" x 1" Bolt 3/8" Star Washer #12 x 1 1/4" Screw #8 x 1/2" Belt Guide Screw 1/4" x 2" Bolt Idler Roller Bolt Motor Bolt 1/4" x 1 3/4" Bolt 5/16" x 4 1/2" Bolt #8 x 3/4" Track Screw 1/4" x 1 1/4" Bolt #8 x 1/2" Isolator Screw #8 x 1" Screw 3/8" x 1 3/4" Pin 3/8" x 1...


