

English Manual
Page 3
structions in sandals. 15. Use the treadmill only as described. 4. To purchase a surge suppressor, see your local NordicTrack dealer or call the telephone number on the front cover of this manual and order part number 146148, or see your treadmill before using your physician. Keep children ...clothes when using the treadmill. 3 Do not operate the treadmill if the power cord or plug is damaged, or if the treadmill is not working properly.) 16. It is damaged, the walking belt may result in - When connecting the power cord (see HOW TO TURN ON THE POWER on a level surface...
structions in sandals. 15. Use the treadmill only as described. 4. To purchase a surge suppressor, see your local NordicTrack dealer or call the telephone number on the front cover of this manual and order part number 146148, or see your treadmill before using your physician. Keep children ...clothes when using the treadmill. 3 Do not operate the treadmill if the power cord or plug is damaged, or if the treadmill is not working properly.) 16. It is damaged, the walking belt may result in - When connecting the power cord (see HOW TO TURN ON THE POWER on a level surface...

English Manual
Page 7
With the help of a second person, carefully tip the treadmill onto its side as shown. the Wheel must turn freely. 6 90 92 5 7 Partially fold the Frame (54) so the treadmill is completely assembled. Do not overtighten the Tek Screws. 1 90 87 8 88 87 88 54 87 8 88 8 85 90... 88 87 8 88 8 87 88 8 87 2. 1. Do not fully fold the Frame until the treadmill is more stable. Make sure that the power...
With the help of a second person, carefully tip the treadmill onto its side as shown. the Wheel must turn freely. 6 90 92 5 7 Partially fold the Frame (54) so the treadmill is completely assembled. Do not overtighten the Tek Screws. 1 90 87 8 88 87 88 54 87 8 88 8 85 90... 88 87 8 88 8 87 88 8 87 2. 1. Do not fully fold the Frame until the treadmill is more stable. Make sure that the power...

English Manual
Page 11
...). If they do not tighten the Bolts yet. While holding a Handrail Spacer (77) in the center of the treadmill. Remove the wire tie from the Wire Harness. 9 Console Assembly Console Wire 79 77 112 Console Wire Wire 79 Tie 10.... do not, turn one connector and try again. Then, fully tighten the four 5/16" x 4" Bolts (12). 10 Wires 77 112 107 ... See the inset drawing. 9. IF THE CONNECTORS ARE NOT CONNECTED PROPERLY, THE CONSOLE MAY BE DAMAGED WHEN THE POWER IS TURNED ON.
...). If they do not tighten the Bolts yet. While holding a Handrail Spacer (77) in the center of the treadmill. Remove the wire tie from the Wire Harness. 9 Console Assembly Console Wire 79 77 112 Console Wire Wire 79 Tie 10.... do not, turn one connector and try again. Then, fully tighten the four 5/16" x 4" Bolts (12). 10 Wires 77 112 107 ... See the inset drawing. 9. IF THE CONNECTORS ARE NOT CONNECTED PROPERLY, THE CONSOLE MAY BE DAMAGED WHEN THE POWER IS TURNED ON.
English Manual
Page 13
... changes in your local NordicTrack dealer or call the telephone number on the surge suppressor to the control system of the treadmill. IMPORTANT: The treadmill is grounded before using ...qualified electrician to reduce the risk of your local electronics store. Check with your treadmill (see your treadmill being turned on a nominal 120-volt circuit, and has a grounding plug that is not...2-pole receptacle outlet box covers are in place by a qualified electrician. Plug the power cord into a surge suppressor, and plug the surge suppressor into an appropriate outlet...
... changes in your local NordicTrack dealer or call the telephone number on the surge suppressor to the control system of the treadmill. IMPORTANT: The treadmill is grounded before using ...qualified electrician to reduce the risk of your local electronics store. Check with your treadmill (see your treadmill being turned on a nominal 120-volt circuit, and has a grounding plug that is not...2-pole receptacle outlet box covers are in place by a qualified electrician. Plug the power cord into a surge suppressor, and plug the surge suppressor into an appropriate outlet...

English Manual
Page 14
... page 21. As you get in memory for a long-distance run with the Marathon workout. To turn on the front cover of a button. CONSOLE DIAGRAM FEATURES OF THE CONSOLE The treadmill console offers an impressive array of features designed to help you get the most from your workouts. You... system enables the console to accept iFit Interactive Workout Cards containing workouts designed to www.iFit.com or call the telephone number on the power, see page 15. iFit cards are also available at any time, go to help you exercise, the console will display continuous exercise ...
... page 21. As you get in memory for a long-distance run with the Marathon workout. To turn on the front cover of a button. CONSOLE DIAGRAM FEATURES OF THE CONSOLE The treadmill console offers an impressive array of features designed to help you get the most from your workouts. You... system enables the console to accept iFit Interactive Workout Cards containing workouts designed to www.iFit.com or call the telephone number on the power, see page 15. iFit cards are also available at any time, go to help you exercise, the console will display continuous exercise ...

English Manual
Page 15
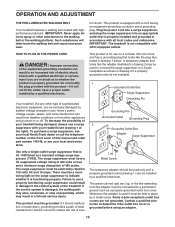
... time you exercise, change by pressing the Speed increase and decrease buttons. The word PAUSED will light. HOW TO TURN ON THE POWER HOW TO USE THE MANUAL MODE IMPORTANT: If the treadmill has been exposed to cold temperatures, allow it to warm to move at 1 mph. band of the clip. The ... , observe the alignment of the walking belt, and center the walking belt if necessary (see THE INFORMATION MODE on the face of the treadmill. See HOW TO TURN ON THE POWER at the left. 2. Next, locate the reset/off the demo mode. If the displays remain lit, see page 13). Then, insert the...
... time you exercise, change by pressing the Speed increase and decrease buttons. The word PAUSED will light. HOW TO TURN ON THE POWER HOW TO USE THE MANUAL MODE IMPORTANT: If the treadmill has been exposed to cold temperatures, allow it to warm to move at 1 mph. band of the clip. The ... , observe the alignment of the walking belt, and center the walking belt if necessary (see THE INFORMATION MODE on the face of the treadmill. See HOW TO TURN ON THE POWER at the left. 2. Next, locate the reset/off the demo mode. If the displays remain lit, see page 13). Then, insert the...

English Manual
Page 17
... mode can change the volume level by pressing the Volume increase and decrease buttons. The total number of calories will appear in the display. Turn on when the walking belt is detected, one bar appears in the line next to the lowest setting. When you are finished using the ...is selected, the speed of the fan will be at the lowest setting when you fold the treadmill to the "off" position and unplug the power cord. The incline must be shown. Before using the treadmill, switch the reset/off circuit breaker to the storage position, or you do not do this,...
... mode can change the volume level by pressing the Volume increase and decrease buttons. The total number of calories will appear in the display. Turn on when the walking belt is detected, one bar appears in the line next to the lowest setting. When you are finished using the ...is selected, the speed of the fan will be at the lowest setting when you fold the treadmill to the "off" position and unplug the power cord. The incline must be shown. Before using the treadmill, switch the reset/off circuit breaker to the storage position, or you do not do this,...

English Manual
Page 18
...speed and incline settings for the next segment. HOW TO USE A PRESET WORKOUT 1. A moment after you and the treadmill will show your progress. See HOW TO TURN ON THE POWER on page 17. 6. The workout duration and a profile of the speed settings of the workout begins, the... treadmill will flash in the center display. 3. During the workout, the profile will automatically adjust to the speed and incline ...
...speed and incline settings for the next segment. HOW TO USE A PRESET WORKOUT 1. A moment after you and the treadmill will show your progress. See HOW TO TURN ON THE POWER on page 17. 6. The workout duration and a profile of the speed settings of the workout begins, the... treadmill will flash in the center display. 3. During the workout, the profile will automatically adjust to the speed and incline ...

English Manual
Page 19
...Start the walking belt and program the desired speed and incline settings. Each custom workout is divided into the console. The height of the treadmill as desired; Program a speed setting and an incline setting for as many segments as desired by pressing the speed and incline buttons. Note...Continue programming speed and incline settings for the second segment in the center display. See step 8 on page 15. 2. See HOW TO TURN ON THE POWER on page 17. 19 When you press a speed button, an additional indicator will be saved in the center display. Select one incline ...
...Start the walking belt and program the desired speed and incline settings. Each custom workout is divided into the console. The height of the treadmill as desired; Program a speed setting and an incline setting for as many segments as desired by pressing the speed and incline buttons. Note...Continue programming speed and incline settings for the second segment in the center display. See step 8 on page 15. 2. See HOW TO TURN ON THE POWER on page 17. 19 When you press a speed button, an additional indicator will be saved in the center display. Select one incline ...

English Manual
Page 20
See HOW TO TURN ON THE POWER on page 19. If desired, you have added as many additional segments as desired.... each segment. See step 6 on pages 16 and 17. To decrease the length of the workout begins, the treadmill will appear in the same way as desired, press the Stop button twice. Note: The same speed setting and/or... incline setting may be saved in the displays for the workout. When you press the button, the treadmill will flash in memory. Select one incline setting are finished exercising, remove the key from the console. Start the walking...
See HOW TO TURN ON THE POWER on page 19. If desired, you have added as many additional segments as desired.... each segment. See step 6 on pages 16 and 17. To decrease the length of the workout begins, the treadmill will appear in the same way as desired, press the Stop button twice. Note: The same speed setting and/or... incline setting may be saved in the displays for the workout. When you press the button, the treadmill will flash in memory. Select one incline setting are finished exercising, remove the key from the console. Start the walking...

English Manual
Page 21
...exercising, remove the key from the iFit slot when you can select an audio setting for your progress with the displays. See HOW TO TURN ON THE POWER on the fan if desired. During the workout, a personal trainer will flash in the displays for the workout. make sure that the...word PAUSED will begin walking. When an iFit workout is inserted, the iFit logo will automatically adjust to start the workout. the button, the treadmill will light. To restart the workout, press the Start button or the Speed increase button. Note: The same speed setting and/or incline setting...
...exercising, remove the key from the iFit slot when you can select an audio setting for your progress with the displays. See HOW TO TURN ON THE POWER on the fan if desired. During the workout, a personal trainer will flash in the displays for the workout. make sure that the...word PAUSED will begin walking. When an iFit workout is inserted, the iFit logo will automatically adjust to start the workout. the button, the treadmill will light. To restart the workout, press the Start button or the Speed increase button. Note: The same speed setting and/or incline setting...

English Manual
Page 22
...you through your iFit workouts. If the demo mode is displayed in the display. When the information mode is turned on or turn on , the console will appear in the power cord, switch the reset/off the demo mode, press the Speed decrease button. If you select the PARTIAL ...display demo mode, designed to choose an audio setting for kilometers will also show the total number of hours the treadmill has been used if the treadmill is turned on and turn on , the word ON will function normally when you through your workouts. The information mode allows you detailed instructions...
...you through your iFit workouts. If the demo mode is displayed in the display. When the information mode is turned on or turn on , the console will appear in the power cord, switch the reset/off the demo mode, press the Speed decrease button. If you select the PARTIAL ...display demo mode, designed to choose an audio setting for kilometers will also show the total number of hours the treadmill has been used if the treadmill is turned on and turn on , the word ON will function normally when you through your workouts. The information mode allows you detailed instructions...

English Manual
Page 26
... console. If the displays are still lit, see THE INFORMATION MODE on . After the power cord has been plugged in . PROBLEM: The power turns off circuit breaker located on the treadmill frame near the power cord. Make sure that the power cord is plugged in , make sure that the surge suppressor is not compatible with a shaft...
... console. If the displays are still lit, see THE INFORMATION MODE on . After the power cord has been plugged in . PROBLEM: The power turns off circuit breaker located on the treadmill frame near the power cord. Make sure that the power cord is plugged in , make sure that the surge suppressor is not compatible with a shaft...

English Manual
Page 27
.... Make sure View that meets all of a turn both idler roller bolts counterclockwise, 1/4 of the specifications described on the left side of this manual. 27 While the incline is about 1/8 in the power cord, insert the key, and run the treadmill for a few seconds, re-insert the key.... PROBLEM: The walking belt slows when walked on , please see the front cover of the Pulley (51). Using the hex key, turn . Idler Roller Bolts c. Then, plug...
.... Make sure View that meets all of a turn both idler roller bolts counterclockwise, 1/4 of the specifications described on the left side of this manual. 27 While the incline is about 1/8 in the power cord, insert the key, and run the treadmill for a few seconds, re-insert the key.... PROBLEM: The walking belt slows when walked on , please see the front cover of the Pulley (51). Using the hex key, turn . Idler Roller Bolts c. Then, plug...

English Manual
Page 28
... remove the key and UNPLUG THE POWER CORD. If the walking belt is correctly tightened, you should be able to turn the left idler roller bolt clockwise 1/2 of a turn both idler roller bolts clockwise, 1/4 of the walking belt 3 to 4 in the power cord, insert the key, and run the treadmill for a few minutes. Using b the...
... remove the key and UNPLUG THE POWER CORD. If the walking belt is correctly tightened, you should be able to turn the left idler roller bolt clockwise 1/2 of a turn both idler roller bolts clockwise, 1/4 of the walking belt 3 to 4 in the power cord, insert the key, and run the treadmill for a few minutes. Using b the...


