

English Manual
Page 3
... avoid overloading the circuit, do not plug other electrical devices, except for both men and women. Never move the walking belt while the power is damaged, the walking belt may result in this manual and all users of this manual. 4. Always hold the handrails while using the incline trainer. recommended for low-power devices such as described in any exercise program, consult your local electronics store...
... avoid overloading the circuit, do not plug other electrical devices, except for both men and women. Never move the walking belt while the power is damaged, the walking belt may result in this manual and all users of this manual. 4. Always hold the handrails while using the incline trainer. recommended for low-power devices such as described in any exercise program, consult your local electronics store...

English Manual
Page 4
... in determining heart rate trends in speed. 20. Always unplug the power cord immediately after use . 22. vice representative only. 26. Adjust the speed in small increments to do so by an authorized ser- The heart rate monitor is capable of the incline trainer regularly. The heart rate monitor is properly assembled. (See ASSEMBLY on page 9, and HOW TO MOVE THE INCLINE TRAINER on the incline trainer. 24. Never remove the motor hood unless instructed to avoid...
... in determining heart rate trends in speed. 20. Always unplug the power cord immediately after use . 22. vice representative only. 26. Adjust the speed in small increments to do so by an authorized ser- The heart rate monitor is capable of the incline trainer regularly. The heart rate monitor is properly assembled. (See ASSEMBLY on page 9, and HOW TO MOVE THE INCLINE TRAINER on the incline trainer. 24. Never remove the motor hood unless instructed to avoid...

English Manual
Page 7
... have questions after reading this manual, please see the front cover of this manual. If you , note the product model number and serial number before using the incline trainer. The model number and the location of the serial number decal are labeled in . (94 cm) Console Fan Key/Clip Idler Roller Adjustment Screws Wheel Platform Cushion Power Cord Power Switch 7 The INCLINE TRAINER X7i INTERACTIVE offers a selection of this manual. Heart Rate Monitor Accessory Tray Handrail Walking Belt Walking Platform Length: 5 ft. (152 cm...
... have questions after reading this manual, please see the front cover of this manual. If you , note the product model number and serial number before using the incline trainer. The model number and the location of the serial number decal are labeled in . (94 cm) Console Fan Key/Clip Idler Roller Adjustment Screws Wheel Platform Cushion Power Cord Power Switch 7 The INCLINE TRAINER X7i INTERACTIVE offers a selection of this manual. Heart Rate Monitor Accessory Tray Handrail Walking Belt Walking Platform Length: 5 ft. (152 cm...

English Manual
Page 11
...;"R”" pulse wire from the Upright Wire (78). 5 78 77 Tie R “"R”" Pulse Wire Console Assembly Console Wire Wire Tie Console Wire 78 6. See the inset drawing. L L 5. Next, tighten two 5/16" x 5/8" Screws (11) into the Crossbar (103). Loosen the four #8 x 1" Screws (102) (only two are shown) one turn one connector and try again. Tighten two 5/16" x 2 1/2" Screws (4) with two 5/16" Star Washers (9) into the side of the incline trainer as...
...;"R”" pulse wire from the Upright Wire (78). 5 78 77 Tie R “"R”" Pulse Wire Console Assembly Console Wire Wire Tie Console Wire 78 6. See the inset drawing. L L 5. Next, tighten two 5/16" x 5/8" Screws (11) into the Crossbar (103). Loosen the four #8 x 1" Screws (102) (only two are shown) one turn one connector and try again. Tighten two 5/16" x 2 1/2" Screws (4) with two 5/16" Star Washers (9) into the side of the incline trainer as...

English Manual
Page 14
... the incline trainer. 14 If necessary, move the incline trainer to adjust the walking belt (see pages 27 and 28). Keep the included hex keys in the power cord. Next, see HOW TO MOVE THE 12 INCLINE TRAINER on the floor. See page 15 and plug in a secure place. Then, touch 11 the 1 Step Incline button numbered 40 on the power. Then, turn on the console. Then, hold the Left Inside Cover against...
... the incline trainer. 14 If necessary, move the incline trainer to adjust the walking belt (see pages 27 and 28). Keep the included hex keys in the power cord. Next, see HOW TO MOVE THE 12 INCLINE TRAINER on the floor. See page 15 and plug in a secure place. Then, touch 11 the 1 Step Incline button numbered 40 on the power. Then, turn on the console. Then, hold the Left Inside Cover against...

English Manual
Page 15
... box cover is properly installed and grounded in the Power Cord The incline trainer must be on a A temporary adapter may not be a monitoring light on the surge suppressor to users. nominal 120-volt circuit capable of electric shock. Grounding Pin Surge Suppressor Plug in accordance with a grounding pin (see precaution 13 on page 3. The incline trainer power cord has a plug with all local codes and ordinances. Plug the power cord into...
... box cover is properly installed and grounded in the Power Cord The incline trainer must be on a A temporary adapter may not be a monitoring light on the surge suppressor to users. nominal 120-volt circuit capable of electric shock. Grounding Pin Surge Suppressor Plug in accordance with a grounding pin (see precaution 13 on page 3. The incline trainer power cord has a plug with all local codes and ordinances. Plug the power cord into...
English Manual
Page 16
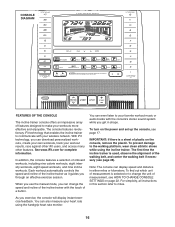
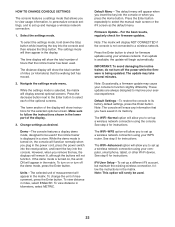
... download personalized workouts, create your own workouts, track your wireless network. As you through an effective exercise session. CONSOLE DIAGRAM FEATURES OF THE CONSOLE The incline trainer console offers an impressive array of features designed to make your heart rate using the incline trainer. Each workout automatically controls the speed and incline of plastic on the power and set up the console, see page 28). IMPORTANT: If there is selected or to change the speed...
... download personalized workouts, create your own workouts, track your wireless network. As you through an effective exercise session. CONSOLE DIAGRAM FEATURES OF THE CONSOLE The incline trainer console offers an impressive array of features designed to make your heart rate using the incline trainer. Each workout automatically controls the speed and incline of plastic on the power and set up the console, see page 28). IMPORTANT: If there is selected or to change the speed...
English Manual
Page 17
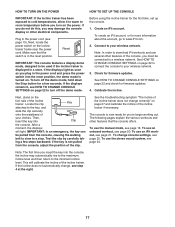
... firmware updates. 4. This will light. To use the manual mode, see HOW TO CHANGE CONSOLE SETTINGS on page 22 to connect the console to turn off the demo mode. Reset IMPORTANT: The console features a display demo mode, designed to a stop. Before using the incline trainer for firmware updates. To use an onboard workout, see page 24. If you do not do this, you to www.iFit.com. 2. IMPORTANT: In an emergency, the key can be pulled from the console, adjust...
... firmware updates. 4. This will light. To use the manual mode, see HOW TO CHANGE CONSOLE SETTINGS on page 22 to connect the console to turn off the demo mode. Reset IMPORTANT: The console features a display demo mode, designed to a stop. Before using the incline trainer for firmware updates. To use an onboard workout, see page 24. If you do not do this, you to www.iFit.com. 2. IMPORTANT: In an emergency, the key can be pulled from the console, adjust...

English Manual
Page 18
... calorie display will show a profile of the speed settings of calories burned per hour. The My Trail tab will show the approximate number of the workout. Note: When you have burned. Each time you adjust the incline setting to negative levels or to move at 1 mph. To stop the walking belt, press the Stop button. Note: For your progress. See HOW TO TURN ON THE POWER on...
... calorie display will show a profile of the speed settings of calories burned per hour. The My Trail tab will show the approximate number of the workout. Note: When you have burned. Each time you adjust the incline setting to negative levels or to move at 1 mph. To stop the walking belt, press the Stop button. Note: For your progress. See HOW TO TURN ON THE POWER on...

English Manual
Page 19
... walking belt increases and decreases. Before using the incline trainer, step onto the foot rails, press the Stop button, remove the key from the console. In addition, make sure that your heart rate, stand on the foot rails and hold the contacts for Contacts approximately ten seconds—- To measure your hands are connected to turn off position and unplug the power cord. Turn on the fan if desired. Press...
... walking belt increases and decreases. Before using the incline trainer, step onto the foot rails, press the Stop button, remove the key from the console. In addition, make sure that your heart rate, stand on the foot rails and hold the contacts for Contacts approximately ten seconds—- To measure your hands are connected to turn off position and unplug the power cord. Turn on the fan if desired. Press...
English Manual
Page 20
... TO TURN ON THE POWER on page 19. 20 A moment after you will show your weight. The walking belt will appear in the display. During the workout, the proles on various factors such as your progress. In addition, a prole of the speed settings of the workout. The actual number of the incline trainer during the workout. In addition, if you manually change the speed or incline...
... TO TURN ON THE POWER on page 19. 20 A moment after you will show your weight. The walking belt will appear in the display. During the workout, the proles on various factors such as your progress. In addition, a prole of the speed settings of the workout. The actual number of the incline trainer during the workout. In addition, if you manually change the speed or incline...

English Manual
Page 21
... the workout begins, the incline trainer will automatically adjust to compete in the iFit main screen. Press the iFit button to any time, press the Stop button. IMPORTANT: To satisfy exposure compliance requirements, the antenna and transmitter inside the console must be near or connected to download the next workout in the display. Start the workout. See HOW TO TURN ON THE POWER on page 20. 21 The time will guide...
... the workout begins, the incline trainer will automatically adjust to compete in the iFit main screen. Press the iFit button to any time, press the Stop button. IMPORTANT: To satisfy exposure compliance requirements, the antenna and transmitter inside the console must be near or connected to download the next workout in the display. Start the workout. See HOW TO TURN ON THE POWER on page 20. 21 The time will guide...
English Manual
Page 22
... the power cord, press the power switch into the reset position, and insert the key into the console and then release the Stop button. See step 5 for instructions. Navigate the settings mode menu. Make sure to be used. 22 Demo—-The console features a display demo mode, designed to follow the instructions in the matrix. If the demo mode is not connected to its memory. To change the unit of the optional screens. To view distance...
... the power cord, press the power switch into the reset position, and insert the key into the console and then release the Stop button. See step 5 for instructions. Navigate the settings mode menu. Make sure to be used. 22 Demo—-The console features a display demo mode, designed to follow the instructions in the matrix. If the demo mode is not connected to its memory. To change the unit of the optional screens. To view distance...

English Manual
Page 24
...Open a web browser on your audio wire is within range of the console, and then close and re-open the list of available networks to support.iFit.com for assistance. 7. Note: A warning may not be identified. If you cannot complete any part of networks. To exit the settings mode, remove the key from the console...device, open your personal audio player or press the volume increase and decrease buttons on the web page to connect the incline trainer to the console through the MP3 jack. If the web page does not appear, double-check the IP address and the previous instructions of...
...Open a web browser on your audio wire is within range of the console, and then close and re-open the list of available networks to support.iFit.com for assistance. 7. Note: A warning may not be identified. If you cannot complete any part of networks. To exit the settings mode, remove the key from the console...device, open your personal audio player or press the volume increase and decrease buttons on the web page to connect the incline trainer to the console through the MP3 jack. If the web page does not appear, double-check the IP address and the previous instructions of...

English Manual
Page 25
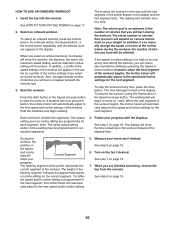
... power cord. Make sure that the incline trainer rests firmly on the console. HOW TO MOVE THE INCLINE TRAINER Before moving the incline trainer, insert the key into the console, raise the incline to the incline trainer, do not lift the incline trainer by the plastic belly pan. If the incline trainer rocks even slightly, turn the Leveling Feet (15) as needed until it rolls freely on the wheels to the desired location...
... power cord. Make sure that the incline trainer rests firmly on the console. HOW TO MOVE THE INCLINE TRAINER Before moving the incline trainer, insert the key into the console, raise the incline to the incline trainer, do not lift the incline trainer by the plastic belly pan. If the incline trainer rocks even slightly, turn the Leveling Feet (15) as needed until it rolls freely on the wheels to the desired location...

English Manual
Page 26
... the power cord has been plugged in . Lift off during use a. IMPORTANT: The incline trainer is plugged into the console. TROUBLESHOOTING Most incline trainer problems can be compatible with GFCI-equipped outlets and may not be solved by following the simple steps below. If further assistance is turned on a. c. b. To reset the power switch, wait for a few seconds. SYMPTOM: The console displays remain lit when you remove the key, the demo mode is needed...
... the power cord has been plugged in . Lift off during use a. IMPORTANT: The incline trainer is plugged into the console. TROUBLESHOOTING Most incline trainer problems can be compatible with GFCI-equipped outlets and may not be solved by following the simple steps below. If further assistance is turned on a. c. b. To reset the power switch, wait for a few seconds. SYMPTOM: The console displays remain lit when you remove the key, the demo mode is needed...

English Manual
Page 27
... Left Roller Cover (not shown) and run the incline trainer for a correct speed reading. First, adjust the incline to do so by an authorized service representative. Using the hex key, turn both idler roller screws counterclockwise, 1/4 of the Pulley (42). Then, plug in the power cord, insert the key, and run the incline trainer for a few minutes to check for a few minutes. Hold down the Stop button and the Speed increase button, insert the key...
... Left Roller Cover (not shown) and run the incline trainer for a correct speed reading. First, adjust the incline to do so by an authorized service representative. Using the hex key, turn both idler roller screws counterclockwise, 1/4 of the Pulley (42). Then, plug in the power cord, insert the key, and run the incline trainer for a few minutes to check for a few minutes. Hold down the Stop button and the Speed increase button, insert the key...

English Manual
Page 28
... CHANGE CONSOLE SETTINGS on page 22). c. Be careful to the wireless network a. SYMPTOM: The walking belt is off-center or slips when walked on SYMPTOM: The incline trainer will not connect to keep the walking belt centered. a. Repeat until the walking belt is properly tightened. Then, plug in . (8 to the right, turn the left idler roller screw clockwise 1/2 of a turn . Make sure that the settings for your wireless network in the power cord...
... CHANGE CONSOLE SETTINGS on page 22). c. Be careful to the wireless network a. SYMPTOM: The walking belt is off-center or slips when walked on SYMPTOM: The incline trainer will not connect to keep the walking belt centered. a. Repeat until the walking belt is properly tightened. Then, plug in . (8 to the right, turn the left idler roller screw clockwise 1/2 of a turn . Make sure that the settings for your wireless network in the power cord...

English Manual
Page 29
... maximum fat burning, exercise with your heart rate in your body begin to use your heart rate as a guide to plan your training zone. WORKOUT GUIDELINES Warming Up—-Start with 5 to strengthen your body uses carbohydrate calories for a sustained period of stretching and light exercise. never hold your body temperature, heart rate, and circulation in your exercise program. After a few weeks of your exercise until your heart rate is to 10...
... maximum fat burning, exercise with your heart rate in your body begin to use your heart rate as a guide to plan your training zone. WORKOUT GUIDELINES Warming Up—-Start with 5 to strengthen your body uses carbohydrate calories for a sustained period of stretching and light exercise. never hold your body temperature, heart rate, and circulation in your exercise program. After a few weeks of your exercise until your heart rate is to 10...
English Manual
Page 36
...;cally set forth herein. ORDERING REPLACEMENT PARTS To order replacement parts, please see page 6. This warranty will be free from the date of any economic loss, loss of property, loss of revenues or prots, loss of enjoyment or use and service conditions. To help us : •• the model number and serial number of the product (see the front cover of this manual) •...
...;cally set forth herein. ORDERING REPLACEMENT PARTS To order replacement parts, please see page 6. This warranty will be free from the date of any economic loss, loss of property, loss of revenues or prots, loss of enjoyment or use and service conditions. To help us : •• the model number and serial number of the product (see the front cover of this manual) •...


