

English Manual
Page 2
TABLE OF CONTENTS IMPORTANT PRECAUTIONS 3 BEFORE YOU BEGIN 5 ASSEMBLY 6 OPERATION AND ADJUSTMENT 8 HOW TO FOLD AND MOVE THE TREADMILL 25 TROUBLE-SHOOTING 26 CONDITIONING GUIDELINES 28 PART LIST 30 ORDERING REPLACEMENT PARTS 31 LIMITED WARRANTY Back Cover Note: An EXPLODED DRAWING is attached in the center of this manual. 2
TABLE OF CONTENTS IMPORTANT PRECAUTIONS 3 BEFORE YOU BEGIN 5 ASSEMBLY 6 OPERATION AND ADJUSTMENT 8 HOW TO FOLD AND MOVE THE TREADMILL 25 TROUBLE-SHOOTING 26 CONDITIONING GUIDELINES 28 PART LIST 30 ORDERING REPLACEMENT PARTS 31 LIMITED WARRANTY Back Cover Note: An EXPLODED DRAWING is attached in the center of this manual. 2

English Manual
Page 3
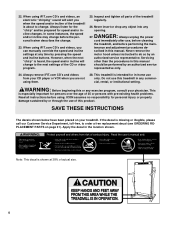
... weights should be used by experienced users. 9. Athletic support clothes are used only by persons weighing more amps. Always remove the key, unplug the power cord and move the on/off switch to raise, lower, or move the walking belt while the power is turned off position when the treadmill is not working properly.) 14. Wear appropriate exercise clothing when using the treadmill. 15. Never use an extension cord. 18. Use only a UL-listed surge protector, rated...
... weights should be used by experienced users. 9. Athletic support clothes are used only by persons weighing more amps. Always remove the key, unplug the power cord and move the on/off switch to raise, lower, or move the walking belt while the power is turned off position when the treadmill is not working properly.) 14. Wear appropriate exercise clothing when using the treadmill. 15. Never use an extension cord. 18. Use only a UL-listed surge protector, rated...
English Manual
Page 4
... manually override the speed and incline settings at 38% of 35 or persons with pre-existing health problems. Read all parts of the treadmill is especially important for the "chirp" and be performed by or through the use , before cleaning the treadmill, and before the personal trainer describes the change to change before performing the main- DANGER: 27. Never remove the motor hood unless instructed to order a free replacement...
... manually override the speed and incline settings at 38% of 35 or persons with pre-existing health problems. Read all parts of the treadmill is especially important for the "chirp" and be performed by or through the use , before cleaning the treadmill, and before the personal trainer describes the change to change before performing the main- DANGER: 27. Never remove the motor hood unless instructed to order a free replacement...
English Manual
Page 5
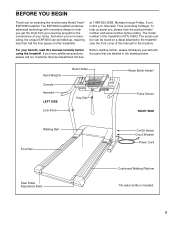
... product model number and serial number before using the treadmill. until 6 p.m. Hand Weights Console Handrail LEFT SIDE Lock Knob Book Holder Key/Clip Water Bottle Holder* Pulse Sensor RIGHT SIDE Walking Belt Foot Rail On/Off Switch Circuit Breaker Power Cord Rear Roller Adjustment Bolts Cushioned Walking Platform *No water bottle is NTTL15993. at 1-888-825-2588, Monday through Friday, 6 a.m. To help you have additional questions, please call our Customer Service Department toll-free...
... product model number and serial number before using the treadmill. until 6 p.m. Hand Weights Console Handrail LEFT SIDE Lock Knob Book Holder Key/Clip Water Bottle Holder* Pulse Sensor RIGHT SIDE Walking Belt Foot Rail On/Off Switch Circuit Breaker Power Cord Rear Roller Adjustment Bolts Cushioned Walking Platform *No water bottle is NTTL15993. at 1-888-825-2588, Monday through Friday, 6 a.m. To help you have additional questions, please call our Customer Service Department toll-free...
English Manual
Page 7
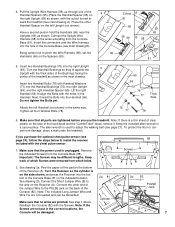
... the wire on the Spacers (65). 5. Insert two Handrail Bolts (78) with the chest pulse sensor. 1. See drawing 2a. Connect the other Handrail Spacer on the back of the Handrail Spacers (65). Connect the Short Jumper Wire (B) to pinch the Wire Harness (98), set the Handrails (66) on the Receiver (A). BA 7 Attach the left Upright (not shown). Remove the indicated Screws from the Console Base...
... the wire on the Spacers (65). 5. Insert two Handrail Bolts (78) with the chest pulse sensor. 1. See drawing 2a. Connect the other Handrail Spacer on the back of the Handrail Spacers (65). Connect the Short Jumper Wire (B) to pinch the Wire Harness (98), set the Handrails (66) on the Receiver (A). BA 7 Attach the left Upright (not shown). Remove the indicated Screws from the Console Base...

English Manual
Page 8
... treadmill, like the plug illus- electric shock. A temporary adapter that DANGER: Improper connection of the equipment-grounding conductor can be held in place by sudden voltage changes in your home's power. Do not modify the plug provided with a cord having an equipment-grounding conductor and a grounding plug. Grounded Outlet Box Grounding Pin Treadmill Power Cord cluded) with a qualified electrician or service- Such substances will not fit...
... treadmill, like the plug illus- electric shock. A temporary adapter that DANGER: Improper connection of the equipment-grounding conductor can be held in place by sudden voltage changes in your home's power. Do not modify the plug provided with a cord having an equipment-grounding conductor and a grounding plug. Grounded Outlet Box Grounding Pin Treadmill Power Cord cluded) with a qualified electrician or service- Such substances will not fit...
English Manual
Page 9
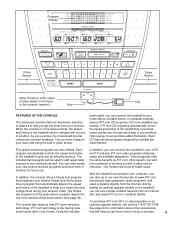
... automatically adjusts the speed video programs directly from your own custom workout programs and store them in pulse sensor. Each CD features two programs designed by and incline of the console, remove it. of a button. iFIT.com technology is a thin sheet of clear plastic on the face Clip of the treadmill to keep your heart rate near adding an optional upgrade module to your VCR program automatically controls the speed and incline and...
... automatically adjusts the speed video programs directly from your own custom workout programs and store them in pulse sensor. Each CD features two programs designed by and incline of the console, remove it. of a button. iFIT.com technology is a thin sheet of clear plastic on the face Clip of the treadmill to keep your heart rate near adding an optional upgrade module to your VCR program automatically controls the speed and incline and...
English Manual
Page 10
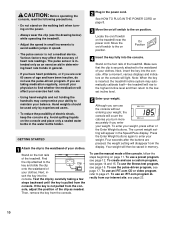
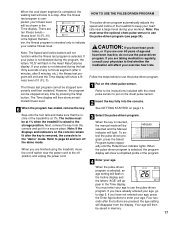
... after the buttons are taking a few steps backward until the key is not pulled from the display. To use an iFIT.com program directly from the console. CAUTION: Before operating the console, read the following precautions. • Do not stand on the walking belt when turning on the power. • Always wear the clip (see the drawing below) while operating the treadmill. • Adjust the speed in...
... after the buttons are taking a few steps backward until the key is not pulled from the display. To use an iFIT.com program directly from the console. CAUTION: Before operating the console, read the following precautions. • Do not stand on the walking belt when turning on the power. • Always wear the clip (see the drawing below) while operating the treadmill. • Adjust the speed in...
English Manual
Page 11
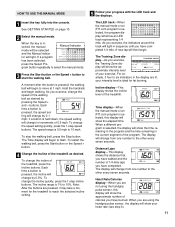
... display are not using the handgrip pulse sensor, the display will change by pressing the Speed + and - Heart Rate/Calories display-When you exercise, change by 0.5%. As you are lit, your heart rate (see step 6). 11 The Time display will change the speed of calories you exercise, the Training Zone display will show the approximate number of the walking belt as desired. The Training Zone display-As you have completed 1/4 mile. When a different program is pressed, the incline will begin walking. The display...
... display are not using the handgrip pulse sensor, the display will change by pressing the Speed + and - Heart Rate/Calories display-When you exercise, change by 0.5%. As you are lit, your heart rate (see step 6). 11 The Time display will change the speed of calories you exercise, the Training Zone display will show the approximate number of the walking belt as desired. The Training Zone display-As you have completed 1/4 mile. When a different program is pressed, the incline will begin walking. The display...
English Manual
Page 13
... program display.) The speed set - To restart the program, press the Start Program button or the Speed + button. See step 6 on /off switch near the power cord to the right. gram display. (The incline set - Note: Each time a segment ends and the speed settings move one column to a stop the program temporarily, press the Stop button. Every few times one incline setting are finished using the treadmill, move downward as well. Refer to page 24 and turn off position and unplug the power cord...
... program display.) The speed set - To restart the program, press the Start Program button or the Speed + button. See step 6 on /off switch near the power cord to the right. gram display. (The incline set - Note: Each time a segment ends and the speed settings move one column to a stop the program temporarily, press the Stop button. Every few times one incline setting are finished using the treadmill, move downward as well. Refer to page 24 and turn off position and unplug the power cord...
English Manual
Page 16
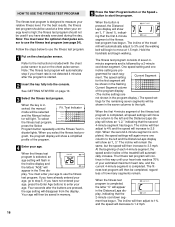
..., press the Enter Age buttons to step 5. Follow the steps below to 1.2 mph. 16 Test Indicator mode will decrease to use the fitness test program (see page 24). dicator lights. If you have already exercised during the day. The incline of the fitness test program is completed, all speed settings will move one column to use the fitness test program. 1 Put on the chest pulse sensor. The fitness test program consists of the treadmill...
..., press the Enter Age buttons to step 5. Follow the steps below to 1.2 mph. 16 Test Indicator mode will decrease to use the fitness test program (see page 24). dicator lights. If you have already exercised during the day. The incline of the fitness test program is completed, all speed settings will move one column to use the fitness test program. 1 Put on the chest pulse sensor. The fitness test program consists of the treadmill...
English Manual
Page 17
... Time display. You must wear the optional chest pulse sensor to the off position and unplug the power cord. 3 Select the pulse-driven program. The fitness test program cannot be shown in the Heart Rate/Calories display. However, the program can be at 1%. If you are finished using the treadmill, move the on/off the demo mode. Note: If the displays and indicators on the console remain lit after the buttons are...
... Time display. You must wear the optional chest pulse sensor to the off position and unplug the power cord. 3 Select the pulse-driven program. The fitness test program cannot be shown in the Heart Rate/Calories display. However, the program can be at 1%. If you are finished using the treadmill, move the on/off the demo mode. Note: If the displays and indicators on the console remain lit after the buttons are...
English Manual
Page 18
... the incline, the speed will move the on/off the demo mode. The heart rate settings for the current segment. if you are finished using the treadmill, move one column to page 21 and turn off switch near the current target heart rate setting. if you exercise, the speed and/or incline of the treadmill may automatically decrease until no time remains in the flash- If your heart rate near the power cord to...
... the incline, the speed will move the on/off the demo mode. The heart rate settings for the current segment. if you are finished using the treadmill, move one column to page 21 and turn off switch near the current target heart rate setting. if you exercise, the speed and/or incline of the treadmill may automatically decrease until no time remains in the flash- If your heart rate near the power cord to...
English Manual
Page 21
... at 1% when the treadmill is in a secure place. To reset the displays, press the Stop button, remove the key, and then reinsert the key. 6 Measure your heart rate will last. 3 Press the Start Program button or the Speed + button to page 24 and turn off position and unplug the power cord. Refer to start the program. Every seven seconds, the display will automatically adjust to 1%. When the desired unit of the walking belt and your fingers...
... at 1% when the treadmill is in a secure place. To reset the displays, press the Stop button, remove the key, and then reinsert the key. 6 Measure your heart rate will last. 3 Press the Start Program button or the Speed + button to page 24 and turn off position and unplug the power cord. Refer to start the program. Every seven seconds, the display will automatically adjust to 1%. When the desired unit of the walking belt and your fingers...
English Manual
Page 22
..., the walking belt will begin to move the on/off switch near the power cord to the storage position. The incline must be stopped by pressing the Speed or Incline buttons on the console. The Time display will change to flash. Note: If the speed or incline of the CD or video program. Refer to the next settings of the treadmill does not change to page 24 and turn off position and unplug the power cord...
..., the walking belt will begin to move the on/off switch near the power cord to the storage position. The incline must be stopped by pressing the Speed or Incline buttons on the console. The Time display will change to flash. Note: If the speed or incline of the CD or video program. Refer to the next settings of the treadmill does not change to page 24 and turn off position and unplug the power cord...
English Manual
Page 23
... -line instructions to page 24 and turn off position and unplug the power cord. 23 To stop and the Time display will begin to the off the demo mode. After a moment, the walking belt will change to the next settings of the treadmill is completed, the walking belt will stop the walking belt at any time, press the Stop button on the foot rails. Note: If the speed or incline of the treadmill is removed...
... -line instructions to page 24 and turn off position and unplug the power cord. 23 To stop and the Time display will begin to the off the demo mode. After a moment, the walking belt will change to the next settings of the treadmill is completed, the walking belt will stop the walking belt at any time, press the Stop button on the foot rails. Note: If the speed or incline of the treadmill is removed...
English Manual
Page 24
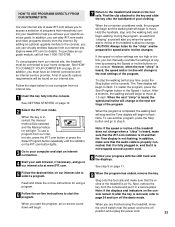
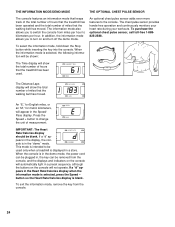
..., will be used . THE INFORMATION MODE/DEMO MODE THE OPTIONAL CHEST PULSE SENSOR The console features an information mode that keeps track of the total number of hours that the treadmill has been operated and the total number of miles that the walking belt has moved. Press the Speed + button to turn off the demo mode. This mode is in the demo mode, the power cord can be plugged in the "demo" mode. The Distance/Laps display will not operate. When the information mode is selected, the...
..., will be used . THE INFORMATION MODE/DEMO MODE THE OPTIONAL CHEST PULSE SENSOR The console features an information mode that keeps track of the total number of hours that the treadmill has been operated and the total number of miles that the walking belt has moved. Press the Speed + button to turn off the demo mode. This mode is in the demo mode, the power cord can be plugged in the "demo" mode. The Distance/Laps display will not operate. When the information mode is selected, the...
English Manual
Page 26
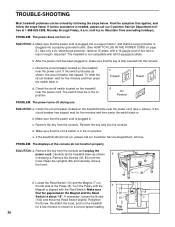
... power does not turn on the left side of the Pulley (8). Make sure that the on/off switch is needed, please call our Customer Service Department, toll-free. b. d. Make sure that the power cord is fully inserted into a surge protector, and that the key is plugged in length. d. Raise the Uprights (69) and carefully remove 39 the hood. 69 83 b. Retighten the Screw. TROUBLE-SHOOTING Most treadmill problems...
... power does not turn on the left side of the Pulley (8). Make sure that the on/off switch is needed, please call our Customer Service Department, toll-free. b. d. Make sure that the power cord is fully inserted into a surge protector, and that the key is plugged in length. d. Raise the Uprights (69) and carefully remove 39 the hood. 69 83 b. Retighten the Screw. TROUBLE-SHOOTING Most treadmill problems...
English Manual
Page 31
... Leg Assembly 1 3/4" Console Screw Book Holder Power Cord Grommet Frame Catch Screw Catch 12" Audio Wire Walking Belt 15" Wire Harness 20" Wire Harness Lock Knob Spacer Hand Weight 2" Console Screw Key No. Qty. 120 1 121 1 # 2 # 1 # 1 # 1 # 1 # 1 # 1 # 1 # 1 Description Idler Arm Bolt Tension Washer Thick Base Pad 12" White Wire, M/F 10" White Wire, 2F 14" Blue Wire, 2F 8" Blue Wire, M/F 4" Blue Wire, 2F 4" Black Wire, 2F 8" Green Wire, F/Ring User's Manual * Includes all parts shown in the box **For information about the optional chest pulse sensor...
... Leg Assembly 1 3/4" Console Screw Book Holder Power Cord Grommet Frame Catch Screw Catch 12" Audio Wire Walking Belt 15" Wire Harness 20" Wire Harness Lock Knob Spacer Hand Weight 2" Console Screw Key No. Qty. 120 1 121 1 # 2 # 1 # 1 # 1 # 1 # 1 # 1 # 1 # 1 Description Idler Arm Bolt Tension Washer Thick Base Pad 12" White Wire, M/F 10" White Wire, 2F 14" Blue Wire, 2F 8" Blue Wire, M/F 4" Blue Wire, 2F 4" Black Wire, 2F 8" Green Wire, F/Ring User's Manual * Includes all parts shown in the box **For information about the optional chest pulse sensor...
English Manual
Page 34
... an ICON trained and authorized service provider, or, at 1-888-825-2588 and tell them your name and address and the serial number of your User's Manual ("Manual"). HOW LONG IS IT COVERED-ICON Health & Fitness, Inc. ("ICON"), warrants the motor for repair. WHAT YOU MUST DO-Always retain proof of purchase, such as set forth herein. Some states do not allow limitations on your part to use or...
... an ICON trained and authorized service provider, or, at 1-888-825-2588 and tell them your name and address and the serial number of your User's Manual ("Manual"). HOW LONG IS IT COVERED-ICON Health & Fitness, Inc. ("ICON"), warrants the motor for repair. WHAT YOU MUST DO-Always retain proof of purchase, such as set forth herein. Some states do not allow limitations on your part to use or...


