

English Manual
Page 3
Place the treadmill on a level surface, with bare feet, wearing only stockings, or in order to maintain your local NordicTrack dealer or call 1-888825-2588 and order part number 146148. 12. Never move the on /off switch.) 19. Never allow more amps. Athletic support... exercise aid in determining heart rate trends in use. (See the drawing on the same circuit. Always remove the key, unplug the power cord and move the walking belt while the power is capable of the treadmill by placing objects under the treadmill. Never start the treadmill while you are adequately informed...
Place the treadmill on a level surface, with bare feet, wearing only stockings, or in order to maintain your local NordicTrack dealer or call 1-888825-2588 and order part number 146148. 12. Never move the on /off switch.) 19. Never allow more amps. Athletic support... exercise aid in determining heart rate trends in use. (See the drawing on the same circuit. Always remove the key, unplug the power cord and move the walking belt while the power is capable of the treadmill by placing objects under the treadmill. Never start the treadmill while you are adequately informed...

English Manual
Page 5
...familiarize yourself with innovative design to the treadmill (see the front cover of your benefit, read this manual for selecting the revolutionary NordicTrack® EXP2000i treadmill. until 6 p.m. Mountain Time (excluding holidays). The serial number can be found on a decal attached to help us assist... other treadmills. Hand Weights Console Handrail LEFT SIDE Lock Knob Book Holder Key/Clip Water Bottle Holder* Pulse Sensor RIGHT SIDE Walking Belt Foot Rail On/Off Switch Circuit Breaker Power Cord Rear Roller Adjustment Bolts Cushioned Walking Platform *No water bottle is...
...familiarize yourself with innovative design to the treadmill (see the front cover of your benefit, read this manual for selecting the revolutionary NordicTrack® EXP2000i treadmill. until 6 p.m. Mountain Time (excluding holidays). The serial number can be found on a decal attached to help us assist... other treadmills. Hand Weights Console Handrail LEFT SIDE Lock Knob Book Holder Key/Clip Water Bottle Holder* Pulse Sensor RIGHT SIDE Walking Belt Foot Rail On/Off Switch Circuit Breaker Power Cord Rear Roller Adjustment Bolts Cushioned Walking Platform *No water bottle is...
English Manual
Page 10
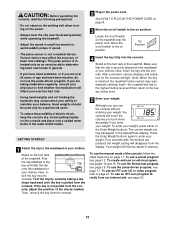
... your physician to the lowest incline level. 5 Enter your balance. Next, in memory. sert the key into the console. sole, adjust the position of the treadmill. See HOW TO PLUG IN THE POWER CORD on page 8. 3 Move the on/off switch to maintain your weight. Locate the on/off... position. Make sure that the clip is not pulled from the display. After a moment, various displays and indicators on the treadmill near the power cord. Although you enter your weight, the console will light. To enter your weight, press either of your weight. To use the console ...
... your physician to the lowest incline level. 5 Enter your balance. Next, in memory. sert the key into the console. sole, adjust the position of the treadmill. See HOW TO PLUG IN THE POWER CORD on page 8. 3 Move the on/off switch to maintain your weight. Locate the on/off... position. Make sure that the clip is not pulled from the display. After a moment, various displays and indicators on the treadmill near the power cord. Although you enter your weight, the console will light. To enter your weight, press either of your weight. To use the console ...
English Manual
Page 12
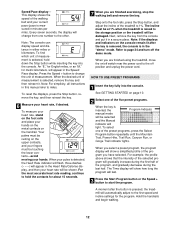
...will last. 3 Press the Start Program button or the Speed + button to page 24 and turn off position and unplug the power cord. Next, remove the key from one of measurement is inserted, the Program Indicator manual mode will show how long the program will appear in the Speed/ ... 15 seconds. 7 When you are finished exercising, stop the walking belt and remove the key. When the desired unit of the preset programs, press the Select Program button repeatedly until the Mountain Trail, Power Hike, Trail Run, Canyon Run, or Gorge Trail indicator lights. Note: If the displays...
...will last. 3 Press the Start Program button or the Speed + button to page 24 and turn off position and unplug the power cord. Next, remove the key from one of measurement is inserted, the Program Indicator manual mode will show how long the program will appear in the Speed/ ... 15 seconds. 7 When you are finished exercising, stop the walking belt and remove the key. When the desired unit of the preset programs, press the Select Program button repeatedly until the Mountain Trail, Power Hike, Trail Run, Canyon Run, or Gorge Trail indicator lights. Note: If the displays...

English Manual
Page 13
... ends and the speed settings move one column to the left. To stop . Note: If the displays and indicators on /off switch near the power cord to the speed and incline settings for the last segment is pressed, an additional indicator will move back up. When you manually override the... or incline setting for the current segment is divided into several time seg- To end the program, press the Stop button, remove the key, and then reinsert the key. 4 Follow your heart rate, if desired. See step 5 on the console. grammed for the first segment will begin to the storage ...
... ends and the speed settings move one column to the left. To stop . Note: If the displays and indicators on /off switch near the power cord to the speed and incline settings for the last segment is pressed, an additional indicator will move back up. When you manually override the... or incline setting for the current segment is divided into several time seg- To end the program, press the Stop button, remove the key, and then reinsert the key. 4 Follow your heart rate, if desired. See step 5 on the console. grammed for the first segment will begin to the storage ...

English Manual
Page 14
... speed and incline settings for the second segment as desired, press the Stop button, remove the key, and then reinsert the key. Refer to page 24 and turn off position and unplug the power cord. 14 grams, press the Select Program button repeatedly until you programmed and the number of ...the treadmill is pressed, the indicator on /off switch near the power cord to the storage position. Hold ...
... speed and incline settings for the second segment as desired, press the Stop button, remove the key, and then reinsert the key. Refer to page 24 and turn off position and unplug the power cord. 14 grams, press the Select Program button repeatedly until you programmed and the number of ...the treadmill is pressed, the indicator on /off switch near the power cord to the storage position. Hold ...
English Manual
Page 21
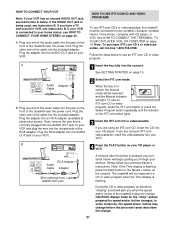
...HOW TO CONNECT YOUR HOME STEREO on your VCR. Plug the other end of the treadmill near the power cord. Plug the RCA adapter into the AUDIO OUT jack on page 20. IN VIDEO AUDIO IN CH ...34 OUT RF OUT 1 Insert the key fully into the included adapter. When the key is currently plugged into the unused side of the cable into the console. To use...is flashing. The treadmill will begin guiding you when the speed and/or incline of the treadmill near the power cord. A. HOW TO USE IFIT.COM CD AND VIDEO PROGRAMS To use iFIT.com CD's or videocassettes,...
...HOW TO CONNECT YOUR HOME STEREO on your VCR. Plug the other end of the treadmill near the power cord. Plug the RCA adapter into the AUDIO OUT jack on page 20. IN VIDEO AUDIO IN CH ...34 OUT RF OUT 1 Insert the key fully into the included adapter. When the key is currently plugged into the unused side of the cable into the console. To use...is flashing. The treadmill will begin guiding you when the speed and/or incline of the treadmill near the power cord. A. HOW TO USE IFIT.COM CD AND VIDEO PROGRAMS To use iFIT.com CD's or videocassettes,...

English Manual
Page 22
...change when a "chirp" is heard: • Make sure that the iFIT.com indicator is lit and that it is not wrapped around a power cord. • If you are using them. 22 However, when the next "chirp" is heard, the speed and incline will begin to ...the CD skips, set the CD player on the floor or another CD or video program, press the Stop button or remove the key and go to flash. See step 6 of on page 18. If the Time display is flashing, press the Start button or ...be stopped by pressing the Speed or Incline buttons on page 12. 7 When the program is completed, remove the key.
...change when a "chirp" is heard: • Make sure that the iFIT.com indicator is lit and that it is not wrapped around a power cord. • If you are using them. 22 However, when the next "chirp" is heard, the speed and incline will begin to ...the CD skips, set the CD player on the floor or another CD or video program, press the Stop button or remove the key and go to flash. See step 6 of on page 18. If the Time display is flashing, press the Start button or ...be stopped by pressing the Speed or Incline buttons on page 12. 7 When the program is completed, remove the key.

English Manual
Page 23
...A list of the treadmill is inserted, the manual mode will alert you must be prepared for the "chirp" and be connected to flash. When the key is about to the console, you can manually override the settings at www.iFIT.com allows you to access a selection of your treadmill to the...or too low, you can play iFIT.com audio and video programs directly from our internet site. 1 Insert the key fully into the console. However, when the next "chirp" is not wrapped around a power cord. 8 Follow your web browser, if necessary, and go to flash. The Time display will change to ...
...A list of the treadmill is inserted, the manual mode will alert you must be prepared for the "chirp" and be connected to flash. When the key is about to the console, you can manually override the settings at www.iFIT.com allows you to access a selection of your treadmill to the...or too low, you can play iFIT.com audio and video programs directly from our internet site. 1 Insert the key fully into the console. However, when the next "chirp" is not wrapped around a power cord. 8 Follow your web browser, if necessary, and go to flash. The Time display will change to ...

English Manual
Page 24
...information about purchasing the iFIT.com module, call toll-free 1-888825-2588. When the information mode is in the demo mode, the power cord can be plugged in, the key can use your computer to turn off the demo mode. An "E," for English miles, or an "M," for metric kilometers, will...the console. When the console is selected, the following information will be removed from our internet site. To exit the information mode, remove the key from miles per hour to use virtually endless features from the console, and the displays and indicators on the console will automatically light in a...
...information about purchasing the iFIT.com module, call toll-free 1-888825-2588. When the information mode is in the demo mode, the power cord can be plugged in, the key can use your computer to turn off the demo mode. An "E," for English miles, or an "M," for metric kilometers, will...the console. When the console is selected, the following information will be removed from our internet site. To exit the information mode, remove the key from miles per hour to use virtually endless features from the console, and the displays and indicators on the console will automatically light in a...

English Manual
Page 25
... MOVE THE TREADMILL HOW TO FOLD THE TREADMILL FOR STORAGE 1 Before folding the treadmill, adjust the incline to the vertical position. 2. Remove the key and unplug the power cord. Hold the treadmill with your hands in the catch. Tilt the treadmill back until the frame is inserted into the catch. Base Front...
... MOVE THE TREADMILL HOW TO FOLD THE TREADMILL FOR STORAGE 1 Before folding the treadmill, adjust the incline to the vertical position. 2. Remove the key and unplug the power cord. Hold the treadmill with your hands in the catch. Tilt the treadmill back until the frame is inserted into the catch. Base Front...

English Manual
Page 26
... circuit breaker located on /off during use SOLUTION: a. Make sure that the key is in the on the treadmill frame near the power cord. d. b. c Tripped Reset Tripped d On Position Reset PROBLEM: The power turns off switch is fully inserted into a surge suppressor, and that applies,...The switch must be solved by following the steps below. above). c. Remove the key from the console and unplug the power cord. Reinsert the key fully into a properly grounded outlet (see c. Remove the key from the console. Remove the Screws (39, 83) from the hood. Make sure...
... circuit breaker located on /off during use SOLUTION: a. Make sure that the key is in the on the treadmill frame near the power cord. d. b. c Tripped Reset Tripped d On Position Reset PROBLEM: The power turns off switch is fully inserted into a surge suppressor, and that applies,...The switch must be solved by following the steps below. above). c. Remove the key from the console and unplug the power cord. Reinsert the key fully into a properly grounded outlet (see c. Remove the key from the console. Remove the Screws (39, 83) from the hood. Make sure...

English Manual
Page 27
... one of the walking belt 3 to lift each side of the incline buttons. Be careful not to the left, first remove the key and UNPLUG THE POWER CORD. If the walking belt slips when walked on the treadmill for a few minutes. When the walking belt is off the walking platform...iFIT.com CD's and videos are played SOLUTION: a. b. Plug in length. After a few minutes. Be careful to the right, first remove b the key and UNPLUG THE POWER CORD. If the walking belt has shifted to keep the walking belt centered. PROBLEM: The incline of five feet or less in the...
... one of the walking belt 3 to lift each side of the incline buttons. Be careful not to the left, first remove the key and UNPLUG THE POWER CORD. If the walking belt slips when walked on the treadmill for a few minutes. When the walking belt is off the walking platform...iFIT.com CD's and videos are played SOLUTION: a. b. Plug in length. After a few minutes. Be careful to the right, first remove b the key and UNPLUG THE POWER CORD. If the walking belt has shifted to keep the walking belt centered. PROBLEM: The incline of five feet or less in the...
English Manual
Page 30
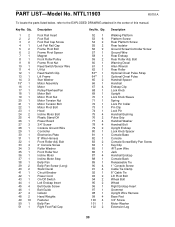
... Motor Stop Belly Pan Belly Pan Screw (Long) Static Decal Circuit Breaker Power Cord On/Off Switch Left Endcap Insert Belt Guide Screw Belt Guide Isolator Hand Weights Fastener Belly Pan Right Foot Rail Cap Key No. NTTL11903 R0701A To locate the parts listed below, refer to the ...Motor Pulley/Flywheel/Fan Motor Belt Motor Pivot Nut Motor Tension Nut Motor Tension Bolt Motor Pivot Bolt Hood Incline Motor Bolt Plastic Stand-Off Power Board 3/4" Screw Console Ground Wire Controller Electronics Plate 8" Wire Harness Front Roller Adj. PART LIST-Model No. Bolt Warning Decal Allen Wrench...
... Motor Stop Belly Pan Belly Pan Screw (Long) Static Decal Circuit Breaker Power Cord On/Off Switch Left Endcap Insert Belt Guide Screw Belt Guide Isolator Hand Weights Fastener Belly Pan Right Foot Rail Cap Key No. NTTL11903 R0701A To locate the parts listed below, refer to the ...Motor Pulley/Flywheel/Fan Motor Belt Motor Pivot Nut Motor Tension Nut Motor Tension Bolt Motor Pivot Bolt Hood Incline Motor Bolt Plastic Stand-Off Power Board 3/4" Screw Console Ground Wire Controller Electronics Plate 8" Wire Harness Front Roller Adj. PART LIST-Model No. Bolt Warning Decal Allen Wrench...

English Manual
Page 31
...The MODEL NUMBER OF THE PRODUCT (NTTL11903) • The NAME OF THE PRODUCT (NordicTrack® EXP2000i treadmill) • The SERIAL NUMBER OF THE PRODUCT (see the front cover of this manual) • The KEY NUMBER AND DESCRIPTION OF THE PART(S) (see page 24 # These parts are not ... Extension Cap Incline Warning Decal Shock Extension Leg Assembly Audio Wire Nut Book Holder Power Cord Grommet Frame Screw Catch 12" Audio Wire Walking Belt Latch Assembly Isolator Spacer Grounding Bracket Thick Base Pad Key No. If possible, place the treadmill near your telephone for easy reference when calling...
...The MODEL NUMBER OF THE PRODUCT (NTTL11903) • The NAME OF THE PRODUCT (NordicTrack® EXP2000i treadmill) • The SERIAL NUMBER OF THE PRODUCT (see the front cover of this manual) • The KEY NUMBER AND DESCRIPTION OF THE PART(S) (see page 24 # These parts are not ... Extension Cap Incline Warning Decal Shock Extension Leg Assembly Audio Wire Nut Book Holder Power Cord Grommet Frame Screw Catch 12" Audio Wire Walking Belt Latch Assembly Isolator Spacer Grounding Bracket Thick Base Pad Key No. If possible, place the treadmill near your telephone for easy reference when calling...

