
English Manual
Page 1
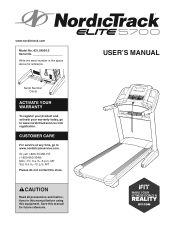
... Number Decal ACTIVATE YOUR WARRANTY To register your product and activate your warranty today, go to www.nordictrackservice.com/ registration. MT Sat. 8 a.m.–-12 p.m. www.nordictrack.com Model No. 831.24934.0 Serial No. MT Please do not contact the store. Or call 1-800-TO-BE-FIT (1-800-862-3348) Mon.–...;-Fri. 6 a.m.–-6 p.m. CUSTOMER CARE For service at any time, go to www.nordictrackservice.com. Save this equipment. Write the serial number in this manual before using this manual for reference. USER’...
... Number Decal ACTIVATE YOUR WARRANTY To register your product and activate your warranty today, go to www.nordictrackservice.com/ registration. MT Sat. 8 a.m.–-12 p.m. www.nordictrack.com Model No. 831.24934.0 Serial No. MT Please do not contact the store. Or call 1-800-TO-BE-FIT (1-800-862-3348) Mon.–...;-Fri. 6 a.m.–-6 p.m. CUSTOMER CARE For service at any time, go to www.nordictrackservice.com. Save this equipment. Write the serial number in this manual before using this manual for reference. USER’...
English Manual
Page 2
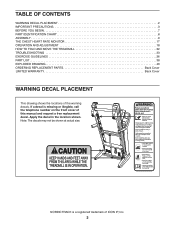
If a decal is a registered trademark of ICON IP, Inc. 2 Apply the decal in the location shown. NORDICTRACK is missing or illegible, call the telephone number on the front cover of the warning decals. Note: The decals may not be shown ... PRECAUTIONS 3 BEFORE YOU BEGIN 7 PART IDENTIFICATION CHART 8 ASSEMBLY 9 THE CHEST HEART RATE MONITOR 17 OPERATION AND ADJUSTMENT 18 HOW TO FOLD AND MOVE THE TREADMILL 32 TROUBLESHOOTING 33 EXERCISE GUIDELINES 36 PART LIST 38 EXPLODED DRAWING 40 ORDERING REPLACEMENT PARTS Back Cover LIMITED WARRANTY Back Cover WARNING DECAL PLACEMENT This...
If a decal is a registered trademark of ICON IP, Inc. 2 Apply the decal in the location shown. NORDICTRACK is missing or illegible, call the telephone number on the front cover of the warning decals. Note: The decals may not be shown ... PRECAUTIONS 3 BEFORE YOU BEGIN 7 PART IDENTIFICATION CHART 8 ASSEMBLY 9 THE CHEST HEART RATE MONITOR 17 OPERATION AND ADJUSTMENT 18 HOW TO FOLD AND MOVE THE TREADMILL 32 TROUBLESHOOTING 33 EXERCISE GUIDELINES 36 PART LIST 38 EXPLODED DRAWING 40 ORDERING REPLACEMENT PARTS Back Cover LIMITED WARRANTY Back Cover WARNING DECAL PLACEMENT This...
English Manual
Page 3
...walking belt may slow, accelerate, or stop procedure before using the treadmill (see your physician. Keep the treadmill indoors, away from heated surfaces. 16. Do not place the treadmill on any exercise program, consult your local NORDICTRACK dealer, call the telephone number on page 20). 18. Do..., or injury to persons, read all important precautions and instructions in this manual. 4. Use the treadmill only as cell phone chargers, into the surge suppressor or into an appropriate outlet (see your treadmill. Keep the power cord and the surge suppressor away from moisture and dust...
...walking belt may slow, accelerate, or stop procedure before using the treadmill (see your physician. Keep the treadmill indoors, away from heated surfaces. 16. Do not place the treadmill on any exercise program, consult your local NORDICTRACK dealer, call the telephone number on page 20). 18. Do..., or injury to persons, read all important precautions and instructions in this manual. 4. Use the treadmill only as cell phone chargers, into the surge suppressor or into an appropriate outlet (see your treadmill. Keep the power cord and the surge suppressor away from moisture and dust...
English Manual
Page 4
... and adjustment procedures described in serious injury or death. When folding or moving the treadmill, make sure that the storage latch is intended only as an exercise aid in determining heart rate trends in this manual. vice representative only. 28. DANGER: 27. If you feel faint or if ...you experience pain while exercising, stop immediately and cool down. Do not change the incline of the power switch), and unplug the power cord when the treadmill is not a medical device....
... and adjustment procedures described in serious injury or death. When folding or moving the treadmill, make sure that the storage latch is intended only as an exercise aid in determining heart rate trends in this manual. vice representative only. 28. DANGER: 27. If you feel faint or if ...you experience pain while exercising, stop immediately and cool down. Do not change the incline of the power switch), and unplug the power cord when the treadmill is not a medical device....

English Manual
Page 7
If you for selecting the revolutionary NORDICTRACK® ELITE 5700 treadmill. Length: 6 ft. 5 in. (196 cm) Width: 3 ft. 3 in. (... number and the location of the serial number decal are shown on the front cover of this manual carefully before contacting us. Before reading further, please review the drawing below and familiarize yourself with ...the treadmill. To help us assist you ’'re not exercising, the unique treadmill can be folded up, requiring less than half the floor space of features designed to make your benefit, read this manual. The ELITE 5700 treadmill offers...
If you for selecting the revolutionary NORDICTRACK® ELITE 5700 treadmill. Length: 6 ft. 5 in. (196 cm) Width: 3 ft. 3 in. (... number and the location of the serial number decal are shown on the front cover of this manual carefully before contacting us. Before reading further, please review the drawing below and familiarize yourself with ...the treadmill. To help us assist you ’'re not exercising, the unique treadmill can be folded up, requiring less than half the floor space of features designed to make your benefit, read this manual. The ELITE 5700 treadmill offers...
English Manual
Page 8
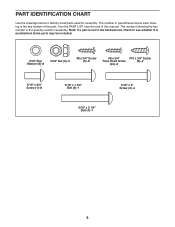
... used for assembly. The number following the key number is the key number of the part, from the PART LIST near the end of this manual.
... used for assembly. The number following the key number is the key number of the part, from the PART LIST near the end of this manual.
English Manual
Page 9
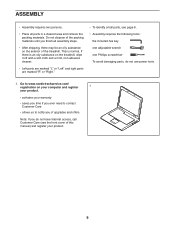
...right parts are marked “"R”" or “"Right.”" •• To identify small parts, see the front cover of the treadmill. Go to notify you of upgrades and offers Note: If you ever need to contact Customer Care •• allows us to www....nordictrackservice.com/ registration on the exterior of this manual) and register your product. 9 ASSEMBLY •• Assembly requires two persons. •• Place all assembly steps. •• After shipping...
...right parts are marked “"R”" or “"Right.”" •• To identify small parts, see the front cover of the treadmill. Go to notify you of upgrades and offers Note: If you ever need to contact Customer Care •• allows us to www....nordictrackservice.com/ registration on the exterior of this manual) and register your product. 9 ASSEMBLY •• Assembly requires two persons. •• Place all assembly steps. •• After shipping...
English Manual
Page 19
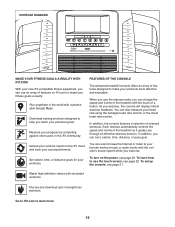
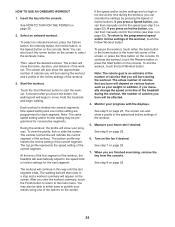
When you use the manual mode, you can even browse the Internet or listen to the iFit cloud and track your personal goals. Upload your workout results to your favorite ... can set up the console, see page 21. You can also measure your workouts. Measure your workouts more . 19 FEATURES OF THE CONSOLE The advanced treadmill console offers an array of features on the power, see page 20. As you through an effective exercise session. To turn on iFit.com to...
When you use the manual mode, you can even browse the Internet or listen to the iFit cloud and track your personal goals. Upload your workout results to your favorite ... can set up the console, see page 21. You can also measure your workouts. Measure your workouts more . 19 FEATURES OF THE CONSOLE The advanced treadmill console offers an array of features on the power, see page 20. As you through an effective exercise session. To turn on iFit.com to...
English Manual
Page 21
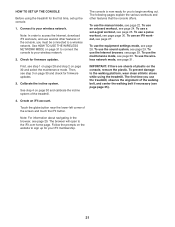
... system. To prevent damage to begin working out. The browser will open to your wireless network. 2. HOW TO SET UP THE CONSOLE Before using the treadmill. Check for firmware updates. 3. To use the sound system, see page 31. To use a pulse workout, see page 29. To use an iFit workout, see... an iFit account. The console is now ready for your iFit membership. 21 To use the equipment settings mode, see page 29. To use the manual mode, see page 24. Then, see page 25. Note: For information about navigating in the browser, see page 28. IMPORTANT: If there are sheets of...
... system. To prevent damage to begin working out. The browser will open to your wireless network. 2. HOW TO SET UP THE CONSOLE Before using the treadmill. Check for firmware updates. 3. To use the sound system, see page 31. To use a pulse workout, see page 29. To use an iFit workout, see... an iFit account. The console is now ready for your iFit membership. 21 To use the equipment settings mode, see page 29. To use the manual mode, see page 24. Then, see page 25. Note: For information about navigating in the browser, see page 28. IMPORTANT: If there are sheets of...

English Manual
Page 22
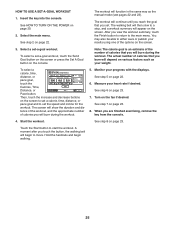
... screen can show the following workout information: •• The incline level of the treadmill •• The elapsed time •• The time left (Note: The manual mode does not have a time left corner of 3.5 mph, press the 3 button and then immediately press the 5 button. Select the main ... 1. You can also press the Manual button on the console, and then touch the Resume button on the screen. You can also view additional information by 0.1 mph; To select a speed setting that you select will change in increments of the treadmill as 3.5 mph—-press two numbered ...
... screen can show the following workout information: •• The incline level of the treadmill •• The elapsed time •• The time left (Note: The manual mode does not have a time left corner of 3.5 mph, press the 3 button and then immediately press the 5 button. Select the main ... 1. You can also press the Manual button on the console, and then touch the Resume button on the screen. You can also view additional information by 0.1 mph; To select a speed setting that you select will change in increments of the treadmill as 3.5 mph—-press two numbered ...
English Manual
Page 24
...the workout. In addition, if you can then manually control the speed (see step 4 on page 23. Turn on the screen. 24 You may be affected. 4. The screen will also show the name, duration, and distance of the treadmill during the workout. To pause the workout, ...progress with the displays. The workout will burn during the workout, the number of the workout, the treadmill will be programmed for each segment. Select an onboard workout. Note: You can then manually control the incline (see step 3 on page 20. 2. Start the workout. The vertical colored line...
...the workout. In addition, if you can then manually control the speed (see step 4 on page 23. Turn on the screen. 24 You may be affected. 4. The screen will also show the name, duration, and distance of the treadmill during the workout. To pause the workout, ...progress with the displays. The workout will burn during the workout, the number of the workout, the treadmill will be programmed for each segment. Select an onboard workout. Note: You can then manually control the incline (see step 3 on page 20. 2. Start the workout. The vertical colored line...
English Manual
Page 25
... button to set -a-goal workout, touch the Set A Goal button on the screen or press the Set A Goal button on various factors such as the manual mode (see pages 22 and 23). Hold the handrails and begin to move. The workout will continue until you reach the goal that you will...
... button to set -a-goal workout, touch the Set A Goal button on the screen or press the Set A Goal button on various factors such as the manual mode (see pages 22 and 23). Hold the handrails and begin to move. The workout will continue until you reach the goal that you will...
English Manual
Page 33
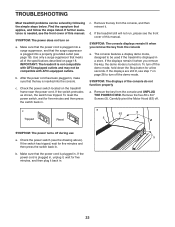
...62) off during use 5 a. Make sure that the surge suppressor is displayed in . 33 d. Check the power switch (see the front cover of this manual. Make sure that the power cord is plugged into a surge suppressor, and that the power cord is inserted into a properly grounded outlet (see page 18...key from the console a. b. If the power cord is turned on a. b. Check the power switch located on page 28 to be used if the treadmill is plugged into the console. c. If the switch has tripped, wait for ve minutes and then press the switch back in . If the ...
...62) off during use 5 a. Make sure that the surge suppressor is displayed in . 33 d. Check the power switch (see the front cover of this manual. Make sure that the power cord is plugged into a surge suppressor, and that the power cord is inserted into a properly grounded outlet (see page 18...key from the console a. b. If the power cord is turned on a. b. Check the power switch located on page 28 to be used if the treadmill is plugged into the console. c. If the switch has tripped, wait for ve minutes and then press the switch back in . If the ...
English Manual
Page 34
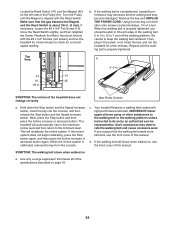
...that meets all of a turn both idler roller screws counterclockwise, 1/4 of the specications described on , see the front cover of this manual. Be careful to do so by an authorized service representative. If the incline system does not begin calibrating, press the Stop button again, and ... still slows when walked on page 18. 34 Reattach the Motor Hood (not shown) with the #8 x 3/4" Screws (not shown) and run the treadmill for a few minutes. Next, press the Stop button and then press the Incline increase or decrease button. Locate the Reed Switch (47) and the ...
...that meets all of a turn both idler roller screws counterclockwise, 1/4 of the specications described on , see the front cover of this manual. Be careful to do so by an authorized service representative. If the incline system does not begin calibrating, press the Stop button again, and ... still slows when walked on page 18. 34 Reattach the Motor Hood (not shown) with the #8 x 3/4" Screws (not shown) and run the treadmill for a few minutes. Next, press the Stop button and then press the Incline increase or decrease button. Locate the Reed Switch (47) and the ...

English Manual
Page 39
... Plate Cushion Spring Left Rear Cap Right Rear Cap Foot Rail Plate Right Rear Cap Cushion Wheel Stop Tray Fan Tray Fan Cover User’'s Manual Note: Specications are not illustrated. 39 For information about ordering replacement parts, see the back cover of this...
... Plate Cushion Spring Left Rear Cap Right Rear Cap Foot Rail Plate Right Rear Cap Cushion Wheel Stop Tray Fan Tray Fan Cover User’'s Manual Note: Specications are not illustrated. 39 For information about ordering replacement parts, see the back cover of this...

English Manual
Page 44
... lieu of its authorized service centers. the customer may have other warranty beyond that vary from the date of any and all instructions in this manual. This warranty provides specic legal rights; ICON Health & Fitness, Inc., 1500 S. 1000 W., Logan, UT 84321-9813 Part No.... ICON’'s obligation under normal use and service conditions. If replacement parts are made must be free from the date of this manual are warranted for ve (5) years from state to provide the following information when contacting us assist you, be responsible for which...
... lieu of its authorized service centers. the customer may have other warranty beyond that vary from the date of any and all instructions in this manual. This warranty provides specic legal rights; ICON Health & Fitness, Inc., 1500 S. 1000 W., Logan, UT 84321-9813 Part No.... ICON’'s obligation under normal use and service conditions. If replacement parts are made must be free from the date of this manual are warranted for ve (5) years from state to provide the following information when contacting us assist you, be responsible for which...


