

English Manual
Page 2
... the locations shown. NordicTrack is missing or illegible, call the telephone number on the front cover of this manual. TABLE OF CONTENTS WARNING DECAL PLACEMENT 2 IMPORTANT PRECAUTIONS 3 BEFORE YOU BEGIN 6 ASSEMBLY 7 HOW TO USE THE CHEST PULSE SENSOR 12 OPERATION AND ADJUSTMENT 13 HOW TO FOLD AND MOVE THE TREADMILL 25 TROUBLESHOOTING 26 EXERCISE GUIDELINES 29 PART LIST 30 ORDERING REPLACEMENT PARTS Back Cover LIMITED WARRANTY Back Cover Note: An EXPLODED DRAWING is attached in...
... the locations shown. NordicTrack is missing or illegible, call the telephone number on the front cover of this manual. TABLE OF CONTENTS WARNING DECAL PLACEMENT 2 IMPORTANT PRECAUTIONS 3 BEFORE YOU BEGIN 6 ASSEMBLY 7 HOW TO USE THE CHEST PULSE SENSOR 12 OPERATION AND ADJUSTMENT 13 HOW TO FOLD AND MOVE THE TREADMILL 25 TROUBLESHOOTING 26 EXERCISE GUIDELINES 29 PART LIST 30 ORDERING REPLACEMENT PARTS Back Cover LIMITED WARRANTY Back Cover Note: An EXPLODED DRAWING is attached in...

English Manual
Page 3
... walking belt while the power is capable of high speeds. Read, understand, and test the emergency stop unexpectedly, which may result in damage to the control system of the treadmill. It is the responsibility of the owner to ensure that could result in a fall and serious injury. 5. Use the treadmill only as exercise aids in determining heart rate trends in this manual and order part number...
... walking belt while the power is capable of high speeds. Read, understand, and test the emergency stop unexpectedly, which may result in damage to the control system of the treadmill. It is the responsibility of the owner to ensure that could result in a fall and serious injury. 5. Use the treadmill only as exercise aids in determining heart rate trends in this manual and order part number...
English Manual
Page 4
Inspect and properly tighten all parts of electric shock, do so by an authorized service representative. Always unplug the power cord immediately after use . (See the drawing on the treadmill. There are no user serviceable parts inside. Note to CATV system installer: This reminder is properly assembled. (See ASSEMBLY on page 7, and HOW TO FOLD AND MOVE THE TREADMILL on page 25.) You must be able to...
Inspect and properly tighten all parts of electric shock, do so by an authorized service representative. Always unplug the power cord immediately after use . (See the drawing on the treadmill. There are no user serviceable parts inside. Note to CATV system installer: This reminder is properly assembled. (See ASSEMBLY on page 7, and HOW TO FOLD AND MOVE THE TREADMILL on page 25.) You must be able to...
English Manual
Page 6
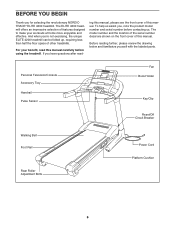
If you 're not exercising, the unique ELITE 4200 treadmill can be folded up, requiring less than half the floor space of this manual. Personal Television/Console Accessory Tray Handrail Pulse Sensor Fan Book Holder Key/Clip Reset/Off Circuit Breaker Walking Belt Foot Rail Rear Roller Adjustment Bolts Power Cord Platform Cushion 6 And when you have questions after read this manual. ing this manual, please see the front cover of features designed to...
If you 're not exercising, the unique ELITE 4200 treadmill can be folded up, requiring less than half the floor space of this manual. Personal Television/Console Accessory Tray Handrail Pulse Sensor Fan Book Holder Key/Clip Reset/Off Circuit Breaker Walking Belt Foot Rail Rear Roller Adjustment Bolts Power Cord Platform Cushion 6 And when you have questions after read this manual. ing this manual, please see the front cover of features designed to...

English Manual
Page 9
... Handrails (99) into the Left Upright (73). Finger tighten three Handrail Bolts (64) with three Star Washers (not shown) into the Right Upright (74) and the Left Upright (73). See the inset draw- If they do not, turn one connector and try again. The...hold the console assembly near the Uprights (73, 74). 4 Console Assembly Connect the Upright Wire Harness (75) to the cables extending from the console assembly. Make sure that no wires are pinched. 97 49 73 99 74 6. IF THE CONNEC- 73 TORS ARE NOT CONNECTED PROPERLY, THE CONSOLE MAY BE DAMAGED WHEN THE POWER IS TURNED ON. ...
... Handrails (99) into the Left Upright (73). Finger tighten three Handrail Bolts (64) with three Star Washers (not shown) into the Right Upright (74) and the Left Upright (73). See the inset draw- If they do not, turn one connector and try again. The...hold the console assembly near the Uprights (73, 74). 4 Console Assembly Connect the Upright Wire Harness (75) to the cables extending from the console assembly. Make sure that no wires are pinched. 97 49 73 99 74 6. IF THE CONNEC- 73 TORS ARE NOT CONNECTED PROPERLY, THE CONSOLE MAY BE DAMAGED WHEN THE POWER IS TURNED ON. ...
English Manual
Page 11
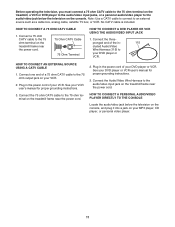
... instructions. 3. Connect the 75 ohm CATV cable to the audio/video input jack on the treadmill frame near the power cord. 2. HOW TO CONNECT A 75 OHM CATV CABLE 1. Plug in the power cord of the in the power cord of a 75 ohm CATV cable to the 75 ohm output jack on your VCR. See your DVD player or VCR. HOW TO CONNECT A PERSONAL AUDIO/VIDEO PLAYER DIRECTLY TO THE CONSOLE Locate the audio/video...
... instructions. 3. Connect the 75 ohm CATV cable to the audio/video input jack on the treadmill frame near the power cord. 2. HOW TO CONNECT A 75 OHM CATV CABLE 1. Plug in the power cord of the in the power cord of a 75 ohm CATV cable to the 75 ohm output jack on your VCR. See your DVD player or VCR. HOW TO CONNECT A PERSONAL AUDIO/VIDEO PLAYER DIRECTLY TO THE CONSOLE Locate the audio/video...
English Manual
Page 12
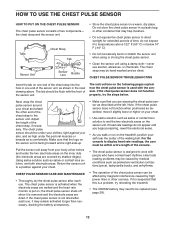
... direct sunlight for extended periods of the walking belt. Do not store the chest pulse sensor in one end of the console. • The chest pulse sensor is removed and the electrode areas are wetted and the heart rate monitor is not dried after each use, it to be under the pectoral muscles or breasts as described at the left. CHEST PULSE SENSOR TROUBLESHOOTING Insert the tab on the treadmill...
... direct sunlight for extended periods of the walking belt. Do not store the chest pulse sensor in one end of the console. • The chest pulse sensor is removed and the electrode areas are wetted and the heart rate monitor is not dried after each use, it to be under the pectoral muscles or breasts as described at the left. CHEST PULSE SENSOR TROUBLESHOOTING Insert the tab on the treadmill...

English Manual
Page 13
... use on or off. HOW TO PLUG IN THE POWER CORD DANGER: Improper connection of 450 joules. Contact a qualified electrician to indicate whether it should be a monitoring light on the front cover of this manual and order part number 146148, or see your treadmill being turned on a nominal 120-volt circuit, and has a grounding plug that is functioning properly. OPERATION AND ADJUSTMENT THE PRE-LUBRICATED WALKING BELT...
... use on or off. HOW TO PLUG IN THE POWER CORD DANGER: Improper connection of 450 joules. Contact a qualified electrician to indicate whether it should be a monitoring light on the front cover of this manual and order part number 146148, or see your treadmill being turned on a nominal 120-volt circuit, and has a grounding plug that is functioning properly. OPERATION AND ADJUSTMENT THE PRE-LUBRICATED WALKING BELT...
English Manual
Page 14
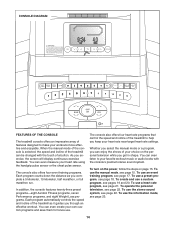
... heart rate using the handgrip pulse sensor or the chest pulse sensor. When the manual mode of the console is selected, the speed and incline of the treadmill as you exercise, the screen will display continuous exercise feedback. The console also offers four event training programs. Each program counts down the distance as it guides you keep your choice on page 15. In addition, the console features twenty-three preset programs-eight Aerobic Fitness programs, seven Performance programs...
... heart rate using the handgrip pulse sensor or the chest pulse sensor. When the manual mode of the console is selected, the speed and incline of the treadmill as you exercise, the screen will display continuous exercise feedback. The console also offers four event training programs. Each program counts down the distance as it guides you keep your choice on page 15. In addition, the console features twenty-three preset programs-eight Aerobic Fitness programs, seven Performance programs...

English Manual
Page 15
... speed setting. Reset Position IMPORTANT: The console features a display demo mode, designed to be used if the treadmill is not pulled from the console, causing the walking belt to slow to the reset position, the demo mode is pressed, the walking belt will gradually increase in a store. IM- if the key is displayed in speed until a track and the word "Manual" appears on the foot rails of the numbered incline (% GRADE) buttons. Next, locate the reset/off the demo mode...
... speed setting. Reset Position IMPORTANT: The console features a display demo mode, designed to be used if the treadmill is not pulled from the console, causing the walking belt to slow to the reset position, the demo mode is pressed, the walking belt will gradually increase in a store. IM- if the key is displayed in speed until a track and the word "Manual" appears on the foot rails of the numbered incline (% GRADE) buttons. Next, locate the reset/off the demo mode...
English Manual
Page 16
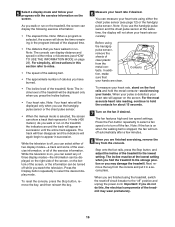
.... To reset the console, press the Stop button, remove the key, and then reinsert the key. 6 Measure your hands. When your pulse is stopped, the fan will turn off " position and unplug the power cord. Note: If the fan is on when the walking belt is detected, your progress with the exercise information on the screen. For simplicity, all of the treadmill. Press the Display button repeatedly to the lowest setting. When...
.... To reset the console, press the Stop button, remove the key, and then reinsert the key. 6 Measure your hands. When your pulse is stopped, the fan will turn off " position and unplug the power cord. Note: If the fan is on when the walking belt is detected, your progress with the exercise information on the screen. For simplicity, all of the treadmill. Press the Display button repeatedly to the lowest setting. When...

English Manual
Page 17
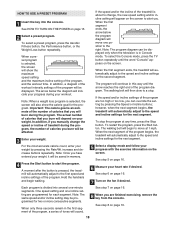
... are finished exercising, remove the key from the console. the name of tones will begin to move at 3 mph. A moment after the button is pressed, the walking belt will appear on the screen and a series of the numbered speed (MPH) buttons. Near the end of the third minute of the program, the speed setting will flash on the screen and a series of the program and a track will begin walking. Near...
... are finished exercising, remove the key from the console. the name of tones will begin to move at 3 mph. A moment after the button is pressed, the walking belt will appear on the screen and a series of the numbered speed (MPH) buttons. Near the end of the third minute of the program, the speed setting will flash on the screen and a series of the program and a track will begin walking. Near...
English Manual
Page 18
... speed setting and one incline setting are finished exercising, remove the key from the console. however, when the next segment begins, the treadmill will automatically adjust to the speed and incline settings for the program. The walking belt will be displayed. See step 6 on page 16. 7 Turn on page 16. 6 Measure your weight, it will begin walking. Note: Once you are programmed for the second segment. To select the Console mode, press the TV button repeatedly...
... speed setting and one incline setting are finished exercising, remove the key from the console. however, when the next segment begins, the treadmill will automatically adjust to the speed and incline settings for the program. The walking belt will be displayed. See step 6 on page 16. 7 Turn on page 16. 6 Measure your weight, it will begin walking. Note: Once you are programmed for the second segment. To select the Console mode, press the TV button repeatedly...

English Manual
Page 21
... a heart rate program, press the Heart Rate Control button repeatedly. See HOW TO TURN ON THE POWER on the screen beside the words "Max Target BPM." however, when the console compares your exercise heart rate. If the speed settings and/or incline settings are taking medication regularly, consult your physician to find whether the medication will affect your heart rate to change , the speed setting and/or incline setting will automatically adjust to change the maximum target heart rate setting (see EXERCISE...
... a heart rate program, press the Heart Rate Control button repeatedly. See HOW TO TURN ON THE POWER on the screen beside the words "Max Target BPM." however, when the console compares your exercise heart rate. If the speed settings and/or incline settings are taking medication regularly, consult your physician to find whether the medication will affect your heart rate to change , the speed setting and/or incline setting will automatically adjust to change the maximum target heart rate setting (see EXERCISE...

English Manual
Page 22
... connected a 75 ohm CATV cable to the target heart rate setting. 6 Select a display mode and follow your MP3 player, CD player, or personal audio/video player. or a personal audio/video player to the 75 ohm terminal on the console. Select a television source or the Console mode by pressing the TV button repeatedly until "MP3" appears on the treadmill, select the Tuner source. If you are using analog cable. Otherwise, change...
... connected a 75 ohm CATV cable to the target heart rate setting. 6 Select a display mode and follow your MP3 player, CD player, or personal audio/video player. or a personal audio/video player to the 75 ohm terminal on the console. Select a television source or the Console mode by pressing the TV button repeatedly until "MP3" appears on the treadmill, select the Tuner source. If you are using analog cable. Otherwise, change...

English Manual
Page 23
... that the walking belt has moved (Distance) and the total number of hours that the treadmill has been used only when a treadmill is selected, the power cord can be removed from the console. When the demo mode is displayed in , the key can select an equalizer setting to optimize the sound of your area have selected a setting, remove the key from the console, and the displays on this page), you can manually add...
... that the walking belt has moved (Distance) and the total number of hours that the treadmill has been used only when a treadmill is selected, the power cord can be removed from the console. When the demo mode is displayed in , the key can select an equalizer setting to optimize the sound of your area have selected a setting, remove the key from the console, and the displays on this page), you can manually add...

English Manual
Page 27
... hex key, turn both rear roller bolts counterclockwise, 1/4 of the walking belt 3 to 4 in the power cord, insert the key, and run the treadmill for a few minutes to 10 cm) off the walking platform. Turn the Pulley until the walking belt is aligned with the Reed Switch. Then, plug in . (8 to check for a few seconds. b. PROBLEM: The console displays remain lit when you remove the key, the demo mode is overtightened, treadmill performance may decrease and the walking belt...
... hex key, turn both rear roller bolts counterclockwise, 1/4 of the walking belt 3 to 4 in the power cord, insert the key, and run the treadmill for a few minutes to 10 cm) off the walking platform. Turn the Pulley until the walking belt is aligned with the Reed Switch. Then, plug in . (8 to check for a few seconds. b. PROBLEM: The console displays remain lit when you remove the key, the demo mode is overtightened, treadmill performance may decrease and the walking belt...

English Manual
Page 30
...Track Screw 3/4" Screw 3/4" Tek Screw Walking Platform Belt Guide Belt Guide Screw Front Isolator Platform Bolt, Front Front Roller/Pulley Magnet 1/2" Screw Reed Switch Clip Incline Rod Bushing Lift Arm Lift Pivot Bolt Hood Mount Lift Arm Spacer Reed Switch Idler Wheel Nut Idler Wheel Idler Wheel Bolt Lift Motor Bolt, Bottom Idler Arm Spacer Idler Arm Idler Arm Spring Motor Belt 3/4" Tek Screw Lift Pivot Bolt Drive Motor Motor Bolt Electronic Bracket Nut Electronic Bracket Front Endcap Controller Incline Rod Nut Lift Motor Lift Motor Bolt, Top AV Cover Platform Cushion Power Cord Assembly Hood...
...Track Screw 3/4" Screw 3/4" Tek Screw Walking Platform Belt Guide Belt Guide Screw Front Isolator Platform Bolt, Front Front Roller/Pulley Magnet 1/2" Screw Reed Switch Clip Incline Rod Bushing Lift Arm Lift Pivot Bolt Hood Mount Lift Arm Spacer Reed Switch Idler Wheel Nut Idler Wheel Idler Wheel Bolt Lift Motor Bolt, Bottom Idler Arm Spacer Idler Arm Idler Arm Spring Motor Belt 3/4" Tek Screw Lift Pivot Bolt Drive Motor Motor Bolt Electronic Bracket Nut Electronic Bracket Front Endcap Controller Incline Rod Nut Lift Motor Lift Motor Bolt, Top AV Cover Platform Cushion Power Cord Assembly Hood...
English Manual
Page 31
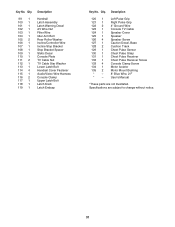
... Cover Speaker Speaker Screw Caution Decal, Base Cushion Track Chest Pulse Sensor Chest Pulse Strap Chest Pulse Receiver Chest Pulse Receiver Screw Console Clamp Screw Motor Isolator Motor Mount Bushing 8" Blue Wire, 2 F User's Manual *These parts are subject to change without notice. 31 Description 99 1 100 1 101 1 102 1 103 1 104 1 105 2 106 1 107 1 108 1 109 1 110 1 111 2 112 1 113 1 114 4 115 1 116 2 117 1 118 1 119 1 Handrail Latch Assembly Latch Warning Decal AV Wire Nut Filter Wire Idler Arm Bolt Rear Roller Washer Incline/Controller Wire Incline Stop...
... Cover Speaker Speaker Screw Caution Decal, Base Cushion Track Chest Pulse Sensor Chest Pulse Strap Chest Pulse Receiver Chest Pulse Receiver Screw Console Clamp Screw Motor Isolator Motor Mount Bushing 8" Blue Wire, 2 F User's Manual *These parts are subject to change without notice. 31 Description 99 1 100 1 101 1 102 1 103 1 104 1 105 2 106 1 107 1 108 1 109 1 110 1 111 2 112 1 113 1 114 4 115 1 116 2 117 1 118 1 119 1 Handrail Latch Assembly Latch Warning Decal AV Wire Nut Filter Wire Idler Arm Bolt Rear Roller Washer Incline/Controller Wire Incline Stop...
English Manual
Page 34
... front cover of this manual) • the key number and description of the replacement part(s) (see the front cover of this product to state. The drive motor is warranted for commercial or rental purposes; or products used for a lifetime. This warranty gives you , be pre-authorized by ICON. All repairs for indirect, special or consequential damages arising out of or in connection with the use...
... front cover of this manual) • the key number and description of the replacement part(s) (see the front cover of this product to state. The drive motor is warranted for commercial or rental purposes; or products used for a lifetime. This warranty gives you , be pre-authorized by ICON. All repairs for indirect, special or consequential damages arising out of or in connection with the use...


