
English Manual
Page 1
... (1-800-862-3348) Mon.-Fri., 6 a.m.-6 p.m. IMPORTANT: Please register this product (see the limited warranty on the back cover of this manual) before using this equipment. MT Sat. 8 a.m.-4 p.m. www.nordictrack.com Model No. Write the serial number in this manual for reference. please contact Customer Care. Keep this manual before contacting Customer Care...
... (1-800-862-3348) Mon.-Fri., 6 a.m.-6 p.m. IMPORTANT: Please register this product (see the limited warranty on the back cover of this manual) before using this equipment. MT Sat. 8 a.m.-4 p.m. www.nordictrack.com Model No. Write the serial number in this manual for reference. please contact Customer Care. Keep this manual before contacting Customer Care...
English Manual
Page 2
...NORDICTRACK is missing or illegible, see the front cover of this manual and request a free replacement decal. Note: The decal(s) may not be shown at actual size. TABLE OF CONTENTS WARNING DECAL PLACEMENT 2 IMPORTANT PRECAUTIONS 3 BEFORE YOU BEGIN 4 PART IDENTIFICATION CHART 5 ASSEMBLY 6 HOW TO USE THE HEART RATE MONITOR 15 HOW TO USE... THE ELLIPTICAL 16 FCC INFORMATION 26 MAINTENANCE AND TROUBLESHOOTING 27 EXERCISE GUIDELINES 29 PART LIST 30 EXPLODED ...
...NORDICTRACK is missing or illegible, see the front cover of this manual and request a free replacement decal. Note: The decal(s) may not be shown at actual size. TABLE OF CONTENTS WARNING DECAL PLACEMENT 2 IMPORTANT PRECAUTIONS 3 BEFORE YOU BEGIN 4 PART IDENTIFICATION CHART 5 ASSEMBLY 6 HOW TO USE THE HEART RATE MONITOR 15 HOW TO USE... THE ELLIPTICAL 16 FCC INFORMATION 26 MAINTENANCE AND TROUBLESHOOTING 27 EXERCISE GUIDELINES 29 PART LIST 30 EXPLODED ...
English Manual
Page 3
... side. If you feel faint or if you experience pain while exercising, stop immediately and cool down. 3 The elliptical should not be used by or through the use the elliptical in a commercial, rental, or institutional setting. 5. It is the responsibility of the owner to move until the ...PRECAUTIONS WARNING: To reduce the risk of serious injury, read all important precautions and instructions in this manual and all warnings on your elliptical before using the elliptical. 4. To protect the floor or carpet from damage, place a mat under age 12 and pets away from moisture and dust....
... side. If you feel faint or if you experience pain while exercising, stop immediately and cool down. 3 The elliptical should not be used by or through the use the elliptical in a commercial, rental, or institutional setting. 5. It is the responsibility of the owner to move until the ...PRECAUTIONS WARNING: To reduce the risk of serious injury, read all important precautions and instructions in this manual and all warnings on your elliptical before using the elliptical. 4. To protect the floor or carpet from damage, place a mat under age 12 and pets away from moisture and dust....
English Manual
Page 4
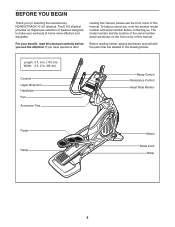
If you , note the product model number and serial number before you for selecting the revolutionary NORDICTRACK® E 9.0 elliptical. Before reading further, please familiarize yourself with the parts that are shown on the front cover of this manual carefully before... benefit, read this manual. Length: 5 ft. 9 in. (175 cm) Width: 2 ft. 2 in the drawing below. BEFORE YOU BEGIN Thank you use the elliptical. The E 9.0 elliptical provides an impressive selection of the serial number decal are labeled in . (66 cm) Console Upper Body Arm Handlebar Fan Accessory Tray Ramp Control...
If you , note the product model number and serial number before you for selecting the revolutionary NORDICTRACK® E 9.0 elliptical. Before reading further, please familiarize yourself with the parts that are shown on the front cover of this manual carefully before... benefit, read this manual. Length: 5 ft. 9 in. (175 cm) Width: 2 ft. 2 in the drawing below. BEFORE YOU BEGIN Thank you use the elliptical. The E 9.0 elliptical provides an impressive selection of the serial number decal are labeled in . (66 cm) Console Upper Body Arm Handlebar Fan Accessory Tray Ramp Control...
English Manual
Page 5
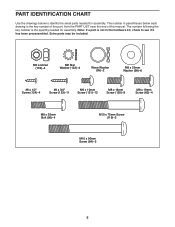
... this manual. Note: If a part is not in parentheses below to see if it has been preassembled. Extra parts may be included. PART IDENTIFICATION CHART Use the drawings below each drawing is the quantity needed for assembly. M8 Locknut (102)-4 M8 Star Washer (122)-4 Wave Washer (95)-2 M8 x 25mm Washer (98...
... this manual. Note: If a part is not in parentheses below to see if it has been preassembled. Extra parts may be included. PART IDENTIFICATION CHART Use the drawings below each drawing is the quantity needed for assembly. M8 Locknut (102)-4 M8 Star Washer (122)-4 Wave Washer (95)-2 M8 x 25mm Washer (98...
English Manual
Page 6
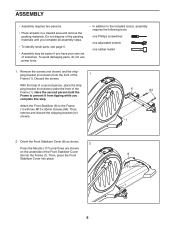
... remove the packing materials. Discard the screws. Do not dispose of the packing materials until you complete this step. To avoid damaging parts, do not use power tools. • In addition to the included tool(s), assembly requires the following tools: one Phillips screwdriver one adjustable wrench one rubber mallet 1. Then, remove...
... remove the packing materials. Discard the screws. Do not dispose of the packing materials until you complete this step. To avoid damaging parts, do not use power tools. • In addition to the included tool(s), assembly requires the following tools: one Phillips screwdriver one adjustable wrench one rubber mallet 1. Then, remove...
English Manual
Page 9
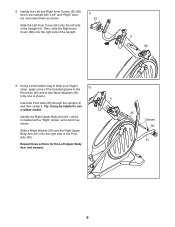
8. Using a small plastic bag to keep your fingers clean, apply some of the Upright. 8 55 4 68 9. Tip: It may be helpful to two Wave Washers (95) (... of the Upright (4). Then, slide the Right Inner Cover (68) onto the right side of the included grease to the 9 Pivot Axle (35) and to use a rubber mallet. Slide the Left Inner Cover (55) onto the left side of the Pivot Axle (35). 61 Repeat these actions for the Left Upper...
8. Using a small plastic bag to keep your fingers clean, apply some of the Upright. 8 55 4 68 9. Tip: It may be helpful to two Wave Washers (95) (... of the Upright (4). Then, slide the Right Inner Cover (68) onto the right side of the included grease to the 9 Pivot Axle (35) and to use a rubber mallet. Slide the Left Inner Cover (55) onto the left side of the Pivot Axle (35). 61 Repeat these actions for the Left Upper...
English Manual
Page 14
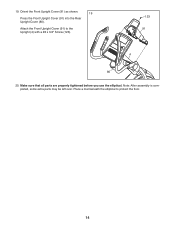
Make sure that all parts are properly tightened before you use the elliptical. pleted, some extra parts may be left over. Note: After assembly is com- Place a mat beneath the elliptical to the Upright (4) with a #8 x 3/4" Screw (123). 123 91 4 80 20. Orient the Front Upright Cover (91) as shown. 19 Press the Front Upright Cover (91) into the Rear Upright Cover (80). Attach the Front Upright Cover (91) to protect the floor. 14 19.
Make sure that all parts are properly tightened before you use the elliptical. pleted, some extra parts may be left over. Note: After assembly is com- Place a mat beneath the elliptical to the Upright (4) with a #8 x 3/4" Screw (123). 123 91 4 80 20. Orient the Front Upright Cover (91) as shown. 19 Press the Front Upright Cover (91) into the Rear Upright Cover (80). Attach the Front Upright Cover (91) to protect the floor. 14 19.
English Manual
Page 15
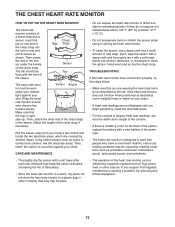
... you suspect that the logo is a battery cover on one end of the chest strap into the hole in a warm, dry place. Never use alcohol, abrasives, or chemicals to a position against your chest. • If heart rate readings are covered by shallow ridges. Chest Tabs Strap Sensor...the heart rate monitor as premature ventricular contractions (pvcs), tachycardia bursts, and arrhythmia. • Thoroughly dry the sensor with a soft towel after each use a damp cloth and a small amount of the sensor under your clothes, tight against your chest. do not expose it to direct sunlight for ...
... you suspect that the logo is a battery cover on one end of the chest strap into the hole in a warm, dry place. Never use alcohol, abrasives, or chemicals to a position against your chest. • If heart rate readings are covered by shallow ridges. Chest Tabs Strap Sensor...the heart rate monitor as premature ventricular contractions (pvcs), tachycardia bursts, and arrhythmia. • Thoroughly dry the sensor with a soft towel after each use a damp cloth and a small amount of the sensor under your clothes, tight against your chest. do not expose it to direct sunlight for ...
English Manual
Page 16
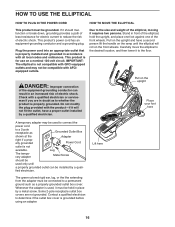
... and a grounding plug. DANGER: Improper connection of electric shock. This product is used, it requires two persons. Carefully move the elliptical to the desired location, and then lower it should be used only until the elliptical will not fit the outlet, have a second person lift the handle on the...a path of the front wheels. Some 2-pole receptacle outlet box covers are in front of the elliptical, hold the upright, and place one foot against one of least resistance for use on the upright Place your foot here A temporary adapter may not be compatible with all local codes...
... and a grounding plug. DANGER: Improper connection of electric shock. This product is used, it requires two persons. Carefully move the elliptical to the desired location, and then lower it should be used only until the elliptical will not fit the outlet, have a second person lift the handle on the...a path of the front wheels. Some 2-pole receptacle outlet box covers are in front of the elliptical, hold the upright, and place one foot against one of least resistance for use on the upright Place your foot here A temporary adapter may not be compatible with all local codes...
English Manual
Page 18
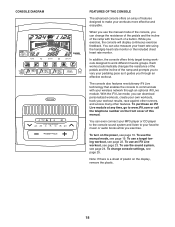
... measure your workout results, race against other runners, and access many other features. You can change console settings, see page 19. To use the manual mode, see page 25. To change the resistance of the pedals and the incline of plastic on the display, remove the plastic. ...workout automatically changes the resistance of the pedals and the incline of features designed to make your wireless network through an effective workout. To use an iFit Live workout, see page 24. The console also features revolutionary iFit Live technology that enables the console to www.iFit.com ...
... measure your workout results, race against other runners, and access many other features. You can change console settings, see page 19. To use the manual mode, see page 25. To change the resistance of the pedals and the incline of plastic on the display, remove the plastic. ...workout automatically changes the resistance of the pedals and the incline of features designed to make your wireless network through an effective workout. To use an iFit Live workout, see page 24. The console also features revolutionary iFit Live technology that enables the console to www.iFit.com ...
English Manual
Page 19
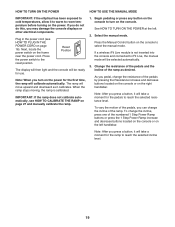
... module is calibrated. Note: After you press a button, it will take a moment for the ramp to iFit Live, the manual mode will take a moment for use. IMPORTANT: If the ramp does not calibrate automatically, see HOW TO PLUG IN THE POWER CORD on the left . 2. See HOW TO TURN ON THE... POWER at the left handlebar. HOW TO TURN ON THE POWER HOW TO USE THE MANUAL MODE IMPORTANT: If the elliptical has been exposed to cold temperatures, allow it calibrates. Select the manual mode.
... module is calibrated. Note: After you press a button, it will take a moment for the ramp to iFit Live, the manual mode will take a moment for use. IMPORTANT: If the ramp does not calibrate automatically, see HOW TO PLUG IN THE POWER CORD on the left . 2. See HOW TO TURN ON THE... POWER at the left handlebar. HOW TO TURN ON THE POWER HOW TO USE THE MANUAL MODE IMPORTANT: If the elliptical has been exposed to cold temperatures, allow it calibrates. Select the manual mode.
English Manual
Page 20
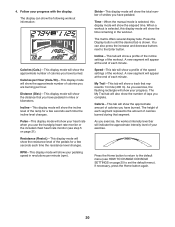
...-This tab will show the resistance level of each time the incline level changes. Calorie-This tab will show the total number of calories you use the handgrip heart rate monitor or the included chest heart rate monitor (see HOW TO CHANGE CONSOLE SETTINGS on page 21). If necessary, press the...
...-This tab will show the resistance level of each time the incline level changes. Calorie-This tab will show the total number of calories you use the handgrip heart rate monitor or the included chest heart rate monitor (see HOW TO CHANGE CONSOLE SETTINGS on page 21). If necessary, press the...
English Manual
Page 21
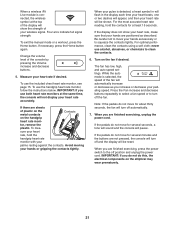
... decrease buttons repeatedly to select a fan speed or to the off automatically. 7. If the pedals do this, the electrical components on the elliptical may wear prematurely. 21 Four arcs indicate full signal strength. Change the volume level of the console by pressing the Volume increase and decrease ...to squeeze the contacts tightly. If the display does not show the strength of your wireless signal. Turn on the fan if desired. To use the included chest heart rate monitor, see page 15. Avoid moving your heart rate if desired. sure your heart rate, hold the contacts...
... decrease buttons repeatedly to select a fan speed or to the off automatically. 7. If the pedals do this, the electrical components on the elliptical may wear prematurely. 21 Four arcs indicate full signal strength. Change the volume level of the console by pressing the Volume increase and decrease ...to squeeze the contacts tightly. If the display does not show the strength of your wireless signal. Turn on the fan if desired. To use the included chest heart rate monitor, see page 15. Avoid moving your heart rate if desired. sure your heart rate, hold the contacts...
English Manual
Page 22
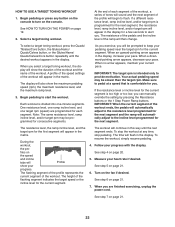
HOW TO USE A TARGET TONING WORKOUT 1. When you select a target toning workout, the display will show the duration of the workout and the name of the profile will ...
HOW TO USE A TARGET TONING WORKOUT 1. When you select a target toning workout, the display will show the duration of the workout and the name of the profile will ...
English Manual
Page 23
...setting for your schedule. Press the increase and decrease buttons next to the Enter button to the beginning of the iFit Live buttons. To use an iFit Live module, you through your schedule. Note: Before some workouts, the voice of that the iFit Live module is registered with... an internet connection and a USB port. Select the iFit Live mode. HOW TO USE AN IFIT LIVE WORKOUT 5. Select an iFit Live workout. To resume the workout, simply resume pedaling. 4. To select an iFit Live workout, press...
...setting for your schedule. Press the increase and decrease buttons next to the Enter button to the beginning of the iFit Live buttons. To use an iFit Live module, you through your schedule. Note: Before some workouts, the voice of that the iFit Live module is registered with... an internet connection and a USB port. Select the iFit Live mode. HOW TO USE AN IFIT LIVE WORKOUT 5. Select an iFit Live workout. To resume the workout, simply resume pedaling. 4. To select an iFit Live workout, press...
English Manual
Page 24
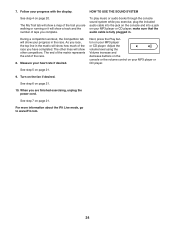
...power cord. The other lines will show other competitors. Next, press the Play button on your MP3 player or CD player. Adjust the volume level using the Volume increase and decrease buttons on the console or the volume control on page 21. When you complete. During a competition workout, the Competition tab... rate if desired. For more information about the iFit Live mode, go to www.iFit.com. 24 Measure your progress with the display. 7. HOW TO USE THE SOUND SYSTEM See step 4 on the fan if desired. See step 5 on page 21. 10. See step 6 on page 21. 9. See step 7 on...
...power cord. The other lines will show other competitors. Next, press the Play button on your MP3 player or CD player. Adjust the volume level using the Volume increase and decrease buttons on the console or the volume control on page 21. When you complete. During a competition workout, the Competition tab... rate if desired. For more information about the iFit Live mode, go to www.iFit.com. 24 Measure your progress with the display. 7. HOW TO USE THE SOUND SYSTEM See step 4 on the fan if desired. See step 5 on page 21. 10. See step 6 on page 21. 9. See step 7 on...

English Manual
Page 25
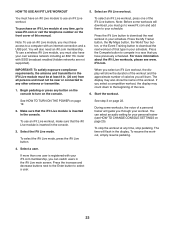
...Adjust the contrast level of measurement. 4. To change the audio setting, press the Enter button repeatedly to turn on the elliptical. 3. If no module is connected to view the iFit Live status display. If no module is connected to the console...kilometers) that has been pedaled on the console. The default menu is connected to the console, you can also use the information mode to choose an audio setting for the voice of the iFit Live module if desired. To exit ... for metric kilometers will appear when you turn the voice of hours that the elliptical has been used.
...Adjust the contrast level of measurement. 4. To change the audio setting, press the Enter button repeatedly to turn on the elliptical. 3. If no module is connected to view the iFit Live status display. If no module is connected to the console...kilometers) that has been pedaled on the console. The default menu is connected to the console, you can also use the information mode to choose an audio setting for the voice of the iFit Live module if desired. To exit ... for metric kilometers will appear when you turn the voice of hours that the elliptical has been used.

English Manual
Page 26
...TV technician for compliance could void the user's authority to computer or peripheral devices. FCC CAUTION: To assure continued compliance, use only shielded interface cables when connecting to operate this equipment does cause harmful interference to radio or television reception, which the ...receiver is no guarantee that to provide reasonable protection against harmful interference in a particular installation. This equipment generates, uses, and can be determined by turning the equipment off and on, try to correct the interference by the party responsible for help...
...TV technician for compliance could void the user's authority to computer or peripheral devices. FCC CAUTION: To assure continued compliance, use only shielded interface cables when connecting to operate this equipment does cause harmful interference to radio or television reception, which the ...receiver is no guarantee that to provide reasonable protection against harmful interference in a particular installation. This equipment generates, uses, and can be determined by turning the equipment off and on, try to correct the interference by the party responsible for help...
English Manual
Page 27
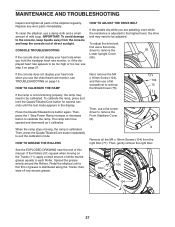
... chest heart rate monitor, see step 5 on page 21. HOW TO GREASE THE ROLLERS Then, use a flat screwdriver to the console, keep the console out of the elliptical regularly. then, 104 wipe off any worn parts immediately. IMPORTANT: To avoid damage to remove the Front Stabilizer Cover.../Tibiales/Core button for several seconds until a 104 thin film of mild soap. Pedal the elliptical until the test mode appears in the display. To clean the elliptical, use a flat screw- driver to exit the calibration mode. Then, press the Quads/Tibiales/Core button repeatedly...
... chest heart rate monitor, see step 5 on page 21. HOW TO GREASE THE ROLLERS Then, use a flat screwdriver to the console, keep the console out of the elliptical regularly. then, 104 wipe off any worn parts immediately. IMPORTANT: To avoid damage to remove the Front Stabilizer Cover.../Tibiales/Core button for several seconds until a 104 thin film of mild soap. Pedal the elliptical until the test mode appears in the display. To clean the elliptical, use a flat screw- driver to exit the calibration mode. Then, press the Quads/Tibiales/Core button repeatedly...


