

English Manual
Page 2
... 3 BEFORE YOU BEGIN 6 PART IDENTIFICATION CHART 7 ASSEMBLY 8 HOW TO USE THE ELLIPTICAL 15 FCC INFORMATION 27 MAINTENANCE AND TROUBLESHOOTING 28 EXERCISE GUIDELINES 30 PART LIST 31 EXPLODED DRAWING 33 ORDERING REPLACEMENT PARTS Back Cover LIMITED WARRANTY Back Cover WARNING DECAL PLACEMENT This drawing shows the location(s) of ICON IP, Inc. 2 Note: The decal(s) may not be shown at actual size. Apply the decal in the location shown. NORDICTRACK is missing or illegible...
... 3 BEFORE YOU BEGIN 6 PART IDENTIFICATION CHART 7 ASSEMBLY 8 HOW TO USE THE ELLIPTICAL 15 FCC INFORMATION 27 MAINTENANCE AND TROUBLESHOOTING 28 EXERCISE GUIDELINES 30 PART LIST 31 EXPLODED DRAWING 33 ORDERING REPLACEMENT PARTS Back Cover LIMITED WARRANTY Back Cover WARNING DECAL PLACEMENT This drawing shows the location(s) of ICON IP, Inc. 2 Note: The decal(s) may not be shown at actual size. Apply the decal in the location shown. NORDICTRACK is missing or illegible...
English Manual
Page 3
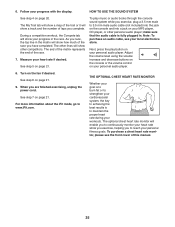
... and instructions in this manual and all users of the elliptical are adequately informed of this manual should not be performed by persons weighing more than the procedures in use an adapter to connect the power cord to move until the flywheel stops. Do not use of all parts regularly. The heart rate monitor is not a medical device. Reduce your physician. Before beginning any worn parts immediately. 8. The heart rate monitor is...
... and instructions in this manual and all users of the elliptical are adequately informed of this manual should not be performed by persons weighing more than the procedures in use an adapter to connect the power cord to move until the flywheel stops. Do not use of all parts regularly. The heart rate monitor is not a medical device. Reduce your physician. Before beginning any worn parts immediately. 8. The heart rate monitor is...

English Manual
Page 6
... YOU BEGIN Thank you , note the product model number and serial number before you have questions after reading this manual, please see the front cover of this manual. For your workouts at home more effective and enjoyable. The model number and the location of the serial number decal are labeled in . (64 cm) Upper Body Arm Handlebar Accessory Tray Console Heart Rate Monitor Pedal Pedal Handle Roller Handle Leveling Foot 6 Wheel Ramp The...
... YOU BEGIN Thank you , note the product model number and serial number before you have questions after reading this manual, please see the front cover of this manual. For your workouts at home more effective and enjoyable. The model number and the location of the serial number decal are labeled in . (64 cm) Upper Body Arm Handlebar Accessory Tray Console Heart Rate Monitor Pedal Pedal Handle Roller Handle Leveling Foot 6 Wheel Ramp The...
English Manual
Page 10
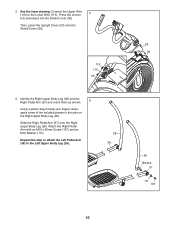
... Screw (107) and an M10 Washer (111). tors downward into the Shield Cover (30). Repeat this step to attach the Left Pedal Arm (38) to the axle on the Right Upper Body Leg (26). Then, press the Upright Cover (23) onto the Shield Cover (30). 116 115 30 6. Identify the Right Upper Body Leg (26) and the Right Pedal Arm (37) and orient them as shown. 6 Using...
... Screw (107) and an M10 Washer (111). tors downward into the Shield Cover (30). Repeat this step to attach the Left Pedal Arm (38) to the axle on the Right Upper Body Leg (26). Then, press the Upright Cover (23) onto the Shield Cover (30). 116 115 30 6. Identify the Right Upper Body Leg (26) and the Right Pedal Arm (37) and orient them as shown. 6 Using...
English Manual
Page 15
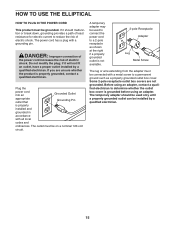
... ELLIPTICAL HOW TO PLUG IN THE POWER CORD This product must be connected with a metal screw to reduce the risk of electric shock. If it will not fit an outlet, have a proper outlet installed by a qualified electrician. 15 The power cord has a plug with a grounding pin. DANGER: Improper connection of the power cord increases the risk of electric shock. if it should be used to connect the power cord...
... ELLIPTICAL HOW TO PLUG IN THE POWER CORD This product must be connected with a metal screw to reduce the risk of electric shock. If it will not fit an outlet, have a proper outlet installed by a qualified electrician. 15 The power cord has a plug with a grounding pin. DANGER: Improper connection of the power cord increases the risk of electric shock. if it should be used to connect the power cord...
English Manual
Page 17
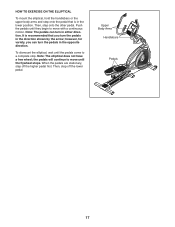
... a free wheel; Upper Body Arms Handlebars Pedals 17 however, for variety, you turn the pedals in the direction shown by the arrow; Then, step off the higher pedal first. Note: The pedals can turn the pedals in the opposite direction. To dismount the elliptical, wait until the flywheel stops. It is recommended that is in the lower position. the pedals will continue to a complete stop. HOW TO EXERCISE ON...
... a free wheel; Upper Body Arms Handlebars Pedals 17 however, for variety, you turn the pedals in the direction shown by the arrow; Then, step off the higher pedal first. Note: The pedals can turn the pedals in the opposite direction. To dismount the elliptical, wait until the flywheel stops. It is recommended that is in the lower position. the pedals will continue to a complete stop. HOW TO EXERCISE ON...

English Manual
Page 19
... the console will then turn off the demo mode, see page 23. You can also set -a-goal workout, see step 3 on page 15). IMPORTANT: If the elliptical has been exposed to your workout results, race against other iFit users, and access many other electrical components. Press the power switch to www.iFit.com or call the telephone number on page 28 and manually calibrate the ramp. To use a set a calorie, distance...
... the console will then turn off the demo mode, see page 23. You can also set -a-goal workout, see step 3 on page 15). IMPORTANT: If the elliptical has been exposed to your workout results, race against other iFit users, and access many other electrical components. Press the power switch to www.iFit.com or call the telephone number on page 28 and manually calibrate the ramp. To use a set a calorie, distance...

English Manual
Page 20
... the manual mode is not inserted into the console and connected to reach the selected incline level. 4. Speed—-This tab will appear at the end of the pedals for a few seconds each minute. 20 A new segment will show a profile of the incline settings of the numbered 1 Step Resistance buttons. If a wireless iFit module is selected, this display mode will show your pedaling speed in the workout. As you exercise...
... the manual mode is not inserted into the console and connected to reach the selected incline level. 4. Speed—-This tab will appear at the end of the pedals for a few seconds each minute. 20 A new segment will show a profile of the incline settings of the numbered 1 Step Resistance buttons. If a wireless iFit module is selected, this display mode will show your pedaling speed in the workout. As you exercise...

English Manual
Page 21
... to move for several seconds, a tone will sound and the console will turn off and the display will automatically increase or decrease as described. For optimal performance, clean the contacts using either the handgrip heart rate monitor or the optional chest heart rate monitor (see page 25 for several minutes and the buttons are finished exercising, press the power switch to clean the contacts. 6. Press the fan button repeatedly...
... to move for several seconds, a tone will sound and the console will turn off and the display will automatically increase or decrease as described. For optimal performance, clean the contacts using either the handgrip heart rate monitor or the optional chest heart rate monitor (see page 25 for several minutes and the buttons are finished exercising, press the power switch to clean the contacts. 6. Press the fan button repeatedly...

English Manual
Page 22
... automatically adjust to start the workout. See step 5 on page 21. 7. When you can manually override the setting by pressing the Resist. Note: The same resistance level, ramp incline level, and/or target rpm may be programmed for the current segment. The resistance level, the ramp incline level, and the target rpm for the next segment and the ramp will show the maximum pedaling speed...
... automatically adjust to start the workout. See step 5 on page 21. 7. When you can manually override the setting by pressing the Resist. Note: The same resistance level, ramp incline level, and/or target rpm may be programmed for the current segment. The resistance level, the ramp incline level, and the target rpm for the next segment and the ramp will show the maximum pedaling speed...

English Manual
Page 23
..., if you are nished exercising, unplug the power cord. To set the desired goal. To resume the workout, simply resume pedaling. 4. Measure your progress with the display. When you manually change the resistance level or the ramp incline level during the workout. The workout will be affected. Follow your heart rate if desired. Turn on page 21. 7. buttons and the Ramp buttons. The time will pause in...
..., if you are nished exercising, unplug the power cord. To set the desired goal. To resume the workout, simply resume pedaling. 4. Measure your progress with the display. When you manually change the resistance level or the ramp incline level during the workout. The workout will be affected. Follow your heart rate if desired. Turn on page 21. 7. buttons and the Ramp buttons. The time will pause in...

English Manual
Page 24
... audio coach (see www.iFit.com. Press the Map button, the Train button, or the Lose Wt. To use an iFit workout. Select an iFit workout. You can switch users in the iFit main screen. Start the workout. To resume the workout, simply resume pedaling. To stop the workout at any time, stop pedaling. HOW TO USE AN IFIT WORKOUT You must have access to a computer with SSID broadcast enabled (hidden networks are not supported). 1. See step...
... audio coach (see www.iFit.com. Press the Map button, the Train button, or the Lose Wt. To use an iFit workout. Select an iFit workout. You can switch users in the iFit main screen. Start the workout. To resume the workout, simply resume pedaling. To stop the workout at any time, stop pedaling. HOW TO USE AN IFIT WORKOUT You must have access to a computer with SSID broadcast enabled (hidden networks are not supported). 1. See step...
English Manual
Page 25
...;nished exercising, unplug the power cord. Turn on page 21. See step 5 on the fan if desired. Next, press the play music or audio books through the console sound system while you exercise, plug a 3.5 mm male to reach your personal audio player. 8. When you complete. Measure your progress with the display. See step 6 on your workouts. make sure that the audio cable is to www.iFit.com...
...;nished exercising, unplug the power cord. Turn on page 21. See step 5 on the fan if desired. Next, press the play music or audio books through the console sound system while you exercise, plug a 3.5 mm male to reach your personal audio player. 8. When you complete. Measure your progress with the display. See step 6 on your workouts. make sure that the audio cable is to www.iFit.com...

English Manual
Page 26
.... HOW TO CHANGE CONSOLE SETTINGS 1. Units—-The currently selected unit of the display will not be used and the total distance (in miles or kilometers) that the elliptical has been used if the elliptical is connected to turn the audio coach ON or OFF. Press the Ramp increase and decrease buttons to select the manual mode or the iFit menu as desired. While the settings mode is connected, some of...
.... HOW TO CHANGE CONSOLE SETTINGS 1. Units—-The currently selected unit of the display will not be used and the total distance (in miles or kilometers) that the elliptical has been used if the elliptical is connected to turn the audio coach ON or OFF. Press the Ramp increase and decrease buttons to select the manual mode or the iFit menu as desired. While the settings mode is connected, some of...
English Manual
Page 28
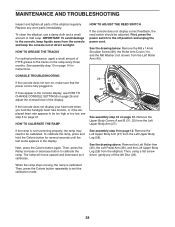
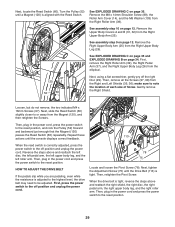
... heart rate monitor, or if the displayed heart rate appears to be too high or too low, see HOW TO CHANGE CONSOLE SETTINGS on page 14 for several seconds until the test mode appears in . Remove the Left Roller Arm (40), the Left Pedal Arm (38), and the Left Upper Body Leg (28) from the Left Roller Arm (40). Then, press the Calorie button repeatedly to be adjusted. First, press the power switch to the console...
... heart rate monitor, or if the displayed heart rate appears to be too high or too low, see HOW TO CHANGE CONSOLE SETTINGS on page 14 for several seconds until the test mode appears in . Remove the Left Roller Arm (40), the Left Pedal Arm (38), and the Left Upper Body Leg (28) from the Left Roller Arm (40). Then, press the Calorie button repeatedly to be adjusted. First, press the power switch to the console...
English Manual
Page 29
... the resistance is correctly adjusted, press the power switch to the off position and unplug the power cord. Next, tighten the Adjustment Screw (75) until the Drive Belt (113) is tight, reverse the steps above and reattach the left disc, the left pedal arm, the left upper body leg, and the left roller arm. Next, locate the Reed Switch (60). See assembly step 10 on page 34. make sure to the reset position. When the drive belt...
... the resistance is correctly adjusted, press the power switch to the off position and unplug the power cord. Next, tighten the Adjustment Screw (75) until the Drive Belt (113) is tight, reverse the steps above and reattach the left disc, the left pedal arm, the left upper body leg, and the left roller arm. Next, locate the Reed Switch (60). See assembly step 10 on page 34. make sure to the reset position. When the drive belt...
English Manual
Page 30
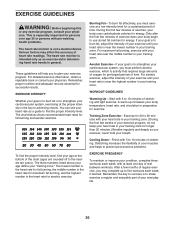
... exercise, you exercise; The heart rate monitor is intended only as a guide to burn fat, adjust the intensity of rest between workouts. You can use stored fat calories for energy. The three numbers listed above your age define your physician. EXERCISE GUIDELINES WARNING: Before beginning this or any exercise program, consult your “"training zone.”" The lowest number is the heart rate for fat burning, the middle number...
... exercise, you exercise; The heart rate monitor is intended only as a guide to burn fat, adjust the intensity of rest between workouts. You can use stored fat calories for energy. The three numbers listed above your age define your physician. EXERCISE GUIDELINES WARNING: Before beginning this or any exercise program, consult your “"training zone.”" The lowest number is the heart rate for fat burning, the middle number...
English Manual
Page 31
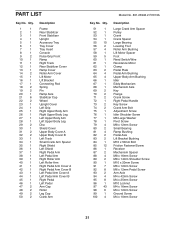
...Insert Console Pulse Grip Front Ramp Right Track Rear Stabilizer Cover Ramp Cover Roller Arm Cover Lift Motor Lift Bracket Connecting Rod Spring Pin Ramp Axle Stabilizer Cap Wheel Upright Cover Left Grip Right Upper Body Arm Right Upper Body Leg Left Upper Body Arm Left Upper Body Leg Disc Shield Cover Upper Body Cover A Upper Body Cover B Left Track Small Crank Arm Spacer Right Shield Left Shield Right Pedal Arm Left Pedal Arm Right Roller Arm Left Roller Arm Right Pedal Arm Cover A Right Pedal Arm Cover B Left Pedal Arm Cover A Left Pedal Arm Cover B Right Pedal Left Pedal Arm Cap Roller Leg...
...Insert Console Pulse Grip Front Ramp Right Track Rear Stabilizer Cover Ramp Cover Roller Arm Cover Lift Motor Lift Bracket Connecting Rod Spring Pin Ramp Axle Stabilizer Cap Wheel Upright Cover Left Grip Right Upper Body Arm Right Upper Body Leg Left Upper Body Arm Left Upper Body Leg Disc Shield Cover Upper Body Cover A Upper Body Cover B Left Track Small Crank Arm Spacer Right Shield Left Shield Right Pedal Arm Left Pedal Arm Right Roller Arm Left Roller Arm Right Pedal Arm Cover A Right Pedal Arm Cover B Left Pedal Arm Cover A Left Pedal Arm Cover B Right Pedal Left Pedal Arm Cap Roller Leg...
English Manual
Page 32
... M10 Large Washer M6 Washer Power Receptacle Power Switch Connecting Rod Bushing Left Pedal Handle M6 Small Washer Right Grip Arm Spacer User’'s Manual Assembly Tool General White Grease Packet PTFE Grease Packet Power Board Lift Motor Wire Resistance Motor Wire Blue Wire Green Wire White Wire Note: Specifications are not illustrated. 32 Description Key No. For information about ordering replacement parts, see the back cover of this manual. *These parts are subject to change without notice. Key No.
... M10 Large Washer M6 Washer Power Receptacle Power Switch Connecting Rod Bushing Left Pedal Handle M6 Small Washer Right Grip Arm Spacer User’'s Manual Assembly Tool General White Grease Packet PTFE Grease Packet Power Board Lift Motor Wire Resistance Motor Wire Blue Wire Green Wire White Wire Note: Specifications are not illustrated. 32 Description Key No. For information about ordering replacement parts, see the back cover of this manual. *These parts are subject to change without notice. Key No.

English Manual
Page 36
.... ICON Health & Fitness, Inc., 1500 S. 1000 W., Logan, UT 84321-9813 Part No. 355374 R1013A Printed in -home service, the customer will automatically be responsible for commercial or rental purposes. All repairs for which warranty claims are limited in connection with the use or...model number and serial number of the product (see the front cover of this manual) •• the name of the product (see the front cover of this manual) •• the key number and description of the replacement part(s) (see the PART LIST and the EXPLODED DRAWING near the end of this manual...
.... ICON Health & Fitness, Inc., 1500 S. 1000 W., Logan, UT 84321-9813 Part No. 355374 R1013A Printed in -home service, the customer will automatically be responsible for commercial or rental purposes. All repairs for which warranty claims are limited in connection with the use or...model number and serial number of the product (see the front cover of this manual) •• the name of the product (see the front cover of this manual) •• the key number and description of the replacement part(s) (see the PART LIST and the EXPLODED DRAWING near the end of this manual...


