
English Manual
Page 2
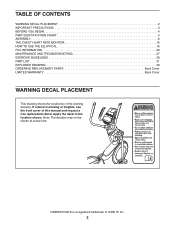
... a free replacement decal. NORDICTRACK is missing or illegible, see the front cover of ICON IP, Inc. 2 Note: The decal(s) may not be shown at actual size. TABLE OF CONTENTS WARNING DECAL PLACEMENT 2 IMPORTANT PRECAUTIONS 3 BEFORE YOU BEGIN 4 PART IDENTIFICATION CHART 5 ASSEMBLY 6 THE CHEST HEART RATE MONITOR 15 HOW TO USE THE ELLIPTICAL 16 FCC INFORMATION 26 MAINTENANCE AND TROUBLESHOOTING 27 EXERCISE GUIDELINES 29 PART LIST 31 EXPLODED DRAWING 33 ORDERING REPLACEMENT PARTS Back Cover LIMITED WARRANTY...
... a free replacement decal. NORDICTRACK is missing or illegible, see the front cover of ICON IP, Inc. 2 Note: The decal(s) may not be shown at actual size. TABLE OF CONTENTS WARNING DECAL PLACEMENT 2 IMPORTANT PRECAUTIONS 3 BEFORE YOU BEGIN 4 PART IDENTIFICATION CHART 5 ASSEMBLY 6 THE CHEST HEART RATE MONITOR 15 HOW TO USE THE ELLIPTICAL 16 FCC INFORMATION 26 MAINTENANCE AND TROUBLESHOOTING 27 EXERCISE GUIDELINES 29 PART LIST 31 EXPLODED DRAWING 33 ORDERING REPLACEMENT PARTS Back Cover LIMITED WARRANTY...

English Manual
Page 3
... elliptical in this manual. 9. IMPORTANT PRECAUTIONS WARNING: To reduce the risk of serious injury, read all important precautions and instructions in this product. 1. Before beginning any worn parts immediately. 8. Use the elliptical only as an exercise aid in determining heart rate trends in a commercial, rental, or institutional setting. 5. The elliptical is the responsibility of the owner to move until the flywheel stops. Do not use...
... elliptical in this manual. 9. IMPORTANT PRECAUTIONS WARNING: To reduce the risk of serious injury, read all important precautions and instructions in this product. 1. Before beginning any worn parts immediately. 8. Use the elliptical only as an exercise aid in determining heart rate trends in a commercial, rental, or institutional setting. 5. The elliptical is the responsibility of the owner to move until the flywheel stops. Do not use...
English Manual
Page 4
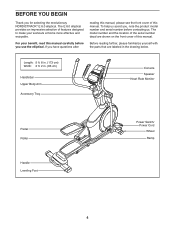
... you , note the product model number and serial number before you use the elliptical. Before reading further, please familiarize yourself with the parts that are shown on the front cover of the serial number decal are labeled in . (66 cm) Handlebar Upper Body Arm Accessory Tray Console Speaker Heart Rate Monitor Pedal Roller Handle Leveling Foot Power Switch/ Power Cord Wheel Ramp 4 The model number and the location of this manual. If you have questions after...
... you , note the product model number and serial number before you use the elliptical. Before reading further, please familiarize yourself with the parts that are shown on the front cover of the serial number decal are labeled in . (66 cm) Handlebar Upper Body Arm Accessory Tray Console Speaker Heart Rate Monitor Pedal Roller Handle Leveling Foot Power Switch/ Power Cord Wheel Ramp 4 The model number and the location of this manual. If you have questions after...
English Manual
Page 11
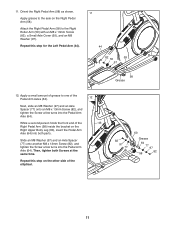
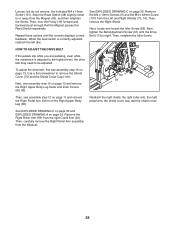
...Body Leg (60), insert the Pedal Arm Axle (64) into both Screws at the same time. Repeat this step on the other side of the Pedal Arm Axles (64). Apply a small amount of grease to one of the elliptical. 12 46 82 97 77 60 Grease 64 77 97 82 58 11 Repeat this step for the Left Pedal Arm... Screw (82), and tighten the Screw a few turns into the Pedal Arm Axle (64). Apply grease to the Right Roller Arm (59) with an M8 x 13mm Screw (82), a Small Axle Cover (55), and an M8 Washer (97). Then, tighten both parts. While a second person holds the front end of the Right Pedal Arm ...
...Body Leg (60), insert the Pedal Arm Axle (64) into both Screws at the same time. Repeat this step on the other side of the Pedal Arm Axles (64). Apply a small amount of grease to one of the elliptical. 12 46 82 97 77 60 Grease 64 77 97 82 58 11 Repeat this step for the Left Pedal Arm... Screw (82), and tighten the Screw a few turns into the Pedal Arm Axle (64). Apply grease to the Right Roller Arm (59) with an M8 x 13mm Screw (82), a Small Axle Cover (55), and an M8 Washer (97). Then, tighten both parts. While a second person holds the front end of the Right Pedal Arm ...
English Manual
Page 15
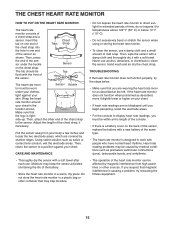
... on the back of the sensor, replace the battery with a soft towel after each use alcohol, abrasives, or chemicals to the sensor. Wrap the heart rate monitor around your skin. Adjust the length of the battery. •• Store the heart rate monitor in one end of the same type. •• The heart rate monitor is a battery cover on one end of the chest strap into the hole in...
... on the back of the sensor, replace the battery with a soft towel after each use alcohol, abrasives, or chemicals to the sensor. Wrap the heart rate monitor around your skin. Adjust the length of the battery. •• Store the heart rate monitor in one end of the same type. •• The heart rate monitor is a battery cover on one end of the chest strap into the hole in...
English Manual
Page 16
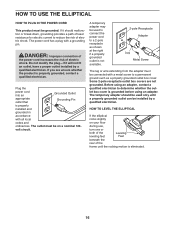
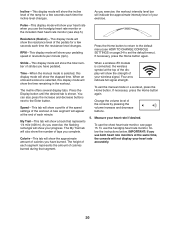
... use, turn one or both of the Leveling leveling feet Feet beneath the rear of least resistance for electric current to determine whether the outlet box cover is properly grounded, contact a qualified electrician. HOW TO LEVEL THE ELLIPTICAL If the elliptical rocks slightly on a nominal 120- The power cord has a plug with all local codes and ordinances. If it will not fit...
... use, turn one or both of the Leveling leveling feet Feet beneath the rear of least resistance for electric current to determine whether the outlet box cover is properly grounded, contact a qualified electrician. HOW TO LEVEL THE ELLIPTICAL If the elliptical rocks slightly on a nominal 120- The power cord has a plug with all local codes and ordinances. If it will not fit...
English Manual
Page 17
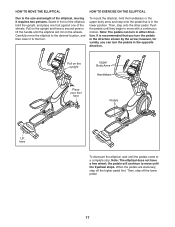
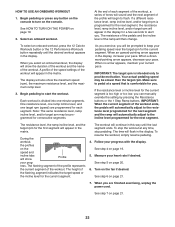
... a free wheel; however, for variety, you turn in the direction shown by the arrow; HOW TO MOVE THE ELLIPTICAL HOW TO EXERCISE ON THE ELLIPTICAL Due to the size and weight of the elliptical, moving it to the floor. Then, step onto the other pedal. When the pedals are stationary, step off the lower pedal. 17 Stand in front of the elliptical, hold the handlebars or the upper body arms...
... a free wheel; however, for variety, you turn in the direction shown by the arrow; HOW TO MOVE THE ELLIPTICAL HOW TO EXERCISE ON THE ELLIPTICAL Due to the size and weight of the elliptical, moving it to the floor. Then, step onto the other pedal. When the pedals are stationary, step off the lower pedal. 17 Stand in front of the elliptical, hold the handlebars or the upper body arms...
English Manual
Page 18
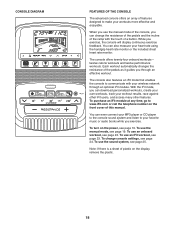
... workouts more effective and enjoyable. The console also features an iFit mode that enables the console to www.iFit.com or call the telephone number on the front cover of the console, you exercise. You can change console settings, see page 25. To use the manual mode, see page 22. To change the resistance of the pedals and the incline of a button. To use an onboard workout, see page 19. When you use the manual mode...
... workouts more effective and enjoyable. The console also features an iFit mode that enables the console to www.iFit.com or call the telephone number on the front cover of the console, you exercise. You can change console settings, see page 25. To use the manual mode, see page 22. To change the resistance of the pedals and the incline of a button. To use an onboard workout, see page 19. When you use the manual mode...
English Manual
Page 19
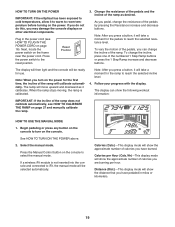
... manual mode. The display can change the incline of the numbered 1 Step Ramp buttons or press the 1 Step Ramp increase and decrease buttons. When the ramp stops moving, the ramp is not inserted into the console and connected to reach the selected incline level. 4. Note: After you press a button, it will calibrate automatically. Follow your progress with the display. Press the Manual Control button on the frame near the power cord. Change the resistance of the pedals and the incline...
... manual mode. The display can change the incline of the numbered 1 Step Ramp buttons or press the 1 Step Ramp increase and decrease buttons. When the ramp stops moving, the ramp is not inserted into the console and connected to reach the selected incline level. 4. Note: After you press a button, it will calibrate automatically. Follow your progress with the display. Press the Manual Control button on the frame near the power cord. Change the resistance of the pedals and the incline...
English Manual
Page 20
... chest heart rate monitor, see step 5). Stride—-This display mode will show the total number of strides you exercise, the flashing rectangle will show your pedaling speed in the workout. A new segment will appear at the end of each time the resistance level changes. As you have burned. Calorie—-This tab will show the approximate amount of calories you use the handgrip heart rate monitor, follow the instructions below. Change...
... chest heart rate monitor, see step 5). Stride—-This display mode will show the total number of strides you exercise, the flashing rectangle will show your pedaling speed in the workout. A new segment will appear at the end of each time the resistance level changes. As you have burned. Calorie—-This tab will show the approximate amount of calories you use the handgrip heart rate monitor, follow the instructions below. Change...
English Manual
Page 22
... rpm (speed) are nished exercising, unplug the power cord. Turn on the console. See step 7 on page 19. 5. HOW TO USE AN ONBOARD WORKOUT 1. As you exercise, you . Follow your current pace. At the end of each segment. Your actual pedaling speed may be programmed for you will begin to provide motivation. See step 4 on page 21. 22 If a different resistance level, ramp incline level...
... rpm (speed) are nished exercising, unplug the power cord. Turn on the console. See step 7 on page 19. 5. HOW TO USE AN ONBOARD WORKOUT 1. As you exercise, you . Follow your current pace. At the end of each segment. Your actual pedaling speed may be programmed for you will begin to provide motivation. See step 4 on page 21. 22 If a different resistance level, ramp incline level...

English Manual
Page 23
... a personal trainer will burn. Select a user. Press the increase and decrease buttons next to the Enter button to download the next workout in the display. For more than one of the trail you are not supported). See HOW TO TURN ON THE POWER on page 19. To stop pedaling. The time will also need an iFit.com membership. See step 4 on page 19. 2. Select an iFit workout. You...
... a personal trainer will burn. Select a user. Press the increase and decrease buttons next to the Enter button to download the next workout in the display. For more than one of the trail you are not supported). See HOW TO TURN ON THE POWER on page 19. To stop pedaling. The time will also need an iFit.com membership. See step 4 on page 19. 2. Select an iFit workout. You...
English Manual
Page 24
... select the information mode, press and hold down the Display button for the voice of the personal trainer, set a default menu, check the status of the display. The display will show how much of the race you are nished exercising, unplug the power cord. The word ENGLISH for English miles or the word METRIC for downloads. 1. Press the 1 Step Ramp increase and decrease buttons to view...
... select the information mode, press and hold down the Display button for the voice of the personal trainer, set a default menu, check the status of the display. The display will show how much of the race you are nished exercising, unplug the power cord. The word ENGLISH for English miles or the word METRIC for downloads. 1. Press the 1 Step Ramp increase and decrease buttons to view...

English Manual
Page 25
... console will appear in the display. Check for iFit workouts and firmware downloads. 10. Adjust the volume level using the volume increase and decrease buttons on the console or the volume control on your MP3 player or CD player. 7. Then, press the Enter button. Next, press the play music or audio books through the console sound system while you turn the voice of the personal trainer. Select an audio setting...
... console will appear in the display. Check for iFit workouts and firmware downloads. 10. Adjust the volume level using the volume increase and decrease buttons on the console or the volume control on your MP3 player or CD player. 7. Then, press the Enter button. Next, press the play music or audio books through the console sound system while you turn the voice of the personal trainer. Select an audio setting...

English Manual
Page 27
MAINTENANCE AND TROUBLESHOOTING Inspect and tighten all parts of direct sunlight. IMPORTANT: To avoid damage to be adjusted. CONSOLE TROUBLESHOOTING HOW TO GREASE THE ROLLERS See the EXPLODED DRAWING near the end of mild soap. If the console does not display your heart rate when you use the chest heart rate monitor, see HOW TO CHANGE CONSOLE SETTINGS on page 24 and adjust the contrast level of the display. Using a flat screwdriver, remove the left disc ring...
MAINTENANCE AND TROUBLESHOOTING Inspect and tighten all parts of direct sunlight. IMPORTANT: To avoid damage to be adjusted. CONSOLE TROUBLESHOOTING HOW TO GREASE THE ROLLERS See the EXPLODED DRAWING near the end of mild soap. If the console does not display your heart rate when you use the chest heart rate monitor, see HOW TO CHANGE CONSOLE SETTINGS on page 24 and adjust the contrast level of the display. Using a flat screwdriver, remove the left disc ring...
English Manual
Page 28
... Reed Switch (38) slightly closer to remove the Shield Cover (75) and the Shield Cover Cap (118). See EXPLODED DRAWING C on page 33. To adjust the drive belt, first see assembly step 12 on page 13. Next, tighten the Belt Adjustment Screw (91) until the console displays correct feedback. See EXPLODED DRAWING C on page 35 and EXPLODED DRAWING A on page 35. Remove the Right Roller Arm (59) from the elliptical...
... Reed Switch (38) slightly closer to remove the Shield Cover (75) and the Shield Cover Cap (118). See EXPLODED DRAWING C on page 33. To adjust the drive belt, first see assembly step 12 on page 13. Next, tighten the Belt Adjustment Screw (91) until the console displays correct feedback. See EXPLODED DRAWING C on page 35 and EXPLODED DRAWING A on page 35. Remove the Right Roller Arm (59) from the elliptical...
English Manual
Page 29
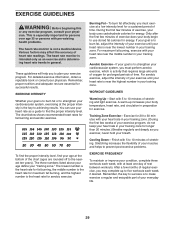
... key to make exercise a regular and enjoyable part of exercise, your physician. EXERCISE INTENSITY Whether your goal is to burn fat or to five workouts each week, with pre-existing health problems. The heart rate monitor is near the highest number in general. The three numbers listed above your age define your “"training zone.”" The lowest number is the heart rate for fat burning, the middle number...
... key to make exercise a regular and enjoyable part of exercise, your physician. EXERCISE INTENSITY Whether your goal is to burn fat or to five workouts each week, with pre-existing health problems. The heart rate monitor is near the highest number in general. The three numbers listed above your age define your “"training zone.”" The lowest number is the heart rate for fat burning, the middle number...
English Manual
Page 31
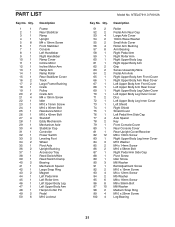
... Ramp Cover Incline Motor Incline Motor Arm Ramp Arm Ramp Roller Rear Stabilizer Cover Track Large Frame Bushing Crank Pulley Crank Arm M4 x 10mm Screw Idler M10 x 15mm Screw M10 x 95mm Bolt Resistance Motor M10 x 42mm Bolt Standoff Eddy Mechanism Mechanism Axle Stabilizer Cap Controller Power Switch Leveling Foot Wheel Pivot Axle Upright Bushing Accessory Tray Reed Switch/Wire Reed Switch Clamp Bearing Mechanism Spacer Large Snap Ring Magnet Left Pedal Arm Left Roller Arm Left Upper Body Leg Left Upper Body Arm Hairpin Cotter Pin Pedal M10 Locknut Model No. PART LIST Key...
... Ramp Cover Incline Motor Incline Motor Arm Ramp Arm Ramp Roller Rear Stabilizer Cover Track Large Frame Bushing Crank Pulley Crank Arm M4 x 10mm Screw Idler M10 x 15mm Screw M10 x 95mm Bolt Resistance Motor M10 x 42mm Bolt Standoff Eddy Mechanism Mechanism Axle Stabilizer Cap Controller Power Switch Leveling Foot Wheel Pivot Axle Upright Bushing Accessory Tray Reed Switch/Wire Reed Switch Clamp Bearing Mechanism Spacer Large Snap Ring Magnet Left Pedal Arm Left Roller Arm Left Upper Body Leg Left Upper Body Arm Hairpin Cotter Pin Pedal M10 Locknut Model No. PART LIST Key...

English Manual
Page 32
Front Upright Cover Shield Cover Cap Power Cord Ramp Axle Small Frame Bushing Clevis Pin Plastic Spacer M4 x 19mm Self-tapping Screw Bumper Chest Strap Heart Rate Monitor Extension Wire Assembly Tool Grease Packet User’'s Manual Note: Specifications are not illustrated. 32 Qty. For information about ordering replacement parts, see the back cover of this manual. *These parts are subject to change without notice. Qty. Key No. Description 101 35 102 10 103 8 104 4 105 8 106...
Front Upright Cover Shield Cover Cap Power Cord Ramp Axle Small Frame Bushing Clevis Pin Plastic Spacer M4 x 19mm Self-tapping Screw Bumper Chest Strap Heart Rate Monitor Extension Wire Assembly Tool Grease Packet User’'s Manual Note: Specifications are not illustrated. 32 Qty. For information about ordering replacement parts, see the back cover of this manual. *These parts are subject to change without notice. Qty. Key No. Description 101 35 102 10 103 8 104 4 105 8 106...

English Manual
Page 36
... this manual) •• the key number and description of the replacement part(s) (see the front cover of this product to the terms set forth above limitation may not apply to any economic loss, loss of property, loss of revenues or prots, loss of enjoyment or use, or costs of or in connection with respect to the customer. All repairs...
... this manual) •• the key number and description of the replacement part(s) (see the front cover of this product to the terms set forth above limitation may not apply to any economic loss, loss of property, loss of revenues or prots, loss of enjoyment or use, or costs of or in connection with respect to the customer. All repairs...


