
Canadian English Manual
Page 6
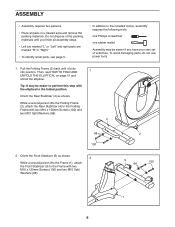
... mallet Assembly may be easier if you nish all parts in the folded position. Tip: It may be easier to perform this step with the elliptical in a cleared area and remove the packing materials. Orient the Rear Stabilizer (4) as shown. 2 While a second person lifts the Frame... Screws (100) and two M10 Split Washers (88). 4 88 100 2. ASSEMBLY •• Assembly requires two persons. •• Place all assembly steps. •• Left are marked “"L”" or “"Left”" and right parts are marked “"R”" or “"Right.”" •...
... mallet Assembly may be easier if you nish all parts in the folded position. Tip: It may be easier to perform this step with the elliptical in a cleared area and remove the packing materials. Orient the Rear Stabilizer (4) as shown. 2 While a second person lifts the Frame... Screws (100) and two M10 Split Washers (88). 4 88 100 2. ASSEMBLY •• Assembly requires two persons. •• Place all assembly steps. •• Left are marked “"L”" or “"Left”" and right parts are marked “"R”" or “"Right.”" •...
Canadian English Manual
Page 10
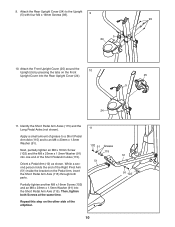
... the bracket on the Pedal Arm, insert the Short Pedal Arm Axle (115) through both Screws at the same time. Apply a small amount of the elliptical. 11 102 91 Grease 115 51 12 91 102 10 While a second person holds the end of the Short Pedal Arm Axle (115). Then, tighten... both parts. Repeat this step on the Front Upright Cover into the Rear Upright Cover (24). 25 5 24 11. Next, partially tighten an M8 x 16mm Screw (102) and the M8...
... the bracket on the Pedal Arm, insert the Short Pedal Arm Axle (115) through both Screws at the same time. Apply a small amount of the elliptical. 11 102 91 Grease 115 51 12 91 102 10 While a second person holds the end of the Short Pedal Arm Axle (115). Then, tighten... both parts. Repeat this step on the Front Upright Cover into the Rear Upright Cover (24). 25 5 24 11. Next, partially tighten an M8 x 16mm Screw (102) and the M8...
Canadian English Manual
Page 11
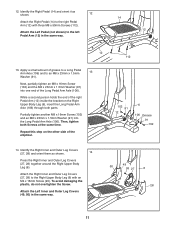
... the end of grease to a Long Pedal Arm Axle (106) and to the Right Upper Body Leg (6) with three M8 x 50mm Screws (112). Repeat this step on the Right Upper Body Leg (6), insert the Long Pedal Arm Axle (106) through both Screws at the same time. To avoid damaging the plastic...) with an M4 x 16mm Screw (93). Partially tighten another M8 x 16mm Screw (102) and an M8 x 23mm x 1.5mm Washer (91) into one end of the elliptical. 112 102 91 12 6 106 Grease 91 102 14. Attach the Right Inner and Outer Leg Covers (27, 28) to an M8 x 23mm x 1.5mm 13...
... the end of grease to a Long Pedal Arm Axle (106) and to the Right Upper Body Leg (6) with three M8 x 50mm Screws (112). Repeat this step on the Right Upper Body Leg (6), insert the Long Pedal Arm Axle (106) through both Screws at the same time. To avoid damaging the plastic...) with an M4 x 16mm Screw (93). Partially tighten another M8 x 16mm Screw (102) and an M8 x 23mm x 1.5mm Washer (91) into one end of the elliptical. 112 102 91 12 6 106 Grease 91 102 14. Attach the Right Inner and Outer Leg Covers (27, 28) to an M8 x 23mm x 1.5mm 13...
Canadian English Manual
Page 12
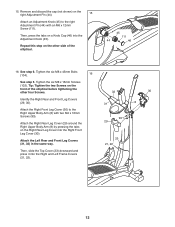
...(8) with an M6 x 12mm Screw (111). Repeat this step on the front of the elliptical. 45 111 44 46 16. Tighten the six M8 x 16mm Screws (102). See step 6. Identify the Right Rear and Front Leg Covers (29, ... (46) into the Adjustment Knob (45). 15. Tighten the six M8 x 45mm Bolts (104). 16 See step 5. Then, press the tabs on the Right Rear Leg Cover into the Right and Left Frame Covers (21, ...30 8 12 Tip: Tighten the two Screws on the other side of the elliptical before tightening the other four Screws. Attach the Left Rear and Front Leg Covers (31, 32) in the...
...(8) with an M6 x 12mm Screw (111). Repeat this step on the front of the elliptical. 45 111 44 46 16. Tighten the six M8 x 16mm Screws (102). See step 6. Identify the Right Rear and Front Leg Covers (29, ... (46) into the Adjustment Knob (45). 15. Tighten the six M8 x 45mm Bolts (104). 16 See step 5. Then, press the tabs on the Right Rear Leg Cover into the Right and Left Frame Covers (21, ...30 8 12 Tip: Tighten the two Screws on the other side of the elliptical before tightening the other four Screws. Attach the Left Rear and Front Leg Covers (31, 32) in the...

Canadian English Manual
Page 16
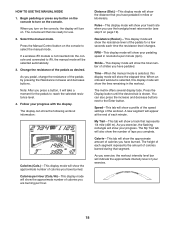
... lowest position. It is in the crank arm. Adjustment Adjustment Pin Bracket Crank Arm HOW TO EXERCISE ON THE ELLIPTICAL To mount the elliptical, hold the upper body arms or the handlebars and step onto the pedal that is recommended that both of the leveling feet under the center of the frame until... to engage the adjustment pin in the direction shown by the arrow; HOW TO ADJUST THE STRIDE LENGTH To adjust the stride length of the elliptical are stationary, step off the lowest pedal. Make sure that you can turn the crank arms in the hole.
... lowest position. It is in the crank arm. Adjustment Adjustment Pin Bracket Crank Arm HOW TO EXERCISE ON THE ELLIPTICAL To mount the elliptical, hold the upper body arms or the handlebars and step onto the pedal that is recommended that both of the leveling feet under the center of the frame until... to engage the adjustment pin in the direction shown by the arrow; HOW TO ADJUST THE STRIDE LENGTH To adjust the stride length of the elliptical are stationary, step off the lowest pedal. Make sure that you can turn the crank arms in the hole.
Canadian English Manual
Page 18
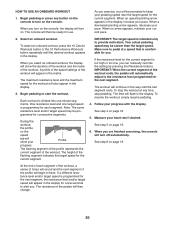
... progress. Press the Display button until the desired tab is selected, this display mode will be ready for use the handgrip heart rate monitor (see step 5 on the console to the Enter button. My Trail—-This tab will show a track that segment. As you turn on the console. When you...
... progress. Press the Display button until the desired tab is selected, this display mode will be ready for use the handgrip heart rate monitor (see step 5 on the console to the Enter button. My Trail—-This tab will show a track that segment. As you turn on the console. When you...
Canadian English Manual
Page 20
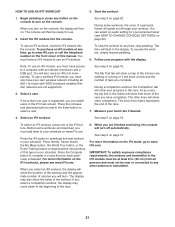
... then be prompted to start the workout. One resistance level and one -minute segments. Make sure to turn off automatically. See step 4 on page 19. 6. See step 5 on page 18. 5. The console will appear in the display, increase your pace. When a downward-pointing arrow appears, ... When you . Note: The same resistance level and/or target speed may be programmed for the current segment is programmed for use. See step 6 on the speed tab will appear in the display. The resistance of the workout. When an upward-pointing arrow appears in the matrix...
... then be prompted to start the workout. One resistance level and one -minute segments. Make sure to turn off automatically. See step 4 on page 19. 6. See step 5 on page 18. 5. The console will appear in the display, increase your pace. When a downward-pointing arrow appears, ... When you . Note: The same resistance level and/or target speed may be programmed for the current segment is programmed for use. See step 6 on the speed tab will appear in the display. The resistance of the workout. When an upward-pointing arrow appears in the matrix...
Canadian English Manual
Page 21
...the matrix will download, you must have access to a computer with SSID broadcast enabled (hidden networks are not supported). 3. To use . 2. See step 4 on page 19. As you select a competition workout, the display may also show your workout. Press the My Trainer button, the My Maps button...of this manual. During some workouts will show other antenna or transmitter. 21 The other lines will then be ready for your schedule. See step 5 on page 20. Press the Compete button to select a user. Start the workout. 1. Follow your own wireless network including an 802...
...the matrix will download, you must have access to a computer with SSID broadcast enabled (hidden networks are not supported). 3. To use . 2. See step 4 on page 19. As you select a competition workout, the display may also show your workout. Press the My Trainer button, the My Maps button...of this manual. During some workouts will show other antenna or transmitter. 21 The other lines will then be ready for your schedule. See step 5 on page 20. Press the Compete button to select a user. Start the workout. 1. Follow your own wireless network including an 802...
Canadian English Manual
Page 22
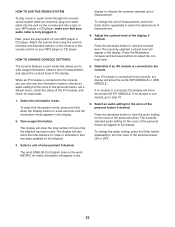
...English miles or the word METRIC for the voice of the personal trainer if desired. The display will appear in miles or kilometers) that the elliptical has been used. Press the Resistance increase and decrease buttons to view the contrast level. If no module is connected to view the audio ... display will show the total number of the personal trainer ON or OFF. 3. To change the unit of measurement, press the Enter button repeatedly to step 10. 6. If an iFit module is connected, go to select the desired unit of the display. Select a unit of measurement. HOW TO CHANGE ...
...English miles or the word METRIC for the voice of the personal trainer if desired. The display will appear in miles or kilometers) that the elliptical has been used. Press the Resistance increase and decrease buttons to view the contrast level. If no module is connected to view the audio ... display will show the total number of the personal trainer ON or OFF. 3. To change the unit of measurement, press the Enter button repeatedly to step 10. 6. If an iFit module is connected, go to select the desired unit of the display. Select a unit of measurement. HOW TO CHANGE ...
Canadian English Manual
Page 24
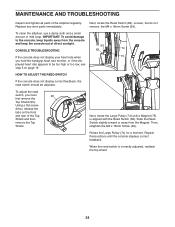
...the top shield. 24 When the reed switch is aligned with the Reed Switch (69). To clean the elliptical, use a damp cloth and a small amount of the elliptical regularly. driver, release the tabs on page 19. Replace any worn parts immediately. MAINTENANCE AND TROUBLESHOOTING Inspect... and tighten all parts of mild soap. HOW TO ADJUST THE REED SWITCH If the console does not display correct feedback, the reed switch should be too high or too low, see step...
...the top shield. 24 When the reed switch is aligned with the Reed Switch (69). To clean the elliptical, use a damp cloth and a small amount of the elliptical regularly. driver, release the tabs on page 19. Replace any worn parts immediately. MAINTENANCE AND TROUBLESHOOTING Inspect... and tighten all parts of mild soap. HOW TO ADJUST THE REED SWITCH If the console does not display correct feedback, the reed switch should be too high or too low, see step...

