

Canadian English Manual
Page 1
Serial Number Decal (under frame) QUESTIONS? www.nordictrack.com Model No. 29843.0 Serial No. If you have questions, or if parts are damaged or missing, PLEASE CONTACT OUR CUSTOMER SERVICE DEPARTMENT DIRECTLY. CALL TOLL-FREE: 1-888-936-4266 Mon.–-Fri. 7:30 until 16:30 ET (excluding holidays) OR E-MAIL US: [email protected] USER’'S MANUAL CAUTION Read all precautions and instructions in the space above for future reference. Keep this equipment. Write the serial number in this manual before using this manual for reference.
Serial Number Decal (under frame) QUESTIONS? www.nordictrack.com Model No. 29843.0 Serial No. If you have questions, or if parts are damaged or missing, PLEASE CONTACT OUR CUSTOMER SERVICE DEPARTMENT DIRECTLY. CALL TOLL-FREE: 1-888-936-4266 Mon.–-Fri. 7:30 until 16:30 ET (excluding holidays) OR E-MAIL US: [email protected] USER’'S MANUAL CAUTION Read all precautions and instructions in the space above for future reference. Keep this equipment. Write the serial number in this manual before using this manual for reference.
Canadian English Manual
Page 2
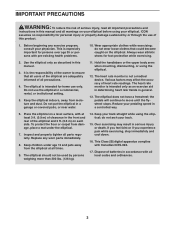
ATTENTION Part # 166295 NORDICTRACK is missing or illegible, see the front cover of ICON IP, Inc. 2 Note: The decal(s) may not be shown at actual size. If a decal is a ... the location shown. TABLE OF CONTENTS WARNING DECAL PLACEMENT 2 IMPORTANT PRECAUTIONS 3 BEFORE YOU BEGIN 4 PART IDENTIFICATION CHART 5 ASSEMBLY 6 HOW TO USE THE ELLIPTICAL 15 MAINTENANCE AND TROUBLESHOOTING 24 EXERCISE GUIDELINES 26 PART LIST 27 EXPLODED DRAWING 29 ORDERING REPLACEMENT PARTS Back Cover LIMITED WARRANTY Back Cover WARNING DECAL PLACEMENT This drawing shows the location...
ATTENTION Part # 166295 NORDICTRACK is missing or illegible, see the front cover of ICON IP, Inc. 2 Note: The decal(s) may not be shown at actual size. If a decal is a ... the location shown. TABLE OF CONTENTS WARNING DECAL PLACEMENT 2 IMPORTANT PRECAUTIONS 3 BEFORE YOU BEGIN 4 PART IDENTIFICATION CHART 5 ASSEMBLY 6 HOW TO USE THE ELLIPTICAL 15 MAINTENANCE AND TROUBLESHOOTING 24 EXERCISE GUIDELINES 26 PART LIST 27 EXPLODED DRAWING 29 ORDERING REPLACEMENT PARTS Back Cover LIMITED WARRANTY Back Cover WARNING DECAL PLACEMENT This drawing shows the location...
Canadian English Manual
Page 3
... of heart rate readings. This Class [B] digital apparatus complies with pre-existing health problems. 10. Before beginning any worn parts immediately. 8. Do not use the elliptical in a controlled way. 6. IMPORTANT PRECAUTIONS WARNING: To reduce the risk of serious injury, read all important precautions and...death. The heart rate monitor is the responsibility of clearance in this manual and all warnings on a level surface, with all parts regularly. The elliptical does not have a freewheel; To protect the floor or carpet from damage, place a mat under age 12 and pets ...
... of heart rate readings. This Class [B] digital apparatus complies with pre-existing health problems. 10. Before beginning any worn parts immediately. 8. Do not use the elliptical in a controlled way. 6. IMPORTANT PRECAUTIONS WARNING: To reduce the risk of serious injury, read all important precautions and...death. The heart rate monitor is the responsibility of clearance in this manual and all warnings on a level surface, with all parts regularly. The elliptical does not have a freewheel; To protect the floor or carpet from damage, place a mat under age 12 and pets ...
Canadian English Manual
Page 4
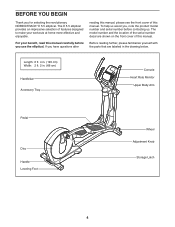
...this manual carefully before you , note the product model number and serial number before contacting us assist you use the elliptical. If you for selecting the revolutionary NORDICTRACK® E 5.5 elliptical. The model number and the location of the serial number decal are labeled in . (66 cm) Handlebar Accessory Tray...have questions after reading this manual, please see the front cover of this manual. Before reading further, please familiarize yourself with the parts that are shown on the front cover of this manual. Length: 6 ft. 4 in. (193 cm) Width: 2 ft. 2 in the ...
...this manual carefully before you , note the product model number and serial number before contacting us assist you use the elliptical. If you for selecting the revolutionary NORDICTRACK® E 5.5 elliptical. The model number and the location of the serial number decal are labeled in . (66 cm) Handlebar Accessory Tray...have questions after reading this manual, please see the front cover of this manual. Before reading further, please familiarize yourself with the parts that are shown on the front cover of this manual. Length: 6 ft. 4 in. (193 cm) Width: 2 ft. 2 in the ...
Canadian English Manual
Page 5
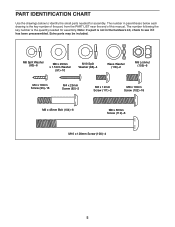
... it has been preassembled. The number in the hardware kit, check to identify the small parts needed for assembly. Extra parts may be included. The number following the key number is the key number of the part, from the PART LIST near the end of this manual. M8 Split Washer (83)–-6 M8 x 23mm... x 12mm Screw (111)–-2 M8 x 16mm Screw (102)–-18 M8 x 45mm Bolt (104)–-6 M8 x 50mm Screw (112)–-6 M10 x 120mm Screw (100)–-4 5 PART IDENTIFICATION CHART Use the drawings below each drawing is the quantity needed for assembly.
... it has been preassembled. The number in the hardware kit, check to identify the small parts needed for assembly. Extra parts may be included. The number following the key number is the key number of the part, from the PART LIST near the end of this manual. M8 Split Washer (83)–-6 M8 x 23mm... x 12mm Screw (111)–-2 M8 x 16mm Screw (102)–-18 M8 x 45mm Bolt (104)–-6 M8 x 50mm Screw (112)–-6 M10 x 120mm Screw (100)–-4 5 PART IDENTIFICATION CHART Use the drawings below each drawing is the quantity needed for assembly.
Canadian English Manual
Page 6
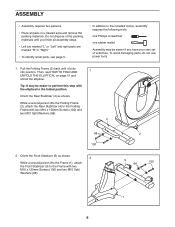
To avoid damaging parts, do not use power tools. 1. Then, see page 5. •• In addition to the Frame with the elliptical in a cleared area and remove the packing materials. Orient the Rear Stabilizer (4) as shown. 2 While a second person lifts the Frame (1), attach the ... are marked “"L”" or “"Left”" and right parts are marked “"R”" or “"Right.”" •• To identify small parts, see HOW TO FOLD AND 1 UNFOLD THE ELLIPTICAL on page 15 and unfold the elliptical. Pull the Folding Frame (2) back until you have your own set...
To avoid damaging parts, do not use power tools. 1. Then, see page 5. •• In addition to the Frame with the elliptical in a cleared area and remove the packing materials. Orient the Rear Stabilizer (4) as shown. 2 While a second person lifts the Frame (1), attach the ... are marked “"L”" or “"Left”" and right parts are marked “"R”" or “"Right.”" •• To identify small parts, see HOW TO FOLD AND 1 UNFOLD THE ELLIPTICAL on page 15 and unfold the elliptical. Pull the Folding Frame (2) back until you have your own set...
Canadian English Manual
Page 10
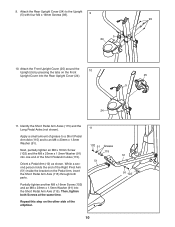
... Cover (24). 25 5 24 11. Next, partially tighten an M8 x 16mm Screw (102) and the M8 x 23mm x 1.5mm Washer (91) into one end of the elliptical. 11 102 91 Grease 115 51 12 91 102 10 While a second person holds the end of the Right Pivot Arm (51) inside the bracket... (115). 9. Repeat this step on the Pedal Arm, insert the Short Pedal Arm Axle (115) through both Screws at the same time. Then, tighten both parts. Orient a Pedal Arm (12) as shown. Attach the Rear Upright Cover (24) to an M8 x 23mm x 1.5mm Washer (91). Attach the Front Upright Cover (25...
... Cover (24). 25 5 24 11. Next, partially tighten an M8 x 16mm Screw (102) and the M8 x 23mm x 1.5mm Washer (91) into one end of the elliptical. 11 102 91 Grease 115 51 12 91 102 10 While a second person holds the end of the Right Pivot Arm (51) inside the bracket... (115). 9. Repeat this step on the Pedal Arm, insert the Short Pedal Arm Axle (115) through both Screws at the same time. Then, tighten both parts. Orient a Pedal Arm (12) as shown. Attach the Rear Upright Cover (24) to an M8 x 23mm x 1.5mm Washer (91). Attach the Front Upright Cover (25...
Canadian English Manual
Page 11
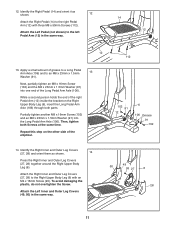
... on the Right Upper Body Leg (6), insert the Long Pedal Arm Axle (106) through both Screws at the same time. Apply a small amount of the elliptical. 112 102 91 12 6 106 Grease 91 102 14. Partially tighten another M8 x 16mm Screw (102) and an M8 x 23mm x 1.5mm Washer (91) into one... orient it as shown. 14 Press the Right Inner and Outer Leg Covers (27, 28) together around the Right Upper Body Leg (6). Then, tighten both parts. Next, partially tighten an M8 x 16mm Screw (102) and the M8 x 23mm x 1.5mm Washer (91) into the Long Pedal Arm Axle (106). 12. Attach ...
... on the Right Upper Body Leg (6), insert the Long Pedal Arm Axle (106) through both Screws at the same time. Apply a small amount of the elliptical. 112 102 91 12 6 106 Grease 91 102 14. Partially tighten another M8 x 16mm Screw (102) and an M8 x 23mm x 1.5mm Washer (91) into one... orient it as shown. 14 Press the Right Inner and Outer Leg Covers (27, 28) together around the Right Upper Body Leg (6). Then, tighten both parts. Next, partially tighten an M8 x 16mm Screw (102) and the M8 x 23mm x 1.5mm Washer (91) into the Long Pedal Arm Axle (106). 12. Attach ...
Canadian English Manual
Page 14
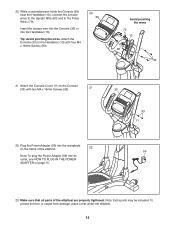
... Power Adapter (59) into the receptacle on the frame of the elliptical are properly tightened. 20. Note: Extra parts may be included. To protect the floor or carpet from damage, place a mat under the elliptical. 14 Make sure that all parts of the elliptical. 22 59 Note: To plug the Power Adapter (59) into the...
... Power Adapter (59) into the receptacle on the frame of the elliptical are properly tightened. 20. Note: Extra parts may be included. To protect the floor or carpet from damage, place a mat under the elliptical. 14 Make sure that all parts of the elliptical. 22 59 Note: To plug the Power Adapter (59) into the...
Canadian English Manual
Page 24
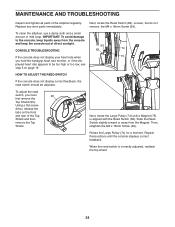
...the Large Pulley (74) for a moment. When the reed switch is aligned with the Reed Switch (69). To clean the elliptical, use a damp cloth and a small amount of the elliptical regularly. Repeat these actions until a Magnet (75) is correctly adjusted, reattach the top shield. 24 Loosen, but do not... rate appears to the console, keep liquids away from the Magnet. Then, retighten the M4 x 16mm Screw (93). Replace any worn parts immediately. CONSOLE TROUBLESHOOTING 93 69 74 If the console does not display your heart rate when 75 you must 20 first remove the Top ...
...the Large Pulley (74) for a moment. When the reed switch is aligned with the Reed Switch (69). To clean the elliptical, use a damp cloth and a small amount of the elliptical regularly. Repeat these actions until a Magnet (75) is correctly adjusted, reattach the top shield. 24 Loosen, but do not... rate appears to the console, keep liquids away from the Magnet. Then, retighten the M4 x 16mm Screw (93). Replace any worn parts immediately. CONSOLE TROUBLESHOOTING 93 69 74 If the console does not display your heart rate when 75 you must 20 first remove the Top ...
Canadian English Manual
Page 26
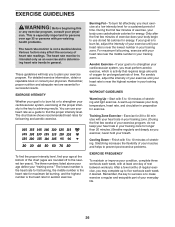
... after the first few minutes of time. Aerobic Exercise—-If your goal is to strengthen your body begin to make exercise a regular and enjoyable part of oxygen for energy. Training Zone Exercise—-Exercise for 20 to find your training zone. never hold your heart rate as a guide to 30...
... after the first few minutes of time. Aerobic Exercise—-If your goal is to strengthen your body begin to make exercise a regular and enjoyable part of oxygen for energy. Training Zone Exercise—-Exercise for 20 to find your training zone. never hold your heart rate as a guide to 30...
Canadian English Manual
Page 27
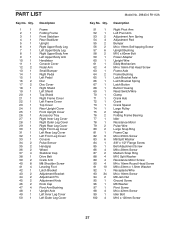
PART LIST Key No. Qty. 51 1 52 1 53 2 54 4 55 2 56 2 57 6 58 2 59 1 60 1 61 1 62 4 63 1 64 2 65 1 66 1 67 1 68 1 69 1 70 1 71 1 ...
PART LIST Key No. Qty. 51 1 52 1 53 2 54 4 55 2 56 2 57 6 58 2 59 1 60 1 61 1 62 4 63 1 64 2 65 1 66 1 67 1 68 1 69 1 70 1 71 1 ...
Canadian English Manual
Page 28
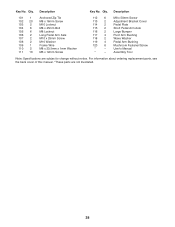
... Bushing Wave Washer Pedal Arm Bushing Mushroom Fastener/Screw User·s Manual Assembly Tool Note: Specifications are not illustrated. 28 For information about ordering replacement parts, see the back cover of this manual. *These parts are subject to change without notice. Key No. Description Key No. Qty. Qty.
... Bushing Wave Washer Pedal Arm Bushing Mushroom Fastener/Screw User·s Manual Assembly Tool Note: Specifications are not illustrated. 28 For information about ordering replacement parts, see the back cover of this manual. *These parts are subject to change without notice. Key No. Description Key No. Qty. Qty.

Canadian English Manual
Page 32
...if the product is in lieu of any kind. Jérôme, QC J7Y 4B8 Part No. 337360 R1112A Printed in this warranty is not responsible or liable for a minimal trip charge. Parts and labor are shipped while the product is warranted for one of its authorized service centers.... cover of this manual) •• the key number and description of the replacement part(s) (see the front cover of this product to province. ORDERING REPLACEMENT PARTS To order replacement parts, please see the PART LIST and the EXPLODED DRAWING near the end of this manual) LIMITED WARRANTY ICON of ...
...if the product is in lieu of any kind. Jérôme, QC J7Y 4B8 Part No. 337360 R1112A Printed in this warranty is not responsible or liable for a minimal trip charge. Parts and labor are shipped while the product is warranted for one of its authorized service centers.... cover of this manual) •• the key number and description of the replacement part(s) (see the front cover of this product to province. ORDERING REPLACEMENT PARTS To order replacement parts, please see the PART LIST and the EXPLODED DRAWING near the end of this manual) LIMITED WARRANTY ICON of ...


