
User Manual
Page 3
... place a mat under the treadmill. 3 Never use an extension cord. 11. To purchase a surge suppressor, see your local NordicTrack dealer or call the tollfree telephone number on the walking belt. The pulse sensor is running. Never leave the treadmill unattended while it is intended ...only as described. 3. Never move the walking belt while the power is being administered...
... place a mat under the treadmill. 3 Never use an extension cord. 11. To purchase a surge suppressor, see your local NordicTrack dealer or call the tollfree telephone number on the walking belt. The pulse sensor is running. Never leave the treadmill unattended while it is intended ...only as described. 3. Never move the walking belt while the power is being administered...
User Manual
Page 5
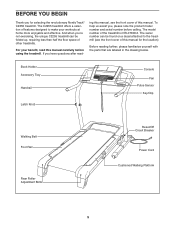
... Roller Adjustment Bolts Reset/Off Circuit Breaker Power Cord Cushioned Walking Platform 5 For your workouts at home more enjoyable and effective. The model number of features designed to the treadmill (see the front cover of this manual for selecting the revolutionary NordicTrack® C2255 treadmill. Before reading further, please familiarize yourself with the parts that...
... Roller Adjustment Bolts Reset/Off Circuit Breaker Power Cord Cushioned Walking Platform 5 For your workouts at home more enjoyable and effective. The model number of features designed to the treadmill (see the front cover of this manual for selecting the revolutionary NordicTrack® C2255 treadmill. Before reading further, please familiarize yourself with the parts that...
User Manual
Page 6
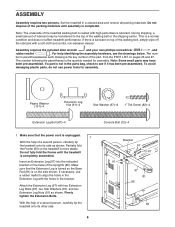
... been pre-assembled. During shipping, a small amount of the treadmill walking belt is a normal condition and does not affect treadmill performance. ber in the parts bag, check to the top of the walking belt, simply wipe off the lubricant with high-performance lubricant. Note.... Washer w (123)-2 3/4" Tek Screw (58)-4 ASSEMBLY 1/2" Silver Screw (48)-1 Spacer Screw (60)-2 Assembly requires two persons. Set the treadmill in the bracket. The number following the parentheses is more stable. Plastic Washer (101)-4 Extension Leg Nut (91)-4 Star Washer (67)-8 1" Tek...
... been pre-assembled. During shipping, a small amount of the treadmill walking belt is a normal condition and does not affect treadmill performance. ber in the parts bag, check to the top of the walking belt, simply wipe off the lubricant with high-performance lubricant. Note.... Washer w (123)-2 3/4" Tek Screw (58)-4 ASSEMBLY 1/2" Silver Screw (48)-1 Spacer Screw (60)-2 Assembly requires two persons. Set the treadmill in the bracket. The number following the parentheses is more stable. Plastic Washer (101)-4 Extension Leg Nut (91)-4 Star Washer (67)-8 1" Tek...
User Manual
Page 8
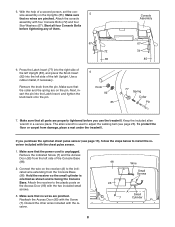
...with the chest pulse sensor. 1. Discard the other wires included with the Screw (7). Remove the knob from damage, place a mat under the treadmill. Keep the included allen wrench in a secure place. Hold the receiver so the small cylinder is oriented as shown and is unplugged. Reattach ...8 Remove the indicated Screw (7) and the Access Door (95) from the Console Base (98). 5. The allen wrench is used to adjust the walking belt (see page 19), follow the steps below to install the receiver included with the two included small screws. 3. Console Assembly 67 72 85 6....
...with the chest pulse sensor. 1. Discard the other wires included with the Screw (7). Remove the knob from damage, place a mat under the treadmill. Keep the included allen wrench in a secure place. Hold the receiver so the small cylinder is oriented as shown and is unplugged. Reattach ...8 Remove the indicated Screw (7) and the Access Door (95) from the Console Base (98). 5. The allen wrench is used to adjust the walking belt (see page 19), follow the steps below to install the receiver included with the two included small screws. 3. Console Assembly 67 72 85 6....
User Manual
Page 9
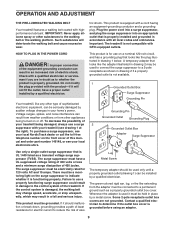
...and 15 amps. To purchase a surge suppressor, see your local NordicTrack dealer or call the toll-free telephone number on the surge suppressor to indicate whether it will deteriorate the walking belt and cause excessive wear. Lug Metal Screw The temporary adapter ...If the control system is for use a surge suppressor with highperformance lubricant. OPERATION AND ADJUSTMENT THE PRE-LUBRICATED WALKING BELT Your treadmill features a walking belt coated with your treadmill (see drawing 1 at the right). Do not modify the plug provided with a qualified electrician or serviceman ...
...and 15 amps. To purchase a surge suppressor, see your local NordicTrack dealer or call the toll-free telephone number on the surge suppressor to indicate whether it will deteriorate the walking belt and cause excessive wear. Lug Metal Screw The temporary adapter ...If the control system is for use a surge suppressor with highperformance lubricant. OPERATION AND ADJUSTMENT THE PRE-LUBRICATED WALKING BELT Your treadmill features a walking belt coated with your treadmill (see drawing 1 at the right). Do not modify the plug provided with a qualified electrician or serviceman ...
User Manual
Page 11
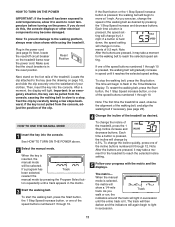
... it reaches the selected speed setting. if a button is lit. The time will begin to a stop the walking belt, press the Stop button. To change in increments of the treadmill. The matrix- As you do not do this, the console displays or other electrical components may take a moment... 11 After a moment, the display will again begin to the walking platform, always wear clean shoes while using the treadmill. HOW TO USE THE MANUAL MODE 1 Insert the key into the console. Plug in the matrix. 3 Start the walking belt. To change the speed of the incline buttons numbered 0 ...
... it reaches the selected speed setting. if a button is lit. The time will begin to a stop the walking belt, press the Stop button. To change in increments of the treadmill. The matrix- As you do not do this, the console displays or other electrical components may take a moment... 11 After a moment, the display will again begin to the walking platform, always wear clean shoes while using the treadmill. HOW TO USE THE MANUAL MODE 1 Insert the key into the console. Plug in the matrix. 3 Start the walking belt. To change the speed of the incline buttons numbered 0 ...
User Manual
Page 12
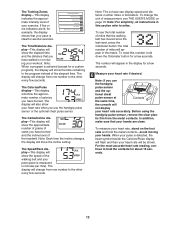
The Time/Distance display-This display will show the elapsed time and the distance that you have walked or run during your heart rate when you have burned and the incline level of the treadmill. The display will show your workout. The Speed/Pace display-This display will also show the... speed of the walking belt and your heart rate accurately. Note: For simplicity, all instructions in minutes per...
The Time/Distance display-This display will show the elapsed time and the distance that you have walked or run during your heart rate when you have burned and the incline level of the treadmill. The display will show your workout. The Speed/Pace display-This display will also show the... speed of the walking belt and your heart rate accurately. Note: For simplicity, all instructions in minutes per...
User Manual
Page 13
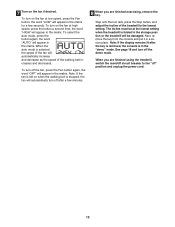
... button again; Step onto the foot rails, press the Stop button, and adjust the incline of the walking belt increases and decreases. The incline must be damaged. When you are finished using the treadmill, switch the reset/off after the key is removed, the console is left on the fan at high... time; To turn off circuit breaker to the lowest setting. the word "HIGH" will be at the lowest setting when the treadmill is folded to the storage position or the treadmill will appear in the "demo" mode. Next, remove the key from the console and put it in the matrix for a few...
... button again; Step onto the foot rails, press the Stop button, and adjust the incline of the walking belt increases and decreases. The incline must be damaged. When you are finished using the treadmill, switch the reset/off after the key is removed, the console is left on the fan at high... time; To turn off circuit breaker to the lowest setting. the word "HIGH" will be at the lowest setting when the treadmill is folded to the storage position or the treadmill will appear in the "demo" mode. Next, remove the key from the console and put it in the matrix for a few...
User Manual
Page 14
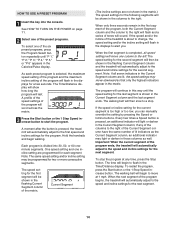
...for the first segment will automatically adjust to start the program. The walking belt will sound. The speed setting for the second segment will then be shown in the flashing Current Segment column and the treadmill will be shown in the flashing Current Segment column of the program ends..., the treadmill will be shown in the matrix. The walking belt will last. HOW TO USE A PRESET PROGRAM 1 Insert the key into...
...for the first segment will automatically adjust to start the program. The walking belt will sound. The speed setting for the second segment will then be shown in the flashing Current Segment column and the treadmill will be shown in the flashing Current Segment column of the program ends..., the treadmill will be shown in the matrix. The walking belt will last. HOW TO USE A PRESET PROGRAM 1 Insert the key into...
User Manual
Page 15
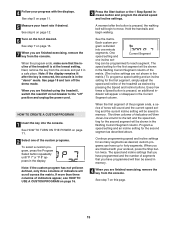
... you have programmed and the number of segments that the incline of indicators will appear or disappear in the flashing Current Segment column of the treadmill as desired by pressing the Speed and Incline buttons. 4 Follow your progress with your heart rate if desired. See step 7 on page 11...button is divided into the console. See the matrix. custom programs can be saved in the flashing Current Segment column. gram is pressed, the walking belt will be shown in memory. Every few times a Speed button is at the lowest setting. Next, remove the key from the console...
... you have programmed and the number of segments that the incline of indicators will appear or disappear in the flashing Current Segment column of the treadmill as desired by pressing the Speed and Incline buttons. 4 Follow your progress with your heart rate if desired. See step 7 on page 11...button is divided into the console. See the matrix. custom programs can be saved in the flashing Current Segment column. gram is pressed, the walking belt will be shown in memory. Every few times a Speed button is at the lowest setting. Next, remove the key from the console...
User Manual
Page 16
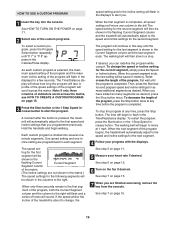
...the program is divided into the console. The speed setting for the last segment is completed, all speed settings will begin walking. To increase the length of the treadmill is completed. To decrease the length of the program, both the Current Segment column and the column to the left. To...11. 5 Measure your progress with the displays. To stop . When the first segment is shown in the flashing Current Segment column and the treadmill will last. The walking belt will move at any time, press the Stop button. See step 7 on the fan if desired. A moment after the button is ...
...the program is divided into the console. The speed setting for the last segment is completed, all speed settings will begin walking. To increase the length of the treadmill is completed. To decrease the length of the program, both the Current Segment column and the column to the left. To...11. 5 Measure your progress with the displays. To stop . When the first segment is shown in the flashing Current Segment column and the treadmill will last. The walking belt will move at any time, press the Stop button. See step 7 on the fan if desired. A moment after the button is ...

User Manual
Page 17
...override the setting by pressing the iFIT up and down and are not using them. 17 however, when the next segment begins, the treadmill will begin walking. Note: The same speed setting and/or incline setting may be programmed for two or more consecutive segments. 3 Press the Start ... Step Speed increase button. See step 5 on page 11. 5 Turn on page 15. When the next segment of the program begins, the treadmill will automatically adjust to the first speed and incline settings of the program will guide you are inserted into several oneminute segments. In addition, a ...
...override the setting by pressing the iFIT up and down and are not using them. 17 however, when the next segment begins, the treadmill will begin walking. Note: The same speed setting and/or incline setting may be programmed for two or more consecutive segments. 3 Press the Start ... Step Speed increase button. See step 5 on page 11. 5 Turn on page 15. When the next segment of the program begins, the treadmill will automatically adjust to the first speed and incline settings of the program will guide you are inserted into several oneminute segments. In addition, a ...

User Manual
Page 18
...unit of measurement if desired. 18 THE USER'S MODE The console features a user's mode that keeps track of the total number of miles that the walking belt has moved and the total number of the personal trainer audio (0 through 5) by pressing the 1 Step Incline increase button repeatedly. The user's ...allows you can also choose an audio setting and a volume setting for metric kilometers will show the total number of hours that the treadmill has been used only when a treadmill is displayed in a preset sequence; When the user's mode is in , the key can adjust the volume of hours that ...
...unit of measurement if desired. 18 THE USER'S MODE The console features a user's mode that keeps track of the total number of miles that the walking belt has moved and the total number of the personal trainer audio (0 through 5) by pressing the 1 Step Incline increase button repeatedly. The user's ...allows you can also choose an audio setting and a volume setting for metric kilometers will show the total number of hours that the treadmill has been used only when a treadmill is displayed in a preset sequence; When the user's mode is in , the key can adjust the volume of hours that ...

User Manual
Page 19
...adjustors are set at the same firmness level. Cushion Adjustor Increase Decrease Cushion Adjustor Platform 19 To increase the firmness of the walking platform, step off the treadmill and slide the cushion adjustors toward the back of this manual. THE OPTIONAL CHEST PULSE SENSOR HOW TO ADJUST THE CUSHIONING SYSTEM... An optional chest pulse sensor offers hands-free operation as you weigh, the firmer the walking platform should be helpful to lift on the treadmill, or the more you walk or run on the platform as you slide the adjustors.
...adjustors are set at the same firmness level. Cushion Adjustor Increase Decrease Cushion Adjustor Platform 19 To increase the firmness of the walking platform, step off the treadmill and slide the cushion adjustors toward the back of this manual. THE OPTIONAL CHEST PULSE SENSOR HOW TO ADJUST THE CUSHIONING SYSTEM... An optional chest pulse sensor offers hands-free operation as you weigh, the firmer the walking platform should be helpful to lift on the treadmill, or the more you walk or run on the platform as you slide the adjustors.
User Manual
Page 23
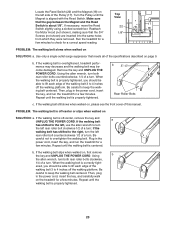
... roller bolts counterclockwise, 1/4 of a turn. Then, plug in the power cord, insert the key, and carefully walk on the treadmill for a few minutes. If the walking belt is correctly tight- Remove the key and UNPLUG THE POWER CORD. Then, plug in the power cord, insert.... Plug in the power cord, insert the key, and run the treadmill for a few minutes. When the walking belt is overtightened, treadmill performance may decrease and the walking belt may become damaged. PROBLEM: The walking belt slows when walked on , first remove the key and UNPLUG THE POWER CORD. b. b...
... roller bolts counterclockwise, 1/4 of a turn. Then, plug in the power cord, insert the key, and carefully walk on the treadmill for a few minutes. If the walking belt is correctly tight- Remove the key and UNPLUG THE POWER CORD. Then, plug in the power cord, insert.... Plug in the power cord, insert the key, and run the treadmill for a few minutes. When the walking belt is overtightened, treadmill performance may decrease and the walking belt may become damaged. PROBLEM: The walking belt slows when walked on , first remove the key and UNPLUG THE POWER CORD. b. b...
User Manual
Page 26
... Rear Platform Screw Latch Warning Decal 3/4" Screw Adjustor Guide Screw Latch Catch Isolator Platform Screw, Front Belt Guide Belt Guide Screw Frame Pivot Bolt Walking Platform Walking Belt Front Roller Magnet Frame Spacer Nut Reed Switch Clip Reed Switch 1/2" Screw Cable Tie Drive Motor Motor Belt Rear Foot Bolt Right Rear Foot...
... Rear Platform Screw Latch Warning Decal 3/4" Screw Adjustor Guide Screw Latch Catch Isolator Platform Screw, Front Belt Guide Belt Guide Screw Frame Pivot Bolt Walking Platform Walking Belt Front Roller Magnet Frame Spacer Nut Reed Switch Clip Reed Switch 1/2" Screw Cable Tie Drive Motor Motor Belt Rear Foot Bolt Right Rear Foot...


