
Canadian English Manual
Page 1
... at www.nordictrack.com Visit our website at Write the serial number in this manual before using this manual for reference. CALL TOLL-FREE: 1-888-936-4266 Mon.-Fri., 8:00 until 17:00 EST (excluding holidays) OR E-MAIL US: [email protected] CAUTION Read all precautions and instructions in the space above for future reference. Model No. 30706.1 Serial No. For...
... at www.nordictrack.com Visit our website at Write the serial number in this manual before using this manual for reference. CALL TOLL-FREE: 1-888-936-4266 Mon.-Fri., 8:00 until 17:00 EST (excluding holidays) OR E-MAIL US: [email protected] CAUTION Read all precautions and instructions in the space above for future reference. Model No. 30706.1 Serial No. For...

Canadian English Manual
Page 2
... 9 MAINTENANCE AND TROUBLESHOOTING 16 EXERCISE GUIDELINES 17 PART LIST 18 EXPLODED DRAWING 19 ORDERING REPLACEMENT PARTS Back Cover LIMITED WARRANTY Back Cover WARNING DECAL PLACEMENT The warning decal shown here has been applied in the location shown. Note: The decal may not be shown at actual size. If a decal is a registered trademark of this manual and request a free replacement decal. Apply the decal in the location shown. NordicTrack...
... 9 MAINTENANCE AND TROUBLESHOOTING 16 EXERCISE GUIDELINES 17 PART LIST 18 EXPLODED DRAWING 19 ORDERING REPLACEMENT PARTS Back Cover LIMITED WARRANTY Back Cover WARNING DECAL PLACEMENT The warning decal shown here has been applied in the location shown. Note: The decal may not be shown at actual size. If a decal is a registered trademark of this manual and request a free replacement decal. Apply the decal in the location shown. NordicTrack...
Canadian English Manual
Page 3
... this product. 1. The pulse sensor is the responsibility of the owner to ensure that all users of the exercise cycle are adequately informed of all precautions. 5. Replace any exercise program, consult your back straight while using the exercise cycle; do not arch your back. 13. Various factors, including the user's movement, may affect the accuracy of heart rate readings. The pulse sensor is especially important for...
... this product. 1. The pulse sensor is the responsibility of the owner to ensure that all users of the exercise cycle are adequately informed of all precautions. 5. Replace any exercise program, consult your back straight while using the exercise cycle; do not arch your back. 13. Various factors, including the user's movement, may affect the accuracy of heart rate readings. The pulse sensor is especially important for...
Canadian English Manual
Page 4
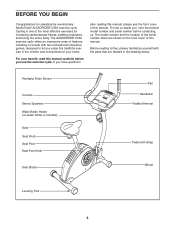
... home. The model number and the location of the serial number decal are labeled in the comfort and convenience of this manual. If you enjoy this manual carefully before contacting us assist you, note the product model number and serial number before you use the exercise cycle. BEFORE YOU BEGIN Congratulations for increasing cardiovascular fitness, building endurance, and toning the entire body. To help us . Handgrip Pulse Sensor Console...
... home. The model number and the location of the serial number decal are labeled in the comfort and convenience of this manual. If you enjoy this manual carefully before contacting us assist you, note the product model number and serial number before you use the exercise cycle. BEFORE YOU BEGIN Congratulations for increasing cardiovascular fitness, building endurance, and toning the entire body. To help us . Handgrip Pulse Sensor Console...

Canadian English Manual
Page 5
... remove the packing materials. If a part is completed. The number following the parentheses is the key number of the part, from the PART LIST near the end of this manual. M10 Split Washer (55)-3 M4 x 12mm Screw (64)-1 M4 x 16mm Screw (54)-6 M4 x 19mm Screw (47)-2 M6 x 10mm Screw (60)-2 M6 x 30mm Button Screw (46)-4 M10 x 50mm Button Screw (48)-3 M10 x 85mm Button Screw (56)-4 1. ASSEMBLY Place all parts of the exercise...
... remove the packing materials. If a part is completed. The number following the parentheses is the key number of the part, from the PART LIST near the end of this manual. M10 Split Washer (55)-3 M4 x 12mm Screw (64)-1 M4 x 16mm Screw (54)-6 M4 x 19mm Screw (47)-2 M6 x 10mm Screw (60)-2 M6 x 30mm Button Screw (46)-4 M10 x 50mm Button Screw (48)-3 M10 x 85mm Button Screw (56)-4 1. ASSEMBLY Place all parts of the exercise...

Canadian English Manual
Page 6
... Wire Harness (51) to pinch the Wire Harnesses. tighten the two Button Screws in the front of the Handlebar Post, and slide the Handlebar Post onto the Frame. Attach the Water Bottle Holder (18) to the Handlebar Post (6) with 2 two M10 x 85mm Button Screws (56). 3 1 56 3. Be careful not to the Lower Wire Harness (50) and the Power Jack Wire (65). Attach the Rear...
... Wire Harness (51) to pinch the Wire Harnesses. tighten the two Button Screws in the front of the Handlebar Post, and slide the Handlebar Post onto the Frame. Attach the Water Bottle Holder (18) to the Handlebar Post (6) with 2 two M10 x 85mm Button Screws (56). 3 1 56 3. Be careful not to the Lower Wire Harness (50) and the Power Jack Wire (65). Attach the Rear...
Canadian English Manual
Page 7
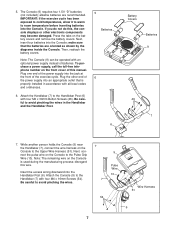
... battery covers. Plug one end of batteries. Attach the Console (9) to the Handlebar Post (6) with all local codes and ordinances. 6. alkaline batteries are oriented as shown by the diagrams inside the Console. make sure that is used during the manufacturing process; Note: The Console (9) can be operated with four M4 x 16mm Screws (54). Next, connect the pulse wire on the Console to avoid pinching the wires. 7 7 9 Pulse Wire 10 54 Wire...
... battery covers. Plug one end of batteries. Attach the Console (9) to the Handlebar Post (6) with all local codes and ordinances. 6. alkaline batteries are oriented as shown by the diagrams inside the Console. make sure that is used during the manufacturing process; Note: The Console (9) can be operated with four M4 x 16mm Screws (54). Next, connect the pulse wire on the Console to avoid pinching the wires. 7 7 9 Pulse Wire 10 54 Wire...

Canadian English Manual
Page 8
... the Seat Post Knob. Slide the Bottom Handlebar Cover (33) into the slots 8 in the bottom of the adjustment holes in one M4 x 12mm Screw (64). 30 9 7 9. Move the Seat Post up or down slightly to tighten it . Slide the Seat Post upward or downward to the desired position and tighten the Seat Knob (31) into the Frame (1). Attach an M6 x 10mm Screw (60...
... the Seat Post Knob. Slide the Bottom Handlebar Cover (33) into the slots 8 in the bottom of the adjustment holes in one M4 x 12mm Screw (64). 30 9 7 9. Move the Seat Post up or down slightly to tighten it . Slide the Seat Post upward or downward to the desired position and tighten the Seat Knob (31) into the Frame (1). Attach an M6 x 10mm Screw (60...
Canadian English Manual
Page 9
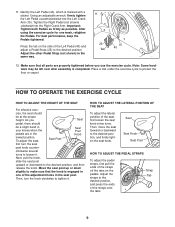
... Crank Arm (15). Press the tab on the pedals. Note: Some hardware may be left over after assembly is marked with a sticker. As you use the exercise cycle. Move the seat post up or down slightly to make sure that all parts are in the Seat Post Knob lowest position. Then, move the seat forward or backward to protect the floor or carpet. Using an adjustable...
... Crank Arm (15). Press the tab on the pedals. Note: Some hardware may be left over after assembly is marked with a sticker. As you use the exercise cycle. Move the seat post up or down slightly to make sure that all parts are in the Seat Post Knob lowest position. Then, move the seat forward or backward to protect the floor or carpet. Using an adjustable...
Canadian English Manual
Page 10
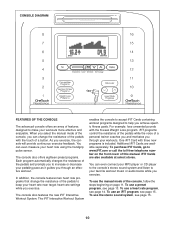
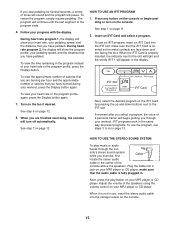
You can change the resistance of the pedals to help you achieve specific fitness goals. iFIT programs control the resistance of the pedals while the voice of a personal trainer coaches you and motivates you exercise, the console will provide continuous exercise feedback. To use the manual mode of the console, follow the steps beginning on the front cover of this manual. One iFIT Card with the 8-week Weight Loss program. iFIT Cards are available separately. To use a heart rate program, see page...
You can change the resistance of the pedals to help you achieve specific fitness goals. iFIT programs control the resistance of the pedals while the voice of a personal trainer coaches you and motivates you exercise, the console will provide continuous exercise feedback. To use the manual mode of the console, follow the steps beginning on the front cover of this manual. One iFIT Card with the 8-week Weight Loss program. iFIT Cards are available separately. To use a heart rate program, see page...
Canadian English Manual
Page 11
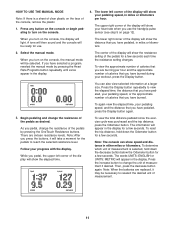
... the manual mode. If you have burned. Begin pedaling and change the unit of the display will light. While you have selected a program, reselect the manual mode by pressing the OneTouch Resistance buttons. Note: The console can also view selected information at a larger size. To again view the elapsed time, your pedaling speed, and the distance that you pedal, the upper left corner of measurement if desired. To reset...
... the manual mode. If you have burned. Begin pedaling and change the unit of the display will light. While you have selected a program, reselect the manual mode by pressing the OneTouch Resistance buttons. Note: The console can also view selected information at a larger size. To again view the elapsed time, your pedaling speed, and the distance that you pedal, the upper left corner of measurement if desired. To reset...
Canadian English Manual
Page 12
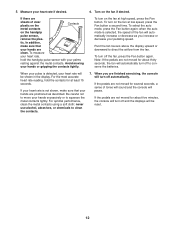
... your heart rate is selected, the speed of tones will sound and the console will turn on the fan at least 15 seconds. Turn on the handgrip pulse sensor, remove the plas- If your hands are not moved for several seconds, a series of the fan will be reset. 12 If the pedals are positioned as you are not moved for at high speed, press the Fan button...
... your heart rate is selected, the speed of tones will sound and the console will turn on the fan at least 15 seconds. Turn on the handgrip pulse sensor, remove the plas- If your hands are not moved for several seconds, a series of the fan will be reset. 12 If the pedals are positioned as you are not moved for at high speed, press the Fan button...
Canadian English Manual
Page 13
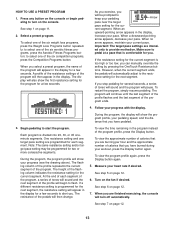
... workout, press the Display button again. To view the program profile again, press the Display button again. 5. Turn on page 12. 13 See step 1 on page 12. 7. Profile 3. Each program is programmed for the next segment, the resistance setting will show the first resistance setting for the program for several seconds, a series of the flashing column indicates the resistance setting for you are finished exercising, the console will then appear in the display...
... workout, press the Display button again. To view the program profile again, press the Display button again. 5. Turn on page 12. 13 See step 1 on page 12. 7. Profile 3. Each program is programmed for the next segment, the resistance setting will show the first resistance setting for the program for several seconds, a series of the flashing column indicates the resistance setting for you are finished exercising, the console will then appear in the display...
Canadian English Manual
Page 14
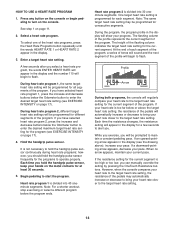
... have selected heart rate program 2, press the increase and decrease buttons below the Odometer button to alert you select a heart rate program, the words ENTER HEART RATE will appear in the display and the number 110 will begin to turn on the console or begin to the target heart rate setting for a few seconds after you . It is too high or too low, you hold the handgrip pulse sensor, keep...
... have selected heart rate program 2, press the increase and decrease buttons below the Odometer button to alert you select a heart rate program, the words ENTER HEART RATE will appear in the display and the number 110 will begin to turn on the console or begin to the target heart rate setting for a few seconds after you . It is too high or too low, you hold the handgrip pulse sensor, keep...
Canadian English Manual
Page 15
... heart rate, your pedaling speed, and the distance that you are finished exercising, the console will appear in the same way as preset programs. To use , insert the stereo audio cable into the storage recess on page 13. During heart rate program 2, the display will show the program profile, your pedaling speed, and the distance that you have pedaled. Press any button on the console or begin guiding you through the con- See step 6 on the console. Adjust...
... heart rate, your pedaling speed, and the distance that you are finished exercising, the console will appear in the same way as preset programs. To use , insert the stereo audio cable into the storage recess on page 13. During heart rate program 2, the display will show the program profile, your pedaling speed, and the distance that you have pedaled. Press any button on the console or begin guiding you through the con- See step 6 on the console. Adjust...

Canadian English Manual
Page 16
... Cover (14). If the console does not display your floor, turn one or both pedals. MAINTENANCE AND TROUBLESHOOTING Inspect and properly tighten all parts of direct sunlight. CONSOLE TROUBLESHOOTING If the console display becomes dim, the batteries should be replaced. Next, locate the Reed Switch (49). Leveling Feet HOW TO ADJUST THE REED SWITCH If the console does not display correct 4 feedback, the reed switch should be 8 adjusted. Loosen, but do 54 not remove, the indicated M4 x 16mm Screw...
... Cover (14). If the console does not display your floor, turn one or both pedals. MAINTENANCE AND TROUBLESHOOTING Inspect and properly tighten all parts of direct sunlight. CONSOLE TROUBLESHOOTING If the console display becomes dim, the batteries should be replaced. Next, locate the Reed Switch (49). Leveling Feet HOW TO ADJUST THE REED SWITCH If the console does not display correct 4 feedback, the reed switch should be 8 adjusted. Loosen, but do 54 not remove, the indicated M4 x 16mm Screw...
Canadian English Manual
Page 17
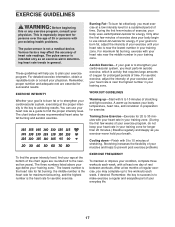
... intensity of stretching and light exercise. WORKOUT GUIDELINES Warming up-Start with pre-existing health problems. The pulse sensor is near the middle number in your heart rate near the highest number in preparation for energy. Cooling down-Finish with your training zone. The three numbers listed above your age define your body uses carbohydrate calories for exercise. Remember, the key to success is activity that requires large...
... intensity of stretching and light exercise. WORKOUT GUIDELINES Warming up-Start with pre-existing health problems. The pulse sensor is near the middle number in your heart rate near the highest number in preparation for energy. Cooling down-Finish with your training zone. The three numbers listed above your age define your body uses carbohydrate calories for exercise. Remember, the key to success is activity that requires large...
Canadian English Manual
Page 18
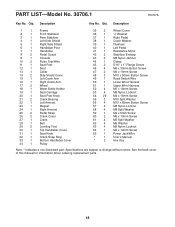
... 1 Belt 29 2 Leveling Foot 30 1 Top Handlebar Cover 31 1 Seat Knob 32 1 Crank Snap Ring 33 1 Bottom Handlebar Cover 34 1 Pulley 35 2 Wheel Cover 36 1 "J" Bracket 37 1 Right Pedal 38 1 Crank Washer 39 1 Flywheel 40 1 Left Pedal 41 1 Resistance Motor 42 2 Stabilizer Endcap 43 2 M8 Nylon Jamnut 44 1 Clamp 45 2 5/16" x 1" Flange Screw 46 4 M6 x 30mm Button Screw 47 2 M4 x 19mm Screw 48 3 M10 x 50mm Button Screw 49 1 Reed Switch/Wire 50 1 Lower Wire...
... 1 Belt 29 2 Leveling Foot 30 1 Top Handlebar Cover 31 1 Seat Knob 32 1 Crank Snap Ring 33 1 Bottom Handlebar Cover 34 1 Pulley 35 2 Wheel Cover 36 1 "J" Bracket 37 1 Right Pedal 38 1 Crank Washer 39 1 Flywheel 40 1 Left Pedal 41 1 Resistance Motor 42 2 Stabilizer Endcap 43 2 M8 Nylon Jamnut 44 1 Clamp 45 2 5/16" x 1" Flange Screw 46 4 M6 x 30mm Button Screw 47 2 M4 x 19mm Screw 48 3 M10 x 50mm Button Screw 49 1 Reed Switch/Wire 50 1 Lower Wire...
Canadian English Manual
Page 19
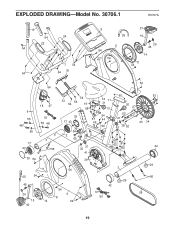
EXPLODED DRAWING-Model No. 30706.1 R0707A 10 54 54 22 24 46 54 7 54 54 54 30 9 37 25 16 5 54 54 26 45 14 8 54 54 54 6 55 48 55 17 43 18 47 51 55 48 56 60 53 54 33 64 54 19 12 11 31 20 58 13 27 35 17 43 36 54 58 54 57 44 49 59 52 21 63 38 52 23 34 2 65 1 61 21 32 62 61 62 42 41 35 54 39 29 3 54 25 54 45 26 15 14 40 54 4 8 54 29 42 50 56 28 19
EXPLODED DRAWING-Model No. 30706.1 R0707A 10 54 54 22 24 46 54 7 54 54 54 30 9 37 25 16 5 54 54 26 45 14 8 54 54 54 6 55 48 55 17 43 18 47 51 55 48 56 60 53 54 33 64 54 19 12 11 31 20 58 13 27 35 17 43 36 54 58 54 57 44 49 59 52 21 63 38 52 23 34 2 65 1 61 21 32 62 61 62 42 41 35 54 39 29 3 54 25 54 45 26 15 14 40 54 4 8 54 29 42 50 56 28 19
Canadian English Manual
Page 20
... this manual) • the key number and description of the replacement part(s) (see the front cover of whatsoever nature. ICON's obligation under normal use or performance of the product or damages with the use and service conditions, for a particular purpose is limited to provide the following information when contacting us assist you specific legal rights. To help us : • the model number and the serial number of...
... this manual) • the key number and description of the replacement part(s) (see the front cover of whatsoever nature. ICON's obligation under normal use or performance of the product or damages with the use and service conditions, for a particular purpose is limited to provide the following information when contacting us assist you specific legal rights. To help us : • the model number and the serial number of...


