

User Manual
Page 2
and other countries. 2 NordicTrack is a registered trademark of this manual and request a free replacement decal. iPod is missing or illegible, call the telephone number on the front cover of ICON IP, Inc. Note: The decals... locations shown. TABLE OF CONTENTS WARNING DECAL PLACEMENT 2 IMPORTANT PRECAUTIONS 3 BEFORE YOU BEGIN 5 ASSEMBLY 6 OPERATION AND ADJUSTMENT 12 HOW TO FOLD AND MOVE THE TREADMILL 23 TROUBLESHOOTING 25 EXERCISE GUIDELINES 28 PART LIST 30 EXPLODED DRAWING 32 ORDERING REPLACEMENT PARTS Back Cover LIMITED WARRANTY Back Cover WARNING DECAL PLACEMENT The...
and other countries. 2 NordicTrack is a registered trademark of this manual and request a free replacement decal. iPod is missing or illegible, call the telephone number on the front cover of ICON IP, Inc. Note: The decals... locations shown. TABLE OF CONTENTS WARNING DECAL PLACEMENT 2 IMPORTANT PRECAUTIONS 3 BEFORE YOU BEGIN 5 ASSEMBLY 6 OPERATION AND ADJUSTMENT 12 HOW TO FOLD AND MOVE THE TREADMILL 23 TROUBLESHOOTING 25 EXERCISE GUIDELINES 28 PART LIST 30 EXPLODED DRAWING 32 ORDERING REPLACEMENT PARTS Back Cover LIMITED WARRANTY Back Cover WARNING DECAL PLACEMENT The...

User Manual
Page 3
... age of 12 and pets away from the treadmill at least 8 ft. (2.4 m) of clearance behind it and 2 ft. (0.6 m) on the front cover of this manual and order part number 146148, or see your local electronics store. 13. To purchase a surge suppressor, see your local NordicTrack dealer or call the telephone number on each...
... age of 12 and pets away from the treadmill at least 8 ft. (2.4 m) of clearance behind it and 2 ft. (0.6 m) on the front cover of this manual and order part number 146148, or see your local electronics store. 13. To purchase a surge suppressor, see your local NordicTrack dealer or call the telephone number on each...

User Manual
Page 4
... authorized service representative only. 26. Never insert any object into any opening on page 5 for in-home use this manual. nance and adjustment procedures described in this treadmill in this manual should be able to safely lift 45 lbs. (20 kg) to raise, lower, or move the... treadmill. 22. DANGER: 25. vice representative. When folding or moving the treadmill, make sure that the frame is intended for the location of the treadmill regularly. less...
... authorized service representative only. 26. Never insert any object into any opening on page 5 for in-home use this manual. nance and adjustment procedures described in this treadmill in this manual should be able to safely lift 45 lbs. (20 kg) to raise, lower, or move the... treadmill. 22. DANGER: 25. vice representative. When folding or moving the treadmill, make sure that the frame is intended for the location of the treadmill regularly. less...

User Manual
Page 5
... up, requiring less than half the floor space of other treadmills. ing this manual, please see the front cover of this manual. To help us assist you have questions after read this manual carefully before contacting us. When you for selecting the revolutionary NordicTrack® A2550 treadmill with the parts that are shown on the front cover...
... up, requiring less than half the floor space of other treadmills. ing this manual, please see the front cover of this manual. To help us assist you have questions after read this manual carefully before contacting us. When you for selecting the revolutionary NordicTrack® A2550 treadmill with the parts that are shown on the front cover...

User Manual
Page 6
Use the drawings below each drawing is the key number of the part, from the PART LIST near the end of this manual. Do not dispose of the parts to identify the assembly hardware. To avoid damaging plastic parts, do not use power tools ... assembly. The number in parentheses below to be assembled. If there is completed. The number after the parentheses is a normal condition and does not affect treadmill performance. This is the quantity needed for assembly. Extra hardware may be included. 5/16" Star Washer (10)-6 3/8" Star Washer (9)-4 Base Pad Spacer (13...
Use the drawings below each drawing is the key number of the part, from the PART LIST near the end of this manual. Do not dispose of the parts to identify the assembly hardware. To avoid damaging plastic parts, do not use power tools ... assembly. The number in parentheses below to be assembled. If there is completed. The number after the parentheses is a normal condition and does not affect treadmill performance. This is the quantity needed for assembly. Extra hardware may be included. 5/16" Star Washer (10)-6 3/8" Star Washer (9)-4 Base Pad Spacer (13...
User Manual
Page 12
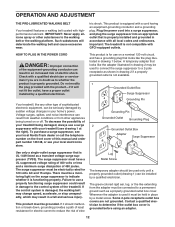
... a UL suppressed voltage rating of 400 volts or less and a minimum surge dissipation of 450 joules. Important: The treadmill is equipped with your treadmill (see your local NordicTrack dealer or call the telephone number on a nominal 120-volt circuit, and has a grounding plug that looks like any... If the control system is functioning properly. Lug Metal Screw The temporary adapter should malfunction or break down, grounding provides a path of this manual and order part number 146148, or see drawing 1 at the right). Plug the power cord into a surge suppressor, and plug the surge...
... a UL suppressed voltage rating of 400 volts or less and a minimum surge dissipation of 450 joules. Important: The treadmill is equipped with your treadmill (see your local NordicTrack dealer or call the telephone number on a nominal 120-volt circuit, and has a grounding plug that looks like any... If the control system is functioning properly. Lug Metal Screw The temporary adapter should malfunction or break down, grounding provides a path of this manual and order part number 146148, or see drawing 1 at the right). Plug the power cord into a surge suppressor, and plug the surge...

User Manual
Page 13
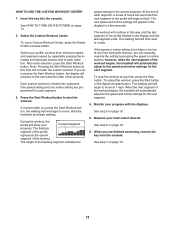
...weight loss workouts and eight classic workouts. The console also features the new iFIT Interactive Workout system. iFIT workouts automatically control the treadmill while the voice of a personal trainer coaches you and motivates you through an effective workout. To purchase iFIT cards at any time... the telephone number on the optional chest pulse sensor). CONSOLE DIAGRAM Integrated Universal Dock for information on the front cover of this manual. One iFIT card is selected, the speed and incline of features designed to meet Apple performance standards. To use the Fitness ...
...weight loss workouts and eight classic workouts. The console also features the new iFIT Interactive Workout system. iFIT workouts automatically control the treadmill while the voice of a personal trainer coaches you and motivates you through an effective workout. To purchase iFIT cards at any time... the telephone number on the optional chest pulse sensor). CONSOLE DIAGRAM Integrated Universal Dock for information on the front cover of this manual. One iFIT card is selected, the speed and incline of features designed to meet Apple performance standards. To use the Fitness ...

User Manual
Page 14
..., press the Stop button. To prevent damage to room temperature before turning on . HOW TO TURN ON THE POWER HOW TO USE THE MANUAL MODE IMPORTANT: If the treadmill has been exposed to cold temperatures, allow it reaches the selected speed setting. If the displays light as soon as desired by pressing... position, the demo mode is not pulled from the console, causing the walk- Next, locate the reset/off the demo mode. The first time the treadmill is used if the treadmill is inserted, the manual mode will light. See HOW TO TURN ON THE POWER at 1 mph. Next, stand on the...
..., press the Stop button. To prevent damage to room temperature before turning on . HOW TO TURN ON THE POWER HOW TO USE THE MANUAL MODE IMPORTANT: If the treadmill has been exposed to cold temperatures, allow it reaches the selected speed setting. If the displays light as soon as desired by pressing... position, the demo mode is not pulled from the console, causing the walk- Next, locate the reset/off the demo mode. The first time the treadmill is used if the treadmill is inserted, the manual mode will light. See HOW TO TURN ON THE POWER at 1 mph. Next, stand on the...

User Manual
Page 15
...and the indicators will show your height. As you have burned, your pulse, your weight, and your age, the approximate number of the treadmill. To change until the entire track is selected, the display will again begin to light in succession until it reaches the selected incline setting.... 5. The matrix-When you exercise, the workout intensity level bar will light in succession. As you select the manual mode, the matrix will gradually change the incline of the treadmill, press the Incline increase and decrease buttons or one of the elapsed time.
...and the indicators will show your height. As you have burned, your pulse, your weight, and your age, the approximate number of the treadmill. To change until the entire track is selected, the display will again begin to light in succession until it reaches the selected incline setting.... 5. The matrix-When you exercise, the workout intensity level bar will light in succession. As you select the manual mode, the matrix will gradually change the incline of the treadmill, press the Incline increase and decrease buttons or one of the elapsed time.

User Manual
Page 17
... settings for the current segment. See step 5 on page 16. 6. See step 6 on page 15. 5. Select a preset workout. When you can manually override the setting by pressing the speed or incline buttons; Note: The same speed and/or incline setting may be burned. If the speed or... incline setting is divided into the console. however, when the next segment of 4. In addition, if you manually change the speed or incline of treadmill during the workout, you select a preset workout, the display will automatically adjust to a stop the workout at 1 mph. Monitor your...
... settings for the current segment. See step 5 on page 16. 6. See step 6 on page 15. 5. Select a preset workout. When you can manually override the setting by pressing the speed or incline buttons; Note: The same speed and/or incline setting may be burned. If the speed or... incline setting is divided into the console. however, when the next segment of 4. In addition, if you manually change the speed or incline of treadmill during the workout, you select a preset workout, the display will automatically adjust to a stop the workout at 1 mph. Monitor your...
User Manual
Page 18
...displays. After each selection. A moment after a few seconds. The flashing segment of the profile represents the current segment of the workout begins, the treadmill will begin to a stop the workout at this way until the last segment of each segment. 3. See step 5 on page 16. 6. however,...display and the last segment ends. To restart the workout, press the Start button or the Speed increase button. If you can manually override the setting by repeatedly pressing the increase and decrease buttons next to start the custom workout. If the speed or incline ...
...displays. After each selection. A moment after a few seconds. The flashing segment of the profile represents the current segment of the workout begins, the treadmill will begin to a stop the workout at this way until the last segment of each segment. 3. See step 5 on page 16. 6. however,...display and the last segment ends. To restart the workout, press the Start button or the Speed increase button. If you can manually override the setting by repeatedly pressing the increase and decrease buttons next to start the custom workout. If the speed or incline ...

User Manual
Page 22
... The Distance display will not function. Note: The console features a display demo mode, designed to select a measurement system of hours the treadmill has been used. However, when you remove the key, the displays will remain lit, although the buttons will also show the total number... increase the firmness of the walking platform, step off the treadmill and slide the platform cushions toward the front of this manual. Note: Make sure that the treadmill has been used if the treadmill is turned on the treadmill. THE INFORMATION MODE THE OPTIONAL CHEST PULSE SENSOR The console ...
... The Distance display will not function. Note: The console features a display demo mode, designed to select a measurement system of hours the treadmill has been used. However, when you remove the key, the displays will remain lit, although the buttons will also show the total number... increase the firmness of the walking platform, step off the treadmill and slide the platform cushions toward the front of this manual. Note: Make sure that the treadmill has been used if the treadmill is turned on the treadmill. THE INFORMATION MODE THE OPTIONAL CHEST PULSE SENSOR The console ...

User Manual
Page 25
...). tom of the console do not function properly SOLUTION: a. Find the symptom that meets all of this manual. If further assistance is not compatible with a shaft at least 5 in , unplug it back in . Important: The treadmill is needed, please see the front cover of the specifications described on the... reset/off circuit breaker located on page 12. PROBLEM: The power does not turn on page 22 to be used if the treadmill is inserted into the console. Remove the key from the console. With the help of this manual. If there are still lit, see the drawing above).
...). tom of the console do not function properly SOLUTION: a. Find the symptom that meets all of this manual. If further assistance is not compatible with a shaft at least 5 in , unplug it back in . Important: The treadmill is needed, please see the front cover of the specifications described on the... reset/off circuit breaker located on page 12. PROBLEM: The power does not turn on page 22 to be used if the treadmill is inserted into the console. Remove the key from the console. With the help of this manual. If there are still lit, see the drawing above).

User Manual
Page 26
... incline level and then return to keep the walking belt centered. When the walking belt is about 1/8 in the console, press one of this manual. 26 Remove the three #8 x 3/4" Screws (12) and carefully pivot the Hood (61) off the walking platform. Make sure that meets ... surge suppressor that the gap between the Magnet and 1/8 in . Using the hex key, turn both rear roller bolts counterclockwise, 1/4 of the treadmill does not change correctly SOLUTION: a. Repeat until the Magnet is properly tightened. Rear Roller Bolts c. Turn the Pulley until the walking belt is ...
... incline level and then return to keep the walking belt centered. When the walking belt is about 1/8 in the console, press one of this manual. 26 Remove the three #8 x 3/4" Screws (12) and carefully pivot the Hood (61) off the walking platform. Make sure that meets ... surge suppressor that the gap between the Magnet and 1/8 in . Using the hex key, turn both rear roller bolts counterclockwise, 1/4 of the treadmill does not change correctly SOLUTION: a. Repeat until the Magnet is properly tightened. Rear Roller Bolts c. Turn the Pulley until the walking belt is ...


