
English Manual
Page 3
... the emergency stop unexpectedly, which may affect the accuracy of the specifications described on a level surface, with bare feet, wearing only stockings, or in speed. 19. The pulse sensor is the responsibility of the owner to the control system of serious injury, read all of heart rate readings. The pulse sensor is not working properly. (See TROUBLESHOOTING on your treadmill before using your treadmill. ICON assumes no...
... the emergency stop unexpectedly, which may affect the accuracy of the specifications described on a level surface, with bare feet, wearing only stockings, or in speed. 19. The pulse sensor is the responsibility of the owner to the control system of serious injury, read all of heart rate readings. The pulse sensor is not working properly. (See TROUBLESHOOTING on your treadmill before using your treadmill. ICON assumes no...
English Manual
Page 4
... properly tighten all parts of the circuit breaker.) 21. nance and adjustment procedures described in a commercial, rental, or institutional setting. Never remove the motor hood un- vice representative. Do not attempt to raise, lower, or move the treadmill until it is intended for the location of the treadmill regularly. less instructed to the off position when the treadmill is not in the storage position. 23...
... properly tighten all parts of the circuit breaker.) 21. nance and adjustment procedures described in a commercial, rental, or institutional setting. Never remove the motor hood un- vice representative. Do not attempt to raise, lower, or move the treadmill until it is intended for the location of the treadmill regularly. less instructed to the off position when the treadmill is not in the storage position. 23...
English Manual
Page 5
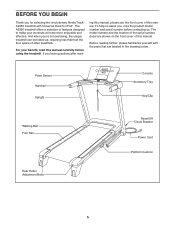
... us . Pulse Sensor Handrail Upright Console Accessory Tray Key/Clip Walking Belt Foot Rail Rear Roller Adjustment Bolts Reset/Off Circuit Breaker Power Cord Platform Cushion 5 The model number and the location of this manual. Before reading further, please familiarize yourself with Universal Dock for selecting the revolutionary NordicTrack® A2350 treadmill with the parts that are shown on the front cover of the serial number decal are labeled in the drawing below. The A2350 treadmill offers...
... us . Pulse Sensor Handrail Upright Console Accessory Tray Key/Clip Walking Belt Foot Rail Rear Roller Adjustment Bolts Reset/Off Circuit Breaker Power Cord Platform Cushion 5 The model number and the location of this manual. Before reading further, please familiarize yourself with Universal Dock for selecting the revolutionary NordicTrack® A2350 treadmill with the parts that are shown on the front cover of the serial number decal are labeled in the drawing below. The A2350 treadmill offers...
English Manual
Page 9
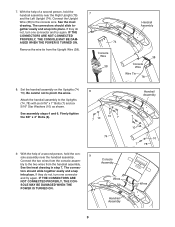
.... Remove the wire tie from the handrail assembly. See assembly steps 4 and 6. With the help of a second person, hold the handrail assembly near the handrail assembly. 9 Connect the two wires from the console assem- The connec- Console Assembly Wires Handrail Assembly Handrail Assembly 7 10 10 7 78 Wires 9 See the inset drawing. See the inset drawing in step 7. SOLE MAY BE DAMAGED WHEN THE POWER IS TURNED ON. Attach the handrail assembly...
.... Remove the wire tie from the handrail assembly. See assembly steps 4 and 6. With the help of a second person, hold the handrail assembly near the handrail assembly. 9 Connect the two wires from the console assem- The connec- Console Assembly Wires Handrail Assembly Handrail Assembly 7 10 10 7 78 Wires 9 See the inset drawing. See the inset drawing in step 7. SOLE MAY BE DAMAGED WHEN THE POWER IS TURNED ON. Attach the handrail assembly...
English Manual
Page 12
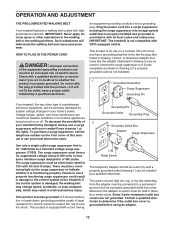
... outlet box cover. IMPORTANT: The treadmill is not available. 1 Grounded Outlet Box Surge Suppressor Grounding Pin Your treadmill, like extending from other substances to reduce the risk of 2 your homeʼs power. OPERATION AND ADJUSTMENT THE PRE-LUBRICATED WALKING BELT Your treadmill features a walking belt coated with your local electronics store. IMPORTANT: Never apply silicone spray or other appliances being damaged, always use a properly...
... outlet box cover. IMPORTANT: The treadmill is not available. 1 Grounded Outlet Box Surge Suppressor Grounding Pin Your treadmill, like extending from other substances to reduce the risk of 2 your homeʼs power. OPERATION AND ADJUSTMENT THE PRE-LUBRICATED WALKING BELT Your treadmill features a walking belt coated with your local electronics store. IMPORTANT: Never apply silicone spray or other appliances being damaged, always use a properly...
English Manual
Page 13
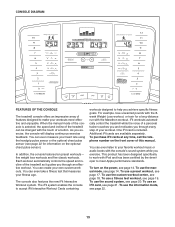
Each workout automatically controls the speed and incline of the treadmill can even listen to your heart rate using the handgrip pulse sensor or the optional chest pulse sensor (see page 19. You can even take a fitness test that measures your workout. iFit workouts automatically control the treadmill while the voice of a personal trainer coaches you and motivates you through an effective workout. To use an iFit card, see page 18. In addition, the console features...
Each workout automatically controls the speed and incline of the treadmill can even listen to your heart rate using the handgrip pulse sensor or the optional chest pulse sensor (see page 19. You can even take a fitness test that measures your workout. iFit workouts automatically control the treadmill while the voice of a personal trainer coaches you and motivates you through an effective workout. To use an iFit card, see page 18. In addition, the console features...

English Manual
Page 14
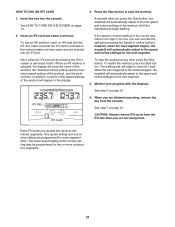
... walking belt as you exercise, change the speed of the workout buttons repeatedly until it to warm to room temperature before turning on the console, remove the plastic. IMPORTANT: In an emergency situation, the key can display speed and distance in the "reset" position. To prevent damage to miles. The first time the treadmill is not inserted into the iFit slot. 3. For simplicity, all instructions in the power cord and switch the reset...
... walking belt as you exercise, change the speed of the workout buttons repeatedly until it to warm to room temperature before turning on the console, remove the plastic. IMPORTANT: In an emergency situation, the key can display speed and distance in the "reset" position. To prevent damage to miles. The first time the treadmill is not inserted into the iFit slot. 3. For simplicity, all instructions in the power cord and switch the reset...
English Manual
Page 15
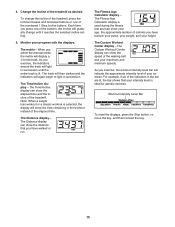
... press one of the treadmill. The Custom Workout Center display-The Custom Workout Center display can show the elapsed time and the incline of the numbered 1 Step Incline buttons. The Fitness Age Calculator display is ideal for aerobic exercise. Workout Intensity Level Bar To reset the displays, press the Stop button, remove the key, and then reinsert the key. 15 The Time/Incline display-The Time/Incline display can show the distance that your intensity level is used during the fitness...
... press one of the treadmill. The Custom Workout Center display-The Custom Workout Center display can show the elapsed time and the incline of the numbered 1 Step Incline buttons. The Fitness Age Calculator display is ideal for aerobic exercise. Workout Intensity Level Bar To reset the displays, press the Stop button, remove the key, and then reinsert the key. 15 The Time/Incline display-The Time/Incline display can show the distance that your intensity level is used during the fitness...
English Manual
Page 16
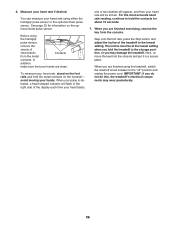
... are finished using the treadmill, switch the reset/off circuit breaker to the "off" position and unplug the power cord. To measure your heart rate will appear, and then your heart rate, stand on the foot rails and hold the contacts for information on the handrail- 6. When you may wear prematurely. 16 Step onto the foot rails, press the Stop button, and adjust the incline of clear...
... are finished using the treadmill, switch the reset/off circuit breaker to the "off" position and unplug the power cord. To measure your heart rate will appear, and then your heart rate, stand on the foot rails and hold the contacts for information on the handrail- 6. When you may wear prematurely. 16 Step onto the foot rails, press the Stop button, and adjust the incline of clear...
English Manual
Page 17
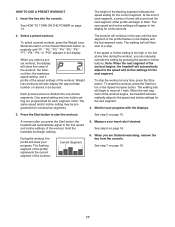
... name of the workout, the workout time, the maximum speed setting, and a profile of the speed settings of the workout. Weight loss workouts will automatically adjust to flash. Hold the handrails and begin to the first speed and incline settings of the workout. Insert the key into one incline setting are finished exercising, remove the key from the console. Select a preset workout. When you press the Start button, the treadmill will also display the approximate number of the...
... name of the workout, the workout time, the maximum speed setting, and a profile of the speed settings of the workout. Weight loss workouts will automatically adjust to flash. Hold the handrails and begin to the first speed and incline settings of the workout. Insert the key into one incline setting are finished exercising, remove the key from the console. Select a preset workout. When you press the Start button, the treadmill will also display the approximate number of the...
English Manual
Page 18
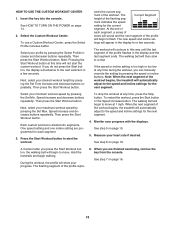
... the speed and incline settings for the current segment. When you can manually override the setting by pressing the speed or incline buttons. The walking belt will show your minimum workout speed by pressing the Set Time increase and decrease buttons repeatedly. Hold the handrails and begin to start the custom workout. HOW TO USE THE CUSTOM WORKOUT CENTER 1. Then press the Start Workout button. Monitor your heart rate if desired. See HOW TO TURN ON THE POWER on...
... the speed and incline settings for the current segment. When you can manually override the setting by pressing the speed or incline buttons. The walking belt will show your minimum workout speed by pressing the Set Time increase and decrease buttons repeatedly. Hold the handrails and begin to start the custom workout. HOW TO USE THE CUSTOM WORKOUT CENTER 1. Then press the Start Workout button. Monitor your heart rate if desired. See HOW TO TURN ON THE POWER on...
English Manual
Page 19
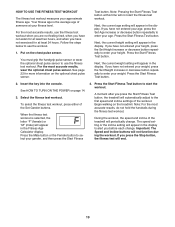
... in the display. Press the Start Fitness Test button. 2. Press the Start Fitness Test button to use the workout. 1. The speed setting or the incline setting will automatically adjust to enter your age, press the Set Age increase or decrease button repeatedly to alert you have not entered your approximate fitness age. A moment after you press the Start Fitness Test button, the treadmill will appear in the display to enter your weight. Put on the optional chest pulse sensor. See...
... in the display. Press the Start Fitness Test button. 2. Press the Start Fitness Test button to use the workout. 1. The speed setting or the incline setting will automatically adjust to enter your age, press the Set Age increase or decrease button repeatedly to alert you have not entered your approximate fitness age. A moment after you press the Start Fitness Test button, the treadmill will appear in the display to enter your weight. Put on the optional chest pulse sensor. See...
English Manual
Page 20
... sure that the iFit Universal iPod Connector is fully plugged in the Fitness Age Calculator display. 5. The workout is fully inserted. Adjust the volume on the console. See step 5 on page 16. Plug one end into your progress with iPod and has been certified by the developer to work with the display. Monitor your iPod. To use the audio wire, locate the audio wire and plug it into the...
... sure that the iFit Universal iPod Connector is fully plugged in the Fitness Age Calculator display. 5. The workout is fully inserted. Adjust the volume on the console. See step 5 on page 16. Plug one end into your progress with iPod and has been certified by the developer to work with the display. Monitor your iPod. To use the audio wire, locate the audio wire and plug it into the...
English Manual
Page 21
... displays. See step 7 on page 15. To use an iFit workout, insert an iFit card into the console. The walking belt will automatically adjust to the first speed and incline settings of the workout. When the next segment of the workout, and the workout time. A moment after you press the Start button, the treadmill will begin walking. 2. however, when the next segment begins, the treadmill will automatically adjust to move at any time, press the Stop button. Each iFit workout...
... displays. See step 7 on page 15. To use an iFit workout, insert an iFit card into the console. The walking belt will automatically adjust to the first speed and incline settings of the workout. When the next segment of the workout, and the workout time. A moment after you press the Start button, the treadmill will begin walking. 2. however, when the next segment begins, the treadmill will automatically adjust to move at any time, press the Stop button. Each iFit workout...
English Manual
Page 22
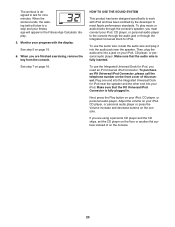
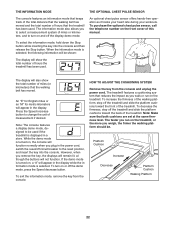
THE INFORMATION MODE THE OPTIONAL CHEST PULSE SENSOR The console features an information mode that keeps track of the total distance that the walking belt has moved and the total number of miles or kilometers, and to turn on , the console will function normally when you remove the key, the displays will remain lit, although the buttons will appear in a store. The information mode also allows you to the reset position, and insert the key into...
THE INFORMATION MODE THE OPTIONAL CHEST PULSE SENSOR The console features an information mode that keeps track of the total distance that the walking belt has moved and the total number of miles or kilometers, and to turn on , the console will function normally when you remove the key, the displays will remain lit, although the buttons will appear in a store. The information mode also allows you to the reset position, and insert the key into...

English Manual
Page 26
... power cord, insert the key, and run 51 the treadmill for a correct speed reading. If the walking belt is properly tightened. b 2-3 in . (5 to the minimum level. With the key in the console, press one of the walking belt 2 to 3 in . Make sure that meets all of the Pulley (51). Be careful to check for a few minutes to keep the walking belt centered. Rear Roller Bolts c. If necessary, loosen the 3/4" Reed Switch Screw...
... power cord, insert the key, and run 51 the treadmill for a correct speed reading. If the walking belt is properly tightened. b 2-3 in . (5 to the minimum level. With the key in the console, press one of the walking belt 2 to 3 in . Make sure that meets all of the Pulley (51). Be careful to check for a few minutes to keep the walking belt centered. Rear Roller Bolts c. If necessary, loosen the 3/4" Reed Switch Screw...
English Manual
Page 28
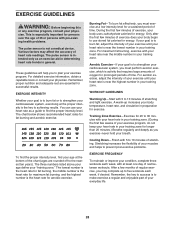
... key to use your exercise program. The chart below shows recommended heart rates for aerobic exercise. Only after the first few minutes of rest between workouts. For maximum fat burning, exercise with at the proper intensity is intended only as you exercise-never hold your training zone. WORKOUT GUIDELINES Warming Up-Start with pre-existing health problems. The pulse sensor is to burn fat or to burn fat, adjust...
... key to use your exercise program. The chart below shows recommended heart rates for aerobic exercise. Only after the first few minutes of rest between workouts. For maximum fat burning, exercise with at the proper intensity is intended only as you exercise-never hold your training zone. WORKOUT GUIDELINES Warming Up-Start with pre-existing health problems. The pulse sensor is to burn fat or to burn fat, adjust...
English Manual
Page 30
... 1 Front Roller/Pulley 15 1/2" Wire Tie Storage Latch Latch Knob Right Foot Rail Frame Rear Roller Bracket Rear Roller Left Rear Foot Right Rear Foot Hood Drive Belt Motor Isolator Motor Lift Frame Wire Tie Controller Ground Wire Power Cord Power Cord Grommet Controller Reed Switch Reed Switch Clip Belly Pan Left Upright Incline Motor Left Upright Spacer Base Endcap Right Upright Right Upright Spacer Bolt Spacer Base Pad Caution Decal Base Wheel Releasable Tie 8" Tie Access Door "U"-nut Console Tray Console Back Plastic Tie Console Base Pulse Bar Top Pulse Bar Bottom Handrail...
... 1 Front Roller/Pulley 15 1/2" Wire Tie Storage Latch Latch Knob Right Foot Rail Frame Rear Roller Bracket Rear Roller Left Rear Foot Right Rear Foot Hood Drive Belt Motor Isolator Motor Lift Frame Wire Tie Controller Ground Wire Power Cord Power Cord Grommet Controller Reed Switch Reed Switch Clip Belly Pan Left Upright Incline Motor Left Upright Spacer Base Endcap Right Upright Right Upright Spacer Bolt Spacer Base Pad Caution Decal Base Wheel Releasable Tie 8" Tie Access Door "U"-nut Console Tray Console Back Plastic Tie Console Base Pulse Bar Top Pulse Bar Bottom Handrail...

English Manual
Page 31
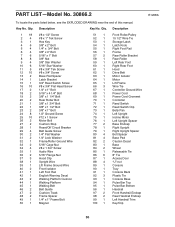
Key No. Qty. 110 1 111 1 112 1 113 1 * - * - Specifications are not illustrated. Description French Warning Decal Incline Motor Wire Key Switch Console Warning Decal 4" White Wire, M/F Userʼs Manual *These parts are subject to change without notice. 31 Qty. 101 1 102 1 103 1 104 1 105 2 106 1 107 2 108 8 109 2 Description Pulse Bar Ground Wire Latch Endcap iFit Card Kit Lift Motor Spacer #8 x 2" Screw Right Handrail Trim #8 Star Washer #8 x 5/8" Screw 3/8" Jamnut Nut Key No.
Key No. Qty. 110 1 111 1 112 1 113 1 * - * - Specifications are not illustrated. Description French Warning Decal Incline Motor Wire Key Switch Console Warning Decal 4" White Wire, M/F Userʼs Manual *These parts are subject to change without notice. 31 Qty. 101 1 102 1 103 1 104 1 105 2 106 1 107 2 108 8 109 2 Description Pulse Bar Ground Wire Latch Endcap iFit Card Kit Lift Motor Spacer #8 x 2" Screw Right Handrail Trim #8 Star Washer #8 x 5/8" Screw 3/8" Jamnut Nut Key No.
English Manual
Page 36
... ICON. products used as store display models. Some provinces do not allow limitations on how long an implied warranty lasts. This warranty gives you , be prepared to provide the following information when contacting us: • the model number and serial number of the product (see the front cover of this manual) • the name of the product (see the front cover of this manual) • the key number...
... ICON. products used as store display models. Some provinces do not allow limitations on how long an implied warranty lasts. This warranty gives you , be prepared to provide the following information when contacting us: • the model number and serial number of the product (see the front cover of this manual) • the name of the product (see the front cover of this manual) • the key number...


