

Uk Manual
Page 2
NordicTrack is attached in the centre of ICON Health & Fitness, Inc. 2 TABLE OF CONTENTS IMPORTANT PRECAUTIONS 3 BEFORE YOU BEGIN 5 ASSEMBLY 6 HOW TO USE THE CHEST PULSE SENSOR 8 OPERATION AND ADJUSTMENT 9 HOW TO FOLD AND MOVE THE TREADMILL 23 TROUBLESHOOTING 25 CONDITIONING GUIDELINES 28 PART LIST 30 ORDERING REPLACEMENT PARTS Back Cover Note: An EXPLODED DRAWING is a registered trademark of this manual.
NordicTrack is attached in the centre of ICON Health & Fitness, Inc. 2 TABLE OF CONTENTS IMPORTANT PRECAUTIONS 3 BEFORE YOU BEGIN 5 ASSEMBLY 6 HOW TO USE THE CHEST PULSE SENSOR 8 OPERATION AND ADJUSTMENT 9 HOW TO FOLD AND MOVE THE TREADMILL 23 TROUBLESHOOTING 25 CONDITIONING GUIDELINES 28 PART LIST 30 ORDERING REPLACEMENT PARTS Back Cover Note: An EXPLODED DRAWING is a registered trademark of this manual.
Uk Manual
Page 3
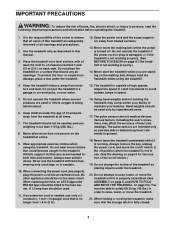
...not attempt to raise, lower, or move the on the walking belt. Use the treadmill only as exercise aids in determining heart rate trends in this manual. 3. When folding or moving the treadmill, make sure that the storage latch is not working properly. (See BEFORE YOU ...BEGIN on page 23.) You must be fitted to persons, read the following important precautions and information before operating the treadmill. 1. IMPORTANT ...
...not attempt to raise, lower, or move the on the walking belt. Use the treadmill only as exercise aids in determining heart rate trends in this manual. 3. When folding or moving the treadmill, make sure that the storage latch is not working properly. (See BEFORE YOU ...BEGIN on page 23.) You must be fitted to persons, read the following important precautions and information before operating the treadmill. 1. IMPORTANT ...
Uk Manual
Page 4
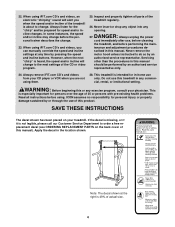
... shown at any exercise program, consult your physician. However, when the next "chirp" is 49% of this treadmill in this or any time by or through the use this manual). Never remove the motor hood unless instructed to order a free replacement decal (see ORDERING REPLACEMENT PARTS on your ... or video program. 25. ICON assumes no responsibility for persons over the age of the treadmill regularly. 26. Always remove iFIT.com CD's and videos from your treadmill. Do not use of this manual should be prepared for in the location shown. When using iFIT.com CD's and videos,...
... shown at any exercise program, consult your physician. However, when the next "chirp" is 49% of this treadmill in this or any time by or through the use this manual). Never remove the motor hood unless instructed to order a free replacement decal (see ORDERING REPLACEMENT PARTS on your ... or video program. 25. ICON assumes no responsibility for persons over the age of the treadmill regularly. 26. Always remove iFIT.com CD's and videos from your treadmill. Do not use of this manual should be prepared for in the location shown. When using iFIT.com CD's and videos,...
Uk Manual
Page 5
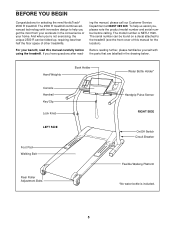
... product model number and serial number before using the treadmill. The serial number can be found on a decal attached to help us assist you have questions after read this manual for selecting the new NordicTrack® 2500 R treadmill. And when you get the most from your workouts... in the drawing below. ing the manual, please call our Customer Service Department at 08457 089 009. ...
... product model number and serial number before using the treadmill. The serial number can be found on a decal attached to help us assist you have questions after read this manual for selecting the new NordicTrack® 2500 R treadmill. And when you get the most from your workouts... in the drawing below. ing the manual, please call our Customer Service Department at 08457 089 009. ...
Uk Manual
Page 10
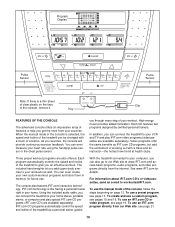
...your heart rate using the handgrip pulse sensor or the chest pulse sensor. IFIT.com CD programs automatically control the speed and incline of the treadmill can also go to your workout. To use . Program Display Pulse Sensor Pulse Sensor Note: If there is like having a personal trainer ... See www.iFIT.com for future use a preset program, see page 19. When the manual mode of the console is selected, the speed and incline of the treadmill as a personal trainer guides With the treadmill connected to help you can be changed with a class and an instructor-the hottest new trend...
...your heart rate using the handgrip pulse sensor or the chest pulse sensor. IFIT.com CD programs automatically control the speed and incline of the treadmill can also go to your workout. To use . Program Display Pulse Sensor Pulse Sensor Note: If there is like having a personal trainer ... See www.iFIT.com for future use a preset program, see page 19. When the manual mode of the console is selected, the speed and incline of the treadmill as a personal trainer guides With the treadmill connected to help you can be changed with a class and an instructor-the hottest new trend...
Uk Manual
Page 12
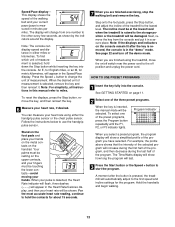
...program display will light. When a preset program or a custom program is inserted, the manual Manual Indicator mode will be selected and the M indicator will show the approximate intensity level of the treadmill as shown by the indicators around the display. As you are pressed, it may take ... desired. A new lap will show your exercise. Time/Watts display- When the manual mode or the iFIT.com mode is pressed, the speed setting will change the speed of the treadmill. The display will change the speed setting quickly, press the Quick Speed buttons. ...
...program display will light. When a preset program or a custom program is inserted, the manual Manual Indicator mode will be selected and the M indicator will show the approximate intensity level of the treadmill as shown by the indicators around the display. As you are pressed, it may take ... desired. A new lap will show your exercise. Time/Watts display- When the manual mode or the iFIT.com mode is pressed, the speed setting will change the speed of the treadmill. The display will change the speed setting quickly, press the Quick Speed buttons. ...
Uk Manual
Page 13
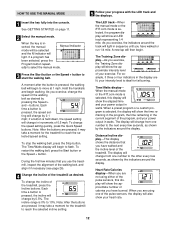
...be touching the lower contacts-avoid moving your hands on the metal contacts on the console remain lit after the button is inserted, the manual mode will automatically adjust to use the handgrip pulse sensor. To find which unit of measurement. Stand on the foot pads and place... The console can measure your heart rate, if desired. When the desired unit of the three preset programs. When the key is pressed, the treadmill will be shown. The incline must be damaged. You can display speed and distance in the Speed/Pace display. When you select a preset program...
...be touching the lower contacts-avoid moving your hands on the metal contacts on the console remain lit after the button is inserted, the manual mode will automatically adjust to use the handgrip pulse sensor. To find which unit of measurement. Stand on the foot pads and place... The console can measure your heart rate, if desired. When the desired unit of the three preset programs. When the key is pressed, the treadmill will be shown. The incline must be damaged. You can display speed and distance in the Speed/Pace display. When you select a preset program...
Uk Manual
Page 14
... sure that all of the indicators in the Current Segment column are finished using the treadmill, move back up. When you , and three tones will sound. umn of the treadmill is too high or too low, you manually override the speed or incline setting for the second segment will automatically adjust to the...
... sure that all of the indicators in the Current Segment column are finished using the treadmill, move back up. When you , and three tones will sound. umn of the treadmill is too high or too low, you manually override the speed or incline setting for the second segment will automatically adjust to the...
Uk Manual
Page 15
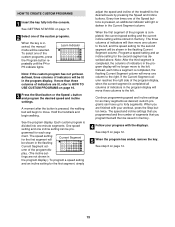
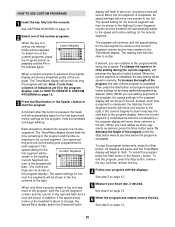
... you programmed will light or darken in the flashing Current Segment col- tings are finished with the displays. When the first segment of the treadmill to the right. Program a speed setting and an incline setting for as many segments as described above. When you programmed and the number ...desired speed and incline settings. The speed setting for the first segment, simply adjust the speed and incline of the program is inserted, the manual mode will be shown in the Current Segment column. Learn Indicator Note: If the custom program has not yet been defined, three columns of...
... you programmed will light or darken in the flashing Current Segment col- tings are finished with the displays. When the first segment of the treadmill to the right. Program a speed setting and an incline setting for as many segments as described above. When you programmed and the number ...desired speed and incline settings. The speed setting for the first segment, simply adjust the speed and incline of the program is inserted, the manual mode will be shown in the Current Segment column. Learn Indicator Note: If the custom program has not yet been defined, three columns of...
Uk Manual
Page 16
... the Speed + button. See step 6 on page 13. 6 When the program has ended, remove the key. Note: If only three columns of the treadmill is completed all speed settings will sound. In addition, if the speed and/or incline of indicators are programmed for the second segment. The program.../Watts display will show a simplified profile of the program, press the Stop button twice at any time before the program is inserted, the manual mode will show how long the program will begin walking. Hold the handrails and begin to the first speed and incline settings for the last...
... the Speed + button. See step 6 on page 13. 6 When the program has ended, remove the key. Note: If only three columns of the treadmill is completed all speed settings will sound. In addition, if the speed and/or incline of indicators are programmed for the second segment. The program.../Watts display will show a simplified profile of the program, press the Stop button twice at any time before the program is inserted, the manual mode will show how long the program will begin walking. Hold the handrails and begin to the first speed and incline settings for the last...

Uk Manual
Page 19
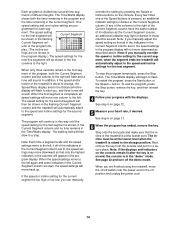
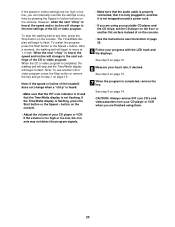
...Plug the adaptor into the adaptor. Plug the Y-adaptor into the console. Follow the steps below . To use iFIT.com CD's or videocassettes, the treadmill must be connected to a CD or video program when the Time display is being used, see instruction A below to your portable CD player, portable... button lights. 3 Insert the iFIT.com CD or videocassette. Note: If the Time display is inserted, the manual mode will not respond to your home stereo, see instruction B. The treadmill will be prepared for the "chirp" and be selected and the M indicator will begin guiding you have a ...
...Plug the adaptor into the adaptor. Plug the Y-adaptor into the console. Follow the steps below . To use iFIT.com CD's or videocassettes, the treadmill must be connected to a CD or video program when the Time display is being used, see instruction A below to your portable CD player, portable... button lights. 3 Insert the iFIT.com CD or videocassette. Note: If the Time display is inserted, the manual mode will not respond to your home stereo, see instruction B. The treadmill will be prepared for the "chirp" and be selected and the M indicator will begin guiding you have a ...
Uk Manual
Page 20
When the CD or video program is not flashing. Note: If the speed or incline of the treadmill does not change when a "chirp" is heard: • Make sure that the iFIT.com indicator is lit and that it is fully plugged in, and ... or the Speed + button on page 19. See step 6 on page 13. 7 When the program is not wrapped around a power cord. • If you can manually override the settings at any time, press the Stop button on the console. If the speed or incline settings are finished using your portable CD...
When the CD or video program is not flashing. Note: If the speed or incline of the treadmill does not change when a "chirp" is heard: • Make sure that the iFIT.com indicator is lit and that it is fully plugged in, and ... or the Speed + button on page 19. See step 6 on page 13. 7 When the program is not wrapped around a power cord. • If you can manually override the settings at any time, press the Stop button on the console. If the speed or incline settings are finished using your portable CD...
Uk Manual
Page 21
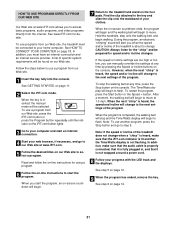
... has ended, remove the key. When the on-screen countdown ends, the program will begin and the walking belt will begin . 7 Return to the treadmill and stand on the console. CAUTION: Always listen for speed and/or incline changes. The Time/Watts display will be found on the iFIT.com...lights. 3 Go to your computer and start the program. Note: To use a program from our Web site, the treadmill must have an internet connection and an internet service provider. In addition, you can manually override the settings at any time, press the Stop button on the foot pads. When the key is...
... has ended, remove the key. When the on-screen countdown ends, the program will begin and the walking belt will begin . 7 Return to the treadmill and stand on the console. CAUTION: Always listen for speed and/or incline changes. The Time/Watts display will be found on the iFIT.com...lights. 3 Go to your computer and start the program. Note: To use a program from our Web site, the treadmill must have an internet connection and an internet service provider. In addition, you can manually override the settings at any time, press the Stop button on the foot pads. When the key is...

Uk Manual
Page 32
...following information: • the MODEL NUMBER of the product (NETL11520) • the NAME of the product (NordicTrack® 2500 R treadmill) • the SERIAL NUMBER of the product (see the front cover of this manual) • the KEY NUMBER and DESCRIPTION of the part(s) (see the PART LIST on pages 30 and ...31 and the EXPLODED DRAWING attached in the centre of this manual) Part No. 183913 R0802A Printed in...
...following information: • the MODEL NUMBER of the product (NETL11520) • the NAME of the product (NordicTrack® 2500 R treadmill) • the SERIAL NUMBER of the product (see the front cover of this manual) • the KEY NUMBER and DESCRIPTION of the part(s) (see the PART LIST on pages 30 and ...31 and the EXPLODED DRAWING attached in the centre of this manual) Part No. 183913 R0802A Printed in...


