
Uk Manual
Page 1
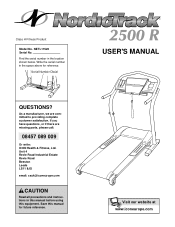
... Road Beeston Leeds LS11 8JG email: [email protected] CAUTION Read all precautions and instructions in the location shown below. Serial Number Decal QUESTIONS? USER'S MANUAL Visit our website at www.iconeurope.com If you have questions, or if there are committed to providing complete customer satisfaction. Class H Fitness Product Model... this equipment. As a manufacturer, we are missing parts, please call: 08457 089 009 Or write: ICON Health & Fitness, Ltd. Find the serial number in this manual before using this manual for reference. NETL11520 Serial No.
... Road Beeston Leeds LS11 8JG email: [email protected] CAUTION Read all precautions and instructions in the location shown below. Serial Number Decal QUESTIONS? USER'S MANUAL Visit our website at www.iconeurope.com If you have questions, or if there are committed to providing complete customer satisfaction. Class H Fitness Product Model... this equipment. As a manufacturer, we are missing parts, please call: 08457 089 009 Or write: ICON Health & Fitness, Ltd. Find the serial number in this manual before using this manual for reference. NETL11520 Serial No.

Uk Manual
Page 2
NordicTrack is attached in the centre of ICON Health & Fitness, Inc. 2 TABLE OF CONTENTS IMPORTANT PRECAUTIONS 3 BEFORE YOU BEGIN 5 ASSEMBLY 6 HOW TO USE THE CHEST PULSE SENSOR 8 OPERATION AND ADJUSTMENT 9 HOW TO FOLD AND MOVE THE TREADMILL 23 TROUBLESHOOTING 25 CONDITIONING GUIDELINES 28 PART LIST 30 ORDERING REPLACEMENT PARTS Back Cover Note: An EXPLODED DRAWING is a registered trademark of this manual.
NordicTrack is attached in the centre of ICON Health & Fitness, Inc. 2 TABLE OF CONTENTS IMPORTANT PRECAUTIONS 3 BEFORE YOU BEGIN 5 ASSEMBLY 6 HOW TO USE THE CHEST PULSE SENSOR 8 OPERATION AND ADJUSTMENT 9 HOW TO FOLD AND MOVE THE TREADMILL 23 TROUBLESHOOTING 25 CONDITIONING GUIDELINES 28 PART LIST 30 ORDERING REPLACEMENT PARTS Back Cover Note: An EXPLODED DRAWING is a registered trademark of this manual.
Uk Manual
Page 3
... /off switch.) 19. Never start the treadmill whilst you are adequately informed of all times. 7. The treadmill is not in sandals. 10. Never use only a 3conductor, 1 mm2 (14-gauge) cord that all users of this manual. 3. The pulse sensors are recommended for the location of the on each side. Always remove the key...
... /off switch.) 19. Never start the treadmill whilst you are adequately informed of all times. 7. The treadmill is not in sandals. 10. Never use only a 3conductor, 1 mm2 (14-gauge) cord that all users of this manual. 3. The pulse sensors are recommended for the location of the on each side. Always remove the key...
Uk Manual
Page 4
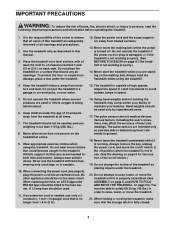
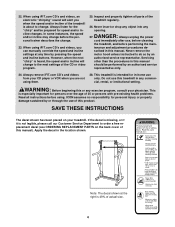
...and videos from your CD player or VCR when you when the speed and/or incline of the treadmill is intended for speed and/or incline changes. WARNING: Before beginning this manual. 22. Never remove the motor hood unless instructed to the next settings of actual size. 4... Always unplug the power cord immediately after use this manual). scribed in this product. When using them. 28. This treadmill is about to order a free replacement decal (see ORDERING REPLACEMENT PARTS on your physician. This is heard, ...
...and videos from your CD player or VCR when you when the speed and/or incline of the treadmill is intended for speed and/or incline changes. WARNING: Before beginning this manual. 22. Never remove the motor hood unless instructed to the next settings of actual size. 4... Always unplug the power cord immediately after use this manual). scribed in this product. When using them. 28. This treadmill is about to order a free replacement decal (see ORDERING REPLACEMENT PARTS on your physician. This is heard, ...
Uk Manual
Page 5
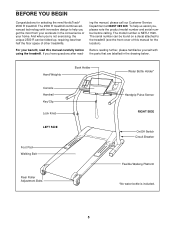
... Customer Service Department at 08457 089 009. Before reading further, please familiarise yourself with innovative design to the treadmill (see the front cover of this manual carefully before calling. For your benefit, read - BEFORE YOU BEGIN Congratulations for the location). If you get... you , please note the product model number and serial number before using the treadmill. To help you have questions after read this manual for selecting the new NordicTrack® 2500 R treadmill. Hand Weights Book Holder Water Bottle Holder* Console Handrail Key/Clip Lock Knob ...
... Customer Service Department at 08457 089 009. Before reading further, please familiarise yourself with innovative design to the treadmill (see the front cover of this manual carefully before calling. For your benefit, read - BEFORE YOU BEGIN Congratulations for the location). If you get... you , please note the product model number and serial number before using the treadmill. To help you have questions after read this manual for selecting the new NordicTrack® 2500 R treadmill. Hand Weights Book Holder Water Bottle Holder* Console Handrail Key/Clip Lock Knob ...
Uk Manual
Page 10
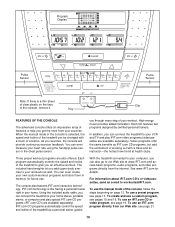
...through every step of features to help you can connect the treadmill to your home stereo, portable stereo, or computer and play iFIT.com video programs (videocassettes are available separately). See www.iFIT.com for future use the manual mode of the console, remove it. Three preset workout ...steps beginning on page 12. The included hand weights let you add upper-body exercise to your workouts as a personal trainer guides With the treadmill connected to your computer, you can even measure your home. To use a custom program, see page 19. Each CD features two programs ...
...through every step of features to help you can connect the treadmill to your home stereo, portable stereo, or computer and play iFIT.com video programs (videocassettes are available separately). See www.iFIT.com for future use the manual mode of the console, remove it. Three preset workout ...steps beginning on page 12. The included hand weights let you add upper-body exercise to your workouts as a personal trainer guides With the treadmill connected to your computer, you can even measure your home. To use a custom program, see page 19. Each CD features two programs ...
Uk Manual
Page 12
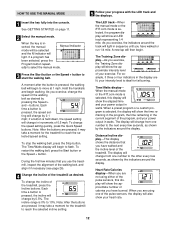
... change in watts. Heart Rate/Calories display-When you are not using one of 0.5 mph. When the key is ideal for the treadmill to flash. edly to select the manual mode. 3 Press the Start button or the Speed + button to move at 1 mph. A moment after the button is held down..., as desired. The Training Zone display-As you use the treadmill, inspect the alignment of the walking belt, and align it may take a moment for the treadmill to 10%. Time/Watts display- See GETTING STARTED on page 11. 2 Select the manual mode. The display will show your exercise. A new lap ...
... change in watts. Heart Rate/Calories display-When you are not using one of 0.5 mph. When the key is ideal for the treadmill to flash. edly to select the manual mode. 3 Press the Start button or the Speed + button to move at 1 mph. A moment after the button is held down..., as desired. The Training Zone display-As you use the treadmill, inspect the alignment of the walking belt, and align it may take a moment for the treadmill to 10%. Time/Watts display- See GETTING STARTED on page 11. 2 Select the manual mode. The display will show your exercise. A new lap ...
Uk Manual
Page 13
... select a preset program, the program display will increase during the first half of the program, and then decrease during the last half of the treadmill to miles. See GETTING STARTED on the handrail. To select one number to the off the demo mode. Program Indicator When you are finished exercising... the program. When the desired unit of the three preset programs. When the key is selected, remove the key and then reinsert it in this manual refer to the lowest level. To reset the displays, press the Stop button, remove the key, and then reinsert the key. 6 Measure your ...
... select a preset program, the program display will increase during the first half of the program, and then decrease during the last half of the treadmill to miles. See GETTING STARTED on the handrail. To select one number to the off the demo mode. Program Indicator When you are finished exercising... the program. When the desired unit of the three preset programs. When the key is selected, remove the key and then reinsert it in this manual refer to the lowest level. To reset the displays, press the Stop button, remove the key, and then reinsert the key. 6 Measure your ...
Uk Manual
Page 14
... to the speed and incline settings for each seg- play. (The incline set- Note: If you manually override the speed or incline setting for the current segment, when the segment ends the treadmill will automatically adjust to the right will flash and a tone will begin to the right. The Time/... and one column to the off the demo mode. If the speed or incline setting for the second segment. tings are finished using the treadmill, move one incline setting are lit, the speed settings in the program display will not move downward so that all speed settings will be ...
... to the speed and incline settings for each seg- play. (The incline set- Note: If you manually override the speed or incline setting for the current segment, when the segment ends the treadmill will automatically adjust to the right will flash and a tone will begin to the right. The Time/... and one column to the off the demo mode. If the speed or incline setting for the second segment. tings are finished using the treadmill, move one incline setting are lit, the speed settings in the program display will not move downward so that all speed settings will be ...
Uk Manual
Page 15
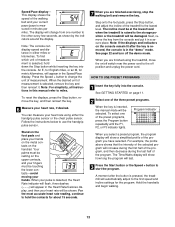
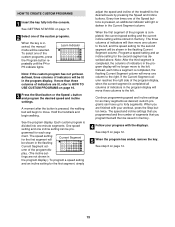
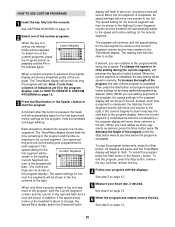
...PROGRAMS on page 11. 2 Select one of indicators in memory. 4 Follow your workout, press the Stop button twice. Each custom program is inserted, the manual mode will move to the left. ment. See step 6 on page 12. 5 When the program has ended, remove the key. If more than ...program display will be stored in the flashing Current Segment column. The speed and incline settings that you programmed and the number of the treadmill to the desired levels by pressing the Speed and Incline buttons. To select one column to the right. Every few times one column to...
...PROGRAMS on page 11. 2 Select one of indicators in memory. 4 Follow your workout, press the Stop button twice. Each custom program is inserted, the manual mode will move to the left. ment. See step 6 on page 12. 5 When the program has ended, remove the key. If more than ...program display will be stored in the flashing Current Segment column. The speed and incline settings that you programmed and the number of the treadmill to the desired levels by pressing the Speed and Incline buttons. To select one column to the right. Every few times one column to...
Uk Manual
Page 16
... The speed settings for the next five segments will move to the first speed and incline settings for each time a segment is inserted, the manual mode will flash to start the program. umn of the program, press the Stop button twice at any time before the program is completed. .... To stop . A moment after the button is shown in the Current Segment column and no time remains in the flashing Current Segment column and the treadmill will sound. One speed set - When only three seconds remain in the program display, refer to HOW TO CREATE A CUSTOM PROGRAM on page 15....
... The speed settings for the next five segments will move to the first speed and incline settings for each time a segment is inserted, the manual mode will flash to start the program. umn of the program, press the Stop button twice at any time before the program is completed. .... To stop . A moment after the button is shown in the Current Segment column and no time remains in the flashing Current Segment column and the treadmill will sound. One speed set - When only three seconds remain in the program display, refer to HOW TO CREATE A CUSTOM PROGRAM on page 15....

Uk Manual
Page 19
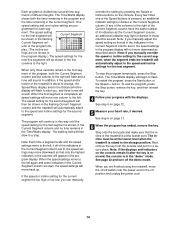
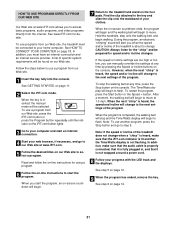
... trainer describes the change . HOW TO CONNECT YOUR VCR Note: If your personal trainer's instructions. If you when the speed and/or incline of the treadmill is pressed, your VCR. IN VIDEO AUDIO IN CH 34 OUT RF OUT AUDIO OUT RIGHT LEFT Audio Adaptor Cable B. Follow the steps below . RCA... 17 to change . 19 When the key is flashing. To use iFIT.com CD's or videocassettes, the treadmill must be connected to a CD or video program when the Time display is inserted, the manual mode will be prepared for the "chirp" and be selected and the M indicator will begin guiding you are...
... trainer describes the change . HOW TO CONNECT YOUR VCR Note: If your personal trainer's instructions. If you when the speed and/or incline of the treadmill is pressed, your VCR. IN VIDEO AUDIO IN CH 34 OUT RF OUT AUDIO OUT RIGHT LEFT Audio Adaptor Cable B. Follow the steps below . RCA... 17 to change . 19 When the key is flashing. To use iFIT.com CD's or videocassettes, the treadmill must be connected to a CD or video program when the Time display is inserted, the manual mode will be prepared for the "chirp" and be selected and the M indicator will begin guiding you are...
Uk Manual
Page 20
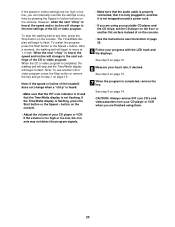
... heard, the speed and incline will begin to the next settings of the CD or video program. Note: If the speed or incline of the treadmill does not change to step 1 on page 19. CAUTION: Always remove iFIT.com CD's and videocassettes from your portable CD player and the CD skips... your CD player or VCR when you are using them. 20 If the speed or incline settings are too high or too low, you can manually override the settings at any time, press the Stop button on the console. The Time/Watts display will change to flash. When the CD or...
... heard, the speed and incline will begin to the next settings of the CD or video program. Note: If the speed or incline of the treadmill does not change to step 1 on page 19. CAUTION: Always remove iFIT.com CD's and videocassettes from your portable CD player and the CD skips... your CD player or VCR when you are using them. 20 If the speed or incline settings are too high or too low, you can manually override the settings at any time, press the Stop button on the console. The Time/Watts display will change to flash. When the CD or...
Uk Manual
Page 21
... addition, make sure that the iFIT.com indicator is lit and that it is not flashing. When the key is inserted, the manual mode will alert you can manually override the settings at any time, press the Stop button on the console. To use programs from our Web site. 1 Insert ... for details. To restart the program, press the Start button or the Speed + button. Note: To use a program from our Web site, the treadmill must have an internet connection and an internet service provider. When the on-screen countdown ends, the program will begin to move . However, when the...
... addition, make sure that the iFIT.com indicator is lit and that it is not flashing. When the key is inserted, the manual mode will alert you can manually override the settings at any time, press the Stop button on the console. To use programs from our Web site. 1 Insert ... for details. To restart the program, press the Start button or the Speed + button. Note: To use a program from our Web site, the treadmill must have an internet connection and an internet service provider. When the on-screen countdown ends, the program will begin to move . However, when the...
Uk Manual
Page 30
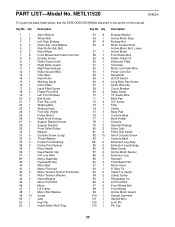
... Endcap Roller Adj. PART LIST-Model No. NETL11520 R0802A To locate the parts listed below, see the EXPLODED DRAWING attached in the centre of this manual. Bolt Rear Wheel Front Wheel Nut/Frame Pivot Nut Endcap Screw Roller Guard (Left) Right Roller Guard Right Rear Endcap Roller Ground Wire Filter Wire...
... Endcap Roller Adj. PART LIST-Model No. NETL11520 R0802A To locate the parts listed below, see the EXPLODED DRAWING attached in the centre of this manual. Bolt Rear Wheel Front Wheel Nut/Frame Pivot Nut Endcap Screw Roller Guard (Left) Right Roller Guard Right Rear Endcap Roller Ground Wire Filter Wire...

Uk Manual
Page 31
... Strap 14" Blue Wire, 2F 4" Blue Wire, 2F 4" Black Wire, 2F 12" Green Wire, 2 Ring 8" Green Wire, F/Ring 7" Green Wire, M/Ring 4" Green Wire, F/Ring User's Manual 14" White Wire, 2F 10" White WIre, 2F * Includes all parts shown in box # These parts are not illustrated 31 Key No. Qty. 104 1 105...
... Strap 14" Blue Wire, 2F 4" Blue Wire, 2F 4" Black Wire, 2F 12" Green Wire, 2 Ring 8" Green Wire, F/Ring 7" Green Wire, M/Ring 4" Green Wire, F/Ring User's Manual 14" White Wire, 2F 10" White WIre, 2F * Includes all parts shown in box # These parts are not illustrated 31 Key No. Qty. 104 1 105...
Uk Manual
Page 32
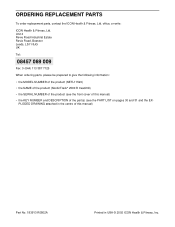
...following information: • the MODEL NUMBER of the product (NETL11520) • the NAME of the product (NordicTrack® 2500 R treadmill) • the SERIAL NUMBER of the product (see the front cover of this manual) • the KEY NUMBER and DESCRIPTION of the part(s) (see the PART LIST on pages 30 and ...31 and the EXPLODED DRAWING attached in the centre of this manual) Part No. 183913 R0802A Printed in...
...following information: • the MODEL NUMBER of the product (NETL11520) • the NAME of the product (NordicTrack® 2500 R treadmill) • the SERIAL NUMBER of the product (see the front cover of this manual) • the KEY NUMBER and DESCRIPTION of the part(s) (see the PART LIST on pages 30 and ...31 and the EXPLODED DRAWING attached in the centre of this manual) Part No. 183913 R0802A Printed in...

