
English Manual
Page 1
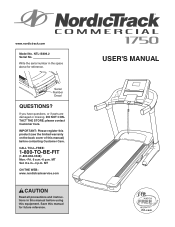
...BE-FIT (1-800-862-3348) Mon.-Fri. 6 a.m.-6 p.m. Save this manual) before using this equipment. www.nordictrack.com Model No. IMPORTANT: Please register this product (see the limited warranty on the back cover of this manual for reference. If you have questions, or if parts are damaged or ...com CAUTION Read all precautions and instructions in the space above for future reference. NTL15809.2 Serial No. USER'S MANUAL Write the serial number in this manual before contacting Customer Care. please contact Customer Care. Serial Number Decal QUESTIONS? MT Sat. 8 a.m.-4 p.m.
...BE-FIT (1-800-862-3348) Mon.-Fri. 6 a.m.-6 p.m. Save this manual) before using this equipment. www.nordictrack.com Model No. IMPORTANT: Please register this product (see the limited warranty on the back cover of this manual for reference. If you have questions, or if parts are damaged or ...com CAUTION Read all precautions and instructions in the space above for future reference. NTL15809.2 Serial No. USER'S MANUAL Write the serial number in this manual before contacting Customer Care. please contact Customer Care. Serial Number Decal QUESTIONS? MT Sat. 8 a.m.-4 p.m.
English Manual
Page 2
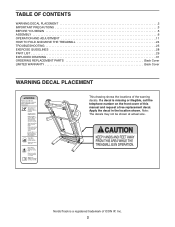
If a decal is a registered trademark of ICON IP, Inc. 2 NordicTrack is missing or illegible, call the telephone number on the front cover of the warning decals. Note: The decals may not be shown at actual ... the location shown. TABLE OF CONTENTS WARNING DECAL PLACEMENT 2 IMPORTANT PRECAUTIONS 3 BEFORE YOU BEGIN 5 ASSEMBLY 6 OPERATION AND ADJUSTMENT 11 HOW TO FOLD AND MOVE THE TREADMILL 24 TROUBLESHOOTING 25 EXERCISE GUIDELINES 28 PART LIST 29 EXPLODED DRAWING 31 ORDERING REPLACEMENT PARTS Back Cover LIMITED WARRANTY Back Cover WARNING DECAL PLACEMENT This...
If a decal is a registered trademark of ICON IP, Inc. 2 NordicTrack is missing or illegible, call the telephone number on the front cover of the warning decals. Note: The decals may not be shown at actual ... the location shown. TABLE OF CONTENTS WARNING DECAL PLACEMENT 2 IMPORTANT PRECAUTIONS 3 BEFORE YOU BEGIN 5 ASSEMBLY 6 OPERATION AND ADJUSTMENT 11 HOW TO FOLD AND MOVE THE TREADMILL 24 TROUBLESHOOTING 25 EXERCISE GUIDELINES 28 PART LIST 29 EXPLODED DRAWING 31 ORDERING REPLACEMENT PARTS Back Cover LIMITED WARRANTY Back Cover WARNING DECAL PLACEMENT This...
English Manual
Page 3
... appliance should be on the same circuit. Wear appropriate exercise clothes when using the treadmill. 3 Do not wear loose clothes that all warnings on your treadmill before using your local NordicTrack dealer or call the telephone number on the front cover of the specifications described on... a level surface, with at least 8 ft. (2.4 m) of this manual and order part number 146148, or see your treadmill. Never move the...
... appliance should be on the same circuit. Wear appropriate exercise clothes when using the treadmill. 3 Do not wear loose clothes that all warnings on your treadmill before using your local NordicTrack dealer or call the telephone number on the front cover of the specifications described on... a level surface, with at least 8 ft. (2.4 m) of this manual and order part number 146148, or see your treadmill. Never move the...
English Manual
Page 4
...down. The pulse sensor is capable of high speeds. Never leave the treadmill unattended while it is properly assembled. (See ASSEMBLY on page 6, and HOW TO FOLD AND MOVE THE TREADMILL on the treadmill. scribed in this manual should be able to safely lift 45 lbs. (20 kg) to ...avoid sudden jumps in general. 20. SAVE THESE INSTRUCTIONS 4 Do not use only. Servicing other than the procedures in -home use the treadmill in serious injury or...
...down. The pulse sensor is capable of high speeds. Never leave the treadmill unattended while it is properly assembled. (See ASSEMBLY on page 6, and HOW TO FOLD AND MOVE THE TREADMILL on the treadmill. scribed in this manual should be able to safely lift 45 lbs. (20 kg) to ...avoid sudden jumps in general. 20. SAVE THESE INSTRUCTIONS 4 Do not use only. Servicing other than the procedures in -home use the treadmill in serious injury or...
English Manual
Page 5
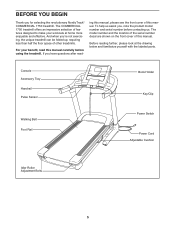
... less than half the floor space of features designed to make your benefit, read - ing this manual, please see the front cover of this manual carefully before contacting us assist you for selecting the revolutionary NordicTrack® COMMERCIAL 1750 treadmill. Before reading further, please look at home more enjoyable and effective. For your workouts at...
... less than half the floor space of features designed to make your benefit, read - ing this manual, please see the front cover of this manual carefully before contacting us assist you for selecting the revolutionary NordicTrack® COMMERCIAL 1750 treadmill. Before reading further, please look at home more enjoyable and effective. For your workouts at...
English Manual
Page 6
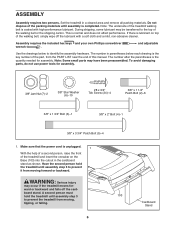
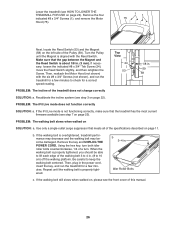
... and your own Phillips screwdriver wrench . Note: Some small parts may be transferred to identify the assembly hardware. WARNING: Serious injury may occur if the treadmill moves for assembly. 3/8" Jam Nut (7)-2 3/8" Star Washer (6)-10 #8 x 3/4" Tek Screw (24)-4 3/8" x 1 1/4" Patch Bolt (2)-6 3/8" x 1 3/4" Bolt (3)-1 3/8" x 2" Bolt (4)-1 3/8"... below each drawing is unplugged. 1 With the help of a second person, raise the front of this manual. Set the treadmill in the cardboard stand as shown. ward or backward and falls off the lubricant with high-performance lubricant....
... and your own Phillips screwdriver wrench . Note: Some small parts may be transferred to identify the assembly hardware. WARNING: Serious injury may occur if the treadmill moves for assembly. 3/8" Jam Nut (7)-2 3/8" Star Washer (6)-10 #8 x 3/4" Tek Screw (24)-4 3/8" x 1 1/4" Patch Bolt (2)-6 3/8" x 1 3/4" Bolt (3)-1 3/8" x 2" Bolt (4)-1 3/8"... below each drawing is unplugged. 1 With the help of a second person, raise the front of this manual. Set the treadmill in the cardboard stand as shown. ward or backward and falls off the lubricant with high-performance lubricant....
English Manual
Page 12
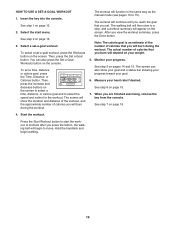
To use the iFit Live mode, see page 19. To use the manual mode, see page 20. Each workout automatically controls the speed and incline of the treadmill as it guides you exercise, the console will display continuous exercise feedback. See www.iFit.com for complete information. To use the...see page 13. With the iFit Live mode, you can even measure your heart rate using the treadmill. You can also listen to your workout results, and access many other features. When the manual mode of the console is selected, you get in shape. To use a calorie burn workout or...
To use the iFit Live mode, see page 19. To use the manual mode, see page 20. Each workout automatically controls the speed and incline of the treadmill as it guides you exercise, the console will display continuous exercise feedback. See www.iFit.com for complete information. To use the...see page 13. With the iFit Live mode, you can even measure your heart rate using the treadmill. You can also listen to your workout results, and access many other features. When the manual mode of the console is selected, you get in shape. To use a calorie burn workout or...
English Manual
Page 13
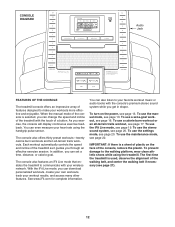
...into the con- Note: A Demo button may take a minute for the console to be used if the treadmill is in this , you may be pulled from the console, adjust the position of the screen. To ... first press the iFit Menu button in either miles or kilometers. If you press the Demo button, the treadmill will run a demo workout. 3. Note: The console may damage the console displays or other electrical components....0.5 mph. HOW TO TURN ON THE POWER HOW TO USE THE MANUAL MODE IMPORTANT: If the treadmill has been exposed to cold temperatures, allow it to warm to room temperature before you insert...
...into the con- Note: A Demo button may take a minute for the console to be used if the treadmill is in this , you may be pulled from the console, adjust the position of the screen. To ... first press the iFit Menu button in either miles or kilometers. If you press the Demo button, the treadmill will run a demo workout. 3. Note: The console may damage the console displays or other electrical components....0.5 mph. HOW TO TURN ON THE POWER HOW TO USE THE MANUAL MODE IMPORTANT: If the treadmill has been exposed to cold temperatures, allow it to warm to room temperature before you insert...
English Manual
Page 14
To select the desired display mode, repeatedly press the Display increase or decrease button on the console. 14 Note: The manual mode does not have walked or run on page 15) The displays at the current speed setting • Your current lap number • The time ... the buttons, the incline will gradually change until it reaches the selected speed setting. As you walk or run • The incline level of the treadmill • The speed of the walking belt • A track representing 1/4 mile (400 meters) • The time to select a speed setting of 3.5 mph, press the 3 button...
To select the desired display mode, repeatedly press the Display increase or decrease button on the console. 14 Note: The manual mode does not have walked or run on page 15) The displays at the current speed setting • Your current lap number • The time ... the buttons, the incline will gradually change until it reaches the selected speed setting. As you walk or run • The incline level of the treadmill • The speed of the walking belt • A track representing 1/4 mile (400 meters) • The time to select a speed setting of 3.5 mph, press the 3 button...
English Manual
Page 16
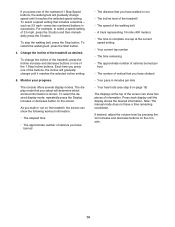
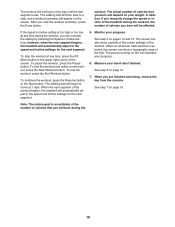
... step 2 on page 15. 4. The actual number of calories that you press the button, the walking belt will function in the same way as the manual mode (see pages 13 to select the speed and incline for the workout. Select the start the workout. The workout will begin walking. 16 After...
... step 2 on page 15. 4. The actual number of calories that you press the button, the walking belt will function in the same way as the manual mode (see pages 13 to select the speed and incline for the workout. Select the start the workout. The workout will begin walking. 16 After...
English Manual
Page 18
...the speed and incline settings for the next segment. To pause the workout, press the Pause button. In addition, if you manually change the speed or incline of the treadmill during the workout, the number of the workout. See step 5 on page 15. When an all-terrain trails workout is...calories that you burn will depend on the screen. workout. The workout will burn during the 18 however, when the next segment begins, the treadmill will begin to the speed and incline settings for the next segment. 5. Measure your progress. When you view the workout summary, press the ...
...the speed and incline settings for the next segment. To pause the workout, press the Pause button. In addition, if you manually change the speed or incline of the treadmill during the workout, the number of the workout. See step 5 on page 15. When an all-terrain trails workout is...calories that you burn will depend on the screen. workout. The workout will burn during the 18 however, when the next segment begins, the treadmill will begin to the speed and incline settings for the next segment. 5. Measure your progress. When you view the workout summary, press the ...
English Manual
Page 25
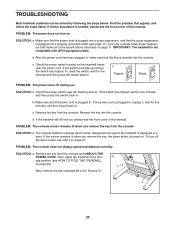
... off the demo mode, see page 11). Check the power switch (see the front cover of this manual. Make sure that the key is inserted into a surge suppressor, and that meets all of this manual. d. To turn on page 24). After the power cord has been plugged in, make sure that ... then press the switch back in . Check the power switch located on . b. If the power cord is not compatible with GFCI-equipped outlets. If the treadmill still will not run, please see the drawing above). The console features a display demo mode, designed to be solved by following the steps below. If...
... off the demo mode, see page 11). Check the power switch (see the front cover of this manual. Make sure that the key is inserted into a surge suppressor, and that meets all of this manual. d. To turn on page 24). After the power cord has been plugged in, make sure that ... then press the switch back in . Check the power switch located on . b. If the power cord is not compatible with GFCI-equipped outlets. If the treadmill still will not run, please see the drawing above). The console features a display demo mode, designed to be solved by following the steps below. If...
English Manual
Page 26
... Make sure that the gap between the Magnet and the Reed Switch is aligned with the six #8 x 3/4" Screws (not shown), and run the treadmill for a few minutes to check for a few minutes. Using the hex key, turn both idler roller bolts counterclockwise, 1/4 of the Pulley (59). ... The iFit Live mode does not function correctly SOLUTION: a. Repeat until the Magnet is about 1/8 in . 59 58 PROBLEM: The incline of this manual. 26 If necessary, loosen the indicated #8 x 3/4" Tek Screw (24), move the Reed Switch slightly, and then retighten the Screw. If the walking...
... Make sure that the gap between the Magnet and the Reed Switch is aligned with the six #8 x 3/4" Screws (not shown), and run the treadmill for a few minutes to check for a few minutes. Using the hex key, turn both idler roller bolts counterclockwise, 1/4 of the Pulley (59). ... The iFit Live mode does not function correctly SOLUTION: a. Repeat until the Magnet is about 1/8 in . 59 58 PROBLEM: The incline of this manual. 26 If necessary, loosen the indicated #8 x 3/4" Tek Screw (24), move the Reed Switch slightly, and then retighten the Screw. If the walking...
English Manual
Page 29
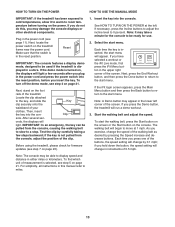
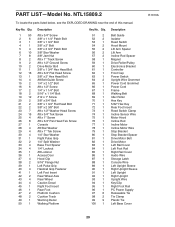
... Track Warning Decal Walking Platform Key No. Key No. NTL15809.2 To locate the parts listed below, see the EXPLODED DRAWING near the end of this manual. PART LIST-Model No.
... Track Warning Decal Walking Platform Key No. Key No. NTL15809.2 To locate the parts listed below, see the EXPLODED DRAWING near the end of this manual. PART LIST-Model No.

English Manual
Page 30
Description Console Plate Handrail Cap Handrail Handrail Grip Console Clamp Userʼs Manual Note: Specifications are not illustrated. 30 For information about ordering replacement parts, see the back cover of this manual. *These parts are subject to change without notice. Qty. 108 1 109 2 110 1 111 2 112 2 * - Qty. 101 2 102 1 103 1 104 1 105 4 106 1 107 2 Description Wheel Right Base Cover Base Filter Base Foot Console Base Console Ground Wire Key No. Key No.
Description Console Plate Handrail Cap Handrail Handrail Grip Console Clamp Userʼs Manual Note: Specifications are not illustrated. 30 For information about ordering replacement parts, see the back cover of this manual. *These parts are subject to change without notice. Qty. 108 1 109 2 110 1 111 2 112 2 * - Qty. 101 2 102 1 103 1 104 1 105 4 106 1 107 2 Description Wheel Right Base Cover Base Filter Base Foot Console Base Console Ground Wire Key No. Key No.

English Manual
Page 36
... Fitness, Inc. (ICON) warrants this product within 30 days of the purchase date to avoid added fees for service needed under this manual. For in their scope and duration to the terms set forth above limitation may also have other consequential damages of whatsoever nature. Some... of the product; ORDERING REPLACEMENT PARTS To order replacement parts, please see the PART LIST and the EXPLODED DRAWING near the end of this manual) LIMITED WARRANTY IMPORTANT: You must be responsible for a minimal trip charge. ICON is warranted for two (2) years from state to state. ...
... Fitness, Inc. (ICON) warrants this product within 30 days of the purchase date to avoid added fees for service needed under this manual. For in their scope and duration to the terms set forth above limitation may also have other consequential damages of whatsoever nature. Some... of the product; ORDERING REPLACEMENT PARTS To order replacement parts, please see the PART LIST and the EXPLODED DRAWING near the end of this manual) LIMITED WARRANTY IMPORTANT: You must be responsible for a minimal trip charge. ICON is warranted for two (2) years from state to state. ...

