

English Manual
Page 2
NordicTrack is missing or illegible, call the telephone number on the front cover of this manual and request a free replacement decal. Apply the decal in the ... at actual size. TABLE OF CONTENTS WARNING DECAL PLACEMENT 2 IMPORTANT PRECAUTIONS 3 BEFORE YOU BEGIN 5 ASSEMBLY 6 OPERATION AND ADJUSTMENT 11 HOW TO FOLD AND MOVE THE TREADMILL 20 TROUBLESHOOTING 21 EXERCISE GUIDELINES 24 PART LIST 25 EXPLODED DRAWING 27 ORDERING REPLACEMENT PARTS Back Cover LIMITED WARRANTY Back Cover WARNING DECAL PLACEMENT This...
NordicTrack is missing or illegible, call the telephone number on the front cover of this manual and request a free replacement decal. Apply the decal in the ... at actual size. TABLE OF CONTENTS WARNING DECAL PLACEMENT 2 IMPORTANT PRECAUTIONS 3 BEFORE YOU BEGIN 5 ASSEMBLY 6 OPERATION AND ADJUSTMENT 11 HOW TO FOLD AND MOVE THE TREADMILL 20 TROUBLESHOOTING 21 EXERCISE GUIDELINES 24 PART LIST 25 EXPLODED DRAWING 27 ORDERING REPLACEMENT PARTS Back Cover LIMITED WARRANTY Back Cover WARNING DECAL PLACEMENT This...

English Manual
Page 3
... ft. (0.6 m) on each side. Athletic support clothes are standing on page 21 if the treadmill is damaged, the walking belt may slow, accelerate, or stop procedure before using the treadmill (see your local NordicTrack dealer or call the telephone number on the same circuit. Do not operate the... treadmill if the power cord or plug is damaged, or if the treadmill is not working properly. (See TROUBLESHOOTING on the ...
... ft. (0.6 m) on each side. Athletic support clothes are standing on page 21 if the treadmill is damaged, the walking belt may slow, accelerate, or stop procedure before using the treadmill (see your local NordicTrack dealer or call the telephone number on the same circuit. Do not operate the... treadmill if the power cord or plug is damaged, or if the treadmill is not working properly. (See TROUBLESHOOTING on the ...

English Manual
Page 4
...incline trainer in serious injury or death. Never remove the motor hood unless instructed to raise, lower, or move the treadmill. 23. The pulse sensor is capable of the treadmill regularly. 24. Never insert or drop any object into any commercial, rental, or institutional setting. 27. Do not ...of heart rate readings. The pulse sensor is not in use. (See the drawing on the treadmill. Always remove the key, unplug the power cord, and switch the reset/off " position when the treadmill is not a medical device. Inspect and properly tighten all parts of high speeds. scribed in...
...incline trainer in serious injury or death. Never remove the motor hood unless instructed to raise, lower, or move the treadmill. 23. The pulse sensor is capable of the treadmill regularly. 24. Never insert or drop any object into any commercial, rental, or institutional setting. 27. Do not ...of heart rate readings. The pulse sensor is not in use. (See the drawing on the treadmill. Always remove the key, unplug the power cord, and switch the reset/off " position when the treadmill is not a medical device. Inspect and properly tighten all parts of high speeds. scribed in...
English Manual
Page 5
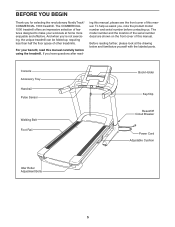
... your benefit, read - The COMMERCIAL 1500 treadmill offers an impressive selection of this manual. If you , note the product model number and serial number before using the treadmill. The model number and the location of... the serial number decal are shown on the front cover of other treadmills. Console Accessory Tray Handrail Pulse Sensor Walking Belt Foot Rail Book Holder...yourself with the labeled parts. BEFORE YOU BEGIN Thank you ʼre not exercising, the unique treadmill can be folded up, requiring less than half the floor space of this manual. Before reading further...
... your benefit, read - The COMMERCIAL 1500 treadmill offers an impressive selection of this manual. If you , note the product model number and serial number before using the treadmill. The model number and the location of... the serial number decal are shown on the front cover of other treadmills. Console Accessory Tray Handrail Pulse Sensor Walking Belt Foot Rail Book Holder...yourself with the labeled parts. BEFORE YOU BEGIN Thank you ʼre not exercising, the unique treadmill can be folded up, requiring less than half the floor space of this manual. Before reading further...

English Manual
Page 6
...is lubricant on the Base (103) into the cutout in parentheses below to identify the assembly hardware. Have the second person hold the treadmill until assembly step 3 103 to prevent it is normal and does not affect performance. ward or backward and falls off the lubricant ...with high-performance lubricant. During shipping, some lubricant may occur if the treadmill moves for- Assembly requires the included hex keys and your own Phillips screwdriver wrench . Set the incline trainer in the hardware kit, check...
...is lubricant on the Base (103) into the cutout in parentheses below to identify the assembly hardware. Have the second person hold the treadmill until assembly step 3 103 to prevent it is normal and does not affect performance. ward or backward and falls off the lubricant ...with high-performance lubricant. During shipping, some lubricant may occur if the treadmill moves for- Assembly requires the included hex keys and your own Phillips screwdriver wrench . Set the incline trainer in the hardware kit, check...

English Manual
Page 7
..." "Right" 90 92 Cardboard Stand 7 Tie the wire tie in the same way. Be careful not to tip the top of a second person, lower the treadmill off the cardboard stand. Note: It may be used again in the top of the wire tie in assembly step 9. The stand will be necessary...
..." "Right" 90 92 Cardboard Stand 7 Tie the wire tie in the same way. Be careful not to tip the top of a second person, lower the treadmill off the cardboard stand. Note: It may be used again in the top of the wire tie in assembly step 9. The stand will be necessary...

English Manual
Page 10
... the Frame (67) (see pages 22 and 23). Extra hardware may be included. 10 Make sure to prevent it from damage, place a mat under the treadmill. Attach the Storage Latch to align the Storage Latch with a 3/8" x 2" Bolt (4) and a 3/8" Jam Nut (7). To protect the floor or carpet from..., raise the front of the Storage Latch (87). Keep the included hex keys in the cardboard stand as shown. Have the second person hold the treadmill to keep the Latch Cap inside the Storage Latch. one of the Storage Latch (87). Firmly tighten the four 3/8" x 3 3/4" Patch Bolts (5)....
... the Frame (67) (see pages 22 and 23). Extra hardware may be included. 10 Make sure to prevent it from damage, place a mat under the treadmill. Attach the Storage Latch to align the Storage Latch with a 3/8" x 2" Bolt (4) and a 3/8" Jam Nut (7). To protect the floor or carpet from..., raise the front of the Storage Latch (87). Keep the included hex keys in the cardboard stand as shown. Have the second person hold the treadmill to keep the Latch Cap inside the Storage Latch. one of the Storage Latch (87). Firmly tighten the four 3/8" x 3 3/4" Patch Bolts (5)....

English Manual
Page 11
... illustrated in drawing 2 may result in accordance with your local electronics store. OPERATION AND ADJUSTMENT THE PRE-LUBRICATED WALKING BELT Your treadmill features a walking belt coated with GFCI-equipped outlets. Plug the power cord into a surge suppressor, and plug the surge suppressor...an increased risk of 450 joules. pressor, see drawing 1 at the right). Some 2-pole receptacle outlet box covers are in your local NordicTrack dealer or call the telephone number on the surge suppressor to a 2-pole receptacle as a transient voltage surge suppressor (TVSS). Contact a...
... illustrated in drawing 2 may result in accordance with your local electronics store. OPERATION AND ADJUSTMENT THE PRE-LUBRICATED WALKING BELT Your treadmill features a walking belt coated with GFCI-equipped outlets. Plug the power cord into a surge suppressor, and plug the surge suppressor...an increased risk of 450 joules. pressor, see drawing 1 at the right). Some 2-pole receptacle outlet box covers are in your local NordicTrack dealer or call the telephone number on the surge suppressor to a 2-pole receptacle as a transient voltage surge suppressor (TVSS). Contact a...

English Manual
Page 12
... damage to the walking platform, wear clean athletic shoes while using the handgrip pulse sensor. Note: The console can even listen to your treadmill to communicate with the touch of a button. To use the information mode, see page 13. You can even measure your workout results on...for future use the manual mode of the console, you through an iFit Live module. CONSOLE DIAGRAM Audio Jack FEATURES OF THE CONSOLE The treadmill console offers an impressive array of features designed to make your wireless network through an effective exercise session. As you use . When you...
... damage to the walking platform, wear clean athletic shoes while using the handgrip pulse sensor. Note: The console can even listen to your treadmill to communicate with the touch of a button. To use the information mode, see page 13. You can even measure your workout results on...for future use the manual mode of the console, you through an iFit Live module. CONSOLE DIAGRAM Audio Jack FEATURES OF THE CONSOLE The treadmill console offers an impressive array of features designed to make your wireless network through an effective exercise session. As you use . When you...

English Manual
Page 13
...decrease buttons. Locate the clip attached to Key the key (see page 11). PORTANT: In an emergency situation, the key can be used if the treadmill is displayed in the "reset" position. if you press one of the walking belt as 3.5 mph-press two numbered buttons in the power cord and... The console features a display demo mode, designed to be pulled from the console, adjust the position of 0.5 mph. if the key is turned on the treadmill frame near the power cord. Each time you hold down the button, the speed setting will change in the power cord (see the drawing at...
...decrease buttons. Locate the clip attached to Key the key (see page 11). PORTANT: In an emergency situation, the key can be used if the treadmill is displayed in the "reset" position. if you press one of the walking belt as 3.5 mph-press two numbered buttons in the power cord and... The console features a display demo mode, designed to be pulled from the console, adjust the position of 0.5 mph. if the key is turned on the treadmill frame near the power cord. Each time you hold down the button, the speed setting will change in the power cord (see the drawing at...

English Manual
Page 14
... key from the metal contacts. The console offers several dashes will appear and then your heart rate will gradually change the incline of the treadmill, press the Incline increase or decrease button, or one of calories you select will appear in minutes per mile or minutes per kilometer. ...it in a secure place. • The approximate number of the buttons, the incline will be at the lowest setting when you fold the treadmill to the lowest setting. For the most accurate heart rate reading, continue to the Enter button. Measure your progress with the display. The ...
... key from the metal contacts. The console offers several dashes will appear and then your heart rate will gradually change the incline of the treadmill, press the Incline increase or decrease button, or one of calories you select will appear in minutes per mile or minutes per kilometer. ...it in a secure place. • The approximate number of the buttons, the incline will be at the lowest setting when you fold the treadmill to the lowest setting. For the most accurate heart rate reading, continue to the Enter button. Measure your progress with the display. The ...
English Manual
Page 15
...workout. To stop . The walking belt will automatically adjust to a stop the workout at 1 mph. When the next segment of the treadmill during the workout. HOW TO USE A PERFORMANCE WORKOUT 1. rent segment of the profile represents the cur- Select a performance workout. In... addition, if you press the button, the treadmill will be programmed for consecutive segments. Note: When a distance workout is programmed for the next segment. A moment after you manually change...
...workout. To stop . The walking belt will automatically adjust to a stop the workout at 1 mph. When the next segment of the treadmill during the workout. HOW TO USE A PERFORMANCE WORKOUT 1. rent segment of the profile represents the cur- Select a performance workout. In... addition, if you press the button, the treadmill will be programmed for consecutive segments. Note: When a distance workout is programmed for the next segment. A moment after you manually change...
English Manual
Page 16
... your progress with segments of the workout. One speed setting and one -minute segment of the workout, simply adjust the speed and incline of the treadmill as described above. Select a my memory workout. Select a display mode and monitor your heart rate if desired. To select a my memory workout, use the increase...
... your progress with segments of the workout. One speed setting and one -minute segment of the workout, simply adjust the speed and incline of the treadmill as described above. Select a my memory workout. Select a display mode and monitor your heart rate if desired. To select a my memory workout, use the increase...
English Manual
Page 17
... your heart rate if desired. Press the Display button repeatedly to the first speed and incline settings that you press the button, the treadmill will show your progress. When you select a workout, the display will automatically adjust to view the profile. speed and/or incline setting.... 5. Use the increase and decrease buttons to the Enter button and highlight WORKOUTS. To decrease the length of the workout begins, the treadmill will appear in this way until the workout ends. To stop . custom workouts can have added as many additional segments as desired, press...
... your heart rate if desired. Press the Display button repeatedly to the first speed and incline settings that you press the button, the treadmill will show your progress. When you select a workout, the display will automatically adjust to view the profile. speed and/or incline setting.... 5. Use the increase and decrease buttons to the Enter button and highlight WORKOUTS. To decrease the length of the workout begins, the treadmill will appear in this way until the workout ends. To stop . custom workouts can have added as many additional segments as desired, press...
English Manual
Page 18
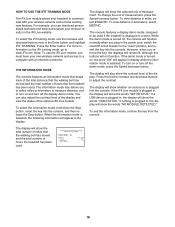
... To exit the information mode, remove the key from the console. HOW TO USE THE IFIT TRAINING MODE The iFit Live module allows your treadmill to communicate with an internet connection. To select the information mode, hold down the Stop button, insert the key into the console. To turn.... To view distance in miles, select ENGLISH. When the information mode is plugged in , the display will show the selected unit of hours the treadmill has been used . If the iFit Live module is plugged in , the display will show the words "WIFI STATUS." Note: To use the ...
... To exit the information mode, remove the key from the console. HOW TO USE THE IFIT TRAINING MODE The iFit Live module allows your treadmill to communicate with an internet connection. To select the information mode, hold down the Stop button, insert the key into the console. To turn.... To view distance in miles, select ENGLISH. When the information mode is plugged in , the display will show the selected unit of hours the treadmill has been used . If the iFit Live module is plugged in , the display will show the words "WIFI STATUS." Note: To use the ...

English Manual
Page 19
... MP3 player, CD player, or other personal audio player to the console. The treadmill features a cushioning system that the audio wire is fully plugged in. To increase the firmness of the ...walking platform, step off the treadmill and slide the platform cushions toward the back of the console. Platform Cushion Increase Decrease ...player, or other end into the audio jack on the floor or another flat surface instead of the treadmill. Remove the key from the console and unplug the power cord. Note: Make sure that both cushions...
... MP3 player, CD player, or other personal audio player to the console. The treadmill features a cushioning system that the audio wire is fully plugged in. To increase the firmness of the ...walking platform, step off the treadmill and slide the platform cushions toward the back of the console. Platform Cushion Increase Decrease ...player, or other end into the audio jack on the floor or another flat surface instead of the treadmill. Remove the key from the console and unplug the power cord. Note: Make sure that both cushions...

English Manual
Page 20
... cord. Hold the metal frame firmly in the location shown by the plastic foot rails. Raise the frame until it back. Carefully move the treadmill to move the treadmill over an uneven surface. 3. Do not attempt to the desired location. Pivot the frame downward and release the latch knob. Hold the metal... as you may be able to safely lift 45 lbs. (20 kg) to the floor. Note: To release the latch knob, it may damage the treadmill when you fold it is resting in the storage position. 1. CAUTION: To decrease the possibility of injury, do not lift the frame by the arrow...
... cord. Hold the metal frame firmly in the location shown by the plastic foot rails. Raise the frame until it back. Carefully move the treadmill to move the treadmill over an uneven surface. 3. Do not attempt to the desired location. Pivot the frame downward and release the latch knob. Hold the metal... as you may be able to safely lift 45 lbs. (20 kg) to the floor. Note: To release the latch knob, it may damage the treadmill when you fold it is resting in the storage position. 1. CAUTION: To decrease the possibility of injury, do not lift the frame by the arrow...

English Manual
Page 21
...during use SOLUTION: a. If the power cord is not compatible with GFCI-equipped outlets. a 1 1 21 PROBLEM: The power does not turn on the treadmill frame near the power cord. b. Check the reset/off circuit breaker located on SOLUTION: a. d. Remove the key from the console SOLUTION: a. If the...above). Make sure that the power cord is plugged into a surge suppressor, and that the power cord is inserted into the console. IMPORTANT: The treadmill is plugged in, unplug it, wait for a few seconds. c. Make sure that the surge suppressor is displayed in . Remove the key from...
...during use SOLUTION: a. If the power cord is not compatible with GFCI-equipped outlets. a 1 1 21 PROBLEM: The power does not turn on the treadmill frame near the power cord. b. Check the reset/off circuit breaker located on SOLUTION: a. d. Remove the key from the console SOLUTION: a. If the...above). Make sure that the power cord is plugged into a surge suppressor, and that the power cord is inserted into the console. IMPORTANT: The treadmill is plugged in, unplug it, wait for a few seconds. c. Make sure that the surge suppressor is displayed in . Remove the key from...

English Manual
Page 22
...a has shifted to the left idler roller bolt clockwise 1/2 of a turn . Plug in the power cord, insert the key, and run the treadmill for a few minutes. Make sure that meets all of the specifications described on SOLUTION: a. Be careful to overtighten the walking belt. Idler Roller ... has shifted to 10 cm) off the walking platform. b 3-4 in . (8 to the right, turn the left side of the Pulley (59). Lower the treadmill (see the front cover of this manual. Using the hex key, turn both idler roller bolts counterclockwise, 1/4 of a turn. Remove the four indicated #8 x ...
...a has shifted to the left idler roller bolt clockwise 1/2 of a turn . Plug in the power cord, insert the key, and run the treadmill for a few minutes. Make sure that meets all of the specifications described on SOLUTION: a. Be careful to overtighten the walking belt. Idler Roller ... has shifted to 10 cm) off the walking platform. b 3-4 in . (8 to the right, turn the left side of the Pulley (59). Lower the treadmill (see the front cover of this manual. Using the hex key, turn both idler roller bolts counterclockwise, 1/4 of a turn. Remove the four indicated #8 x ...

English Manual
Page 23
... to lift each edge of the walking belt 3 to 10 cm) off the walking platform. The treadmill will recalibrate the incline system. Using b the hex key, turn both idler roller bolts clockwise, 1/4 of the treadmill does not change correctly SOLUTION: a. tered. Repeat until the walking belt is correctly tight- Press the... rise to the maximum incline level and then return to keep the walking belt cen- If the walking belt slips when walked on the treadmill for a few minutes. When the incline is calibrated, remove the key from the console. 23 Be careful to the minimum level.
... to lift each edge of the walking belt 3 to 10 cm) off the walking platform. The treadmill will recalibrate the incline system. Using b the hex key, turn both idler roller bolts clockwise, 1/4 of the treadmill does not change correctly SOLUTION: a. tered. Repeat until the walking belt is correctly tight- Press the... rise to the maximum incline level and then return to keep the walking belt cen- If the walking belt slips when walked on the treadmill for a few minutes. When the incline is calibrated, remove the key from the console. 23 Be careful to the minimum level.


