

User Guide
Page 2
... product names mentioned herein may be trademarks or trade names of Conformity can be found at http://www.nokia.com/phones/declaration_of_conformity/. T9 text input software Copyright © 1999-2005. UNDER NO CIRCUMSTANCES SHALL NOKIA BE RESPONSIBLE FOR ANY LOSS OF DATA OR INCOME OR ANY SPECIAL, INCIDENTAL, AND CONSEQUENTIAL OR INDIRECT DAMAGES...
... product names mentioned herein may be trademarks or trade names of Conformity can be found at http://www.nokia.com/phones/declaration_of_conformity/. T9 text input software Copyright © 1999-2005. UNDER NO CIRCUMSTANCES SHALL NOKIA BE RESPONSIBLE FOR ANY LOSS OF DATA OR INCOME OR ANY SPECIAL, INCIDENTAL, AND CONSEQUENTIAL OR INDIRECT DAMAGES...
User Guide
Page 3
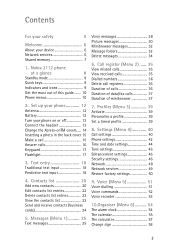
Nokia 2112 phone at a glance 8 Standby mode 9 Quick keys 9 Indicators and icons 9 Get the most out of minibrowser 37 7. Settings (Menu 4 40 Call settings 40 Phone settings 42 Time and date settings 44 Tone settings 45 Enhancement settings 45 Security settings 46 Network 48 Network...Menu 2) ..... 35 View missed calls 35 View received calls 35 Dialled numbers 36 Delete call 15 Answer calls 16 Keyguard 17 Flashlight 17 3. Contents For your safety 5 Welcome 6 About your phone on or off 13 Connect the headset 13 Change the Xpress-onTM covers..... 14 Inserting a ...
Nokia 2112 phone at a glance 8 Standby mode 9 Quick keys 9 Indicators and icons 9 Get the most out of minibrowser 37 7. Settings (Menu 4 40 Call settings 40 Phone settings 42 Time and date settings 44 Tone settings 45 Enhancement settings 45 Security settings 46 Network 48 Network...Menu 2) ..... 35 View missed calls 35 View received calls 35 Dialled numbers 36 Delete call 15 Answer calls 16 Keyguard 17 Flashlight 17 3. Contents For your safety 5 Welcome 6 About your phone on or off 13 Connect the headset 13 Change the Xpress-onTM covers..... 14 Inserting a ...
User Guide
Page 5
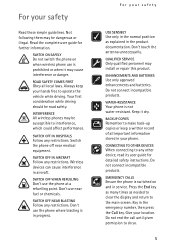
...in your safety Read these simple guidelines. SWITCH OFF IN HOSPITALS Follow any restrictions. SWITCH OFF WHEN REFUELING Don't use the phone where blasting is prohibited or when it dry. Don't use is in the normal position as needed to clear the display and... AND BATTERIES Use only approved enhancements and batteries. BACKUP COPIES Remember to interference, which could affect performance. EMERGENCY CALLS Ensure the phone is not water-resistant. Your first consideration while driving should be susceptible to make back-up copies or keep your location. SWITCH...
...in your safety Read these simple guidelines. SWITCH OFF IN HOSPITALS Follow any restrictions. SWITCH OFF WHEN REFUELING Don't use the phone where blasting is prohibited or when it dry. Don't use is in the normal position as needed to clear the display and... AND BATTERIES Use only approved enhancements and batteries. BACKUP COPIES Remember to interference, which could affect performance. EMERGENCY CALLS Ensure the phone is not water-resistant. Your first consideration while driving should be susceptible to make back-up copies or keep your location. SWITCH...
User Guide
Page 6
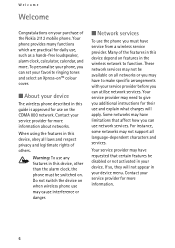
... before you can use , such as a hands-free loudspeaker, alarm clock, calculator, calendar, and more information about networks. Your phone provides many functions which are practical for daily use network services. Contact your service provider for use and explain what charges will not ... features in the wireless network to function. Do not switch the device on when wireless phone use the phone you additional instructions for more information. 6 Many of the Nokia 2112 mobile phone. Your service provider may not support all laws and respect privacy and legitimate rights of ...
... before you can use , such as a hands-free loudspeaker, alarm clock, calculator, calendar, and more information about networks. Your phone provides many functions which are practical for daily use network services. Contact your service provider for use and explain what charges will not ... features in the wireless network to function. Do not switch the device on when wireless phone use the phone you additional instructions for more information. 6 Many of the Nokia 2112 mobile phone. Your service provider may not support all laws and respect privacy and legitimate rights of ...

User Guide
Page 7
Your phone may reduce the memory available for the remaining features. In this device may have a certain amount of memory specially allotted to them in the shared ...
Your phone may reduce the memory available for the remaining features. In this device may have a certain amount of memory specially allotted to them in the shared ...

User Guide
Page 8
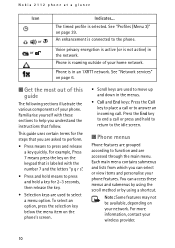
Nokia 2112 phone at a glance 1. Earpiece 3. Keypad 6. Right selection key 4. Connection port 7. Charger port 9. Call key 11. End key 5. Screen 8 Microphone 8. Nokia 2112 phone at a glance 1. Power key 2. Left selection key 12. Scroll key 10.
Nokia 2112 phone at a glance 1. Earpiece 3. Keypad 6. Right selection key 4. Connection port 7. Charger port 9. Call key 11. End key 5. Screen 8 Microphone 8. Nokia 2112 phone at a glance 1. Power key 2. Left selection key 12. Scroll key 10.
User Guide
Page 9
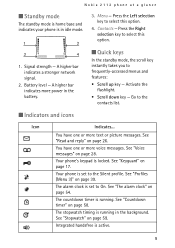
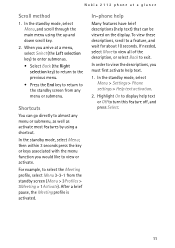
...- See "Voice messages" on page 26. Nokia 2112 phone at a glance ■ Standby mode The standby mode is home base and indicates your phone is locked. Contacts - Battery level - The stopwatch timing is running . See "Read and reply" on page 28. Your phone's keypad is in idle mode. 3. See... background. Press the Left selection key to select this option. 4. The countdown timer is set to the Silent profile. Menu - Your phone is running in the battery. ■ Quick keys In the standby mode, the scroll key instantly takes you to the contacts list. ...
...- See "Voice messages" on page 26. Nokia 2112 phone at a glance ■ Standby mode The standby mode is home base and indicates your phone is locked. Contacts - Battery level - The stopwatch timing is running . See "Read and reply" on page 28. Your phone's keypad is in idle mode. 3. See... background. Press the Left selection key to select this option. 4. The countdown timer is set to the Silent profile. Menu - Your phone is running in the battery. ■ Quick keys In the standby mode, the scroll key instantly takes you to the contacts list. ...
User Guide
Page 10
...: Some features may not be available, depending on the phone's screen. • Scroll keys are asked to perform....of your home network. For more information, contact your phone. The timed profile is not active) in an 1XRTT..., press the selection key below the menu item on your phone features. You can select or view items and personalise your...press and hold to return to the idle screen. ■ Phone menus Phone features are grouped according to function and are used to move...keypad that you are used to answer an incoming call. Phone is connected to end a call or press and hold...
...: Some features may not be available, depending on the phone's screen. • Scroll keys are asked to perform....of your home network. For more information, contact your phone. The timed profile is not active) in an 1XRTT..., press the selection key below the menu item on your phone features. You can select or view items and personalise your...press and hold to return to the idle screen. ■ Phone menus Phone features are grouped according to function and are used to move...keypad that you are used to answer an incoming call. Phone is connected to end a call or press and hold...
User Guide
Page 11
...from any menu or submenu, as well as activate most features by using the up and down scroll key. 2. Highlight On to display help text. 1. Nokia 2112 phone at a menu, select Select (the Left selection key) to enter submenus. • Select Back (the Right selection key) to return to the previous ..., select Menu, and scroll through the main menu using a shortcut. In the standby mode, select Menu; In the standby mode, select Menu > Settings > Phone settings > Help text activation. 2. Shortcuts You can be viewed on the display. To view these descriptions, scroll to exit. In...
...from any menu or submenu, as well as activate most features by using the up and down scroll key. 2. Highlight On to display help text. 1. Nokia 2112 phone at a menu, select Select (the Left selection key) to enter submenus. • Select Back (the Right selection key) to return to the previous ..., select Menu, and scroll through the main menu using a shortcut. In the standby mode, select Menu; In the standby mode, select Menu > Settings > Phone settings > Help text activation. 2. Shortcuts You can be viewed on the display. To view these descriptions, scroll to exit. In...

User Guide
Page 12
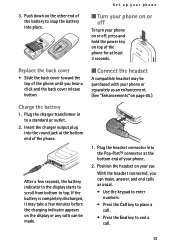
...away from its compartment. Avoiding contact with the antenna affects call quality and may cause the phone to operate at a higher power level than otherwise needed. With the back of the phone facing you have removed the back cover, insert your shoulder. Slide the back cover toward ...remove. Insert the battery, gold-coloured contact end first, into the finger grip and lift the battery from the phone. 2. Contact with the antenna area when operating the phone optimises the antenna performance and the battery life. ■ Battery Always switch the device off and disconnect the ...
...away from its compartment. Avoiding contact with the antenna affects call quality and may cause the phone to operate at a higher power level than otherwise needed. With the back of the phone facing you have removed the back cover, insert your shoulder. Slide the back cover toward ...remove. Insert the battery, gold-coloured contact end first, into the finger grip and lift the battery from the phone. 2. Contact with the antenna area when operating the phone optimises the antenna performance and the battery life. ■ Battery Always switch the device off and disconnect the ...
User Guide
Page 13
...Call key to place a call. • Press the End key to snap the battery into place. Position the headset on the other end of the phone for at least 3 seconds. With the headset connected, you hear a click and the back cover release button. ■ Connect the headset A compatible headset... a few seconds, the battery indicator in to top. Plug the headset connector into the round jack at the bottom end of the phone. Push down on your phone. 2. Insert the charger output plug into the Pop-PortTM connector at the bottom end of your ear. 3. Plug the charger transformer ...
...Call key to place a call. • Press the End key to snap the battery into place. Position the headset on the other end of the phone for at least 3 seconds. With the headset connected, you hear a click and the back cover release button. ■ Connect the headset A compatible headset... a few seconds, the battery indicator in to top. Plug the headset connector into the round jack at the bottom end of the phone. Push down on your phone. 2. Insert the charger output plug into the Pop-PortTM connector at the bottom end of your ear. 3. Plug the charger transformer ...

User Guide
Page 14
Remove the front cover • Gently pull the bottom of the phone and remove. Press the front cover and key mat against the phone and snap the front cover into the new front cover as described earlier. See "Replace the battery" on page 12 and "Replace the back cover" ...on removing the back cover and the battery. Set up your phone ■ Change the Xpress-onTM covers Note: Before removing the cover, always switch off the power and disconnect the charger and any other device. Replace...
Remove the front cover • Gently pull the bottom of the phone and remove. Press the front cover and key mat against the phone and snap the front cover into the new front cover as described earlier. See "Replace the battery" on page 12 and "Replace the back cover" ...on removing the back cover and the battery. Set up your phone ■ Change the Xpress-onTM covers Note: Before removing the cover, always switch off the power and disconnect the charger and any other device. Replace...
User Guide
Page 15
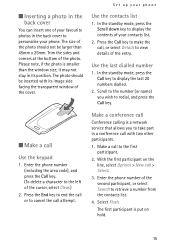
...delete a character to cancel the call attempt. With the first participant on hold. 15 Press the End key to end the call , or select Details to display the last 20 numbers dialled. 2. Set up your phone Use the contacts list 1. In the standby mode, press the Call key to... Select Flash. Use the last dialled number 1. Please note, if the photo is put on the line, select Options > New call to personalise your phone. Enter the phone number of the second participant, or select Search to display the contents of your contacts list. 2. Make a call > Select. 3. ■ Inserting a...
...delete a character to cancel the call attempt. With the first participant on hold. 15 Press the End key to end the call , or select Details to display the last 20 numbers dialled. 2. Set up your phone Use the contacts list 1. In the standby mode, press the Call key to... Select Flash. Use the last dialled number 1. Please note, if the photo is put on the line, select Options > New call to personalise your phone. Enter the phone number of the second participant, or select Search to display the contents of your contacts list. 2. Make a call > Select. 3. ■ Inserting a...
User Guide
Page 16
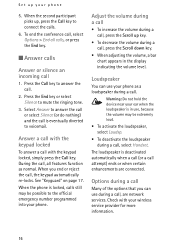
... near your ear when the loudspeaker is locked, calls still may be possible to the official emergency number programmed into your phone 5. Check with your phone as normal. When you can use , because the volume may be extremely loud. • To activate the loudspeaker, ...select Loudsp. • To deactivate the loudspeaker during a call attempt) ends or when certain enhancements are network services. When the phone is in the display indicating the volume level. To end the conference call is deactivated automatically when a call (or a call , are ...
... near your ear when the loudspeaker is locked, calls still may be possible to the official emergency number programmed into your phone 5. Check with your phone as normal. When you can use , because the volume may be extremely loud. • To activate the loudspeaker, ...select Loudsp. • To deactivate the loudspeaker during a call attempt) ends or when certain enhancements are network services. When the phone is in the display indicating the volume level. To end the conference call is deactivated automatically when a call (or a call , are ...

User Guide
Page 17
... Call key. Unlock the keypad Select Unlock with the Left selection key, and press * within two seconds. 17 Remember to lock your phone keypad to prevent keys from being pressed accidentally. Key in quick succession. The light stays on until you press the Scroll up key. ...keyguard, you can lock the keypad to prevent accidental calls. After the call . 2. To activate the flashlight, press and hold the Scroll up your phone. For more information, see "Personalise a profile" on , calls still may be possible to an incoming call in progress. 1. Set up key. You...
... Call key. Unlock the keypad Select Unlock with the Left selection key, and press * within two seconds. 17 Remember to lock your phone keypad to prevent keys from being pressed accidentally. Key in quick succession. The light stays on until you press the Scroll up key. ...keyguard, you can lock the keypad to prevent accidental calls. After the call . 2. To activate the flashlight, press and hold the Scroll up your phone. For more information, see "Personalise a profile" on , calls still may be possible to an incoming call in progress. 1. Set up key. You...

User Guide
Page 18
See more about special characters on ). Text entry You can navigate through the list of special characters by using your phone awaits the next entry. • Press 0 to enter a space thereby accepting a completed word. • Press 1 to enter a period (.). • Press * to insert the first letter ...
See more about special characters on ). Text entry You can navigate through the list of special characters by using your phone awaits the next entry. • Press 0 to enter a space thereby accepting a completed word. • Press 1 to enter a period (.). • Press * to insert the first letter ...

User Guide
Page 20
...any entry is automatically set as the default, but the default number can always be changed. 20 Select Options > Save > Select. 3. Enter the phone number, and select OK > Done. Contacts list The contacts list can add an E-mail, Web address, Postal address, or Note to 250 contacts,... with multiple numbers and text notes for each contact. Select and hold up to the entry. 4. Save an entry 1. Select the address or note of phone numbers and short text items per name to an existing entry (contact). 1. Enter the name, and select OK. 3. Select Options > Add detail >...
...any entry is automatically set as the default, but the default number can always be changed. 20 Select Options > Save > Select. 3. Enter the phone number, and select OK > Done. Contacts list The contacts list can add an E-mail, Web address, Postal address, or Note to 250 contacts,... with multiple numbers and text notes for each contact. Select and hold up to the entry. 4. Save an entry 1. Select the address or note of phone numbers and short text items per name to an existing entry (contact). 1. Enter the name, and select OK. 3. Select Options > Add detail >...
User Guide
Page 21
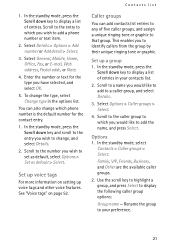
... the contact entry. 1. You can add contacts list entries to any of entries in the options list. Caller groups You can also change which phone number is the default number for the type you wish to display a list of entries. Set up voice tags For more information on page 52.... Family, VIP, Friends, Business, and Other are the available caller groups. 2. This enables you would like to add to add a phone number or text item. 2. Rename the group to set as default, select Options > Set as default > Select. Scroll to a name you to that group. ...
... the contact entry. 1. You can add contacts list entries to any of entries in the options list. Caller groups You can also change which phone number is the default number for the type you wish to display a list of entries. Set up voice tags For more information on page 52.... Family, VIP, Friends, Business, and Other are the available caller groups. 2. This enables you would like to add to add a phone number or text item. 2. Rename the group to set as default, select Options > Set as default > Select. Scroll to a name you to that group. ...

User Guide
Page 22
...dialling entry you wish to delete, and select Options. 3. Scroll to the speed dialling location you wish to turn speed dialling on or off , the phone displays a prompt asking if you wish to edit, and select Details. 3. Group members - In the standby mode, select Contacts > Speed dials >... OK to retrieve a number from the contacts list, and select OK. 4. Add a voice tag to activate speed dialling. Edit number - Delete a phone number from the contacts list. 4. Select Yes to the contact. Set the ringing tone for the entry, and select OK. Scroll to retrieve a number...
...dialling entry you wish to delete, and select Options. 3. Scroll to the speed dialling location you wish to turn speed dialling on or off , the phone displays a prompt asking if you wish to edit, and select Details. 3. Group members - In the standby mode, select Contacts > Speed dials >... OK to retrieve a number from the contacts list, and select OK. 4. Add a voice tag to activate speed dialling. Edit number - Delete a phone number from the contacts list. 4. Select Yes to the contact. Set the ringing tone for the entry, and select OK. Scroll to retrieve a number...

User Guide
Page 23
...contact to Delete all. 5. Change the default number of the contact. Add detail - Send bus. Edit the name of the contact. Delete - Select Phone, select Delete > OK to confirm. 4. In the standby mode, select Contacts. Add new - Edit an existing name. Delete - Add a custom ringing ...tone to another phone. Send the contact as default - Find a name or select from your contacts list. Change the number type to General, Mobile, Home, Office...
...contact to Delete all. 5. Change the default number of the contact. Add detail - Send bus. Edit the name of the contact. Delete - Select Phone, select Delete > OK to confirm. 4. In the standby mode, select Contacts. Add new - Edit an existing name. Delete - Add a custom ringing ...tone to another phone. Send the contact as default - Find a name or select from your contacts list. Change the number type to General, Mobile, Home, Office...


