User Guide
Page 3
... and XP users 5 Install PC Suite 6 Remove PC Suite 8 3 Nokia Content Copier 9 Learn about compatible phones 9 Learn about Content Copier 10 Learn about other Nokia phones 14 4 Nokia PC Composer 16 Tour PC Composer 17 Compose a new ringing tone 18 Learn about other PC Composer views 20 Save your new ringing tone 21 Transfer ringing tone to your phone 21 Create ringing tones from MIDI files 22 Work with RTTTL ringing tone files 24 5 Nokia PC Sync 25 Configure...
... and XP users 5 Install PC Suite 6 Remove PC Suite 8 3 Nokia Content Copier 9 Learn about compatible phones 9 Learn about Content Copier 10 Learn about other Nokia phones 14 4 Nokia PC Composer 16 Tour PC Composer 17 Compose a new ringing tone 18 Learn about other PC Composer views 20 Save your new ringing tone 21 Transfer ringing tone to your phone 21 Create ringing tones from MIDI files 22 Work with RTTTL ringing tone files 24 5 Nokia PC Sync 25 Configure...
User Guide
Page 7
...; wireless modem installation instructions for your Nokia 6370 or 6385 phone • how to configure your data/fax software for digital data calls (using your Nokia 6370 or 6385 phone as a wireless modem • OBSERVE SYSTEM REQUIREMENTS To install and run Nokia PC Suite 4.6, you need: • Nokia 6385 or 6370 phone • an Intel-compatible PC running Windows 98 (First or Second Ed.), Windows Millennium Edition (ME), Windows 2000 Professional, Windows XP (Home...
...; wireless modem installation instructions for your Nokia 6370 or 6385 phone • how to configure your data/fax software for digital data calls (using your Nokia 6370 or 6385 phone as a wireless modem • OBSERVE SYSTEM REQUIREMENTS To install and run Nokia PC Suite 4.6, you need: • Nokia 6385 or 6370 phone • an Intel-compatible PC running Windows 98 (First or Second Ed.), Windows Millennium Edition (ME), Windows 2000 Professional, Windows XP (Home...
User Guide
Page 9
... should not make or receive calls while synchronizing data between the phone and a PC. • Do not point the IR beam at anyone's eyes or allow it may cause interference or danger. • Please make backup copies of all important data to protect against possible loss or alteration. • When connecting to interfere with other device, read its user guide for use is not...
... should not make or receive calls while synchronizing data between the phone and a PC. • Do not point the IR beam at anyone's eyes or allow it may cause interference or danger. • Please make backup copies of all important data to protect against possible loss or alteration. • When connecting to interfere with other device, read its user guide for use is not...
User Guide
Page 10
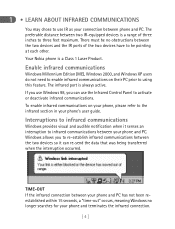
... the two devices have to be no longer searches for your phone's user guide. To enable infrared communications on their PC prior to using this feature. Windows allows you can re-send the data that was being transferred when the interruption occurred. Your Nokia phone is always active. The infrared port is a Class 1 Laser Product. TIME-OUT If the infrared connection between your phone and PC...
... the two devices have to be no longer searches for your phone's user guide. To enable infrared communications on their PC prior to using this feature. Windows allows you can re-send the data that was being transferred when the interruption occurred. Your Nokia phone is always active. The infrared port is a Class 1 Laser Product. TIME-OUT If the infrared connection between your phone and PC...

User Guide
Page 17
... source phone When you select Copy data from a phone to a PC, Content Copier transfers all compatible data types (phone book, calendar, to your PC's hard drive. • If you want to a PC via IR should have already performed the wireless modem installation before installing PC Suite. Nokia PC Suite 4 - Important: Windows ME and XP users who are copying data from a different source to -do, caller groups, etc.) from the Start Menu (Start - Programs -
... source phone When you select Copy data from a phone to a PC, Content Copier transfers all compatible data types (phone book, calendar, to your PC's hard drive. • If you want to a PC via IR should have already performed the wireless modem installation before installing PC Suite. Nokia PC Suite 4 - Important: Windows ME and XP users who are copying data from a different source to -do, caller groups, etc.) from the Start Menu (Start - Programs -
User Guide
Page 23
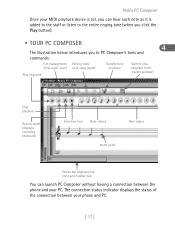
... you to PC Composer's tools and commands: File management (new, open, save) Play ring tone Editing tools (cut, copy, paste) Transfer tone to phone Switch view (displays event tracker window) Stop playback Record mode (displays recording keyboard) Selection tool Note values Rest values Insert point Status bar displays help texts and toolbar tips You can launch PC Composer without having a connection between your PC. The connection status indicator displays the status of the connection between the phone and your phone and PC. [ 17 ]
... you to PC Composer's tools and commands: File management (new, open, save) Play ring tone Editing tools (cut, copy, paste) Transfer tone to phone Switch view (displays event tracker window) Stop playback Record mode (displays recording keyboard) Selection tool Note values Rest values Insert point Status bar displays help texts and toolbar tips You can launch PC Composer without having a connection between your PC. The connection status indicator displays the status of the connection between the phone and your phone and PC. [ 17 ]
User Guide
Page 27
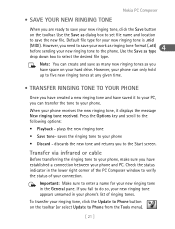
... a new ringing tone and have saved it displays the message New ringing tone received. Important: Make sure to select the desired file type. Use the Save as type drop down box to enter a name for your phone receives the new ringing tone, it to your phone. plays the new ringing tone • Save tone- If you fail to save the new file. Nokia PC Composer • SAVE YOUR NEW RINGING TONE When you are ready to your phone • Discard - saves the ringing tone to save as many new ringing tones as ringing tone format (.ott) before sending your new ringing tone...
... a new ringing tone and have saved it displays the message New ringing tone received. Important: Make sure to select the desired file type. Use the Save as type drop down box to enter a name for your phone receives the new ringing tone, it to your phone. plays the new ringing tone • Save tone- If you fail to save the new file. Nokia PC Composer • SAVE YOUR NEW RINGING TONE When you are ready to your phone • Discard - saves the ringing tone to save as many new ringing tones as ringing tone format (.ott) before sending your new ringing tone...
User Guide
Page 30
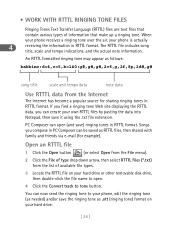
... phone is actually 4 receiving the information in RTTTL format. When your phone receives a ringing tone over the air, your own RTTTL files by pasting the data into Notepad, then save the ringing tone as needed) and/or save it using the .txt file extension. You can open . 4 Click the Convert track to your phone, edit the ringing tone (as .ott (ringing tone) format on your hard drive. [ 24 ] • WORK WITH RTTTL RINGING TONE FILES Ringing Tones Text Transfer Language (RTTTL) files are text files that make up a ringing tone...
... phone is actually 4 receiving the information in RTTTL format. When your phone receives a ringing tone over the air, your own RTTTL files by pasting the data into Notepad, then save the ringing tone as needed) and/or save it using the .txt file extension. You can open . 4 Click the Convert track to your phone, edit the ringing tone (as .ott (ringing tone) format on your hard drive. [ 24 ] • WORK WITH RTTTL RINGING TONE FILES Ringing Tones Text Transfer Language (RTTTL) files are text files that make up a ringing tone...
User Guide
Page 32
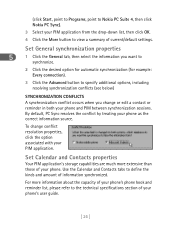
.... To change or edit a contact or reminder in both your PIM application from the drop-down list, then click OK. 4 Click the More button to view a summary of information synchronized. Set Calendar and Contacts properties Your PIM application's storage capabilities are much more information about the capacity of your phone's phone book and reminder list, please refer to the technical specifications section of your phone's user guide...
.... To change or edit a contact or reminder in both your PIM application from the drop-down list, then click OK. 4 Click the More button to view a summary of information synchronized. Set Calendar and Contacts properties Your PIM application's storage capabilities are much more information about the capacity of your phone's phone book and reminder list, please refer to the technical specifications section of your phone's user guide...
User Guide
Page 43
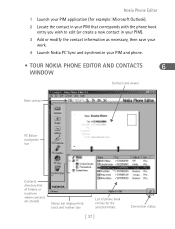
... phone book entry you wish to edit (or create a new contact in your PIM). 3 Add or modify the contact information as necessary, then save your work. 4 Launch Nokia PC Sync and synchronize your PIM and phone. • TOUR NOKIA PHONE EDITOR AND CONTACTS 6 WINDOW Contact card viewer New contact PC Editor navigation bar Contacts directory (list of folders or locations where contacts are stored) Status bar displays help texts and toolbar tips List of phone book entries for the selected folder. [ 37 ] Connection...
... phone book entry you wish to edit (or create a new contact in your PIM). 3 Add or modify the contact information as necessary, then save your work. 4 Launch Nokia PC Sync and synchronize your PIM and phone. • TOUR NOKIA PHONE EDITOR AND CONTACTS 6 WINDOW Contact card viewer New contact PC Editor navigation bar Contacts directory (list of folders or locations where contacts are stored) Status bar displays help texts and toolbar tips List of phone book entries for the selected folder. [ 37 ] Connection...
User Guide
Page 53
.... 1 Make sure your computer's power is the data bearer. • CONNECT FOR THE FIRST TIME USING DLR-3P OR DKU-6 Important: If you are using the DKU-6 USB cable, you must already have chosen IR as your operating system. You may also want the ability to send faxes, you need to create an additional modem installation where CSD is turned off. 2 Connect the...
.... 1 Make sure your computer's power is the data bearer. • CONNECT FOR THE FIRST TIME USING DLR-3P OR DKU-6 Important: If you are using the DKU-6 USB cable, you must already have chosen IR as your operating system. You may also want the ability to send faxes, you need to create an additional modem installation where CSD is turned off. 2 Connect the...
User Guide
Page 63
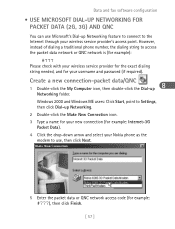
... click Next. 5 Enter the packet data or QNC network access code (for your username and password (if required). Windows 2000 and Windows ME users: Click Start, point to Settings, then click Dial-up Networking. 2 Double-click the Make New Connection icon. 3 Type a name for your new connection (for example: Internet-3G Packet Data). 4 Click the drop-down arrow and select your Nokia phone as the modem to use Microsoft's Dial-up Networking folder. Create a new connection-packet data/QNC 8 1 Double...
... click Next. 5 Enter the packet data or QNC network access code (for your username and password (if required). Windows 2000 and Windows ME users: Click Start, point to Settings, then click Dial-up Networking. 2 Double-click the Make New Connection icon. 3 Type a name for your new connection (for example: Internet-3G Packet Data). 4 Click the drop-down arrow and select your Nokia phone as the modem to use Microsoft's Dial-up Networking folder. Create a new connection-packet data/QNC 8 1 Double...
User Guide
Page 66
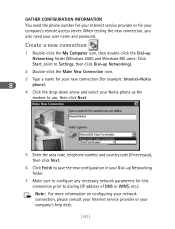
... Computer icon, then double-click the Dial-up Networking folder (Windows 2000 and Windows ME users: Click Start, point to Settings, then click Dial-up Networking folder. 7 Make sure to configure any necessary network parameters for your user name and password. GATHER CONFIGURATION INFORMATION You need your company's remote access server. When testing the new connection, you also need the phone number for your Internet service provider or for this connection prior to save the new configuration...
... Computer icon, then double-click the Dial-up Networking folder (Windows 2000 and Windows ME users: Click Start, point to Settings, then click Dial-up Networking folder. 7 Make sure to configure any necessary network parameters for your user name and password. GATHER CONFIGURATION INFORMATION You need your company's remote access server. When testing the new connection, you also need the phone number for your Internet service provider or for this connection prior to save the new configuration...
User Guide
Page 67
Contact your service provider to verify that Modem (telephone line connection) is selected as the type of connection device you establish a connection between your phone and PC (using the serial cable or IR) before making a digital data call appears on the phone's screen. Once a successful connection has been made, Data call . 1 Double-click the new connection (for example: Internet-Nokia). 2 Enter your user name and password, then click Connect. 3 Your phone displays Connecting... while establishing a connection. MODEM SETUP To add your Nokia phone as...
Contact your service provider to verify that Modem (telephone line connection) is selected as the type of connection device you establish a connection between your phone and PC (using the serial cable or IR) before making a digital data call appears on the phone's screen. Once a successful connection has been made, Data call . 1 Double-click the new connection (for example: Internet-Nokia). 2 Enter your user name and password, then click Connect. 3 Your phone displays Connecting... while establishing a connection. MODEM SETUP To add your Nokia phone as...

User Guide
Page 74
... receive incoming voice calls. Please refer to place calls with either remove the data cable, interrupt the IR connection, or turn the phone's power off and back on to your choice. 4 Press to return to make this modification once; This option uses the phone's menu to pre-arrange inbound data and fax calls, rather than entering customized modem initialization strings into your data or fax software. 8 USE YOUR PHONE'S MENU 1 From the Start screen, press Menu 9-2-1 (Mobile...
... receive incoming voice calls. Please refer to place calls with either remove the data cable, interrupt the IR connection, or turn the phone's power off and back on to your choice. 4 Press to return to make this modification once; This option uses the phone's menu to pre-arrange inbound data and fax calls, rather than entering customized modem initialization strings into your data or fax software. 8 USE YOUR PHONE'S MENU 1 From the Start screen, press Menu 9-2-1 (Mobile...
User Guide
Page 79
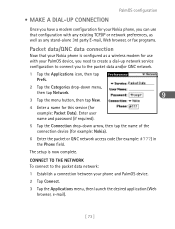
... use that configuration with any existing TCP/IP or network preferences, as well as any stand-alone 3rd party E-mail, Web browser, or fax programs. Packet data/QNC data connection Now that your Nokia phone is now complete. Enter user name and password (if required). 5 Tap the Connection drop-down menu, then tap Network. 9 3 Tap the menu button, then tap New. 4 Enter a name for this service (for example: Packet Data). PalmOS configuration • MAKE A DIAL...
... use that configuration with any existing TCP/IP or network preferences, as well as any stand-alone 3rd party E-mail, Web browser, or fax programs. Packet data/QNC data connection Now that your Nokia phone is now complete. Enter user name and password (if required). 5 Tap the Connection drop-down menu, then tap Network. 9 3 Tap the menu button, then tap New. 4 Enter a name for this service (for example: Packet Data). PalmOS configuration • MAKE A DIAL...
User Guide
Page 93
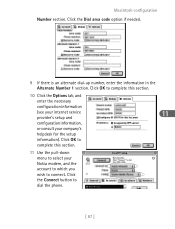
...). Click the Connect button to complete this section. 10 Click the Options tab, and enter the necessary configuration information (see your internet service 11 provider's setup and configuration information, or consult your Nokia modem, and the account to which you wish to connect. Macintosh configuration Number section. Click the Dial area code option if needed. 9 If there is an alternate dial-up number, enter the information...
...). Click the Connect button to complete this section. 10 Click the Options tab, and enter the necessary configuration information (see your internet service 11 provider's setup and configuration information, or consult your Nokia modem, and the account to which you wish to connect. Macintosh configuration Number section. Click the Dial area code option if needed. 9 If there is an alternate dial-up number, enter the information...
User Guide
Page 95
... data software 56 Configure fax software 65 Configure PC Sync 25 Connect to a network/Internet 58, 61 Connect to Palm devices 69 Connection Manager 13 Connection preferences (Palm) 72 Connection to PocketPC devices 75 Contacts custom contact lists 31 deleting-settings 27 Content Copier 9 basics 10 compatible phones 9 log 14 saving data 12 source phone 11 target phone 12 unsupported phones 14 Copy contacts 39 Copy data to Create a new tcaorngnetecpthioonne571,2 60 CSD AOL settings 61 data call (PocketPC OS) 82 dial-up connection...
... data software 56 Configure fax software 65 Configure PC Sync 25 Connect to a network/Internet 58, 61 Connect to Palm devices 69 Connection Manager 13 Connection preferences (Palm) 72 Connection to PocketPC devices 75 Contacts custom contact lists 31 deleting-settings 27 Content Copier 9 basics 10 compatible phones 9 log 14 saving data 12 source phone 11 target phone 12 unsupported phones 14 Copy contacts 39 Copy data to Create a new tcaorngnetecpthioonne571,2 60 CSD AOL settings 61 data call (PocketPC OS) 82 dial-up connection...
User Guide
Page 96
... dial-up connection for PalmOS 73 modem setup (PocketPC OS) 77 when to use 45 GPRS data AOL settings 58 H Hardware setup PC Composer 16 I Ignore contact deletions 27 Infrared 4 Installation change language of installation 8 language selection 7 note to Windows ME users 5 PC Suite 5 uninstall PC Suite 8 Internet access wireless service provider 44 Introduction 1 IR 3 enable IR on PC 50 establishing a connection 50 Windows 2000 update 52 Windows NT Workstation 4.0 55 M Modem driver download 46 Modem installation 51 Windows...
... dial-up connection for PalmOS 73 modem setup (PocketPC OS) 77 when to use 45 GPRS data AOL settings 58 H Hardware setup PC Composer 16 I Ignore contact deletions 27 Infrared 4 Installation change language of installation 8 language selection 7 note to Windows ME users 5 PC Suite 5 uninstall PC Suite 8 Internet access wireless service provider 44 Introduction 1 IR 3 enable IR on PC 50 establishing a connection 50 Windows 2000 update 52 Windows NT Workstation 4.0 55 M Modem driver download 46 Modem installation 51 Windows...
User Guide
Page 97
... starting application 29 supported PIMs 25 synchronize for the first time 28 task bar icon 29 PC Sync configuration calendar and conacts 26 general 26 PIM properties 27 resolving conflicts 26 Phone Editor add/delete contacts 38 change group graphic 41 Contacts window 37 edit caller groups 41 edit profiles 40 limitations 36 managing contacts 37 rename caller groups 41 PIM 3 PocketPC 1X digital data call 79 CSD data call 82 modem setup...
... starting application 29 supported PIMs 25 synchronize for the first time 28 task bar icon 29 PC Sync configuration calendar and conacts 26 general 26 PIM properties 27 resolving conflicts 26 Phone Editor add/delete contacts 38 change group graphic 41 Contacts window 37 edit caller groups 41 edit profiles 40 limitations 36 managing contacts 37 rename caller groups 41 PIM 3 PocketPC 1X digital data call 79 CSD data call 82 modem setup...


