User Guide
Page 15
Copyright © 2003 Nokia. All rights reserved. 15 • Loudspeaker (p. 30), Radio (p. 77), Flashlight (p. 18), Calorie counter (p. 93), Thermometer (p. 94), Countdown timer (p. 90), Stopwatch (p. 92), Automatic volume control (p. 65) ... them dry with a lint-free cloth. • Always be sure that the phone is completely dry when you open the battery cover: SIM card, battery and inner parts are not protected against water. • Always be sure that the battery cover is dry and clean and that it is properly closed. • Always...
Copyright © 2003 Nokia. All rights reserved. 15 • Loudspeaker (p. 30), Radio (p. 77), Flashlight (p. 18), Calorie counter (p. 93), Thermometer (p. 94), Countdown timer (p. 90), Stopwatch (p. 92), Automatic volume control (p. 65) ... them dry with a lint-free cloth. • Always be sure that the phone is completely dry when you open the battery cover: SIM card, battery and inner parts are not protected against water. • Always be sure that the battery cover is dry and clean and that it is properly closed. • Always...
User Guide
Page 21
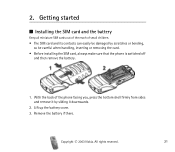
... the battery cover. 3. Getting started ■ Installing the SIM card and the battery Keep all miniature SIM cards out of the reach of the phone facing you, press the bottom shell firmly from sides and remove it downwards. 2. All rights reserved. 21 Remove the battery if there. 2. Copyright © 2003 Nokia. With the...
... the battery cover. 3. Getting started ■ Installing the SIM card and the battery Keep all miniature SIM cards out of the reach of the phone facing you, press the bottom shell firmly from sides and remove it downwards. 2. All rights reserved. 21 Remove the battery if there. 2. Copyright © 2003 Nokia. With the...

User Guide
Page 22
Copyright © 2003 Nokia. All rights reserved. 22 See the step 5 in Changing the shells for reference. Close the SIM card holder. 7. Release the SIM card holder by pulling it locks into the SIM card holder and ensure that the bevelled corner is facing downwards. 6. Insert your SIM card into its place. Slide the bottom shell back on until it downwards. 5. Attach the battery cover back on the top left and the golden contact area is on . 9. Replace the battery. 8. 4.
Copyright © 2003 Nokia. All rights reserved. 22 See the step 5 in Changing the shells for reference. Close the SIM card holder. 7. Release the SIM card holder by pulling it locks into the SIM card holder and ensure that the bevelled corner is facing downwards. 6. Insert your SIM card into its place. Slide the bottom shell back on until it downwards. 5. Attach the battery cover back on the top left and the golden contact area is on . 9. Replace the battery. 8. 4.

User Guide
Page 23
Replace the new top shell by pressing the locking springs on page 21. 2. All rights reserved. 23 Remove the bottom shell of the phone, see for details the step 1 in Installing the SIM card and the battery on sides and then sliding the top shell upwards. 3. ... to the bottom shell. Always store and use the phone with the covers attached. 1. Copyright © 2003 Nokia. Detach the top shell by sliding it over the phone's display. 4. ■ Changing the shells Before changing the cover, always switch off the power and disconnect the phone from the charger or any other device.
Replace the new top shell by pressing the locking springs on page 21. 2. All rights reserved. 23 Remove the bottom shell of the phone, see for details the step 1 in Installing the SIM card and the battery on sides and then sliding the top shell upwards. 3. ... to the bottom shell. Always store and use the phone with the covers attached. 1. Copyright © 2003 Nokia. Detach the top shell by sliding it over the phone's display. 4. ■ Changing the shells Before changing the cover, always switch off the power and disconnect the phone from the charger or any other device.


