Nokia 2600 classic User Guide in English
Page 6
... and multimedia messages 24 Text messages 24 Multimedia messages 25 Get started..........14 Install SIM card and battery 14 Charge the battery..........15 Change front cover.........16 Antenna 16 Strap 17 Keys and parts 17 Switch the phone on and off 18 Standby mode 19 Keypad lock (keyguard 19 Functions without...21 Text modes 21 Traditional text input 22 Predictive text input 22 5. Contents For your device...........11 Network services 11 Enhancements 12 Access codes 12 Nokia support 13 2. Navigate the menus 23 6. General information............11 About your safety 9 1.
... and multimedia messages 24 Text messages 24 Multimedia messages 25 Get started..........14 Install SIM card and battery 14 Charge the battery..........15 Change front cover.........16 Antenna 16 Strap 17 Keys and parts 17 Switch the phone on and off 18 Standby mode 19 Keypad lock (keyguard 19 Functions without...21 Text modes 21 Traditional text input 22 Predictive text input 22 5. Contents For your device...........11 Network services 11 Enhancements 12 Access codes 12 Nokia support 13 2. Navigate the menus 23 6. General information............11 About your safety 9 1.
Nokia 2600 classic User Guide in English
Page 14
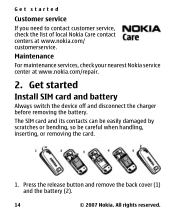
... battery Always switch the device off and disconnect the charger before removing the battery. All rights reserved. Press the release button and remove the back cover (1) and the battery (2). 14 © 2007 Nokia. Get started Customer service If you need to contact customer service, check the list of local...
... battery Always switch the device off and disconnect the charger before removing the battery. All rights reserved. Press the release button and remove the back cover (1) and the battery (2). 14 © 2007 Nokia. Get started Customer service If you need to contact customer service, check the list of local...
Nokia 2600 classic User Guide in English
Page 15
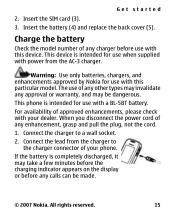
... Connect the lead from the AC-3 charger. For availability of any other types may be made. © 2007 Nokia. Insert the battery (4) and replace the back cover (5). Connect the charger to the charger connector of your dealer. This phone is intended for use when supplied with ...a BL-5BT battery. Get started 2. Warning: Use only batteries, chargers, and enhancements approved by Nokia for use of approved enhancements...
... Connect the lead from the AC-3 charger. For availability of any other types may be made. © 2007 Nokia. Insert the battery (4) and replace the back cover (5). Connect the charger to the charger connector of your dealer. This phone is intended for use when supplied with ...a BL-5BT battery. Get started 2. Warning: Use only batteries, chargers, and enhancements approved by Nokia for use of approved enhancements...
Nokia 2600 classic User Guide in English
Page 16
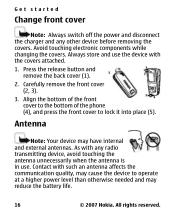
...may reduce the battery life. 16 © 2007 Nokia. All rights reserved. As with any other device before removing the covers. Contact with the covers attached. 1. Press the release button and remove the back cover (1). 2. Get started Change front cover Note: Always switch off the power and disconnect the ...communication quality, may cause the device to lock it into place (5). Align the bottom of the front cover to the bottom of the phone (4), and press the front cover to operate at a higher power level than otherwise needed and may have internal and external antennas. Always...
...may reduce the battery life. 16 © 2007 Nokia. All rights reserved. As with any other device before removing the covers. Contact with the covers attached. 1. Press the release button and remove the back cover (1). 2. Get started Change front cover Note: Always switch off the power and disconnect the ...communication quality, may cause the device to lock it into place (5). Align the bottom of the front cover to the bottom of the phone (4), and press the front cover to operate at a higher power level than otherwise needed and may have internal and external antennas. Always...
Nokia 2600 classic User Guide in English
Page 17
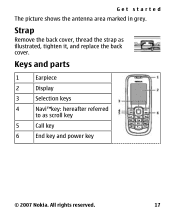
Strap Remove the back cover, thread the strap as scroll key 5 Call key 6 End key and power key © 2007 Nokia. Get started The picture shows the antenna area marked in grey. All rights reserved. 17 Keys and parts 1 Earpiece 2 Display 3 Selection keys 4 Navi™key: hereafter referred to as illustrated, tighten it, and replace the back cover.
Strap Remove the back cover, thread the strap as scroll key 5 Call key 6 End key and power key © 2007 Nokia. Get started The picture shows the antenna area marked in grey. All rights reserved. 17 Keys and parts 1 Earpiece 2 Display 3 Selection keys 4 Navi™key: hereafter referred to as illustrated, tighten it, and replace the back cover.


