Instruction Manual
Page 2
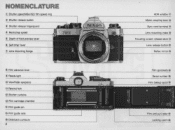
... ® Shutter release button ® Shutter release fingerguard ® Depth-of-field preview lever ® Self-timer lever (J) Lens flange ® Film advance lever ® @J Viewfinder eyepiece (jj) Rewind fork @ Shutter curtains @ Film cartridge chamber ® Film guide pin @ Film guide rails @ Data back contacts 2 ADR window @ Meter coupling lever @ Sync...
... ® Shutter release button ® Shutter release fingerguard ® Depth-of-field preview lever ® Self-timer lever (J) Lens flange ® Film advance lever ® @J Viewfinder eyepiece (jj) Rewind fork @ Shutter curtains @ Film cartridge chamber ® Film guide pin @ Film guide rails @ Data back contacts 2 ADR window @ Meter coupling lever @ Sync...
Instruction Manual
Page 4
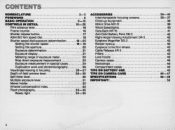
...display 21 Metering range of exposure meter 22 Stop-down exposure measurement 23 Exposure measurement in special cases 24 Duplication work and photomicrography 25 Viewfinder/viewing & focusing 26-27 Depth-of-field preview lever 28-30 Self-timer lever 30 Multiple exposure lever 31 Memo holder 32 Infrared...photography 33-35 Ready-light 34-35 ACCESSORIES 36-44 Interchangeable focusing screens 36- 37 Close-up equipment 38 Motor Drive MD-12 39 Nikon Speedlights 40 Data Back MF-16 41 Anti -Cold Battery Pack OB·2 42 Right-Angle Viewing Attachment DR-3 42 Eyepiece Magnifier DG...
...display 21 Metering range of exposure meter 22 Stop-down exposure measurement 23 Exposure measurement in special cases 24 Duplication work and photomicrography 25 Viewfinder/viewing & focusing 26-27 Depth-of-field preview lever 28-30 Self-timer lever 30 Multiple exposure lever 31 Memo holder 32 Infrared...photography 33-35 Ready-light 34-35 ACCESSORIES 36-44 Interchangeable focusing screens 36- 37 Close-up equipment 38 Motor Drive MD-12 39 Nikon Speedlights 40 Data Back MF-16 41 Anti -Cold Battery Pack OB·2 42 Right-Angle Viewing Attachment DR-3 42 Eyepiece Magnifier DG...

Instruction Manual
Page 7
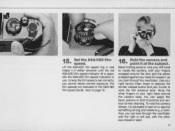
... sufficient, in which case you have taken your finger off the button. 6 Check battery power. • Switch the exposure meter on while looking through the viewfinder. Be sure to unlock the shutter release button (g • The fi lm advance lever doubles as a shutter release button lock.
... sufficient, in which case you have taken your finger off the button. 6 Check battery power. • Switch the exposure meter on while looking through the viewfinder. Be sure to unlock the shutter release button (g • The fi lm advance lever doubles as a shutter release button lock.
Instruction Manual
Page 11
For film speeds not indicated in use. You can look through the viewfinder with the right or left hand to wind the film advance lever. ...film speed indication in the ASAIISO film speed dial ®, refer to depress the shutter release button and your body for support, as you cannot obtain correct exposure. Unless the film speed is advisable to lean on or ...strong and stable (e.g., a wall). Basic holding posture: Use your left eye, with your fingers wrapped around the camera body. 15 Set the ASAIISO film • speed. Lift the ASA/ISO film speed ring CD and rotate it is ...
For film speeds not indicated in use. You can look through the viewfinder with the right or left hand to wind the film advance lever. ...film speed indication in the ASAIISO film speed dial ®, refer to depress the shutter release button and your body for support, as you cannot obtain correct exposure. Unless the film speed is advisable to lean on or ...strong and stable (e.g., a wall). Basic holding posture: Use your left eye, with your fingers wrapped around the camera body. 15 Set the ASAIISO film • speed. Lift the ASA/ISO film speed ring CD and rotate it is ...
Instruction Manual
Page 12
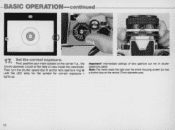
Important! -BASIC OPERATION-continued---------- 1l Set the correct exposure. • First, position your main subject at the center (i.e., the 12mm-diameter circle) of the field of shutter speed are usable. Nota: The meter reads the light over the entire focusing screen but not of view inside the viewfinder. Intermediate settings of lens aperture but has a distinct bias on the central 12mm-diameter area. 12 Then turn the shutter speed dial ® and/or lens aperture ring @ until the LED lamp for the symbol for correct exposure 0 lights up.
Important! -BASIC OPERATION-continued---------- 1l Set the correct exposure. • First, position your main subject at the center (i.e., the 12mm-diameter circle) of the field of shutter speed are usable. Nota: The meter reads the light over the entire focusing screen but not of view inside the viewfinder. Intermediate settings of lens aperture but has a distinct bias on the central 12mm-diameter area. 12 Then turn the shutter speed dial ® and/or lens aperture ring @ until the LED lamp for the symbol for correct exposure 0 lights up.

Instruction Manual
Page 13
Correct focus will then be secured. 13 Look through the viewfinder while turning the focusing ring until the two halves of the split image rangefinder coincide perfectly to form a single unbroken image and the image in the microprism grid appears sharp. 18 Focus on the subject • by rotating the lens focusing ring 46 • The FM2 is provided with the Type K2 focusing screen as standard.
Correct focus will then be secured. 13 Look through the viewfinder while turning the focusing ring until the two halves of the split image rangefinder coincide perfectly to form a single unbroken image and the image in the microprism grid appears sharp. 18 Focus on the subject • by rotating the lens focusing ring 46 • The FM2 is provided with the Type K2 focusing screen as standard.

Instruction Manual
Page 14
... release button, apply light but steady pressure with the ball of your index finger to depress the button all the way. 14 Look through the viewfinder, and depress the shutter release button.
... release button, apply light but steady pressure with the ball of your index finger to depress the button all the way. 14 Look through the viewfinder, and depress the shutter release button.

Instruction Manual
Page 15
... Put the film advance • lever back into place. this position which locks the shutter release button and keeps the exposure indicator lamps inside the viewfinder switched off . 15 Note: Even if the exposure indicator lamp is now fully rewound into the cartridge. 23 Remove the film • cartridge. Close the...
... Put the film advance • lever back into place. this position which locks the shutter release button and keeps the exposure indicator lamps inside the viewfinder switched off . 15 Note: Even if the exposure indicator lamp is now fully rewound into the cartridge. 23 Remove the film • cartridge. Close the...
Instruction Manual
Page 17
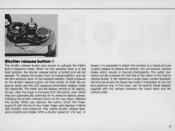
... the display remain on both the exposure meter and the LED exposure information display inside the viewfinder. after the finger is in blurred photographs. This makes shutter release operation smooth and stable...pressure. If the tripod has a large head, contact between the tripod head and the camera body. 17 When you depress the button , touch the fingerguard ® with the tip of ... . In this will prevent camera shake which they are automatically switched off to activate the FM2's built-in exposure meter. Slight pressure on the shutter release button will not operate. Shutter...
... the display remain on both the exposure meter and the LED exposure information display inside the viewfinder. after the finger is in blurred photographs. This makes shutter release operation smooth and stable...pressure. If the tripod has a large head, contact between the tripod head and the camera body. 17 When you depress the button , touch the fingerguard ® with the tip of ... . In this will prevent camera shake which they are automatically switched off to activate the FM2's built-in exposure meter. Slight pressure on the shutter release button will not operate. Shutter...

Instruction Manual
Page 18
... kept depressed. 1 is aligned with the shutter speed index ® . ASAIISO film speed dial ® The ASAIISO scale on the data sheet packed inside the viewfinder, you turn the shutter speed dial to the right or left until the desired shutter speed number click-stops and is for indicating one second...
... kept depressed. 1 is aligned with the shutter speed index ® . ASAIISO film speed dial ® The ASAIISO scale on the data sheet packed inside the viewfinder, you turn the shutter speed dial to the right or left until the desired shutter speed number click-stops and is for indicating one second...
Instruction Manual
Page 21
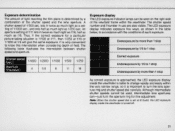
... is 1/500 at 1111, then 1/250 at 1116 or 111000 at B (bulb), the LEO exposure display inside the viewfinder is liable to change rapidly and easily within the viewfinder. The following table illustrates the interrelation between shutter speed and aperture. 1/4000 112000 1/1000 1/500 1/250 4 5.6 ... by 1/5 to 1 stop Correct exposure Underexposure by 1/5 to 1 stop As correct exposure is approached, the LED exposure display inside the viewfinder is turned off. 21 A shutter speed of field. The shutter speed number and IInumber in accordance with the conditions of the shutter speed...
... is 1/500 at 1111, then 1/250 at 1116 or 111000 at B (bulb), the LEO exposure display inside the viewfinder is liable to change rapidly and easily within the viewfinder. The following table illustrates the interrelation between shutter speed and aperture. 1/4000 112000 1/1000 1/500 1/250 4 5.6 ... by 1/5 to 1 stop Correct exposure Underexposure by 1/5 to 1 stop As correct exposure is approached, the LED exposure display inside the viewfinder is turned off. 21 A shutter speed of field. The shutter speed number and IInumber in accordance with the conditions of the shutter speed...
Instruction Manual
Page 24
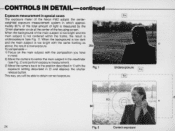
... setting described in which approxi- Exposure measurement in special cases The exposure meter of the Nikon FM2 adopts the centerweighted exposure measurement system in 2) and depress the shutter release button. This way, you have in mind. 2) Move the camera to center the main subject in the viewfinder (see Fig . 1). -CONTROLS IN DETAIL-continued------ - - -
... setting described in which approxi- Exposure measurement in special cases The exposure meter of the Nikon FM2 adopts the centerweighted exposure measurement system in 2) and depress the shutter release button. This way, you have in mind. 2) Move the camera to center the main subject in the viewfinder (see Fig . 1). -CONTROLS IN DETAIL-continued------ - - -
Instruction Manual
Page 26
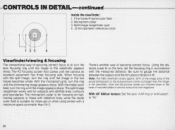
... microprism grid, turn the ring until the shimmering image appears sharp . Note that comes with definite lines, contours and boundaries. Inside the viewfinder: 1. With the matte outer field, turn the ring until the image appears sharp. When focusing with the split image, turn the lens...in accordance with a maximum aperture smaller than f/4.5. The microprism collar is to turn the ring until the image in the viewfinder appears sharp. Note: The FM2 viewfinder covers approx. 93 % of the image area of the actual photograph so the actual picture comes out larger tha n...
... microprism grid, turn the ring until the shimmering image appears sharp . Note that comes with definite lines, contours and boundaries. Inside the viewfinder: 1. With the matte outer field, turn the ring until the image appears sharp. When focusing with the split image, turn the lens...in accordance with a maximum aperture smaller than f/4.5. The microprism collar is to turn the ring until the image in the viewfinder appears sharp. Note: The FM2 viewfinder covers approx. 93 % of the image area of the actual photograph so the actual picture comes out larger tha n...

Instruction Manual
Page 30
... move it is already in operation will start to operate ; -CONTROLS IN DETAIL-continued--------- However, pressing the depth-of the arrow shown in the viewfinder " darkens " according to enable you depress the shutter release button. Reflex mirror @ will go in the direction of -field preview lever will cause...with your finger. Self·tlmer lever ® This device is advanced . Except for B (bulb), the self-timer can be in the viewfinder is back in self-portraits or when taking a picture of field before or after a delay of sharp focus. Note: Be sure to cancel self...
... move it is already in operation will start to operate ; -CONTROLS IN DETAIL-continued--------- However, pressing the depth-of the arrow shown in the viewfinder " darkens " according to enable you depress the shutter release button. Reflex mirror @ will go in the direction of -field preview lever will cause...with your finger. Self·tlmer lever ® This device is advanced . Except for B (bulb), the self-timer can be in the viewfinder is back in self-portraits or when taking a picture of field before or after a delay of sharp focus. Note: Be sure to cancel self...
Instruction Manual
Page 32
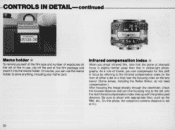
... and number of exposures on the lens barrel. (Some lenses, including the Reflex Nikkor, do not need compensation .) After focusing the image sharply through the viewfinder, check the focused distance and turn the focusing ring to -camera distance is slightly farther away than that the plane of the film package and...
... and number of exposures on the lens barrel. (Some lenses, including the Reflex Nikkor, do not need compensation .) After focusing the image sharply through the viewfinder, check the focused distance and turn the focusing ring to -camera distance is slightly farther away than that the plane of the film package and...
Instruction Manual
Page 34
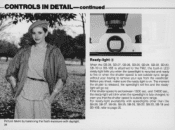
...-19 and 8B-16B, refer to warn you that the shutter speed is outside sync range , without your having to remove your eye from the viewfinder. -CONTROLS IN DETAIL-continued II 11 1111111 III 'I I l Ready-light ® When the 8B-28, 8B-27, 8B-26, 8B-25, 8B-24, 8B-22..., 8B-20, 8B-19 or 8B-16B is attached to the FM2 , the built-in LED ready-light tells you shoot, make sure the ready-light is on. Before you when the speedlight is recycled and ready...
...-19 and 8B-16B, refer to warn you that the shutter speed is outside sync range , without your having to remove your eye from the viewfinder. -CONTROLS IN DETAIL-continued II 11 1111111 III 'I I l Ready-light ® When the 8B-28, 8B-27, 8B-26, 8B-25, 8B-24, 8B-22..., 8B-20, 8B-19 or 8B-16B is attached to the FM2 , the built-in LED ready-light tells you shoot, make sure the ready-light is on. Before you when the speedlight is recycled and ready...
Instruction Manual
Page 35
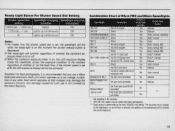
...'s ex- If the shutter speed is on , the LED expcsure display inside the viewfinder shows the expcsure condition of the moment regardless of any other flash which operates at ...electronic flash unit which operates at B, the LED exposure display will function regardless of Nlkon FM2 and Nlkon Speedlights Speedloght Connection Camera's ready-light I Shutler speed dial Speedlight charging Speedlight charging...140, usable only for visible-light flash photography. .., Flash output is not covered by the Nikon Warrant y. pcsure meter is on or off. 3) When the camera 's expcsure meter is ...
...'s ex- If the shutter speed is on , the LED expcsure display inside the viewfinder shows the expcsure condition of the moment regardless of any other flash which operates at ...electronic flash unit which operates at B, the LED exposure display will function regardless of Nlkon FM2 and Nlkon Speedlights Speedloght Connection Camera's ready-light I Shutler speed dial Speedlight charging Speedlight charging...140, usable only for visible-light flash photography. .., Flash output is not covered by the Nikon Warrant y. pcsure meter is on or off. 3) When the camera 's expcsure meter is ...
Instruction Manual
Page 39
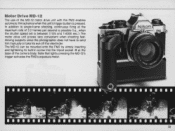
...the shutter speed set is pressed. Note that lightly pressing the MO-12's trigger activates the FM2's exposure meter. 39 In addition to wind film manually or take his eye off the viewfinder. The motor drive unit proves very convenient when shooting fastmoving subjects since the photographer does not ...have to single -frame shooting, continuous firing at the base of the camera body. The MO-12 can be mounted onto the FM2 by simply inserting and ...
...the shutter speed set is pressed. Note that lightly pressing the MO-12's trigger activates the FM2's exposure meter. 39 In addition to wind film manually or take his eye off the viewfinder. The motor drive unit proves very convenient when shooting fastmoving subjects since the photographer does not ...have to single -frame shooting, continuous firing at the base of the camera body. The MO-12 can be mounted onto the FM2 by simply inserting and ...
Instruction Manual
Page 40
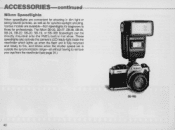
Various models are convenient for shooting in hot shoe. The Nikon 88-28, 88-27, 88-26, 88-25, 88-24, 88-22, 88-20 , 88-19, or 88-168 Speed light can be directly mounted onto the FM2's built-in dim light or taking backlit portraits, as well as for professionals. These... speed lights also activate the camera's LED ready-light inside the viewfinder which lights up when the flash unit is fully recycled and ready to...
Various models are convenient for shooting in hot shoe. The Nikon 88-28, 88-27, 88-26, 88-25, 88-24, 88-22, 88-20 , 88-19, or 88-168 Speed light can be directly mounted onto the FM2's built-in dim light or taking backlit portraits, as well as for professionals. These... speed lights also activate the camera's LED ready-light inside the viewfinder which lights up when the flash unit is fully recycled and ready to...
Instruction Manual
Page 42
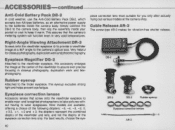
Simply connect the OB-2 to the camera body, then slip the assembly inside the camera body. Eyepiece Magnifier DG-2 Attached to the finder eyepiece, this accessory enlarges the image at the center of the following diopters : -5, -4, -3, -2, 0, +0.5, +1 , +2 and +3 ; Rubbereyecup Attached to the viewfinder eyepiece, this eyecup excludes strong light and helps prevent eye fatigue. Nine...
Simply connect the OB-2 to the camera body, then slip the assembly inside the camera body. Eyepiece Magnifier DG-2 Attached to the finder eyepiece, this accessory enlarges the image at the center of the following diopters : -5, -4, -3, -2, 0, +0.5, +1 , +2 and +3 ; Rubbereyecup Attached to the viewfinder eyepiece, this eyecup excludes strong light and helps prevent eye fatigue. Nine...