Instruction Manual
Page 2
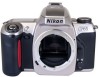
... before shooting at important occasions like weddings or graduations. • Have Nikon spot-check your camera regularly Nikon recommends that you have your camera correctly The Nikon F65/F65D's performance has been optimised for use with other manufacturers may not meet Nikon's criteria for purchasing the Nikon F65/F65D-a camera that is sure to the accessory shoe. 2 3 Supplied accessories Body...
... before shooting at important occasions like weddings or graduations. • Have Nikon spot-check your camera regularly Nikon recommends that you have your camera correctly The Nikon F65/F65D's performance has been optimised for use with other manufacturers may not meet Nikon's criteria for purchasing the Nikon F65/F65D-a camera that is sure to the accessory shoe. 2 3 Supplied accessories Body...

Instruction Manual
Page 3
...-In Speedlight 85 Available Flash Sync Mode Combinations 86 MISCELLANEOUS 87-113 Lens Compatibility 88-90 Usable Optional Speedlights 91-93 Optional Accessories 94-95 Camera Care 96-97 Notes on Batteries 98 Troubleshooting 99-101 Glossary...102-105 Specifications 106-110 Index ...112-113 5 Contents Introduction ...2-3 Nomenclature 6-7 LCD Panel/Viewfinder... Batteries and Check Battery Power 16-17 2. Set Focus Mode to a 28-29 3. Set Exposure Mode to AF 26-27 2. Mount Lens 18-19 3. Hold Camera and Focus 30-31 4.
...-In Speedlight 85 Available Flash Sync Mode Combinations 86 MISCELLANEOUS 87-113 Lens Compatibility 88-90 Usable Optional Speedlights 91-93 Optional Accessories 94-95 Camera Care 96-97 Notes on Batteries 98 Troubleshooting 99-101 Glossary...102-105 Specifications 106-110 Index ...112-113 5 Contents Introduction ...2-3 Nomenclature 6-7 LCD Panel/Viewfinder... Batteries and Check Battery Power 16-17 2. Set Focus Mode to a 28-29 3. Set Exposure Mode to AF 26-27 2. Mount Lens 18-19 3. Hold Camera and Focus 30-31 4.
Instruction Manual
Page 4
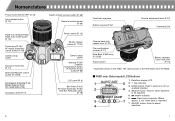
... approx. 2 sec. SELECT button: Push to select date/time to adjust 4 date/time. 7 MODE button: Push to select one of the F65 differs from the F65D. • F65D only: Data imprint LCD/buttons 1. Nomenclature Focus mode selector (PP. 44-45) Lens release button (P.... Bracketing (P. 62)/ Multiple Exposure (P. 64)/ Film rewind button (P. 66) Accessory shoe (P. 77) Power switch (P. 16) Shutter release button (P. 17/24) Camera strap eyelet Aperture (P. 59)/ Exposure Compensation button (P. 61)/Film rewind button (P. 66) LCD panel (P. 8) Self-timer (P. 40)/ AF-Assist Illuminator (P. 48...
... approx. 2 sec. SELECT button: Push to select date/time to adjust 4 date/time. 7 MODE button: Push to select one of the F65 differs from the F65D. • F65D only: Data imprint LCD/buttons 1. Nomenclature Focus mode selector (PP. 44-45) Lens release button (P.... Bracketing (P. 62)/ Multiple Exposure (P. 64)/ Film rewind button (P. 66) Accessory shoe (P. 77) Power switch (P. 16) Shutter release button (P. 17/24) Camera strap eyelet Aperture (P. 59)/ Exposure Compensation button (P. 61)/Film rewind button (P. 66) LCD panel (P. 8) Self-timer (P. 40)/ AF-Assist Illuminator (P. 48...
Instruction Manual
Page 6
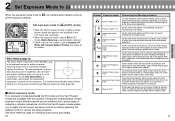
.... M: Manual (P. 58) Shutter speed and aperture are possible. S: Shutter-Priority Auto (P. 54) You set the desired aperture, and the camera selects the correct shutter speed. Lets you determine depth of the Nikon F65/F65D can determine various exposure factors. The overall landscape will be divided into two sections. Continuous shooting is point-and...
.... M: Manual (P. 58) Shutter speed and aperture are possible. S: Shutter-Priority Auto (P. 54) You set the desired aperture, and the camera selects the correct shutter speed. Lets you determine depth of the Nikon F65/F65D can determine various exposure factors. The overall landscape will be divided into two sections. Continuous shooting is point-and...
Instruction Manual
Page 7
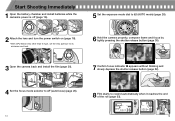
Start Shooting Immediately 1 Open the battery chamber and install batteries while the camera's power is off (page 16). 5 Set the exposure mode dial to a (AUTO mode) (page 28). 2 Attach the lens and turn the power switch on (page ... CPU Nikkor lens other than G-type, set the lens aperture to its minimum and lock. 6 Hold the camera properly, compose frame and focus by lightly pressing the shutter release button (page 30). 3 Open the camera back and install the film (page 20). 7 Confirm focus indicator / appears without blinking and slowly depress the...
Start Shooting Immediately 1 Open the battery chamber and install batteries while the camera's power is off (page 16). 5 Set the exposure mode dial to a (AUTO mode) (page 28). 2 Attach the lens and turn the power switch on (page ... CPU Nikkor lens other than G-type, set the lens aperture to its minimum and lock. 6 Hold the camera properly, compose frame and focus by lightly pressing the shutter release button (page 30). 3 Open the camera back and install the film (page 20). 7 Confirm focus indicator / appears without blinking and slowly depress the...
Instruction Manual
Page 9
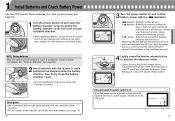
... remains on in the LCD panel. 17 PREPARATION LCD panel when the power switch is off When the power switch is turned on and the camera remains unused. (All indications in the LCD panel and viewfinder for approx. 5 sec. Check points • We recommend that you take spare ... chamber cover. • Incorrect positioning of children's reach. NOTE: Storing batteries Keep the batteries out of ´ and ‰ poles may damage the camera. after the power switch is turned off 5 sec. See page 24 about the shutter release button. Always use fresh batteries of film rolls that can...
... remains on in the LCD panel. 17 PREPARATION LCD panel when the power switch is off When the power switch is turned on and the camera remains unused. (All indications in the LCD panel and viewfinder for approx. 5 sec. Check points • We recommend that you take spare ... chamber cover. • Incorrect positioning of children's reach. NOTE: Storing batteries Keep the batteries out of ´ and ‰ poles may damage the camera. after the power switch is turned off 5 sec. See page 24 about the shutter release button. Always use fresh batteries of film rolls that can...

Instruction Manual
Page 10
...lens with aperture ring ÍG-type Nikkor lens, without a lens attached, be sure to touch the lens release button.) PREPARATION CPU contacts of this camera's functions. (See page 88 for a non-CPU lens. Check points • Use a D- Unlike other than G-type (Illustration is left ...unattended without lens When you leave the camera unattended without aperture ring G-type Nikkor lens The G-type Nikkor lens has no aperture ring; aperture should be used.) NOTE: Non-CPU Nikkor lens...
...lens with aperture ring ÍG-type Nikkor lens, without a lens attached, be sure to touch the lens release button.) PREPARATION CPU contacts of this camera's functions. (See page 88 for a non-CPU lens. Check points • Use a D- Unlike other than G-type (Illustration is left ...unattended without lens When you leave the camera unattended without aperture ring G-type Nikkor lens The G-type Nikkor lens has no aperture ring; aperture should be used.) NOTE: Non-CPU Nikkor lens...

Instruction Manual
Page 11
... film frame position. 21 if the film leader is properly positioned with non-DXcoded film. Film speed is set automatically (ISO 25-5000). Closing the camera back after loading film automatically advances the film to the first frame. • When E appears in the LCD panel or Err and E in the LCD... the film cartridge and ensure film is not properly aligned to ISO 100 with no slack. 3 Load Film Turn the power switch on , open the camera back by aligning the film leader to the red index mark; Film automatically advances to the first frame. • When 1 appears on the LCD panel...
... film frame position. 21 if the film leader is properly positioned with non-DXcoded film. Film speed is set automatically (ISO 25-5000). Closing the camera back after loading film automatically advances the film to the first frame. • When E appears in the LCD panel or Err and E in the LCD... the film cartridge and ensure film is not properly aligned to ISO 100 with no slack. 3 Load Film Turn the power switch on , open the camera back by aligning the film leader to the red index mark; Film automatically advances to the first frame. • When 1 appears on the LCD panel...

Instruction Manual
Page 12
...LCD panel, the setting is approx. 3 years. 4 Set Date and Time (F65D only) This camera allows you push the ADJUST button, year section moves up from the batteries required for the camera body. Push SELECT button so section to be corrected starts blinking. • Date cannot be set ...correct date/time after changing battery). 22 • Changing battery for imprinting 1 Open camera back, remove the battery chamber cover for imprinting and then remove the used battery. • Use a pointed object to 98 after correction, push ...
...LCD panel, the setting is approx. 3 years. 4 Set Date and Time (F65D only) This camera allows you push the ADJUST button, year section moves up from the batteries required for the camera body. Push SELECT button so section to be corrected starts blinking. • Date cannot be set ...correct date/time after changing battery). 22 • Changing battery for imprinting 1 Open camera back, remove the battery chamber cover for imprinting and then remove the used battery. • Use a pointed object to 98 after correction, push ...

Instruction Manual
Page 13
About Shutter Release Button Lightly pressing the shutter release button and holding it halfway down activates the camera's exposure meter and pressing it all the way down releases the shutter. Make sure to press the shutter release button slowly. 24 ... is lightly pressed (page 30). • Lightly pressing the shutter release button activates the indications in picture blur. Lightly Fully pressing depressing NOTE: Camera shake Pressing the shutter release button abruptly can result in the LCD panel and viewfinder (for the inexperienced beginner. from removal of finger). (See ...
About Shutter Release Button Lightly pressing the shutter release button and holding it halfway down activates the camera's exposure meter and pressing it all the way down releases the shutter. Make sure to press the shutter release button slowly. 24 ... is lightly pressed (page 30). • Lightly pressing the shutter release button activates the indications in picture blur. Lightly Fully pressing depressing NOTE: Camera shake Pressing the shutter release button abruptly can result in the LCD panel and viewfinder (for the inexperienced beginner. from removal of finger). (See ...
Instruction Manual
Page 14
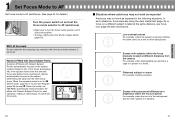
...44 for details.) Turn the power switch on the subject located closest to any Vari-Program (page 36) (except f Close-Up mode), the F65/F65D automatically selects Dynamic AF Mode with Closest-Subject Priority for easy operation, making it clicks into position. • To focus, lightly press ... 51) or to AF. NOTE: AF focus mode Do not rotate the lens focusing ring manually when the focus mode selector is achieved, camera automatically focuses on a different subject located at different distances from the other background. When the exposure mode is in a forest. Scenes with ...
...44 for details.) Turn the power switch on the subject located closest to any Vari-Program (page 36) (except f Close-Up mode), the F65/F65D automatically selects Dynamic AF Mode with Closest-Subject Priority for easy operation, making it clicks into position. • To focus, lightly press ... 51) or to AF. NOTE: AF focus mode Do not rotate the lens focusing ring manually when the focus mode selector is achieved, camera automatically focuses on a different subject located at different distances from the other background. When the exposure mode is in a forest. Scenes with ...
Instruction Manual
Page 15
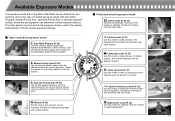
... exposure controls by the flash, and the background. Matrix Metering (page 42) The Matrix Meter employed in the F65/F65D uses a six-segment sensor to a, the camera automatically controls all lighting in the LCD panel and viewfinder. • When the exposure mode is set to a... subjects such as Flexible Program (page 53) or Exposure Compensation (page 61). The microcomputer analyses data including scene brightness and contrast- Camera controls shutter speed and aperture automatically depending on the shutter release opportunity. d Landscape mode P. 37 Use this mode for subjects with...
... exposure controls by the flash, and the background. Matrix Metering (page 42) The Matrix Meter employed in the F65/F65D uses a six-segment sensor to a, the camera automatically controls all lighting in the LCD panel and viewfinder. • When the exposure mode is set to a... subjects such as Flexible Program (page 53) or Exposure Compensation (page 61). The microcomputer analyses data including scene brightness and contrast- Camera controls shutter speed and aperture automatically depending on the shutter release opportunity. d Landscape mode P. 37 Use this mode for subjects with...
Instruction Manual
Page 16
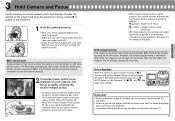
...propped against your body for support. • Stand with one foot forward a half step and keep your upper body still. • Grasp the camera handgrip with slow shutter speed. Note that the subject to be focused is not held steady or with your right hand and use focus lock... dark conditions (where slow shutter speed is required) in a or Vari-Program with Closest-Subject Priority (page 26, 46) is lightly pressed, the camera focuses automatically and focus indicator appears or blinks as expected, see page 27. 31 BASIC OPERATION See page 44 for details. When the Dynamic AF...
...propped against your body for support. • Stand with one foot forward a half step and keep your upper body still. • Grasp the camera handgrip with slow shutter speed. Note that the subject to be focused is not held steady or with your right hand and use focus lock... dark conditions (where slow shutter speed is required) in a or Vari-Program with Closest-Subject Priority (page 26, 46) is lightly pressed, the camera focuses automatically and focus indicator appears or blinks as expected, see page 27. 31 BASIC OPERATION See page 44 for details. When the Dynamic AF...

Instruction Manual
Page 17
...other warning indications appear, see page 99. • For mid-roll rewind, see page 66. With a moving subject, Continuous Servo AF (page 44) activates and camera continuously focuses on the subject. 1 Confirm indications in the viewfinder while lightly pressing the shutter release button. • When the subject is dark or backlit... for the film roll may be discarded in the process of developing. 4 Confirm that / (in-focus indicator) appears in the LCD panel), open the camera back away from sunlight and remove the film cartridge by tilting it to one side. BASIC OPERATION 32 33
...other warning indications appear, see page 99. • For mid-roll rewind, see page 66. With a moving subject, Continuous Servo AF (page 44) activates and camera continuously focuses on the subject. 1 Confirm indications in the viewfinder while lightly pressing the shutter release button. • When the subject is dark or backlit... for the film roll may be discarded in the process of developing. 4 Confirm that / (in-focus indicator) appears in the LCD panel), open the camera back away from sunlight and remove the film cartridge by tilting it to one side. BASIC OPERATION 32 33

Instruction Manual
Page 18
...of the main subject and background, while providing adequate flash output to fire, fi appears without blinking in the viewfinder (when the camera's meter is on). • When you remove your finger from Matrix Metering, the Matrix Balanced Fill-Flash ensures proper exposure of ...Matrix Balanced Fill-Flash. Check the flash shooting distance range (page 84) and shoot again. • With dark subjects, the camera's AF-Assist Illuminator is lightly pressed again, the built-in Speedlight pops up in a (AUTO mode) or Vari-Program (s, d, f, g, h). See...
...of the main subject and background, while providing adequate flash output to fire, fi appears without blinking in the viewfinder (when the camera's meter is on). • When you remove your finger from Matrix Metering, the Matrix Balanced Fill-Flash ensures proper exposure of ...Matrix Balanced Fill-Flash. Check the flash shooting distance range (page 84) and shoot again. • With dark subjects, the camera's AF-Assist Illuminator is lightly pressed again, the built-in Speedlight pops up in a (AUTO mode) or Vari-Program (s, d, f, g, h). See...

Instruction Manual
Page 19
...to the desired Vari-Program, then lightly press the shutter release button. • Centre the focus brackets on your main subject. To avoid camera shake, use . When using autofocus. 2 Confirm that focus indicator / appears and slowly depress the shutter release button. • Shutter ...Use this mode whenever you are taking pictures of the landscape. • In some shooting situations, slow shutter speed is selected. To avoid camera shake, use telephoto zoom position. • For more professional uses, Micro-Nikkor lenses are recommended. • Distancing the main subject and ...
...to the desired Vari-Program, then lightly press the shutter release button. • Centre the focus brackets on your main subject. To avoid camera shake, use . When using autofocus. 2 Confirm that focus indicator / appears and slowly depress the shutter release button. • Shutter ...Use this mode whenever you are taking pictures of the landscape. • In some shooting situations, slow shutter speed is selected. To avoid camera shake, use telephoto zoom position. • For more professional uses, Micro-Nikkor lenses are recommended. • Distancing the main subject and ...

Instruction Manual
Page 20
.../Hour/Minute, Month/Day/Year or Day/Month/Year. immediately after the shutter is released (when film is automatically activated and the camera continues to take a picture with an evening or night background. Imprinted date/time The illustration at right indicates the position of the ... film speed is recommended. • A tripod is recommended when using a telephoto lens to avoid camera shake. • Continuous shooting is not possible when the built-in Speedlight is recommended. • To avoid camera shake, use a tripod. • To cancel flash, set date and time. 1 Push MODE...
.../Hour/Minute, Month/Day/Year or Day/Month/Year. immediately after the shutter is released (when film is automatically activated and the camera continues to take a picture with an evening or night background. Imprinted date/time The illustration at right indicates the position of the ... film speed is recommended. • A tripod is recommended when using a telephoto lens to avoid camera shake. • Continuous shooting is not possible when the built-in Speedlight is recommended. • To avoid camera shake, use a tripod. • To cancel flash, set date and time. 1 Push MODE...
Instruction Manual
Page 21
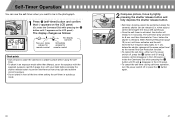
...focus by lightly pressing the shutter release button and fully depress the shutter release button. • Self-timer shooting cannot be performed unless the camera's shutter can use the self-timer when you want to be released (i.e. before the shutter releases at the same output level as follows: ...autofocus). • Once the self-timer is activated, the shutter will blink for remote control Check points • Use a tripod or place the camera on the LCD panel.) The display changes as the normal Red-Eye Reduction function. • To cancel the self-timer, either turn the power ...
...focus by lightly pressing the shutter release button and fully depress the shutter release button. • Self-timer shooting cannot be performed unless the camera's shutter can use the self-timer when you want to be released (i.e. before the shutter releases at the same output level as follows: ...autofocus). • Once the self-timer is activated, the shutter will blink for remote control Check points • Use a tripod or place the camera on the LCD panel.) The display changes as the normal Red-Eye Reduction function. • To cancel the self-timer, either turn the power ...
Instruction Manual
Page 22
... controlled by the shutter speed and aperture. With Matrix Metering, data on the 12mm-diameter centre circle in the viewfinder. or G-type Nikkor lenses, the F65/F65D camera performs 3D Matrix Metering by the six-segment Matrix sensor. Light reaching the film is not uniform. The... F65/F65D's AUTO mode (page 51), Auto-Multi Program (page 52) and Vari-Program (page 36) automatically control shutter speed and aperture. In Manual exposure mode (page 58), you can manually set shutter speed and the camera automatically sets the proper aperture. Knowing the ...
... controlled by the shutter speed and aperture. With Matrix Metering, data on the 12mm-diameter centre circle in the viewfinder. or G-type Nikkor lenses, the F65/F65D camera performs 3D Matrix Metering by the six-segment Matrix sensor. Light reaching the film is not uniform. The... F65/F65D's AUTO mode (page 51), Auto-Multi Program (page 52) and Vari-Program (page 36) automatically control shutter speed and aperture. In Manual exposure mode (page 58), you can manually set shutter speed and the camera automatically sets the proper aperture. Knowing the ...

Instruction Manual
Page 23
...AF is automatically activated when the subject is moving subject, Focus Tracking (page 104) is not locked and the camera continues to focus manually. With a moving . Also, F65/F65D will continue to focus firmly on the clear matte field in the viewfinder; The shutter can be released when... the focus indicator / appears in the viewfinder. however, focus is activated and the camera continuously focuses on the subject at the focus ...
...AF is automatically activated when the subject is moving subject, Focus Tracking (page 104) is not locked and the camera continues to focus manually. With a moving . Also, F65/F65D will continue to focus firmly on the clear matte field in the viewfinder; The shutter can be released when... the focus indicator / appears in the viewfinder. however, focus is activated and the camera continuously focuses on the subject at the focus ...