Instruction Manual
Page 3
... 62 ADVANCED OPERATION 63-70 Exposure Compensation 64-65 Auto Exposure Bracketing 66-68 Multiple Exposure 69-70 OTHER FUNCTIONS 71-74 Film Rewind...72 Dioptre Adjustment/Viewfinder Accessories 73 Available Mode Combinations 74 FLASH PHOTOGRAPHY 75-85 Built-In Speedlight/Ready-Light 76-77 ...Speedlight 84-85 About Depth of Field 86 MISCELLANEOUS 87-117 Lens Compatibility 88-90 Usable Optional Speedlights 91-97 Optional Accessories 98-99 Camera Care...100-101 Notes on Batteries 102 Troubleshooting 103-105 Glossary ...106-109 Specifications 110-114 Index ...116-117 5 BEFORE YOU ...
... 62 ADVANCED OPERATION 63-70 Exposure Compensation 64-65 Auto Exposure Bracketing 66-68 Multiple Exposure 69-70 OTHER FUNCTIONS 71-74 Film Rewind...72 Dioptre Adjustment/Viewfinder Accessories 73 Available Mode Combinations 74 FLASH PHOTOGRAPHY 75-85 Built-In Speedlight/Ready-Light 76-77 ...Speedlight 84-85 About Depth of Field 86 MISCELLANEOUS 87-117 Lens Compatibility 88-90 Usable Optional Speedlights 91-97 Optional Accessories 98-99 Camera Care...100-101 Notes on Batteries 102 Troubleshooting 103-105 Glossary ...106-109 Specifications 110-114 Index ...116-117 5 BEFORE YOU ...
Instruction Manual
Page 4
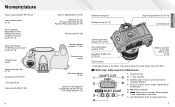
...Month indicator 6. : Data imprint indicator: Blinks approx. 2 sec. The camera back of five 2 6 available displays. 4. ADJUST button: Push to be adjusted. 3 7 -5. when data is the F55D. MODE button: Push to select one of the F55 differs from the F55D. • F55D only: Data imprint LCD/buttons...PP. 46-47) Lens release button (P. 19) Auto Exposure Bracketing (P. 66)/ Multiple Exposure (P. 69)/Film rewind button (P. 72) Flash lock-release (P. 80)/Flash sync mode button (P. 78) Camera strap eyelet Exposure mode dial (P. 10) Accessory shoe (P. 91) LCD panel (P. 8) Focus area ...
...Month indicator 6. : Data imprint indicator: Blinks approx. 2 sec. The camera back of five 2 6 available displays. 4. ADJUST button: Push to be adjusted. 3 7 -5. when data is the F55D. MODE button: Push to select one of the F55 differs from the F55D. • F55D only: Data imprint LCD/buttons...PP. 46-47) Lens release button (P. 19) Auto Exposure Bracketing (P. 66)/ Multiple Exposure (P. 69)/Film rewind button (P. 72) Flash lock-release (P. 80)/Flash sync mode button (P. 78) Camera strap eyelet Exposure mode dial (P. 10) Accessory shoe (P. 91) LCD panel (P. 8) Focus area ...
Instruction Manual
Page 7
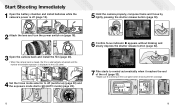
... switch on (page 18). 3 Open the camera back and install the film (page 20). • When the camera back is closed, the film is automatically advanced and the number of available exposures is displayed in the LCD panel when removing the film cartridge. 12 13 Start Shooting Immediately 1 Open... the battery chamber and install batteries while the camera's power is blinking in the LCD panel. 4 Set the focus mode selector to AF (...
... switch on (page 18). 3 Open the camera back and install the film (page 20). • When the camera back is closed, the film is automatically advanced and the number of available exposures is displayed in the LCD panel when removing the film cartridge. 12 13 Start Shooting Immediately 1 Open... the battery chamber and install batteries while the camera's power is blinking in the LCD panel. 4 Set the focus mode selector to AF (...

Instruction Manual
Page 8
PREPARATION This section introduces the various operations necessary before you start shooting. • Install batteries and check battery power • Mount lens • Load film • Set date and time (F55D only) • About shutter release button 14 15
PREPARATION This section introduces the various operations necessary before you start shooting. • Install batteries and check battery power • Mount lens • Load film • Set date and time (F55D only) • About shutter release button 14 15
Instruction Manual
Page 9
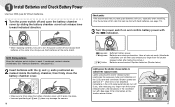
...Lightly press the shutter release button to firmly close the battery chamber cover until it locks into place. • Incorrect positioning of film rolls that you take spare batteries with you release your finger from the shutter release button. (All indications in the LCD panel ...automatically turn the power switch off when you , especially when travelling. • For the number of ´ and ‰ poles may damage the camera. 16 N appears: M appears: M blinks: Sufficient battery power. Always use fresh batteries of children's reach. Check points • We recommend that...
...Lightly press the shutter release button to firmly close the battery chamber cover until it locks into place. • Incorrect positioning of film rolls that you take spare batteries with you release your finger from the shutter release button. (All indications in the LCD panel ...automatically turn the power switch off when you , especially when travelling. • For the number of ´ and ‰ poles may damage the camera. 16 N appears: M appears: M blinks: Sufficient battery power. Always use fresh batteries of children's reach. Check points • We recommend that...
Instruction Manual
Page 11
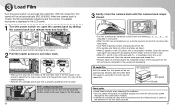
...as photos are very thin. 3 Load Film Turn the power switch on , open the camera back by aligning the film leader to ISO 100 with non-DXcoded film. Open the camera back again and reload film. • Pictures taken on film. • Film rewinds one frame at a time as ...mark; When the camera back is properly positioned with blinking o, o-, o--, o--- With DX-coded film, film speed will be loaded properly. • Hold the film cartridge and ensure film is closed . • The film automatically advances to ISO 5000. DX-coded film With DX-coded film, film speed will be ...
...as photos are very thin. 3 Load Film Turn the power switch on , open the camera back by aligning the film leader to ISO 100 with non-DXcoded film. Open the camera back again and reload film. • Pictures taken on film. • Film rewinds one frame at a time as ...mark; When the camera back is properly positioned with blinking o, o-, o--, o--- With DX-coded film, film speed will be loaded properly. • Hold the film cartridge and ensure film is closed . • The film automatically advances to ISO 5000. DX-coded film With DX-coded film, film speed will be ...
Instruction Manual
Page 13
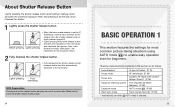
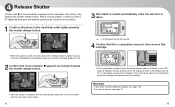
...) Flash sync mode Front-Curtain Sync (fi)* (P. 78) * Automatically set when a AUTO mode is set to AF (autofocus), camera starts to focus on the exposure meter.) 2 Fully depress the shutter release button. • Fully depressing the shutter release button releases shutter and... film automatically advances to the next frame. Lightly pressing Fully depressing NOTE: Camera shake Pressing the shutter release button abruptly can result in picture blur. About Shutter Release ...
...) Flash sync mode Front-Curtain Sync (fi)* (P. 78) * Automatically set when a AUTO mode is set to AF (autofocus), camera starts to focus on the exposure meter.) 2 Fully depress the shutter release button. • Fully depressing the shutter release button releases shutter and... film automatically advances to the next frame. Lightly pressing Fully depressing NOTE: Camera shake Pressing the shutter release button abruptly can result in picture blur. About Shutter Release ...
Instruction Manual
Page 16
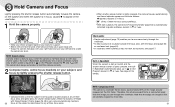
... frame shows approximately 89% of a negative film are partially cropped by lightly pressing the shutter release button. • When shutter release button is lightly pressed, the camera focuses automatically and focus indicator appears or blinks as expected, see through the viewfinder. • To take a picture of... image actually exposed on the film frame. Note that the subject to be focused is lightly pressed, the builtin Speedlight automatically pops up in a or VariProgram (except in d or g). NOTE: Camera shake Camera shake is likely to occur when the camera is not held steady or ...
... frame shows approximately 89% of a negative film are partially cropped by lightly pressing the shutter release button. • When shutter release button is lightly pressed, the camera focuses automatically and focus indicator appears or blinks as expected, see through the viewfinder. • To take a picture of... image actually exposed on the film frame. Note that the subject to be focused is lightly pressed, the builtin Speedlight automatically pops up in a or VariProgram (except in d or g). NOTE: Camera shake Camera shake is likely to occur when the camera is not held steady or ...
Instruction Manual
Page 17
With a moving subject, Continuous Servo AF (page 46) activates and camera continuously focuses on the subject. 1 Confirm indications in the viewfinder while lightly pressing the shutter release button. • When the subject is dark or ...warning indications appear, see page 103. • For mid-roll rewind, see page 72. 33 BASIC OPERATION 1 is displayed during film rewind. 4 Confirm that film is completely rewound, then remove film cartridge. • Film is completely rewound when the frame counter shows blinking E in the LCD panel. (E appears without blinking when the exposure meter...
With a moving subject, Continuous Servo AF (page 46) activates and camera continuously focuses on the subject. 1 Confirm indications in the viewfinder while lightly pressing the shutter release button. • When the subject is dark or ...warning indications appear, see page 103. • For mid-roll rewind, see page 72. 33 BASIC OPERATION 1 is displayed during film rewind. 4 Confirm that film is completely rewound, then remove film cartridge. • Film is completely rewound when the frame counter shows blinking E in the LCD panel. (E appears without blinking when the exposure meter...
Instruction Manual
Page 18
... the subject passes through the lens and exposes the film. With Centre Partial Metering, brightness is controlled by adding distance information to other than Manual and Centre Partial Metering is set aperture and the camera automatically sets the proper shutter speed. Using G- The F55/F55D's AUTO mode (page 28), Auto-Multi Program (page...
... the subject passes through the lens and exposes the film. With Centre Partial Metering, brightness is controlled by adding distance information to other than Manual and Centre Partial Metering is set aperture and the camera automatically sets the proper shutter speed. Using G- The F55/F55D's AUTO mode (page 28), Auto-Multi Program (page...

Instruction Manual
Page 20
... For more professional uses, Micro-Nikkor lenses are recommended. • Use of ISO 400 or faster film speed is recommended. • A tripod is recommended. • To avoid camera shake, use a tripod. Night Portrait mode captures all the lighting in Speedlight does not fire even ...When using a telephoto lens to 300mm telephoto lenses are recommended. h: Night Portrait mode Use this mode for stop-action photography. To avoid camera shake, use a tripod. 38 39 BASIC OPERATION 2 Shooting with an evening or night background. It creates a blurred background to freeze action...
... For more professional uses, Micro-Nikkor lenses are recommended. • Use of ISO 400 or faster film speed is recommended. • A tripod is recommended. • To avoid camera shake, use a tripod. Night Portrait mode captures all the lighting in Speedlight does not fire even ...When using a telephoto lens to 300mm telephoto lenses are recommended. h: Night Portrait mode Use this mode for stop-action photography. To avoid camera shake, use a tripod. 38 39 BASIC OPERATION 2 Shooting with an evening or night background. It creates a blurred background to freeze action...

Instruction Manual
Page 23
... white or reddish hues. 44 FOCUS OPERATION This section features detailed descriptions of the imprinted date/time on the film. It may be difficult to take a picture with the imprinted date/time. Compatible film speeds for approx. Imprinted date/time The illustration at right indicates the position of focusing operations. • Focus... cancel data imprint. Imprinting Date/Time (F55D only) You can imprint the following date information on the picture. immediately after the shutter is released (when film is loaded).
... white or reddish hues. 44 FOCUS OPERATION This section features detailed descriptions of the imprinted date/time on the film. It may be difficult to take a picture with the imprinted date/time. Compatible film speeds for approx. Imprinted date/time The illustration at right indicates the position of focusing operations. • Focus... cancel data imprint. Imprinting Date/Time (F55D only) You can imprint the following date information on the picture. immediately after the shutter is released (when film is loaded).
Instruction Manual
Page 34
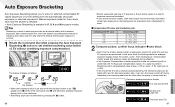
... / and shoot. • Each time the shutter release button is available in selecting one shot out of several shots with bracketed exposures after new film has been loaded. Also, if you to set desired bracketing value (within ±2 EV without combining exposure compensation). Tip Bracketing is useful in P,... shooting with a compensated value of over +2 EV or under -2 EV (maximum of ±4 EV). • If the end of the film roll is minimal. 1 Rotate the Command Dial while pressing the Auto Exposure Bracketing ¸ button to shoot in that order while the blinking electronic...
... / and shoot. • Each time the shutter release button is available in selecting one shot out of several shots with bracketed exposures after new film has been loaded. Also, if you to set desired bracketing value (within ±2 EV without combining exposure compensation). Tip Bracketing is useful in P,... shooting with a compensated value of over +2 EV or under -2 EV (maximum of ±4 EV). • If the end of the film roll is minimal. 1 Rotate the Command Dial while pressing the Auto Exposure Bracketing ¸ button to shoot in that order while the blinking electronic...

Instruction Manual
Page 35
... necessary Exposure Compensation. The display changes as follows: Cancel (no compensation is not recommended. 69 In particular, film advance becomes unstable at the beginning and near the end of one or more exposures of a film roll so 68 multiple exposure is necessary for each shot. • In some cases, frames may shift...
... necessary Exposure Compensation. The display changes as follows: Cancel (no compensation is not recommended. 69 In particular, film advance becomes unstable at the beginning and near the end of one or more exposures of a film roll so 68 multiple exposure is necessary for each shot. • In some cases, frames may shift...

Instruction Manual
Page 36
... depressing the shutter release button and while Z is cancelled before or during multiple exposure operation. The multiple exposure is cancelled, film advances and Z disappears from the second shutter release. The frame counter in the a or Vari-Program. • Multiple Exposure...; button so Z disappears from the LCD panel or set simultaneously. 70 OTHER FUNCTIONS This section describes other useful camera functions and information. • Film rewind • Dioptre adjustment/Viewfinder accessories • Available mode combinations 71 Check points • Multiple Exposure cannot ...
... depressing the shutter release button and while Z is cancelled before or during multiple exposure operation. The multiple exposure is cancelled, film advances and Z disappears from the second shutter release. The frame counter in the a or Vari-Program. • Multiple Exposure...; button so Z disappears from the LCD panel or set simultaneously. 70 OTHER FUNCTIONS This section describes other useful camera functions and information. • Film rewind • Dioptre adjustment/Viewfinder accessories • Available mode combinations 71 Check points • Multiple Exposure cannot ...

Instruction Manual
Page 37
...while sliding the lever. Dioptre Adjustment/Viewfinder Accessories The F55/F55D enables near- Nine optional eyepiece correction lenses provide a viewfinder dioptre range of the finder dioptre is blinking, open the camera back and remove the film cartridge. NOTE: Using the dioptre adjustment lever Since ...• Remove the rubber eyecup and slide the dioptre adjustment lever while looking through the viewfinder until rewind is complete. • Film is located next to the viewfinder, be attached. Attaching viewfinder accessories • To attach an eyepiece cap or eyepiece correction lens,...
...while sliding the lever. Dioptre Adjustment/Viewfinder Accessories The F55/F55D enables near- Nine optional eyepiece correction lenses provide a viewfinder dioptre range of the finder dioptre is blinking, open the camera back and remove the film cartridge. NOTE: Using the dioptre adjustment lever Since ...• Remove the rubber eyecup and slide the dioptre adjustment lever while looking through the viewfinder until rewind is complete. • Film is located next to the viewfinder, be attached. Attaching viewfinder accessories • To attach an eyepiece cap or eyepiece correction lens,...
Instruction Manual
Page 38
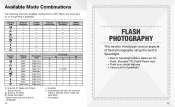
...; R R ® R R ® R R R ® (Centre) R ® R R ® R R R R R R R R R R R R R R R: Available ®: Automatically set when the exposure mode is attached. R R R R R R R R - Auto Exposure Bracketing R R R R Multiple exposure - - - - - - R - Exposure mode Metering system Film advance mode a s d f g h P S A M Matrix Matrix Matrix Matrix Matrix Matrix Matrix Matrix Matrix Centre Partial Single frame Single frame Single frame Single frame Continuous* Single frame Single...
...; R R ® R R ® R R R ® (Centre) R ® R R ® R R R R R R R R R R R R R R R: Available ®: Automatically set when the exposure mode is attached. R R R R R R R R - Auto Exposure Bracketing R R R R Multiple exposure - - - - - - R - Exposure mode Metering system Film advance mode a s d f g h P S A M Matrix Matrix Matrix Matrix Matrix Matrix Matrix Matrix Matrix Centre Partial Single frame Single frame Single frame Single frame Continuous* Single frame Single...

Instruction Manual
Page 42
...-30 sec.*2, -- (Time) Desired setting*3 60 *1 Shutter speed is prolonged up . *3 Flash shooting distance range depends on the ISO speed of the film in use and aperture setting. ISO film speed Guide number Aperture value 25 50 100 200 400 800 6 8.5 12 17 24 34 - - 1.4 2 2.8 4 - 1.4 2 2.8 4 5.6 1.4 2 2.8 4 5.6 8 2 2.8 4 5.6 8 11 ... for the built-in Speedlight changes according to guide autofocus. with Slow Sync and Red-Eye Reduction with ISO 100 film using the camera's built-in Speedlight, the maximum flash shooting distance will be: 12/2.8 = approx. 4.2m 83 Speedlight Flash shooting...
...-30 sec.*2, -- (Time) Desired setting*3 60 *1 Shutter speed is prolonged up . *3 Flash shooting distance range depends on the ISO speed of the film in use and aperture setting. ISO film speed Guide number Aperture value 25 50 100 200 400 800 6 8.5 12 17 24 34 - - 1.4 2 2.8 4 - 1.4 2 2.8 4 5.6 1.4 2 2.8 4 5.6 8 2 2.8 4 5.6 8 11 ... for the built-in Speedlight changes according to guide autofocus. with Slow Sync and Red-Eye Reduction with ISO 100 film using the camera's built-in Speedlight, the maximum flash shooting distance will be: 12/2.8 = approx. 4.2m 83 Speedlight Flash shooting...

Instruction Manual
Page 43
... longer shooting distance AF-S 80-200mm f/2.8 ED 105mm or longer focal length With colour slide film Lens Limitations AF 24-50mm f/3.3-4.5 35mm or longer focal length AF 24-85mm f/2.8-4 35mm or longer focal length; Vignetting is up. • Usable lenses with built-in Speedlight 28mm...frame are cropped out in film processing with the built-in wideangle. • AF-S 17-35mm f/2.8 ED, AF 18-35mm f/3.5-4.5 ED, AF 20-35mm f/2.8 zoom lenses cannot be used with colour print film. 84 With standard colour print film Lens Limitations AF 24-85mm f/2.8-4 35mm or longer focal length;...
... longer shooting distance AF-S 80-200mm f/2.8 ED 105mm or longer focal length With colour slide film Lens Limitations AF 24-50mm f/3.3-4.5 35mm or longer focal length AF 24-85mm f/2.8-4 35mm or longer focal length; Vignetting is up. • Usable lenses with built-in Speedlight 28mm...frame are cropped out in film processing with the built-in wideangle. • AF-S 17-35mm f/2.8 ED, AF 18-35mm f/3.5-4.5 ED, AF 20-35mm f/2.8 zoom lenses cannot be used with colour print film. 84 With standard colour print film Lens Limitations AF 24-85mm f/2.8-4 35mm or longer focal length;...
Instruction Manual
Page 47
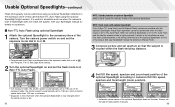
... the subject. See your Speedlight manual for details on ). 92 4 Set ISO film speed, aperture and zoom-head position of the optional Speedlight according to camera's ISO film speed, aperture and focal length (zoom position). • Automatic power zoom of the camera. Usable Optional Speedlights-continued Flash photography can be performed when the flash...
... the subject. See your Speedlight manual for details on ). 92 4 Set ISO film speed, aperture and zoom-head position of the optional Speedlight according to camera's ISO film speed, aperture and focal length (zoom position). • Automatic power zoom of the camera. Usable Optional Speedlights-continued Flash photography can be performed when the flash...


